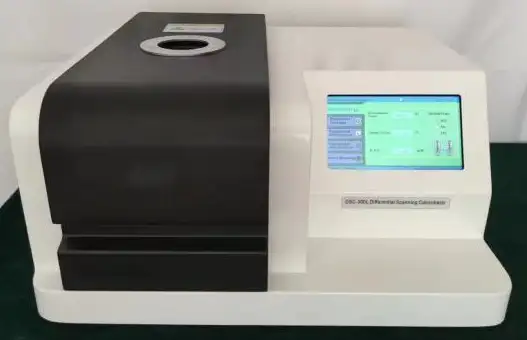
Colorimeter BHJ1D1 (BDSC-108)
Differential Scanning Calorimeter- Sea, Air, Door to Door Shipping
- 1 Year Warranty
- US & European Standards
Specifications
| Model | BHJ1D1 |
| Temperature range | -150°C ~ 600°C |
| Temperature resolution | 0.01°C |
| Temperature fluctuation | ±0.01°C |
| Temperature repeatability | ±0.1°C |
| Heating rate | 0.1 ~ 80°C/min |
| Constant temperature time | 0 ~ 400 |
| Temperature control mode | Heating, constant temperature, cooling |
| DSC range | 0 ~ ±600 mW |
| DSC resolution | 0.001 mW |
| DSC accuracy | 0.001 mW |
| Working power supply | AC 220V 50Hz or customized |
| Cooling equipment | Liquid nitrogen cooling |
| Atmosphere control gas | Nitrogen, oxygen (instrument automatic switch) |
| Gas flow | 0 ~ 300 mL/min |
| Gas pressure | 0.2 MPa |
| Display mode | 24-bit color, 7-inch LCD touch screen display |
| Data interface | Standard USB interface |
| Parameter standard | With reference materials (indium, tin); users can adjust temperature manually |
| Upper computer software and thermocouple configuration | Software automatically adjusts coordinate range; analysis results can be dragged freely; includes multiple thermocouples for sample, furnace, and internal temperature |
Description
The DSC is a touch screen type, which can be used for glass transition temperature test,phase transition test, melting and enthalpy test, product stability and oxidation induction
period test.Wide range of application.
Features
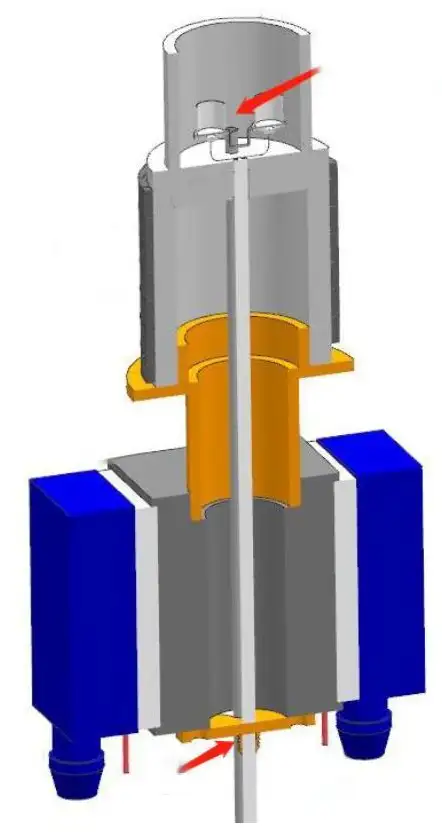
1.Industrial level 7-inch touch screen, display information rich.2. New furnace body structure, can be matched with a variety of refrigeration devices
3. USB communication interface, strong versatility, reliable communication, support self recovery connection function.
4. Automatic switching of two-way atmosphere flow, fast switching speed and short stable time.At the same time, a protective gas input is added.
5. The software is simple and easy to operate.
Furnace structure
Melting point, heat enthalpy, phase change temperature analysis :

Glass analysis:
Initial melting point, final melting point analysis:
Analysis of two or more section lifting temperatures:
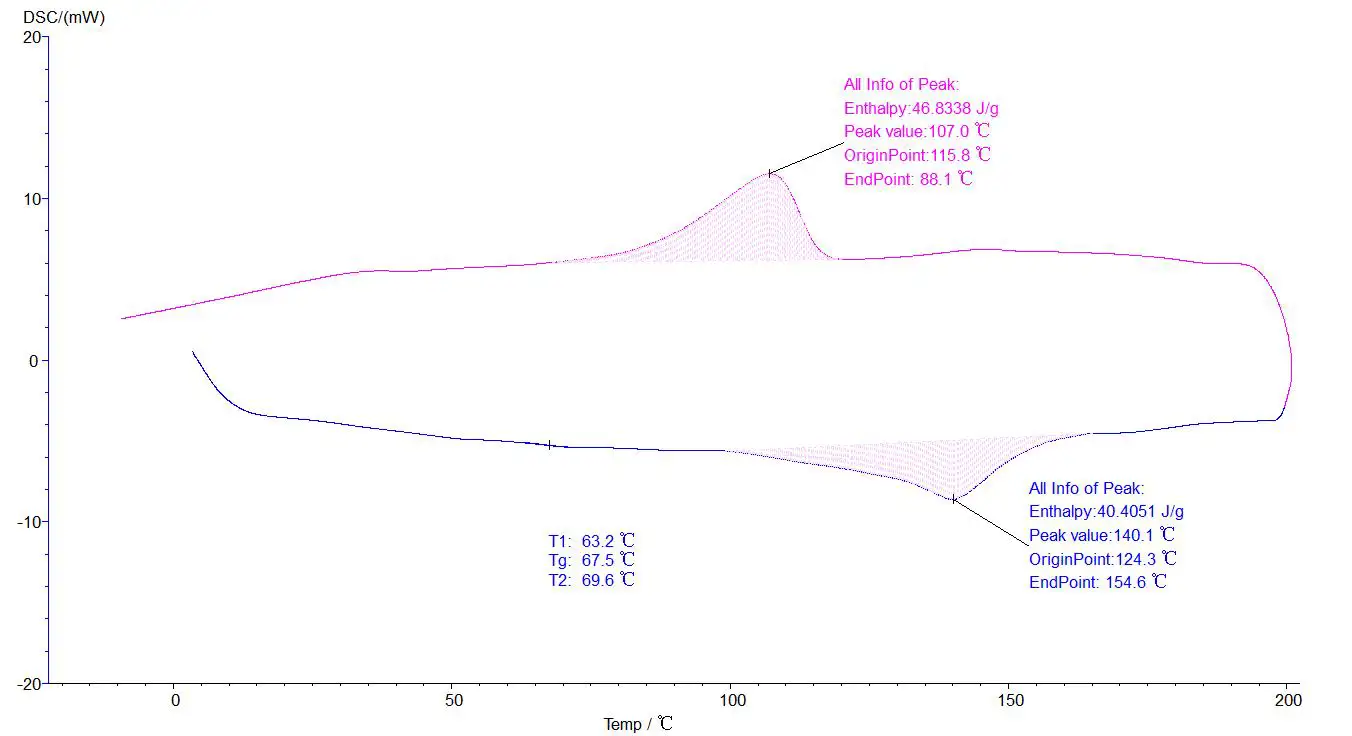
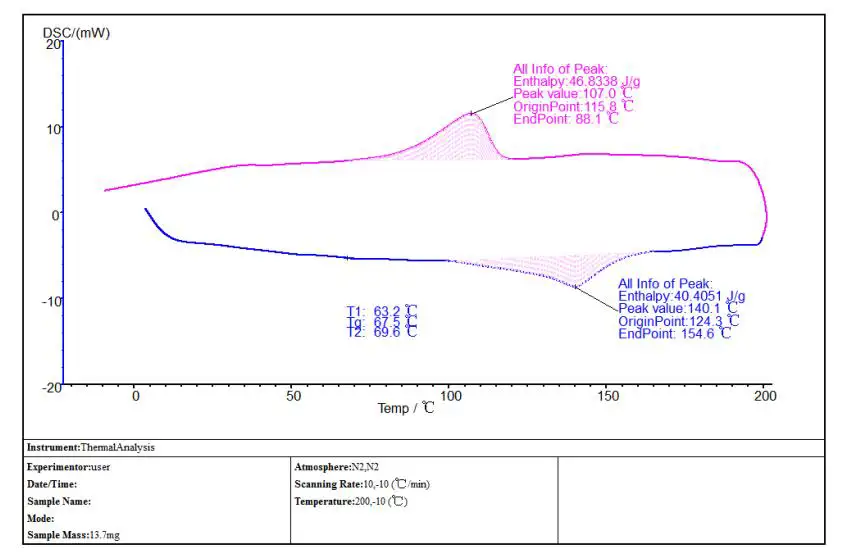
Test report:
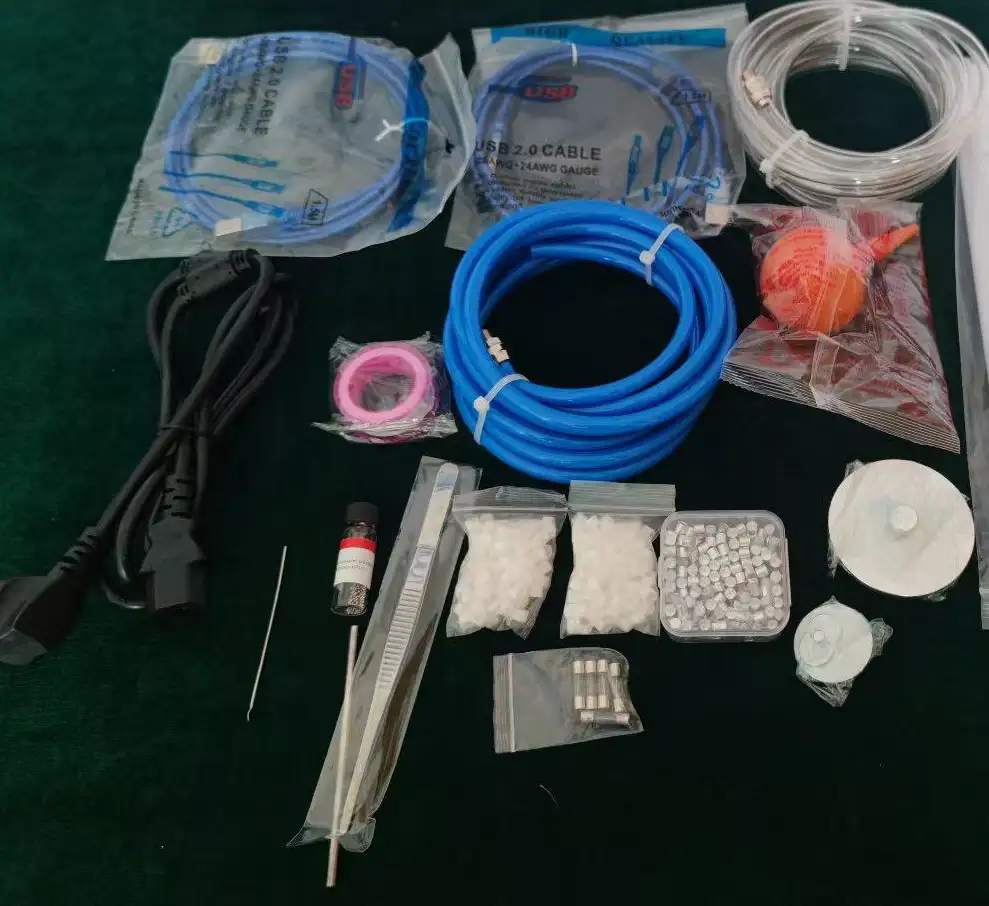
Accessory:
Operating Manual
Download1. Introduction to the instrument
2. Instrument Principle
3. Instrument characteristics
4. Instrument interface
5. Software description
6. Standard object selection and temperature correction
6.1 Selection of calibration objects
6.2 Temperature calibration operation steps:
7. Instrument application
7.1 Melting point (thermal enthalpy) measurement
7.2 Determination of the instrument coefficient
7.3 Measurement of the glass transition temperature
8. Notes for instrument use
9. Packing list
1. Introduction to the instrument
Differential scanning calorimetry (DSC) has been widely used. Differential scanning calorimeter is both a routine quality test tool and a research tool. The measurement is the temperature and heat flow related with the internal thermal transition of the material. Our company's instrument is a heat flow type differential scanning calorimeter, with the characteristics of good repetition and high accuracy, especially suitable for the accurate measurement of specific heat. The device is easy to calibrate, has a low melting point, is fast and reliable, and has a very wide range of applications, especially in material research and development, performance testing and quality control. Characteristics of materials, such as glass transition temperature, cold crystallization, phase transition, melting, crystallization, product stability, curing / crosslinking, are areas of research for differential scanning calorimetry.
The application scope of differential scanning calorimeter includes: curing reaction temperature and thermal effect of polymer materials, material phase change temperature and thermal effect measurement, crystallization of polymer materials, melting temperature and thermal effect measurement, glass transition temperature of polymer materials, etc. The subjects were: solid, liquid and thick samples, in addition to gas.
The sample and reference were respectively placed into the crucible and placed in the furnace for procedural heating to change the temperature of the sample and reference. If the heat capacity of the reference and the sample is the same, and there is no thermal effect, the temperature difference between the two is almost "zero", and a smooth curve is obtained. As the temperature increases, the sample has a thermal effect, and the reference does not produce a thermal effect, and the temperature difference between the two, in the D TA curve is a peak, the greater the temperature difference, the greater the peak, the more the temperature difference changes, the more the number of peaks. The peak up peak is called exothermic peak, the peak down peak is called endothermic peak.
The following figure shows a typical DSC curve showing four types of transitions:
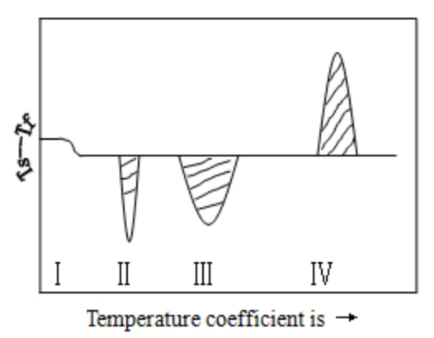
Figure 1
Ⅰ) For a secondary transition, it is a change in the horizontal baseline
Ⅱ) For the heat absorption peak, it is caused by the melting or melting transition of the test sample
Ⅲ) For the heat absorption peak, it is caused by the decomposition or cleavage reaction of the test sample
Ⅳ) is the exothermal peak, which is the result of the sample crystalline phase transition.
2. Instrument Principle
Material is often accompanied by a thermal effect in the process of physical changes and chemical changes, and the exothermic and endothermic phenomena reflect the change in the thermal enthalpy of matter. Differential heat analyzer is to measure the temperature difference between the measurement sample and the reference as a function of temperature or time under the same heating condition.
Differential scanning calorimetry is a technique to measure the power difference between the parameter and the temperature ratio. The instrument of our company is a heat flow type differential scanning calorimeter, and the ordinate is the heat flow difference between the sample and the reference, as measured in mw. The abscissa is the time (t) or the temperature (T), increasing from left to right (not meeting this requirement should be indicated).
After the sample and the reference are put into the crucible, the temperature warms up at a certain rate. If the heat capacity of the reference and the sample is roughly the same, an ideal scanning calorimetric analysis map can be obtained.
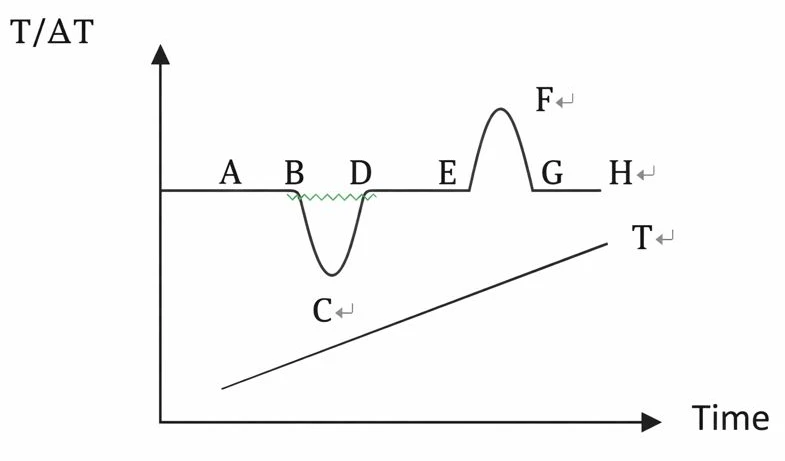
Figure 2
Figure T is the temperature curve reflected by the thermocouple inserted into the reference. Temperature difference curve between AH line reaction sample and reference. If there is no thermal effect occurring in the sample, then △ T=0 and reference shows a smooth baseline as in AB, DE, and GH on the curve. When a thermal effect occurs so that the temperature of the sample is lower than that of the reference, a downward heat absorption peak such as the BCD peak appears. Conversely, a peak-up EFG exothermic appears.
The number of peaks, location, peak area, direction, height, width, and symmetry in the figure reflects the number of physical and chemical changes of the sample in the measured temperature range, the temperature range, the size of the thermal effect, and the positive and negative. The height, width, and symmetry of the peak are also related to the dynamics of the sample change, and the measured results are much more complex than the ideal curve.
3. Instrument characteristics
1. New furnace body structure, better resolution and resolution, and baseline stability.
2. The instrument can be two-way control (host control, software control), friendly interface, easy to operate.
Model | BHJ1D1 liquid nitrogen cooling scan differential scanning calorometer |
DSC range | 0~±1000mW(scalable) |
temperature range | (-150°C) ~600°C (-170°C) liquid nitrogen refrigeration |
heating rate | 0.1~100°C/min |
temperature resolution | 0.001°C |
temperature fluctuation | ±0.01°C |
Temperature repeatability | ±0.1°C |
DSC noise | 0.01μW |
DSC resolution | 0.01μW |
DSC sensitivity | 0.001mW |
Temperature control mode | Full-program automatic control |
Curve scan | Heating Scan & Cooling Scan |
Atmosphere control | The instrument switches automatically |
display mode | A 24-b i t-color 7-inch LCD touchscreen display |
data interface | Standard USB interface |
Parameter standard | Equipped with a standard material, with a one-key calibration function, the user can correct the temperature and heat enthalpy |
Table 1
4. Instrument interface
4.1 Initial State key to view ambient temperature, sample temperature, etc.
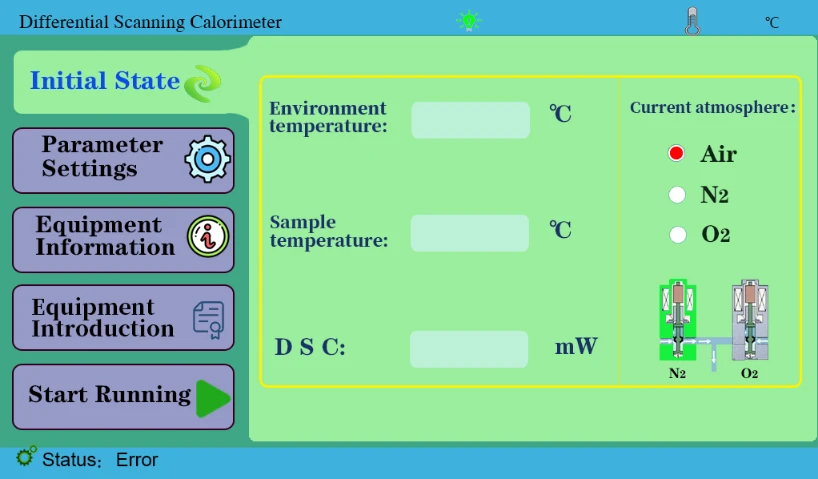
Figure 3
4.2 "Parameter Setting" key is used to set the experimental parameters, generally set on the software.
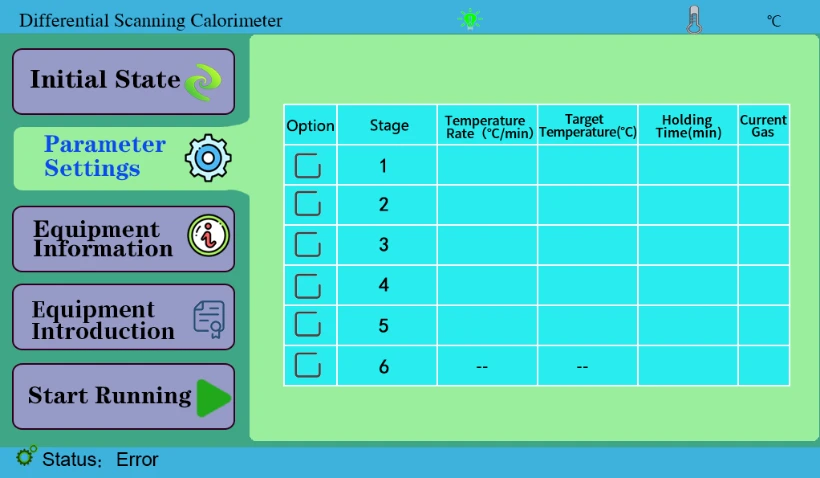
Figure 4
4.3 Device Information key to display device information. Internal personnel calibration temperature is used in the administrator channel.
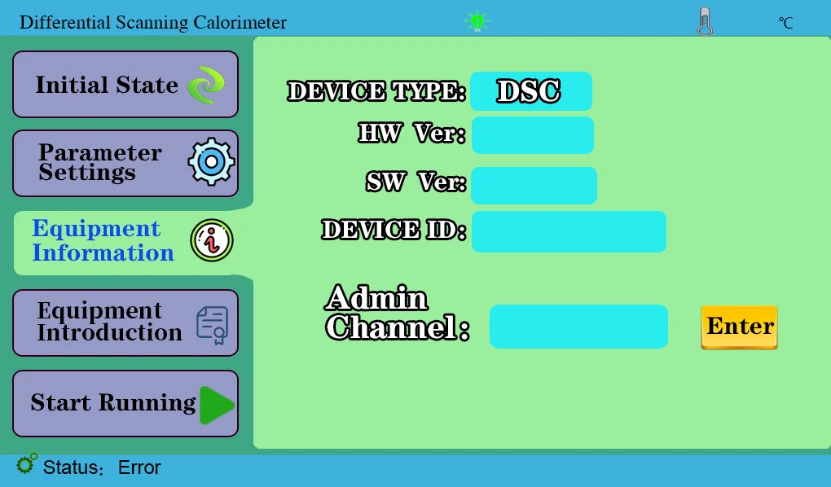
Figure 5
4.4 Start key to display the current data after operation on the computer software.
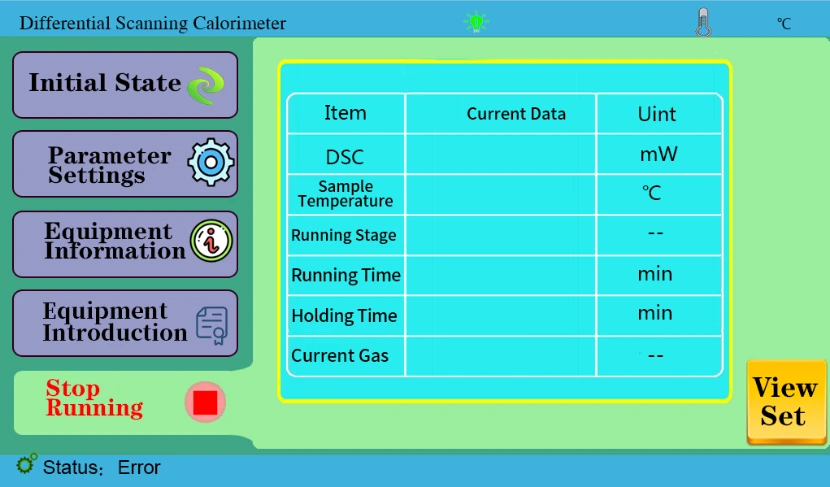
Figure 6
5. Software description
5.1 Open the software, click the [New] or [New] shortcut key under the "File" menu bar in the figure below:
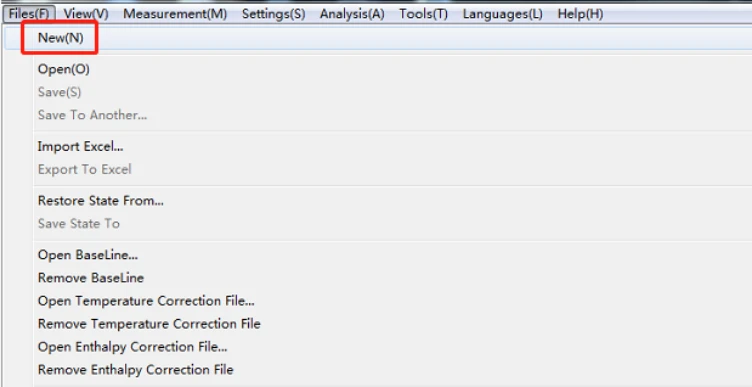
Figure 7
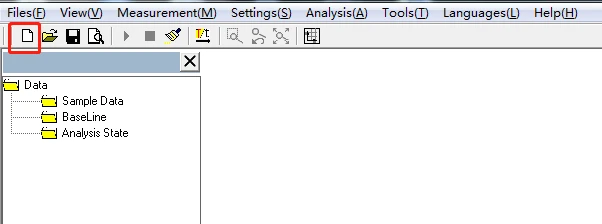
Figure 8
5.2 After clicking "new", you will transfer to a new window, enter [sample name], [sample quality], [operator], [operator], [experimental parameters], [atmosphere] and other information, test type choose [OIT] or [non-OIT] according to customer needs, click [connected instrument], you will hear a beep. Note that in two experiments, the sample name can not be the same, otherwise the last data will be covered, resulting in the loss of the last data.as illustrated in following figure:
![5.2 After clicking "new" 5.2 After clicking "new", you will transfer to a new window, enter [sample name], [sample quality], [operator], [operator],](https://biolabscientific.com/content/manual/20260123001/5.2-After-clicking-new-i10-Biolab.webp)
Figure 9
The experimental parameters are set as follows:
5.2.1 "Parameter Setting of melting Point and Phase Change Temperature experiment" (select non-OIT test.) as illustrated in following figure:
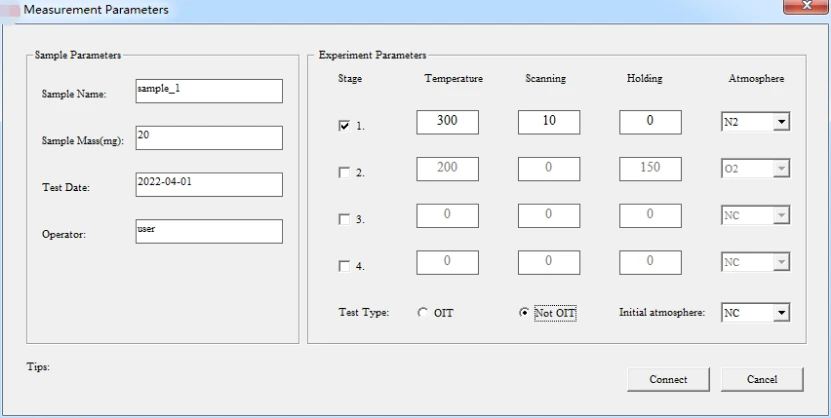
Figure 10
5.2.2 "Parameter temperature setting for two or more sections" (according to the sample estimated parameters setting, select non-OIT test type.) as illustrated in following figure:
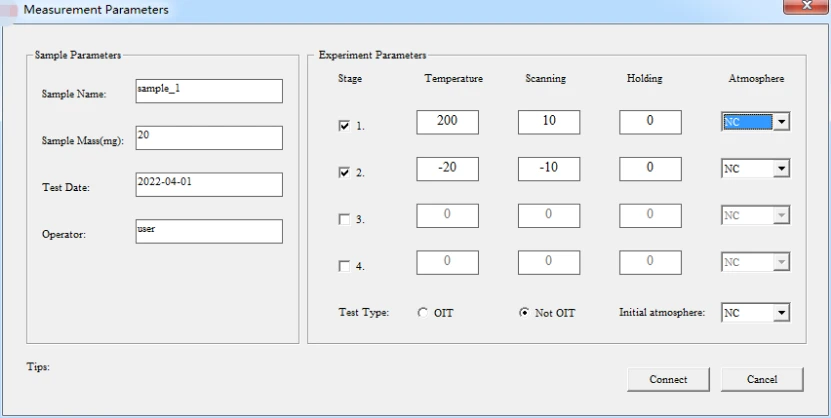
Figure 11
5.3 After the software setting is complete, click [Connect instrument] and start key "" in the upper left corner of the software (as shown below). The device will heat up according to the set program, and the software will record the data in real time. At the set temperature, the instrument automatically stops, and the following map appears.(This map is the melting point and phase transition temperature map)
![5.3 After the software setting is complete 5.3 After the software setting is complete, click [Connect instrument] and start key "" in the upper left corner of the](https://biolabscientific.com/content/manual/20260123001/5.3-After-the-software-setting-is-complete-i13-Biolab.webp)
Figure 12
![5.3 After the software setting is complete 5.3 After the software setting is complete, click [Connect instrument] and start key "" in the upper left corner of the](https://biolabscientific.com/content/manual/20260123001/5.3-After-the-software-setting-is-complete-i14-Biolab.webp)
Figure 13
5.4 First, save the map first to prevent loss. You can also use the shortcut key to select [save as a sample]. The analysis was then followed by the.as illustrated in following figure:
![5.4 First 5.4 First, save the map first to prevent loss. You can also use the shortcut key to select [save as a sample]. The analysis](https://biolabscientific.com/content/manual/20260123001/5.4-First-i15-Biolab.webp)
Figure 14
![5.4 First 5.4 First, save the map first to prevent loss. You can also use the shortcut key to select [save as a sample]. The analysis](https://biolabscientific.com/content/manual/20260123001/5.4-First-i16-Biolab.webp)
Figure 15
5.4.1 Melting point, heat enthalpy, phase change temperature analysis process: click the map to make it green, namely selected map, click the task bar [analysis] - [peak comprehensive analysis] -appear about two black lines, drag left analysis line in the front, right analysis line in the back end, select, click [application], [sure], again, then click the curve, make it blue, analysis. The analyzed map is shown below:
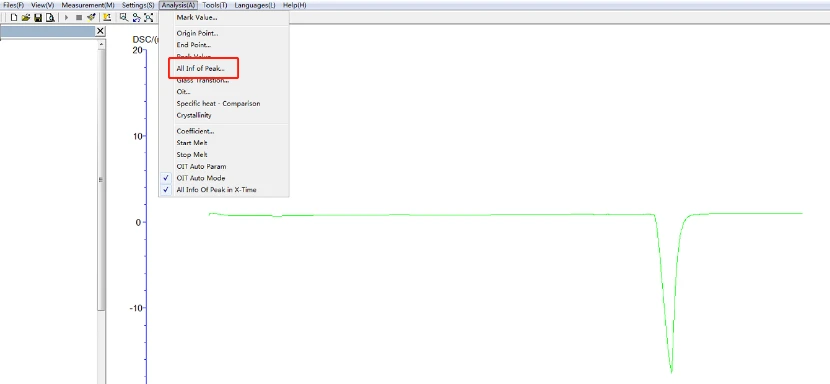
Figure 16
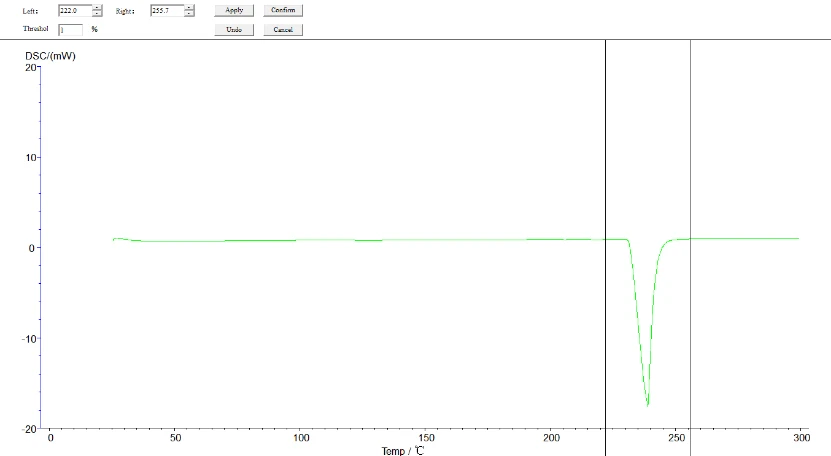
Figure 17
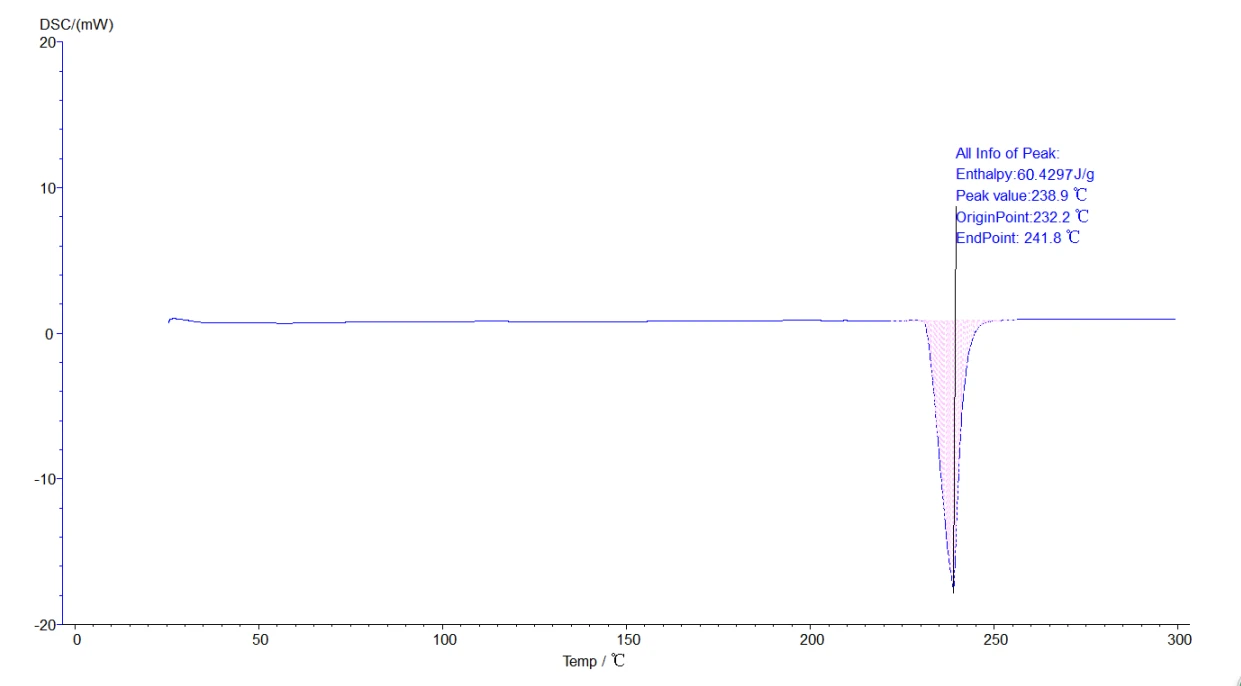
Figure 18
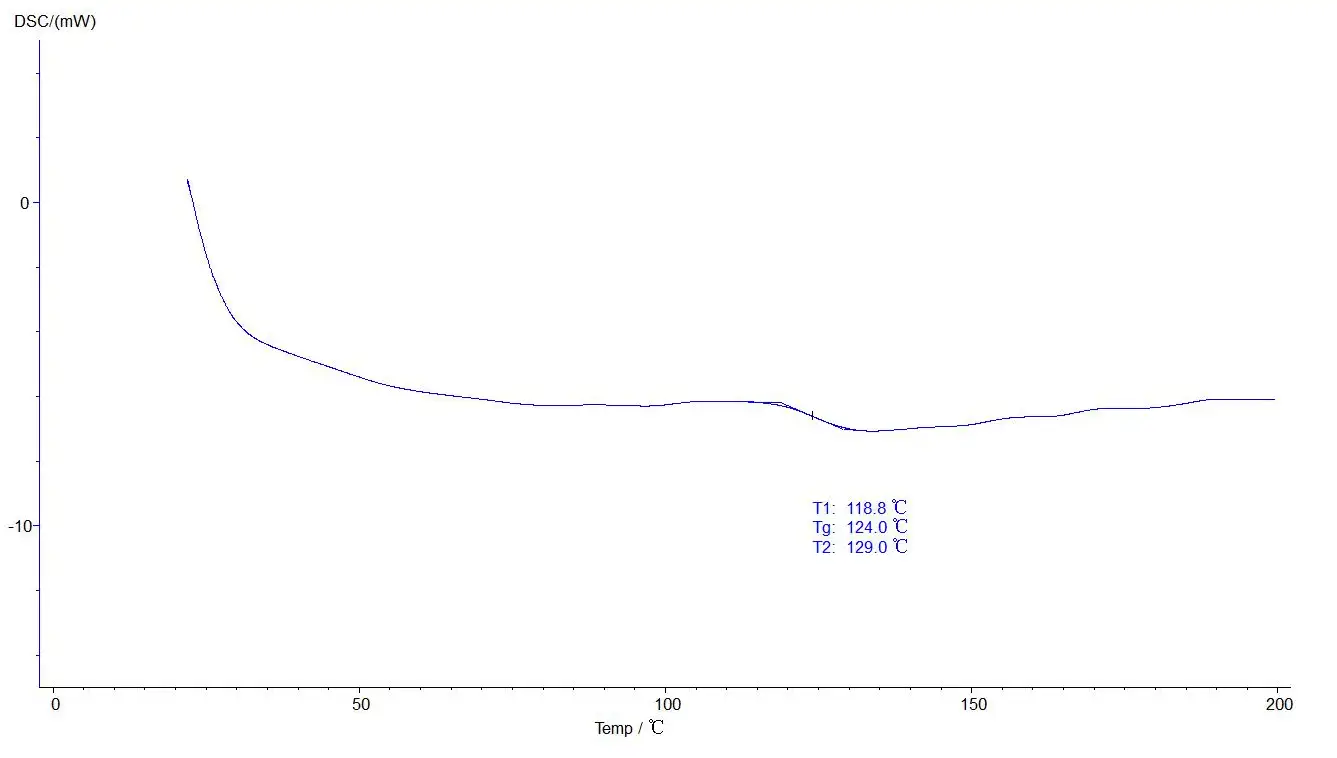
5.4.2 Glass analysis operation: click the map to make it green, the selected map, click on the taskbar [analysis] - [glass transformation] -about two black lines, drag the left analysis line in the front, the right analysis line in the back end, selection, click [application], [sure], then click the curve, make it blue, analysis. The analyzed map is shown below:
![5.4.2 Glass analysis operation: click the map to make it green 5.4.2 Glass analysis operation: click the map to make it green, the selected map, click on the taskbar [analysis] - [glass](https://biolabscientific.com/content/manual/20260123001/5.4.2-Glass-analysis-operation-click-the-map-to-make-it-green-i20-Biolab.webp)
Figure 19
![5.4.2 Glass analysis operation: click the map to make it green 5.4.2 Glass analysis operation: click the map to make it green, the selected map, click on the taskbar [analysis] - [glass](https://biolabscientific.com/content/manual/20260123001/5.4.2-Glass-analysis-operation-click-the-map-to-make-it-green-i21-Biolab.webp)
Figure 20
![5.4.2 Glass analysis operation: click the map to make it green 5.4.2 Glass analysis operation: click the map to make it green, the selected map, click on the taskbar [analysis] - [glass](https://biolabscientific.com/content/manual/20260123001/5.4.2-Glass-analysis-operation-click-the-map-to-make-it-green-i22-Biolab.webp)
![5.4.2 Glass analysis operation: click the map to make it green 5.4.2 Glass analysis operation: click the map to make it green, the selected map, click on the taskbar [analysis] - [glass](https://biolabscientific.com/content/manual/20260123001/5.4.2-Glass-analysis-operation-click-the-map-to-make-it-green-i23-Biolab.webp)
Figure 22
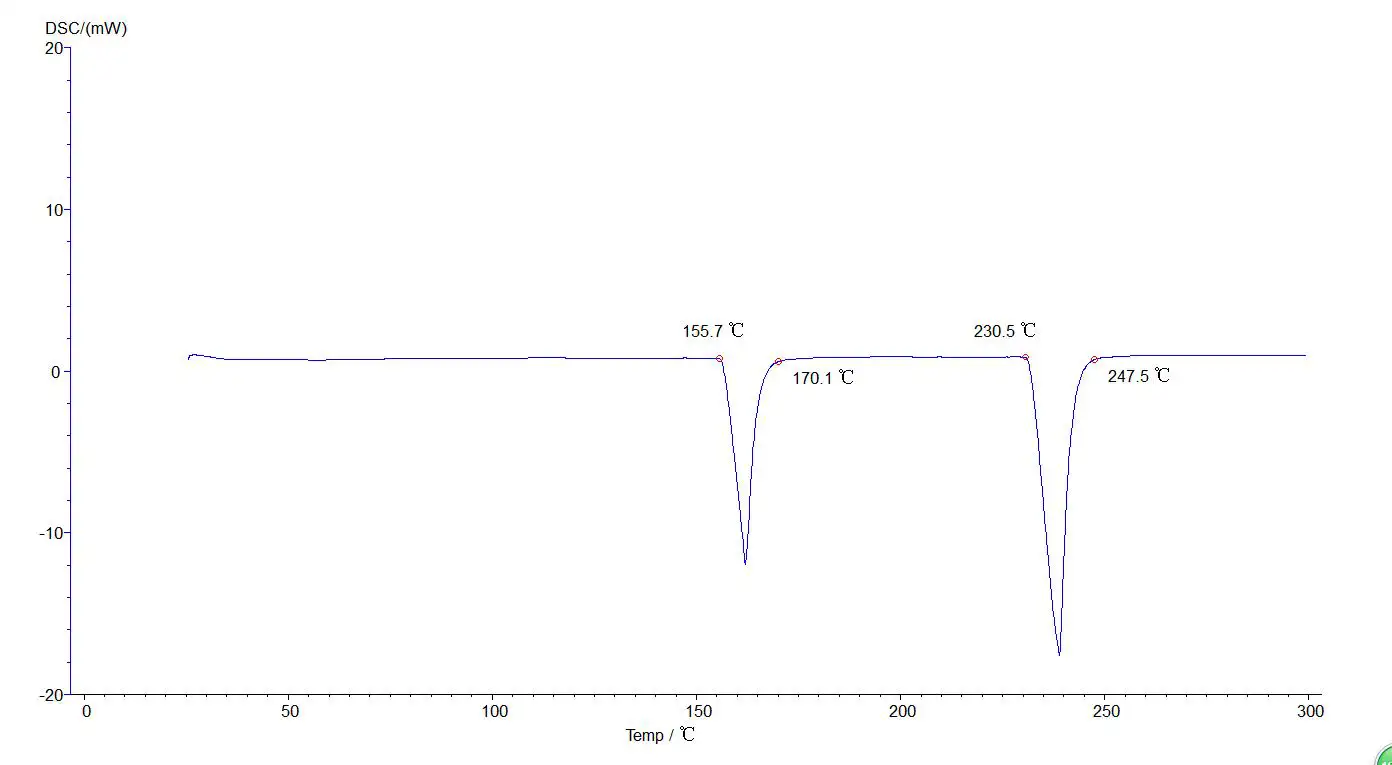
5.4.3 Initial melting point, final melting point analysis: click the map to make it green, that is, selected map, click the task bar [analysis] [initial melting point] or [final melting point] about two black lines, drag the left analysis line in the front, right ana lysis line in the back end, select, click [application], [sure], then click the curve, make it become blue, analysis. The analyzed map is shown below:
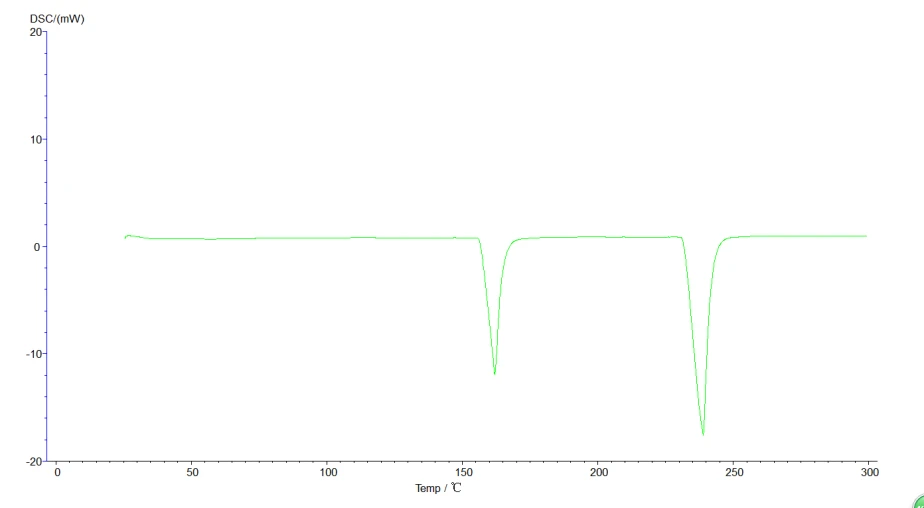
Figure 23
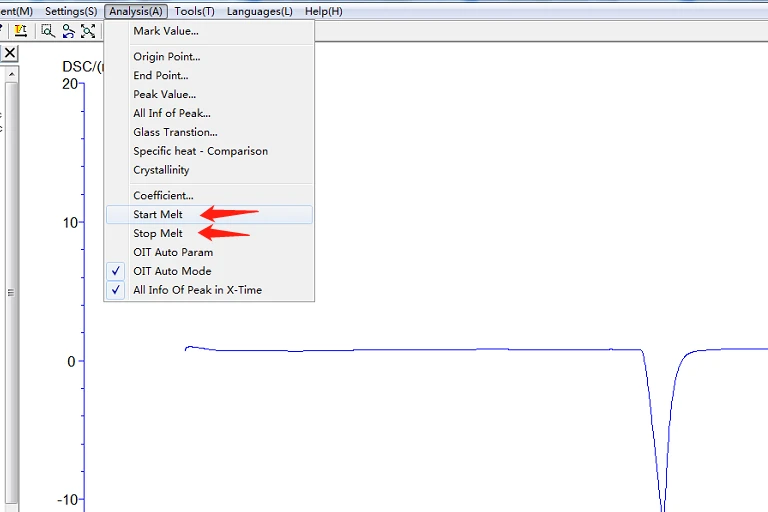
Figure 24
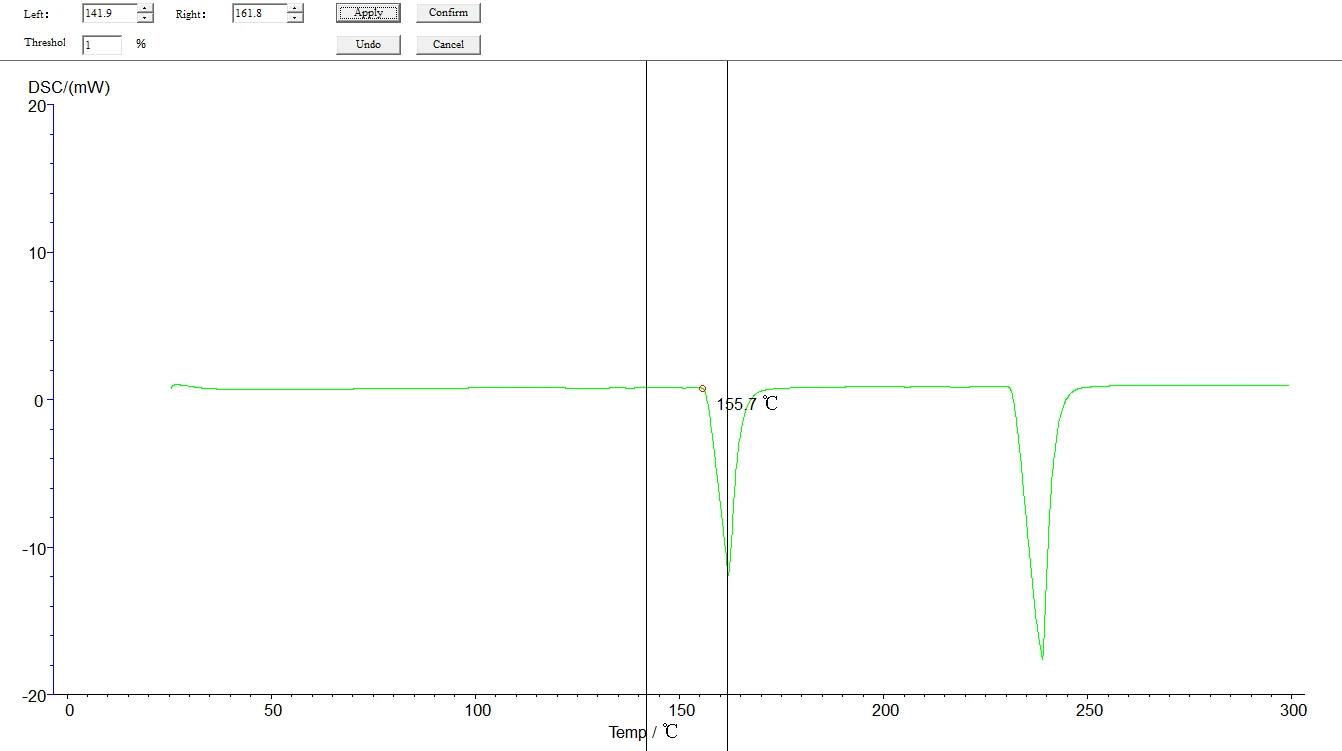
Figure 25
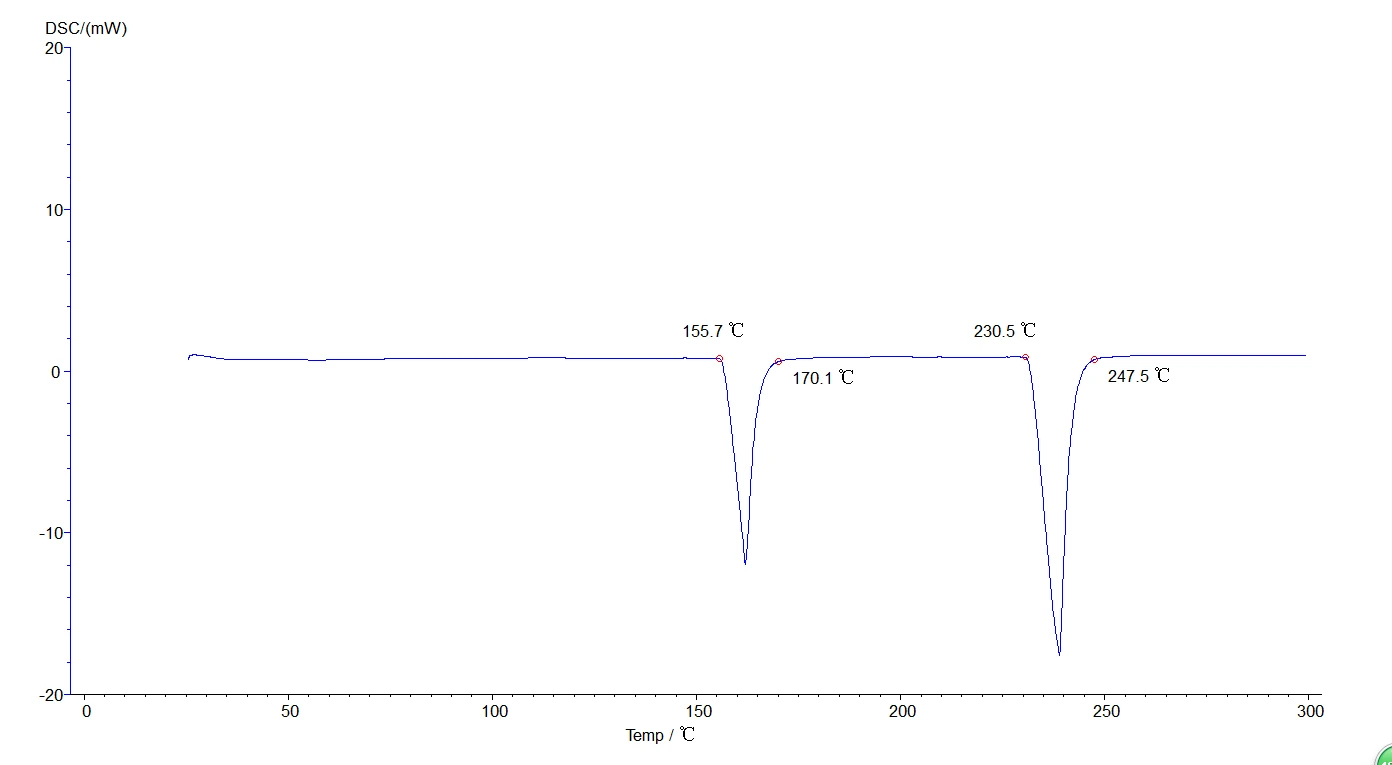
Figure 26
5.4.4 Analysis of two or more section lifting temperatures: Like the melting point, phase change temperature and vitrification analysis method, but the map is multiple sections, as shown in the figure below:
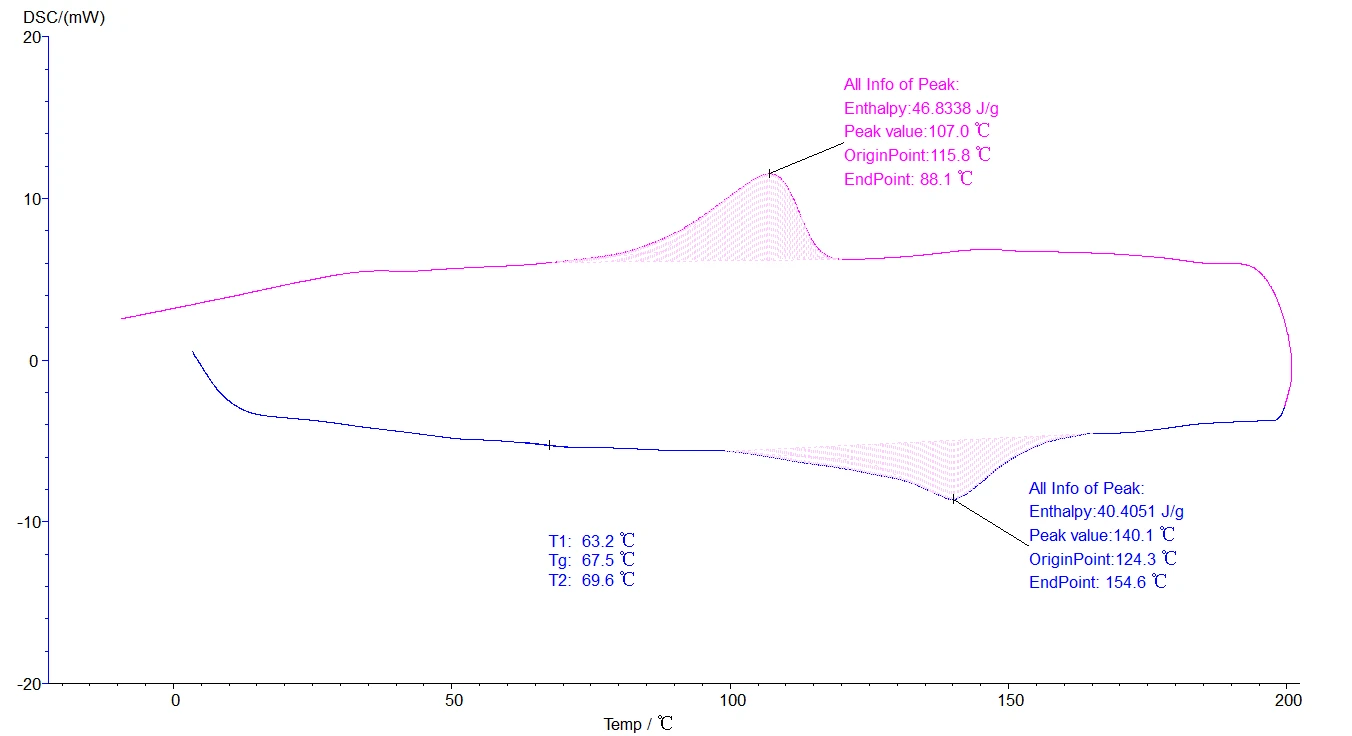
Figure 27
5.5 For all analyzed maps, click [File] - [Save as status T] to save the analyzed data.as illustrated in following figure:
![5.5 For all analyzed maps 5.5 For all analyzed maps, click [File] - [Save as status T] to save the analyzed data.as illustrated in following figure:,](https://biolabscientific.com/content/manual/20260123001/5.5-For-all-analyzed-maps-i29-Biolab.webp)
Figure 28
5.6 All maps can be reported, click [print preview], as shown below:
![5.6 All maps can be reported 5.6 All maps can be reported, click [print preview], as shown below:, Figure 29, Figure 30, Temperature correction is](https://biolabscientific.com/content/manual/20260123001/5.6-All-maps-can-be-reported-i30-Biolab.webp)
Figure 29
![5.6 All maps can be reported 5.6 All maps can be reported, click [print preview], as shown below:, Figure 29, Figure 30, Temperature correction is](https://biolabscientific.com/content/manual/20260123001/5.6-All-maps-can-be-reported-i31-Biolab.webp)
Figure 30
6. Standard object selection and temperature correction
6.1 Selection of calibration objects
Temperature correction is performed irregularly to ensure the test accuracy. The calibration was selected according to the actual test temperature of the sample. The principle of calibration object selection: the extrapolation temperature of the calibration object should be relatively close to the temperature of the sample item to be tested to ensure the accuracy of the test. Our company only provides tin calibration items.
The following table shows the melting point and theoretical thermal enthalpy values of the common calibrates.
RM | The theoretical melting point °C | Theoretical melting heat enthalpy J / g |
indium In | 156.6 | 28.6 |
tin Xi | 231.9 | 60.5 |
zinc Zn | 419.5 | 107.5 |
Table 2
6.2 Temperature calibration operation steps:
1. First open the instrument to enter the main interface, and do a group of melting point experiments between indium and tin. As shown in the figure below;

Figure 31
2. Click the device information, and enter the administrator password 123 in the administrator channel, click to enter, as shown in the figure below;
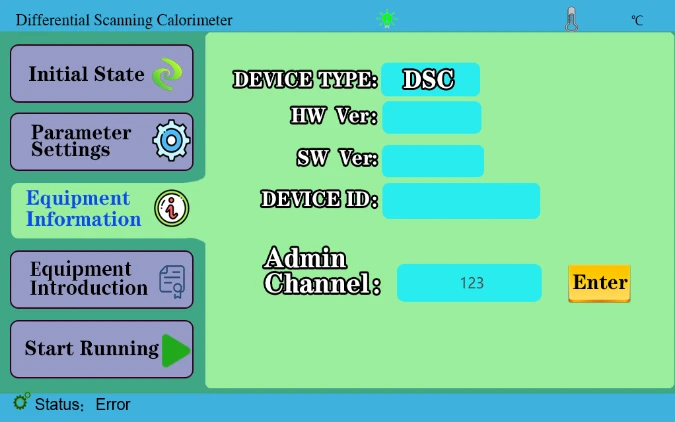
Figure 32
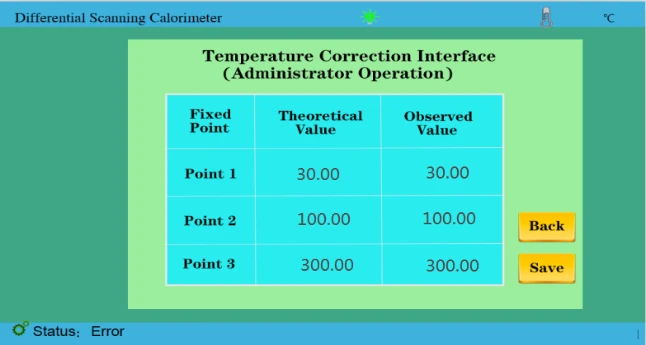
Figure 33
3. Correction point 2 and correction point 3. We need to do the melting point experiment between indium and tin and analyze the melting point results. Enter two values of 156.6 and 231.9 respectively in the theoretical value, and the measured value is input and saved according to the actual measurement results, as shown in the following figure;
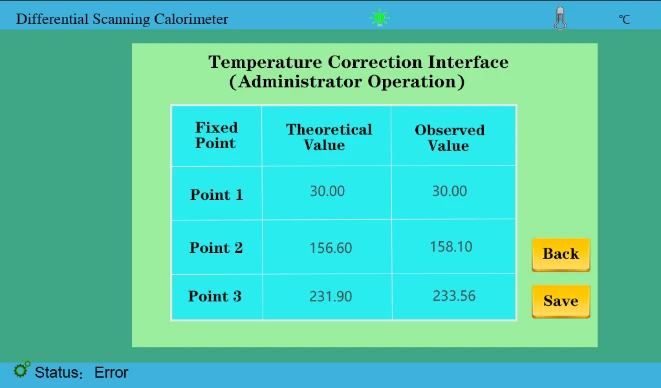
Figure 34
4. As shown in the figure above, we have entered the theoretical value and the measured value and saved it again.(Temperature correction has been completed before leaving the factory)
5. In the later stage, if the calibration temperature is needed, the melting point experiment of indium and tin (single tin can also be done again. According to the test results, it is compared with the theoretical values 156.6,231.9.!!!(Calibration within ± 1°C)
Suppose our test results are 158.1 and 233.56; compare theoretical values. We mainly take more than several degrees, less several degrees reduced several degrees of the test method.
158.1 About 1 degree more than 156.6 (take the integer value here)The measurement value was then changed to 159.1
233.56 About 1 degree more than 231.9 (take the integer value here) So the measured value was changed to 234.56
After completing the above steps, click save and restart the instrument.
As shown in the figure below, the temperature calibration process is all over.

Figure 35
7. Instrument application
7.1 Melting point (thermal enthalpy) measurement
The melting point is the transition temperature of matter from crystalline phase to liquid phase, which is one of the most common physical data determined by thermal analysis. The accuracy of the measurement and the thermodynamic equilibrium temperature can reach about ± 1°C. At present, the method recommended by ICTA is used to measure the molten heat absorption bee of a certain solid material. In the figure below, B 'corresponding to B point is the starting temperature Ti, and G point corresponding temperature is the extrapolation start temperature Teo. That is, the intersection of the tangent at the maximum slope of the leading edge of the peak and the front baseline extension, C point corresponding temperature is the bee top temperature Tm, and D' corresponding to D point is the termination temperature Tf.
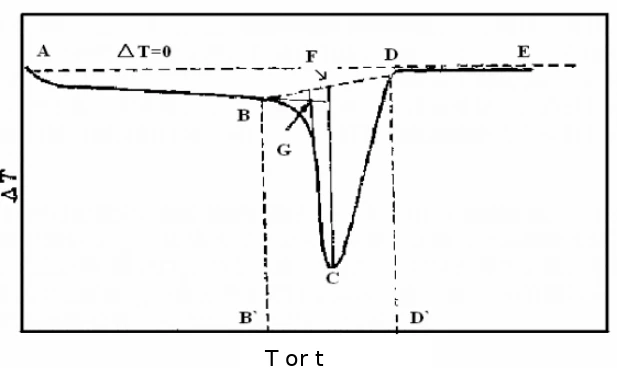
Figure 36
Thermal enthalpy is a state function of the energy of a matter system that is numerically equal to the product of the system's internal energy U plus pressure P and volume V, namely H=U + PV. Under certain conditions, the internal energy and enthalpy changes can be measured from the heat transfer between the system and the environment. In the absence of other work, all the heat absorbed by the system in the isovolume process is used to increase the internal energy, and the heat absorbed by the system in the isovolume process is all used to increase the enthalpy. Because the general chemical reactions are mostly carried out under the isovolume, the enthalpy is more practical. In the DSC curve, we can obtain the melting heat enthalpy of the sample by calculating the peak area, namely, the BCD in Fig.
7.2 Determination of the instrument coefficient
Since the instrument coefficient may change according to the environment, the temperature, humidity, and so on will have a large or small impact on it. To ensure the accuracy of the experimental results, the coefficient of the instrument should be measured. Usually, tin, zinc, indium and so on are used to calibrate the instrument, measuring the instrument coefficient.
The instrument coefficient is to test the thermal enthalpy of the calibration object, and then calculate the instrument coefficient according to the theoretical thermal enthalpy of the calibration object and the calculation formula of the instrument coefficient.
In the [Data Analysis] column, select the [instrument coefficient] to appear in the dialog box below, fill the theoretical melting heat enthalpy and the measured melting heat enthalpy into the corresponding column respectively, and click the calculation button to get the instrument coefficient. The instrument coefficient is also used when calculating the crystallinity. Without continuous experiments, the instrument coefficient needs to be recorded for future use.
Taking the pure tin sample experiment as an example, the theoretical thermal enthalpy value of the input tin is 60.5J/g, the measured thermal enthalpy is 36.3326J/g, and the instrument coefficient K calculated by the system is 60.5/36.3326. The instrument coefficient is automatically generated on the software interface.
Usually the determination of instrument coefficients can be measured after instrument correction. When the instrument correction, weigh the quality of the standard material and fill in the mass column in the real-time data column. If the measured phase change temperature is close to the actual temperature of the sample, the thermal enthalpy value can be recorded and the instrument coefficient is calculated as the coefficient of the instrument. Set as follows:
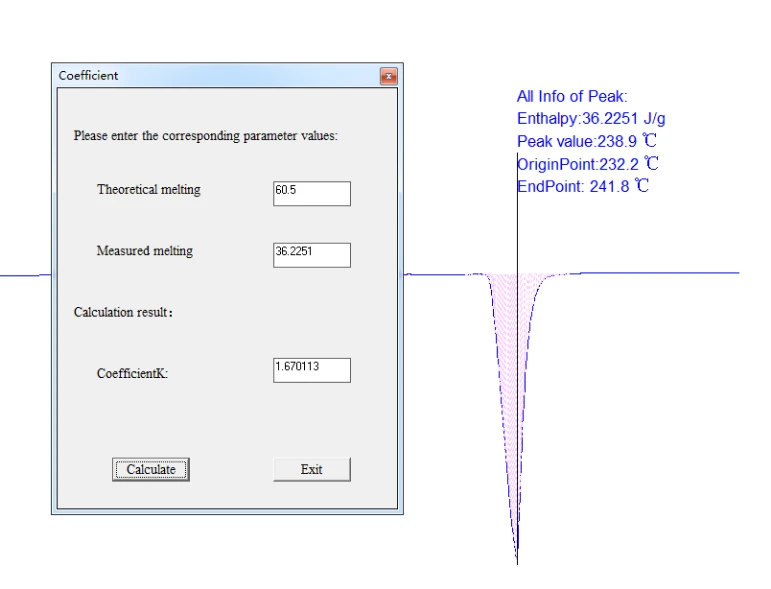
Figure 37
7.3 Measurement of the glass transition temperature
Vitrification is the process of transforming a substance into a glassy-like amorphous form (a glass state), a state between a liquid state and a solid state, in which no crystal structure exists. The DSC determination of the glass transition temperature Tg is based on the increase of the heat capacity of the high polymer during the glass transition temperature transition. In the DSC curve, it is shown: through the glass transition temperature. As shown in the figure below. Point A in Fig is the point starting away from baseline. Extending the baseline before and after the transition, the vertical distance between the two lines, △ J, is called the order difference, and the C point can be found at △ J / 2. Tangent from point C intersects the former baseline extension line at point B. The ICTA recommends point B as the glass transition temperature Tg. The glass transition temperature, without a very fixed value, changes with the measurement method and conditions. Therefore, when marking the glass transition temperature of a certain polymer, the measurement method and conditions should be indicated.
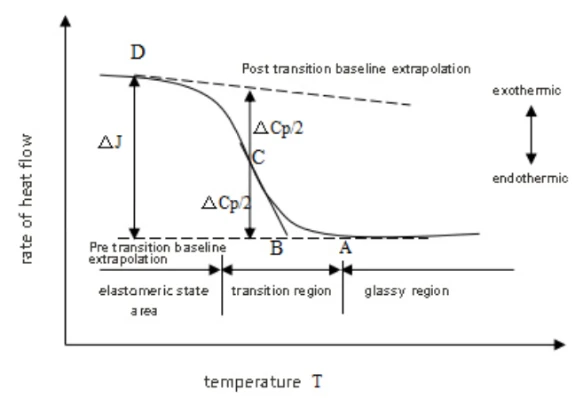
Figure 38
Other phase change temperatures, such as curing temperature, crystallization temperature, can analyze the same melting point.
8. Notes for instrument use
1. In order to ensure the normal use of the instrument, the sample can not undergo thermal decomposition within the test temperature range, and can not react with the metal aluminum, without corrosion. The measured specimen cannot be used if it produces a large amount of gas during heating up or can cause an explosion. Therefore, there is a general understanding of the nature of the sample before the test.
2. Check whether all the instruments are correctly connected, whether the gas used is sufficient, and whether the tools are complete.
3. In the test, if the aluminum crucible is selected as the sample dish, the maximum temperature shall not exceed 550°C. If the maximum temperature exceeds 550°C, the ceramic crucible can be used.
4. The laboratory room temperature is controlled at 20°C -30°C, and the temperature is relatively constant. The experimental results are more accurate and repetitive. At high room temperature, the air conditioner should be turned on to ensure that the ambient temperature is relatively constant temperature in a short time.
5. In order to ensure the accuracy of the test results, use the instrument and first empty burning (without any sample and reference) for about 30 minutes.
6. The instrument is not used for a long time, be sure to burn empty two to three times. The temperature is set to 400°C, the rate is set to 10°C / min, the constant temperature is set to 0min, press [Run] key.
7. The bottom of the crucible should be flat, without zigzag or bending, otherwise the heat transfer is bad.
8. When preparing DSC samples, do not sprinkle the sample on the edge of the crucible, so as not to pollute the sensor and destroy the instrument. The bottom and all external surfaces of the crucible can not be associated with samples and impurities, to avoid affecting the experimental results.
9. The amount of test samples should be appropriate, not too much, or too little. The solid sample is generally about 20mg. The liquid sample shall not exceed two-thirds of the crucible capacity. If the sample amount is required otherwise, the amount shall be determined according to the requirements.
10. The inorganic samples can be ground and screened in advance; the polymer samples should be as uniform as possible; the fibers can be made to the same length of 1~2mm; and the powder samples should be compacted.
11. The crucible should be placed in a fixed position in the support device. The sample should be evenly tiled at the bottom of the crucible, not on one side. If the sample is granular, it should be placed in the center of the crucible.
12. The warming rate is generally selected at 10~20°C / min. Over the curve drift, reduce resolution; too small determination time.
13. Do not use hard objects to clean the sample support and the experimental area, so as to avoid causing irreversible damage to the instrument.
14. If there is dust or other powder in the experimental area, it should be blown with ear ball and mouth.
15. When the pollution in the experimental area is serious, the temperature can be set as 500°C, the rate is set as 20°C / min, the constant temperature is set to 30min, and press the [Run] key.
16. In the process of collecting data collection, avoid obvious vibration around the instrument. It is strictly prohibited to open the upper cover. A slight touch with the front of the instrument will produce obvious peaks and valleys on the DSC curve.
17. Do not regulate the flow rate of the purified gas during the data collection process, as slight changes in the gas flow rate can have an impact on the DSC curve.
18. After the experiment, be careful with the cap of the DSC, and put it gently with tweezers to avoid scalding or damage to the cap.
19. Power supply: AC220V, 50HZ, power consumption≤1000W.
9. Packing list
Host | 1 |
The U disk | 1 |
Data line | 2 |
Power cord | 1 |
The Aluminum Crucible | 200 |
Ceramic crucible | 200 |
Metal cover | 3 |
Raw adhesive tape | 1 |
Pure tin grains | 1 Bag |
10A Fuses | 5 |
Sample spoon / sample bar / tweezers | One for each one |
Eear ball | 1 |
Thracheal | 2 |
Instructions | 1 |
Warranty form | 1 |
Certificate of qualification | 1 |
Solenoid valve | 1 |
Insulation tube | 1 |
Tetrafluoride tube | 1 |
Table 3
Note: If other parts are needed, discuss them separately


