


Halogen Moisture analyzer BANA-503
- Sea, Air, Door to Door Shipping
- 1 Year Warranty
- US & European Standards
Moisture Analyzer measures the amount of moisture in a substance which particularly helps in food processing. These analyzers are also commonly used in environmental, pharmaceutical, and materials science labs. We provide a variety of moisture analyzer according to applications, features and customers requirements.
- Halogen Light Heating
- Stainless Steel Chamber
- Temperature and time can be set
- The percentage of moisture content
Specification
Features
Applications
| Capacity | 110g/1mg |
| Temperature | 40°C-199°C |
| Operating Temperature Range | 5°C-35°C |
| Temperature Set | 1°C |
| Moisture Readability | 0.0001 |
| Dry Range | 100.00%-0.00% |
| Dry Readability | 0.0001 |
| Pan Size | Φ90 mm |
| Readability | 1 mg |
| Heat Source | HALOGEN LAMP-2 |
| ATRO | 100%....999% |
| ATRO 2 | 0%....999% |
| Sensor | LOADCELL |
| Temperature Sensor | PT-100 |
| Time Setting | 1-99 min By 10 s |
| Packaging Size | 490x360x350 mm |
| Number of Storage | 15 |
| Weight | 7.5 kg |
- Halogen Light Heating
- Stainless Steel Chamber
- Temperature and time can be set
- The percentage of moisture content
- The perc entage of dry residual
- The super high resolution back window matrix liquid crystal display (LCD), making it easier to operate in the dark place, and the user will have a more comfortable vision.
- Stores historical setting
Food processing, Environmental, Pharmaceutical, Laboratory, Research, Medical, Hospitals, Agriculture, Industrial
Operating Manual for BANA-503
1. Instruction
2. Installation
2.1 Standard Packing List
2.2 Placing Requirement
2.3 Installation of accessories
2.4 Adjust the level and connect the power
3. Operation
3.2 Icon Introduction
3.3 Keypad
3.4 First test
3.5 Parameters Setting
3.6 Calibration
4. Technical parameters
5. Schedule: Assembly drawing
1. Instruction
1. Security Please reading the following before you use the moisture analyser.
a. The instrument can use for test the sample,each improper operation may result in personal injury and equipment damage
b. Please access the AC power accordance with the manual;
c. Please make sure the power cord does not interfere with people action;
 d. Do not use the instrument under the hazardous ,wet or unstable environment ;
e. Unplug the power before you clean the analyzer;
f. Please keep enough space around the instrument ,and keep the top of the space at least 1m;
g. During a special experiment, please wear protective equipment by yourself;
h. Please do not change the instrument's components and any other aspects. Maintenance of this equipment by the factory authorized professionals.
 Moisture analyser use halogen heating lamp.
i. Do not put the flammable materials around the instrument;
j. Do not touch the lamp when it on working.
Special attention to the dangers of some sample;
k. Before you test the dangerous good , please take Full investigation
Inflammable and explosive materials: Test the inflammable and explosive materials will produce flammable gases or vapors, so need to lower the temperature in a dry environment. In case of fire or explosion.
Toxic and corrosive substance: Keep the samples of toxic or corrosive ingredients in well-ventilated environment.
2. Installation
2.1 Standard Packing List
Please check whether the packaging and accessories is complete when you open it| Standard | Quantity | Note |
| Moisture Analyzer Mainframe | 1 set | |
| Wind Cover | 1 piece | |
| The sample pan holder | 1 piece | |
| Tray handle | 1 piece | |
| Power cord | 1 piece | |
| Aluminum sample pan | 1 set | 50pcs |
| 100g standard weight | 1 piece | |
| Product Manual | 1 piece | |
| Product certification | 1 piece | |
| Warranty card | 1 piece |
Table 1
2.2 Placing Requirement
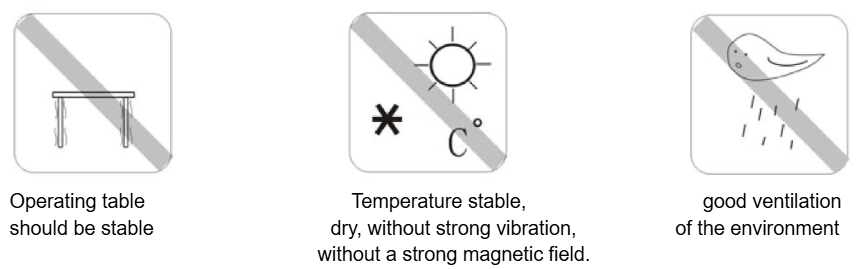
Figure 1
2.3 Installation of accessories
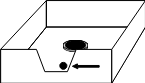 |  |  |
| Place the wind cover, aligned holes. | Place the sample pan holder, rotate until positioning. | Put the aluminum sample pan on the bracket. |
Table 2
2.4 Adjust the level and connect the power

There are two feet in front of the instrument ,adjust it and keep the instrument level.

Connect the instrument with power ,put one side of power cord

Please warm up more than 30minutes for keep it stable.
3. Operation
3.1 Display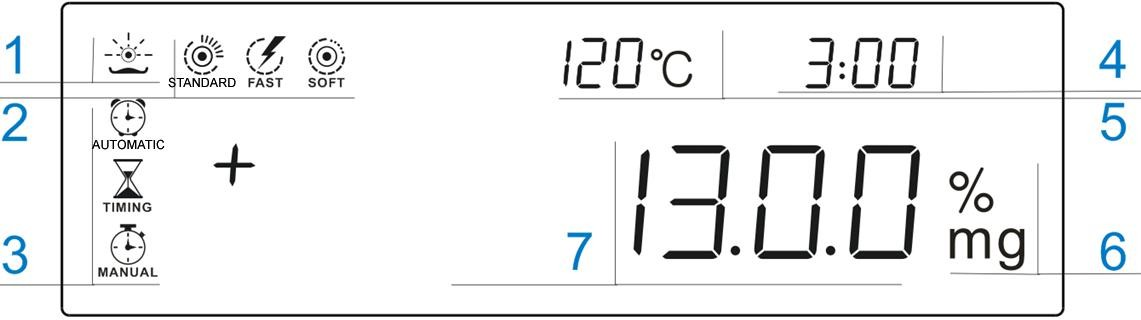
Figure 3
3.2 Icon Introduction
6--The percentage of dry weight(%) /Moisture(%m)/the weight(g)5–The current temperature or Setting temperature
4–Time set and test time
2–Test mode
3--Stop test mode
1 -----
 ---Test state
 ----Standard test mode
  ----Rapid test mode
 --Gentle test mode
  --Automatic
 ---Manual stop mode
 ---Timing stop mode
3.3 Keypad
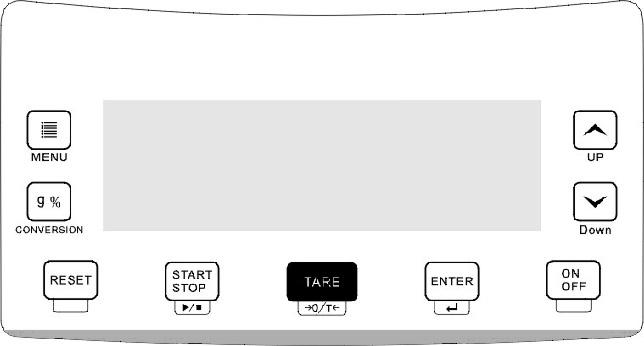
Figure 4
| NAME | Key features |
| ON/OFF | Power on / off, Just off the internal DC power supply |
| START / STOP | Start test/ stop test (it will change to pause function ,after test 30 seconds) |
| TARE | Weighing peeled, Settings exit |
| MENU | Enter the setting menu |
| CONVERSION | Switching measurement results |
| ENTER | Confirm the current setting, go to next |
| RESET | Return to the weighing mode (short press), calibration the balance (long press) |
| DOWN | Reduce (Turn off the back light ) |
| UP | Add (Turn on the back light) |
Table 5
3.4 First test
1. First test, if not change the temperature and time settings, the moisture analyzer defaults to factory defaults.2. Put empty sample pan on the holder (see section 2.3).
3. Press the “TARE” to clean weight.
4. Put the sample on the pan (Sample weight should be heavy than 1g, the general 3-5g).
5. Close the heating cover, press the "Start / Stop" button to start the test. At this point, test tube lights, fans turn on, tested symbol in the upper left flashing. While rolling on the screen displays the current temperature, has been test time, result of the current sample.
6. End of the test, the lamp automatic shut off, the buzzer alarm. Then the sample is displayed on the result, test time, current temperature and the parameter setting mode.
Note: Don't touch the sample plate ,the temperature is too high now.
7. Press the "Reset" button, the instrument returns to weighing mode.
3.5 Parameters Setting
3.5.1 Test parameter storage and recall
a. The instrument can store a total of 16(0-F)group of tested parameters. Each group can set the test method, stop mode, time and time test parameters.b. In weighing mode, press the "Settings" button to enter the parameter setting mode, then store the address number (the number show the highest bit) is flashing. Press "down" or "up" key to select the desired address number, the 0 is the factory setting,1-F for the user store.
c. The memory address number 0 means factory settings, then click "ENTER" button to exit the settings back to weighing mode. At this point tested mode is the factory defaults.
d. When the memory address range for the 1-F any one number, press "ENTER" key, and enter the parameter setting after the completion of a parameter (tested mode, stop mode, time mode) setting. Press the "TARE" key, the address number of the test parameters have been stored.
3.5.2 Test mode and setting
a. Standard test mode:( )
)This mode is the factory setting, suitable for most samples. Test temperature can be set, the sample is tested to a temperature, and keep to the test ends automatically.
b. Rapid test mode: (
)This mode is suitable for samples with higher content. You can set the test temperature, test the temperature will exceeds the set value, the future will be reduced to the set temperature and hold until the test
ends automatically.
c. Gentle test mode: (
 )
)This mode is suitable for low content, surface casing is easy to form, easy to burn the sample. From the test began to rise to the long time required to set temperature, test up even slowly. Test time user selectable.
d. Press the "MENU" to enter the parameter setting mode, press the "ENTER" until the test mode, the icon flashes
 . Press "UP"or"Down"choose the mode you need.and press "ENTER"confirm.
3.5.3 Stop mode setting:
a. Automatic stop mode:( )Test the sample within the specified time during the weight loss of less
than 2mg will automatically stop when the test. This mode after 15 seconds in the test effect.
b. Manual stop mode:(
 )
)Sample test process is the continuing until the press the "start/stop" button to end test.
c. Timing Stop Mode:(
)Stop time set by the user, the sample test process is continued until the end of the test time to set the value of the test.
Press the "MENU" button to enter the parameter setting mode, press the "ENTER" key until the shutdown mode.
when flashing
.Press"UP"or"Down"to choose the stop mode.and press "ENTER" confirm , Parameters are defined, and go to the next parameter (temperature) setting.3.5.4 Test Temperature Setting
The instrument temperature setting range is from 0 to 199 degrees. Press the "MENU" to enter the parameter setting mode, press the"ENTER" key until the
 flashing,Press"UP"or"Down"to choose the temperature.and press "ENTER" to go to next setting(time setting)
Icon
will transform other temperature when its test.3.5.5 Test time setting
1.Just choose timing stop mode need set the stop time.Press the "MENU" to enter the parameter setting mode, press the
"ENTER" key until
 the flashing,Press"UP" or "Down"to choose the temperature .and press "ENTER"
2, Test cycle: Just gentle test mode need choose test cycle
3.5.6 For example:
a. Sample:water,b. Press the "MENU" to enter the parameter setting mode, choose the (
 ),temperature:120℃,Press "ENTER" go to weighing state
c. Put a dry paper on the pan, and press "Tare" clean the weight.
Put on the 3g water on the paper ,until the readability stable. Press" START / STOP " begin test.
Waiting for it sop. look the result. The m% will be 100%.
Weighing error or sample weight deficiency can lead to the result of the
test a deviation
3.6 Calibration
When the instrument error or improper operate. Calibration weights can be adjusted with accuracy.Press "Reset" key and does not release until it display“-cal-”,
Then flashing “100.000”, put on the calibration weight, then it will display "=
= = = = =",
until it display “100.000” remove the weight, it will display "= = = = = = "again, Waiting it show" 0.000 ", the calibration is completed.
4. Technical parameters
| Name | Moisture Analyzer |
| Mode | BANA-503 |
| Specification | 110g/1mg |
| Readability | 1mg |
| Pan size | Φ 90 |
| Display | LCD |
| Temperature Setting | 40℃~199℃ |
| Time Setting | 1~99 minutes |
| History store | 15 set |
| Heating Unit | Halogen Lamp |
| Power supply | 220V |
Table 6
5. Schedule: Assembly drawing
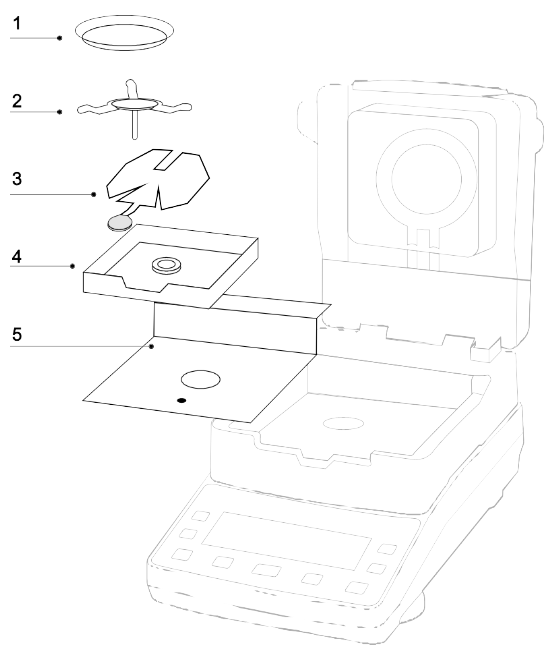
Figure 5
Please installation the instrument according the picture Installation order from top to bottom :
1 --2--3--4--5
1. Aluminum scale pan
2. The triangle scale frame
3. Scale pan brackets
4. Wind cover
5. Stainless steel plate