Get Quote ▼
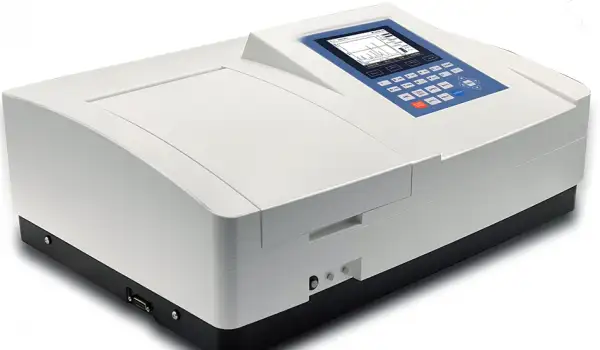
Double Beam UV Visible Spectrophotometer BSDBU-301
- Fixed or variable slits (Bandwidths).
- For stand-alone models, all software methods are included as built-in standard; this eliminates the need of software.
- Online software upgrading via the internet helps to keep it updated.
- Data Download-to-PC software expands the data storage to unlimited.
 Get Quote
 Download Catalog
Specifications
| Model | BSDBU-301 |
| Wavelength Range | 190-1100 nm |
| Spectral Bandwidth | 1.8 nm |
| Optical System | Double Beam, Grating 1200 lines/mm |
| Wavelength Accuracy | ±0.3 nm |
| Wavelength Repeatability | 0.2 nm |
| Scan Speed | Hi, MED., LOW., MAX. 3000 nm/min |
| Photometric Accuracy | ±0.3 %T or ±0.003A @1A |
| Photometric Range | 0-200%T,-0.3-3A |
| Stray Light | 0.04%T @220 nm, 360 nm |
| Stability | 0.0003 A/h @500 nm |
| Display | 5 inches LCD (320x240 dots) |
| Baseline Flatness | ±0.0005 A |
| Standard Cell Holder | Standard 10 mm single cell holder (2 pcs) |
| Sample Compartment | Standard 10 mm pathlength cuvette |
| Light Source | Tungsten & Deuterium lamp (Pre-aligned) |
| USB Type A Port | USB Type A for USB memory device (Right side) |
| USB Type B Port | USB Type B for optional computer connectivity (Back) |
| Output Parallel Port | Parallel port for printer |
| Power Requirement | AC 110/220 V 50/60 Hz |
| Dimensions (LxWxH) | 589x428x200 mm |
| Weight | 22 kg |
Features
For stand-alone models, all software methods are included as built-in standard; this eliminates the need of software.
Online software upgrading via the internet helps to keep it updated.
Data Download-to-PC software expands the data storage to unlimited.
The stand-alone model has a 5-inch screen and the PC model has UV-Vis Analyst software.
Data can be saved by a USB memory device directly.
Stand-alone models of UV-6 Series have the same functions as UV-3 series; see next page for details.
Brief Introduction:
All methods are included as built-in standard; this eliminates the need for software. Online software update via the internet.
The local control software includes functions such as: Photometry, Quantitative, Wavelength Scan, Kinetics, DNA/Protein, Multi-wavelength Test and System Utilities.

Standard Curve:
Up to 10 standard solutions may be used to establish a calibration equation curve. There is a choice of four methods for fitting curves through the calibration points: Linear fit, Linear fit through zero, square fit and cubic fit.

Multi-Wavelength:
Up to 10 wavelengths may be entered, allowing the measurement of multiple wavelengths on a series of samples.

Wavelength Scan:
The Wavelength Scan intervals are 0.1, 0.2, 0.5, 1, 2, 5 nm, and High, Medium and Low scan speeds are available. Scan speeds vary from 100 to 3000 nm/min. Wavelengths are scanned from high to low so that the instrument stands-by at high wavelength. This minimizes the degradation of UV sensitive samples. Precise control of filter and lamp changes means that their effects are not seen on the final scan. Post-run manipulation includes re-scaling axes, curve tracking and peak picking.

Kinetics:
This mode may be used for scanning time courses or reacting rate calculations. Abs. VS Time graphs are displayed on the screen in real time.
Wait time and measurement time up to 12 hours may be entered with time intervals of 0.5, 1, 2, 5, 10, 30 seconds and 1 min.
Post-run manipulation includes re-scaling, curve tracking and selection of the part of the curve required for the rate calculation. Rate is calculated using a linear regression algorithm before multiplying by the entered factor.

DNA/Protein Test:
Concentration and DNA purity are calculated by Absorbance ratios 260 nm/280 nm or 260 nm/230 nm with optional subtracted absorbance at 320 nm.
DNA Concentration = 62.9A260 - 36.0A280 or 49.1A260 - 3.48A230
Protein Concentration = 1552A260 - 757.3A280 or 183A220 - 75.8A230
Other wavelengths and factors may be entered.

UV Analyst PC-Control Software:
The PC application software offers:
Photometric Mode
Quantitative test (Standard curve)
Wavelength Scan
Kinetics
DNA/Protein
Multi-Wavelength
System Utility
The PC application software UV-Vis Analyst takes the best features of the stand-alone version plus more powerful data processing, expanded data collecting, and storage capability. It comes standard with UV3/6 series PC models and is optional to stand-alone models.
Quantitative Test (Standard curve):
Use up to 20 standards to establish a standard curve. Four methods for fitting a curve:
Linear fit.
Linear through zero.
Square fit.
Cubic fit.
: Use up to 20 standards to")
Multi-wavelength:
Up to 20 wavelengths can be selected and multiple samples can be measured. (Auto cell changer is required to run multiple samples automatically)

Wavelength Scan:
Automatically record peaks and valleys. The quantity of channels is unlimited; you can simultaneously store as many as desired.
Post-run manipulation and processing includes:
Re-scaling axes, curve.
1 to 4 derivative.
Smoothing, combination, zooming, overlap.

Kinetics (Abs. VS Time):
The Kinetics mode may be used for scanning time courses or reacting rate calculations. Abs. VS Time graphs are displayed on the screen in real time. Wait time, measurement time and time intervals may be entered.
Post-run manipulation includes re-scaling, curve tracking and selection of the part of the curve required for the rate calculation. Rate is calculated using a linear regression algorithm before multiplying by the entered factor.
: The Kinetics mode may be used for scanning")
DNA/Protein:
Concentration and DNA purity are quickly and easily calculated:
Absorbance ratios 260 nm/280 nm with optional subtracted absorbance at 320 nm.
DNA Concentration = 62.9A260 - 36.0A280
Protein Concentration = 1552A260 - 757.3A280
Other wavelengths and factors may be entered.

Accessories For Purchase
| Images | Name |
 | Micro Cell Holder (Beam height: 15mm) |
 | 8-Position Auto Cell Changer |
 | 4-Cell Holder for 10mm SQU.cuvette |
 | 4-Cell Holder for 50mm SQU.cuvette |
 | 4-Cell Holder for 100mm SQU.cuvette |
 | Square Cuvettes Glass :10 mm |
| 20 mm | |
| 30 mm | |
| 50 mm | |
| 100 mm | |
| Square cuvettes Quartz:10 mm | |
| 20 mm | |
| 30 mm | |
| 50 mm | |
| 100 mm | |
 | Micro cell, Quartz (Beam height: 15mm) 100UL |
| 200UL | |
| 500UL | |
 | Sipper System |
 | Constant-Temperature System |
 | Constant-Temperature Sipper System |
 | Test Tube Holder |
 | Cylindrical Cell Holder |
 | Solid Sample Holder (Single Cell) |
 | Water-Jacketed Cell Holder |
 | 10mm Water-Jacketed 4-Cell Holder |
 | Milas Deuterium Lamp |
 | Halogen Lamp(Philips) |
 | Halogen Lamp(Philips) |
 | Halogen Lamp(Osram) |
 | Self Masking Cont. Flowthrough G.Cell (Beam height: 15mm) 5mm |
| 10mm | |
| 20mm | |
| 30mm | |
| Self Masking Cont. Flowthrough Q. Cell (Beam height: 15mm) 5mm | |
| 10mm | |
| 20mm | |
| 30mm | |
 | Thermal Printer |
Operating Manuals
1.Safety
2.Package Contents
3.Unpacking
4.Installation
4.1. Environment Required
4.2. Install Spectrophotometer
5.Overview
6.Symbols
7.Main Specifications
8.Description of Appearance and Keys
8.1.Appearance
8.2.Keypad
8.3.Description of Keys
9.Functions
9.1.Photometry
9.2.Quantitation
9.3.Wavelength Scan
9.4.Kinetics
9.5.DNA/Protein Measurement
9.6.Multi-wavelength
10.Getting Started
11.Important Guidelines
12.General Operating
13.Measuring
13.1.Photometry
13.2.Quantitation
13.3.Wavelength Scan
13.4.Kinetics
13.5.DNA/Protein Mode
1.Safety
Please follow the guidelines below, and read this manual in its entirety to ensure safe operation of the unit.
We recommends against the use of BSDBU-301 Spectrophotometer.

Do not open the device.
Disconnect the device from the mains supply before carrying out maintenance work or changing the fuses.
The inside of the device is a high-voltage area Danger!
Do not use the device if it is damaged, especially if the main power cable is in any way damaged or defective.
Repairs may only be carried out by the service technicians from us and authorized contractual partners.
The device must be connected to a power outlet that has a protective ground connection.
If the equipment is used in a manner not specified by the manufacturer, the protection provided by the equipment may be impaired.

Do not allow any liquid to enter into the device.
Do not operate the device in a hazardous location or potentially explosive environment.
2.Package Contents
Description | Quantity |
Spectrophotometer | 1PC |
10mm Glass Cuvette | 4PCS |
10mm Quartz Cuvette | 2PCS |
Power Cord | 1PC |
User's Manual | 1PC |
Dust Cover | 1PC |
3.Unpacking
Open the package, according to carefully check the packaging packing list items, if found inside the packaging are missing or damaged items please
contact us and authorized contractual partners.
4.Installation
4.1. Environment Required
To ensure the best performance, the following conditions are required:
The best working temperature range is 16-35°C and the humidity is 45-80%.
Keep it as far as possible away from the strong magnetic or electrical fields or any electrical device that may generate high-frequency fields.
Set the unit up in an area that is free of dust, corrosive gases and strong vibrations.
Remove any obstructions or materials that could hinder the flow of air under and around the instrument.
The power requirement is 110±11V/60±1Hz or 220±22V/50±1Hz.
Use the appropriate power cord and plug into a grounded outlet.
If the local voltage is not stable, a voltage regulator is required.
Be away from direct sunlight.
4.2. Install Spectrophotometer
Placement
Place the instrument on the stable table carefully.
Install Printer (Printer is Optional Accessories)
Check to confirm instrument power switch is turned off, connect the printer's data cable to the instrument's parallel port.
Link the Power Cord
Check to confirm instrument power switch is turned off, the power cord plug into two separate power interface and power supply socket apparatus.
5.Overview
BSDBU-301 Spectrophotometer is an electrical measure instrument which is widely used in the laboratories.
Use Frequency:Intermittence
Excessive Voltage(Current):No
Pollution Class:Class 1
6.Symbols
The following chart is an illustrated glossary of the symbols that are used in this manual.
 Caution, Danger!
 Caution, High Voltage!
 Caution, Hot!
 Ground
 Fuse
Fuse
 Recycle, this instrument will be called back by the appointed Electrical Treatment Department or by the original Manufacturer when wasted.
7.Main Specifications
Optical SystemDouble beam
Wavelength Range190-1100nm
Wavelength Accuracy±0.3nm
Wavelength Repeatability0.2nm
Photometric Range-0.3-3A, 0-200%T
Photometric Accuracy±0.3%T
Photometric Repeatability0.2%T
Spectral Bandwidth1.8nm
Stray Light0.05%T@220nm&360nm
Stability±0.001A/h@500nm
Work Mode
Photometry, Quantitation, Kinetics, Wavelength Scan, DNA/Protein, Multi Wavelength
Interface USB, Parallel(printer)
Power Requirement AC 110/220V, 50/60Hz
Dimensions 600x450x260
Weight 20kg
Work Environment 15-35°C, 15-70% relative humidity
Store Environment -10-50°C, 15-70% relative humidity
8.Description of Appearance and Keys
8.1.Appearance
Front View

Back view

1 LCD Display Lid of Sample Room
2 Sample holder
3 LCD Display
4 Keypad
5 USB Port(Type A, USB Memory)
6 Cover of Fan
7 Power Switch
8 Power Socket
9 LCD Contrast Adjust
10 Printer port
11 USB port (Type B, Communication)
8.2.Keypad

8.3.Description of Keys
 Function Keys: Functions on-screen prompts


…  Numeric Keys: Enter numbers and letters
 CLEAR Key: Delete the input value or stored data
 ESC Key: Return to previous Interface
 100%T/0Abs Key: Blank
 OPEN Key: Open files stored in internal memory
 SAVE Key: Save files to internal memory
 START/STOP Key: Start/Stop testing
 GOTO ʎ Key: Set wavelength
 PRINT Key: Print measuring result
 ENTER Key: Confirm operation
 CELL Key: Select/Deselect Auto-cell Holder

 RIGHT, LEFT Keys: Search peak/valley and set X scale

 UP, DOWN Keys: Scroll menu/data and set Y scale
9.Functions
9.1.Photometry
Display results as Abs, %T or Concentration.
9.2.Quantitation
We provide 2 methods to establish a Standard Curve:
2 methods to set up the regression curve.
Up to 10 standard samples to calibrate the regression curve.
3 methods for curve fit.
Linear fit, Quadratic fit and Cubic fit.
9.3.Wavelength Scan
Allow user to set scan step (0.1, 0.2, 0.5, 1.0 and 5.0nm).
Spectrum display mode can be changed (Wavelength-%Transmittance or Wavelength-Absorbance).
9.4.Kinetics
Allow user to set scan Interval (0.5, 1.0, 2.0, 5.0, 10, 30 and 60s).
Spectrum display mode can be changed (Time-%Transmittance or Time-Absorbance).
9.5.DNA/Protein Measurement
Wavelength points and ratios can be set up.
Results will be grouped into a table format automatically.
9.6.Multi-wavelength
Up to 10 wavelength points can be set up.
Results will be grouped into a table format automatically.
10.Getting Started
The following chart describes the basic operation of the instrument.
Turn On and Self-check
Switch on the power. Then the instrument begins to self-check and 15 minutes' warm up.
Self-check includes the following steps:
Turn on lamps → Check Sensor → Initialize AD → System position → Get Dark Current → Warm up.


Finished self-check, "System calibration" interface displays, press the keys , to select to do calibration or not.

After system do or skip calibration, instrument displays Main Interface.

11.Important Guidelines
Reagents and dilution buffers can cause cauterization and other damage to health.
Samples (nucleic acids, proteins, bacteria cultures) can be infectious and cause serious damage to health.
During sample preparation, measuring procedures and maintenance and cleaning work, observe all local laboratory safety precautions (e.g. wear protective clothing and gloves, use of disinfectant) regarding the handling of sample material.
Dispose of measuring solutions and cleaning and disinfectant materials in accordance with the relevant local laboratory regulations.
12.General Operating
Select Application
Main menu, press numeric keys or use the key  ,
,  to choose corresponding menu, then press
  to enter into.
Set Wavelength
Press  to set wavelength, use numeric keys to input the values, press to confirm and go to the point you set, then do blank automatically.
Set Parameters
Press function key to set parameters, press , to choose or input the values by numeric keys, press  to enter into, press to return.
Set Auto-cell Holder(Optional) Press  Press to active the auto cell holder") to active the auto cell holder and press the numeric key (1-8)to make corresponding cell position at the light path. Press again to inactive the auto cell holder.
to active the auto cell holder and press the numeric key (1-8)to make corresponding cell position at the light path. Press again to inactive the auto cell holder.
Delete the Input Value
Press  to delete a character, press
  to delete all the characters.
Delete the Test Results and Stored data
Press to delete the test result or stored data.
Blank
Put the Reference in the light path, press  to do blank.
Measure Samples
Put the samples in the light path, press  to measure.
Print the Test Results
Store the Test Results
Press  to store the test results, input the file name by numeric keys
and press  to save. If the USB Disk was installed, the data will save
in the USB Disk, or the data will save in the internal memory.
Load the Stored File
In the test interface, press  to go into file selecting interface,
press  ,
,  to choose the file you want, press to open. If the USB Disk was installed, the data will open from the USB Disk, or the data will from the internal memory.
13.Measuring
13.1.Photometry
Step 1.Start Photometry
Main menu, press numeric key  Or , to choose "Basic Mode", then press

.
Step 2.Set Photometric Mode
Press  to set photometric mode. Press , to choose "Abs.", "T%" or "Conc./Factor" and press to confirm. If users choose "Abs." or "T%", please go to step 5 directly.
Step 3.Set Concentration Unit
Press  to set concentration unit. Press , to choose unit followed with pressed to confirm. You can also choose "other" to input the unit.
Step 4. Set "Factor" or "Standard"
Two methods are under your choice:
Method 1:Input Factor F
Press  to set F. Input the value of F by numeric keypad, press to confirm. Then the F value would display on the screen.
Method 2:Use Standard Sample
Put the reference sample in the light path and calibrate 100%T/0Abs; Put the standard sample in the light path,press to start the mark. Input the concentration value of the standard and press to confirm, then it displays on the screen.
Step 5.Set Wavelength
Press to set wavelength, input the value by the numeric keypad
followed with Pressed to confirm.
Step 6. Measure samples
Put the sample to be measured in the main light path and put Reference in the reference light path, then the result displays on the screen automatically.
13.2.Quantitation
Step 1. Start Quantitation
Main menu, press  or press , to choose "Quantitative Mode"
followed with Pressed to confirm.

Step 2. Set Unit
Press to set concentration unit, press , to choose and press to confirm.
Step 3.Establish Standard Curve or load the stored curve
Press to go into set up interface, 2 methods are under your choice.

Establish Standard Curve:
Method 1: Input Regression Equation
1) Set Fit Curve Method. Press to set Fit method,use ,
to choose the method and press to confirm.
2) Set Wavelength. Press  Set Wavelength. Press to set wavelength. Use") to set wavelength. Use , to choose measure method, then press to confirm. Input the wavelength value you need and press to confirm.
to set wavelength. Use , to choose measure method, then press to confirm. Input the wavelength value you need and press to confirm.
3) Setup Standard Samples. Press to setup standard, input the
concentrations of corresponding standard samples according the
indication and press to confirm. Users can use , to
choose the value you just input and press to delete, then
input a new value, press to confirm. Press to cancel
after all the input.
 Setup Standard Samples. Press to setup standard")
4) Calibrate Standard Samples. Put the corresponding standard samples in the main light path and put Reference in the reference light path as the screen indicates and press to measure. Then the Abs. value would appear in the corresponding table.Load the Stored CurvesIn the "Calibration Table"interface, press to go into files select interface. Use , to select the curve you need and press to load.

Load the Stored Curves
In the "Calibration Table" interface, press  to go into files select interface. Use , to select the curve you need and press to load. Users can press
  to view the curve.

Step 4. Return the sample measurement interfaceIn the "Calibration Table" interface, press  to return the Quantitative Test interface.

Step 5. Measure Samples
Place the sample to be tested in the light path, press  to measure.Then the test result will display in the data sheet. Repeat this step to finish measuring all the samples.

13.3.Wavelength Scan
Step 1. Enter into Wavelength Scan
Main menu, press  numeric key or , to choose "Wavelength Scan" and press to enter.

Step 2. Parameters Setup
Press  to set parameters, set "Scan From" , "scan to", "scan step"and "scan speed", press to confirm.
Step 3. Set Photometric Mode
Press  to set photometric mode,choose "T%", "Abs." or "E" and press to confirm.
Step 4. Scan Samples
Put the sample to be measured in the main light path and put Reference in the reference light path, press to scan the sample, press  to cancel.

Step 5. Search Peaks
After scanned, press  to go into peak search mode. Press to set peak height, input the peak height and press to confirm.Press
  ,
,  to display the value of every wavelength point. Press , to display the value of every peak.

Step 6. Smooth the Curve
After scanned, if there are many burrs on it, press  to smooth the curve.
13.4.Kinetics
Step 1. Enter into Kinetics
Main menu, press  or , to select "Kinetics Mode" and press to confirm.

Step 2. Setup Parameters
Press to set parameters, input the corresponding values of"Total Time", "Delay Time" and "Time Intervals" according the screen indicates. Press to confirm.
Step 3. Set Photometric Mode
Press to set photometric mode, choose "T%" or "Abs." and press to confirm.
Step 4. Set Wavelength
Press to to set wavelength, input the value of the wavelength by numeric keypad and press to confirm
Step 5. Measure Samples
Put the sample to be measured in the main light path and put Reference in the reference light path, press to begin the test, press to cancel.

Step 6. Calculate Response Rate
After time scanned, if users want to calculate the response rate of some period, you can press to go into "Process" interface. Input the values of "Begin Time", "End Time" and "Factor" separately and press to confirm. Then the value of "I.U." would display on the screen.

Step 7. Search Peaks
After scan finished, press to go into search mode. Press , to search the value of every point.

13.5.DNA/Protein Mode
Step 1. Enter into DNA/Protein Mode
Main menu, press  or , to choose "DNA/Protein Mode" and press to confirm.

Step 2. Setup Parameters
Press to set coefficients, input all the values of f1 to f4 by numeric keypad according the indication and press to confirm.
Step 3. Choose Measure Method
Press to set method. Press , to choose "Absorbance Difference 1" or "Absorbance Difference 2" followed with pressed to confirm. If users don't want to measure reference, use , to choose "No" followed with pressed to confirm the choice.
Step 4. Set Concentration Unit
Press to set concentration unit. Use , to select unit and press to confirm.
Step 5. Measure Samples
Put the sample to be measured in the main light path and put Reference i