


Biological Indicator Incubator BIBI-201
- Sea, Air, Door to Door Shipping
- 1 Year Warranty
- US & European Standards
Biological indicator incubator- Series helps assure the sterility of instruments, vials, media and other products in very short time. It also provides easy evaluation of incubation temperature.
- Unique designed. Small size, light weight, portable, and suits on various occasions.
- LCD display. Temperature and time display simultaneously.
- Auto fault detect and buzzer alarm. Temperature calibration function.
- 24V DC power supply input, low energy consumption. Built-in over- temperature protection device, safe and reliable.
Specification
Features
Applications Optional Accessories
| Temperature Control Range | RT+5°C~100°C |
| Temperature Setting Range | 5°C~100°C |
| Temperature Stability@56°C | ±0.5°C |
| Temp. Display Accuracy | 0.1°C |
| Heating Speed | <6min (20°C to 56°C) |
| Time Range | 1sec~999sec or 1min~999min |
| Voltage | DC 24V adapter |
| Power | 60W |
| Dimension (WxDxH) | 110x156x92 mm |
| Net Weight | 1kgs |
- Unique designed. Small size, light weight, portable, and suits on various occasions.
- LCD display. Temperature and time display simultaneously.
- Auto fault detect and buzzer alarm. Temperature calibration function.
- 24V DC power supply input, low energy consumption. Built-in over- temperature protection device, safe and reliable.
- Timer function. Time range from 0 to 999 min.
- Variety of standard sample blocks for choice. Convenient for replacement. Block can be cutomized.
Environmental protection, Research institutes, University laboratories
| Accessory Code | Name | Description |
| 2905615006 | Block A | 15 x Φ10mm |
| 2905615007 | Block B | 12 x Φ12mm |
| 2905615008 | Block C | 6 x Φ15mm |
| 2905615009 | Block D | 6 x Φ16mm |
| 2905615010 | Block E | 18 x Φ9mm |
| 2905615011 | Customized | Customized |
Operating Manual for BIBI-201
1 Introduction
1.1 Instrument Content
1.2 Structure
1.3 Installation
2. Specification
3. Safety Warning
4. Operation Guide
4.1 Key Function
4.2 Programming
4.3 Time Unit Changing
4.4 Program Start and Stop
5. Maintenance
4.5 Temperature Calibration
6. Failure Analysis and Trouble Shooting
Appendix 1
PACKING LIST
1 Introduction
biological indicator incubator is best designed instrument which is microprocessor-controlled. It is widespread used for samples of the preservation and reaction, DNA amplification, foreseeability of electrophoresis and so on. Please do read this operation manual carefully before using the instrument.1.1 Instrument Content
biological indicator incubator - 1setPower Adapter - 1pieceOperation Manual - 1piece
1.2 Structure
1.3 Installation
1.3.1 Put the instrument on the working table reposefully.1.3.2 Connect power and instrument through the power adapter. Power voltage should during 100-240V~
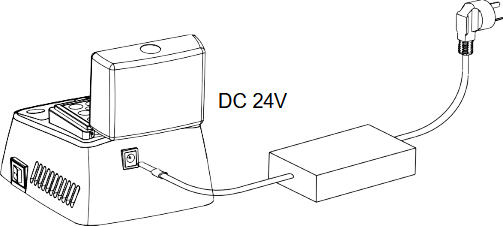

1.3.3 Turn on the power switch on the right side. The incubator runs the program to the setting temperature automatically. Heating always costs 15 minutes.
1.3.4 When it achieves the setting temperature, put the tubes into the
block, close the thermo lid.
2. Specification
| Type | BIBI-201 |
| Power Input | DC24V |
| Power | 60 W |
| Temperature Range | RT+5°C ~100°C |
| Timing Range | 1min - 999min or 1sec - 999 sec |
| Temp.Control Accuracy | ≤± 0.5°C |
| Display Accuracy | 0.1°C |
| Heating Time (from 20℃ to 100℃) | ≤15min |
| Ambient Temperature | 5°C~35°C |
| Dimension(W×D×H) | 110mm×156mm×92mm |
| Net Weight | 1.0Kg |
3. Safety Warning
 The incubator is a normal and an indoor using instrument. Read operation manual carefully before operation.Only the expert of wiring equipment can operate this instrument. The operator should not open or repair the instrument by himself. Otherwise, the instrument will lose the qualification of repair guarantee or cause accidents. The company will repair the instrument based on warranty description. The instrument should be put in the place where of low tem perature, little dust, no water, no sunshine or hard light, and of good aeration, no corrosively gas or strong disturbing magnetic field, and far away from central heating, camp stove and other hot resource. Do not put the instrument in wet and dusty place.
  Main switch is on the rear of the device. Push “I” to power on the device, and push “O” to power off the device.
  Power input interface is on the rear of the instrument. Power voltage input is DC12V/24V. Input is anode, outer ring is cathode. Power off when operation finished. If long period do not use the instrument, pull off the connector plug, cover a cloth on the instrument to prevent from dust.
4. Operation Guide
4.1 Key Function
START/STOP----Start or stop the operation programPROG.-------------Select operation program
 ----------------Set Temperature or Timing value
 ----------------Enter value set or move cursor
4.2 Programming
Press “PROG.”, select option program, e.g. P2. Press “ ” to enter temp setting. Press “ ” to move cursor. Press “
  ” or “ ” to set timing. Two segments could be set in each program. “
  ” indicates temp. or timing of segment 1. “
  ” indicates temp. or timing of segment.
4.3 Time Unit Changing
Press “ " 2 seconds under timing setting, timing unit alternatively changes between min and sec.

 Press”
  ”to select min or sec. Press “ ” to confirm.
4.4 Program Start and Stop
4.4.1 Press “PROG.”, nine preset programs P1,P2,P3,P4,P5,P6,P7,P8, P9 could be selected.4.4.2 When power on, the temperature rises to setting temperature of segment 1 automatically. It display “NOTOK” when heating while it display “OK” when it achieves the setting temperature.
 4.4.3 Press “START” to run the segment 1. “ ” which indicates segment 1 flickers. When segment 1 finishes, the program starts segment 2. “ ” which indicates segment 2 flickers, and it begins to count down.
4.4.4 Buzzer alarm when it counts to 0 at segment 2. “PROGRAM END” displays on LCD. The incubator keeps the temperature of segment 2.
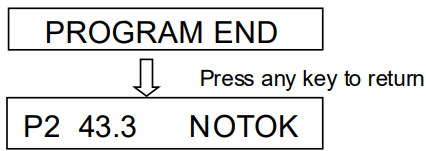
Press any key to return the operating interface. It turns to the setting temperature of the current segment. When it achieves, “OK” is displayed on LCD. Press “START” to run the program again.
4.4.5 Press “START/STOP” continuously for 1 second, program stops, timing ends.
5. Maintenance
Please make periodic cleaning for wells in block with alcohol mull. Use mull with clean paste to clean surface of the instrument. Power off before cleaning the instrument. It is forbidden de canting cleaning fluid into the well of block.4.5 Temperature Calibration
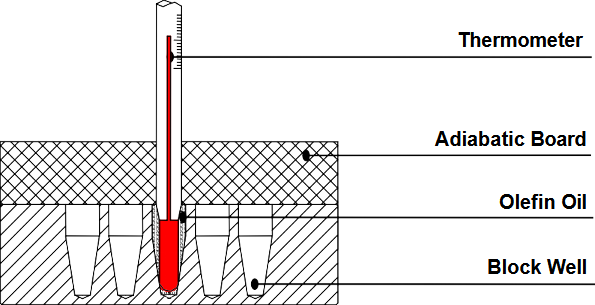
If there is deviation between the actual temperature and the displayed temperature, you can calibrate as follows.NOTICE: The instrument uses two temperatures adjustment to ensure its veracity. It is linearly adjusted on 40C, and 100C. The temperatureveracity will be within ±0.5C after the double temperature adjustment.Both the circumstances and the block temperature should be lower than 35C when calibration.
Notice: The temperature of the instrument has been adjusted before it is sold. Do not use this function self-will
Adjustment Methods
4.5.1 Start up the instrument, it enters waiting interface.
4.5.2 Inject olefin oil into one of the cone-shaped wells. Put a thermometer into this well (the precision of the thermometer should be 0.1. The temperature ball should be absolutely immerged into the coneshaped well). Heat insulation material is needed on the block to separate it from the circumstance. Refer to Figure A
6. Failure Analysis and Trouble Shooting
Appendix 1
Wiring Diagram of biological indicator incubator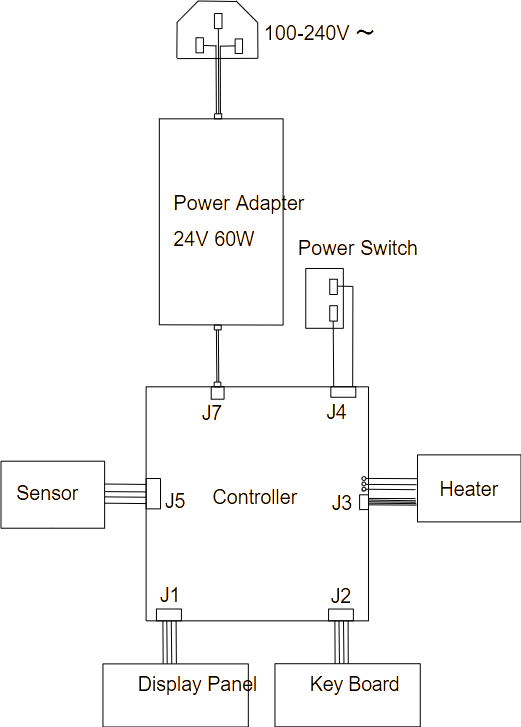
PACKING LIST
| serial | description | type | quantity |
| 1 | Instrument | BIBI-201 | 1set |
| 2 | Power Adapter | DC24V 60W | 1piece |
| 3 | Operation Manual | 1piece | |
| 4 | Warranty Card | 1piece |