


-86°C ULT Freezer Upright BFUR-86-308
- Sea, Air, Door to Door Shipping
- 1 Year Warranty
- US & European Standards
Freezers designed for daily sample protection and dependability. Environment friendly with safety features, these freezers provide outstanding thermal stability for a huge amount of samples. Modify your requirements with several optional features including chart recorder, CO2 back-up system, storage racks and remote alarm system.
- Settable high temperature and low temperature alarms
- Automatic clean-filter alarm and sensor error alert
- Adjustable storage shelf height
- Unique insulated inner door design for four separate storage compartments to minimize frost buildup inside the chamber
Specification
Features
Applications
| Capacity | 588 L |
| Temperature Range | -40°C to -86°C |
| Ambient Temperature | 10°C ~ +32°C |
| Temperature Increament | 1°C |
| Defrosting | Manual |
| Cooling Type | Direct Cooling |
| Insulation Material | PURF |
| Refrigerant | Mixed-gas |
| Internal Dimension | 606x738x1310 mm |
| Overall Dimension | 872x1192x1994.5 mm |
| Package Size | 970x1138x2185 mm |
| Drawers/Shelves | Stainless steel shelf/3 |
| Interior | Stainless steel |
| Exterior | Color sprayed steel |
| Controller | Microprocessor, Digital display |
| Sensor | PTC |
| Compressor Brand/QTY | SECOP/2 |
| Evaporator | Submerged coil evaporator |
| Evaporator Material | Copper tube evaporator |
| Condenser | Copper tube and finned |
| Noise Level | 53 db |
| Alarm | High/low temperature, Power off, Sensor malfunction, Abnormal voltage, Filter screen check, Thermostat failure, Low battery, Condensor clean, High ambient temperature, Door ajar |
| Standard Accessories | Castor, Inner doorx2, Test hole 1/25 mm, USB port |
| Optional Accessories | Data logger, CO2 backup system, LN2 backup system, Temperature recorder, Storage racks and storage box |
| Weight (Net/Gross) | 303 / 332 kg |
| Rated Power | 1400 W |
| Power Consumption ( Kwh/24hrs ) | 12.5 |
| Rated Current A | 8.5 |
| Power Supply | 220V, 50Hz |
- Settable high temperature and low temperature alarms
- Automatic clean-filter alarm and sensor error alert
- Adjustable storage shelf height
- Unique insulated inner door design for four separate storage compartments to minimize frost buildup inside the chamber
- Specialized control system design for a well-balanced operation of cascade refrigeration system
- Audible and visible alarm
- Door open feature standard and USB port for temperature date downloading standard on upright models
- Remote alarm contacts
- Unique door seal design for the minimum loss of cold temperature during a door opening
- High performance VIP insulation panels to minimize cabinet heat gain and to improve temperature stability
Preservation Of Plasma, Microbial Cultures, Tissues, Cell Lines, Clinical, Industrial, Research
Operating Manual for BFUR-86-308
1. Preface
2. Safety Instruction
2.1 Prohibition
2.2 Warning
2.3 Cautions
3. Installation Instruction
3.1 Installation Location
3.2 Installation Steps
3.3 Application
4. Operation Instruction
4.1 Structure
4.2 Turn On
4.3 Home Interface of Temperature Controller
4.4 Record Download
4.5 Setting Interface of Temperature Controller
4.6 Status Interface of Temperature Controller
4.7 Log In Interface of Temperature Controller
4.8 Remote Alarm Port
4.9 Alarm Code
5. Maintenance
5.1 Before Maintenance
5.2 Clean the Freezer
5.3 Clean the Condenser Filter
5.4 Defrost
5.5 Battery Maintenance
6. Troubleshooting
7. Packing List
1. Preface
Thank you for choosing and using our equipment. Please read this manual carefully before using the device and keep it properly for future reference.This manual contains important safety advice. Ignoring the following <Safety Instruction> may cause damage to the equipment and/or user injury.
The user is responsible for any damages to the device caused by ignoring the requirements of this manual during use.
The user is responsible for any personal injuries caused by ignoring the requirements of this manual during use.
If the functions and appearance of the device are updated, the new device is inconsistent with the device
listed in this manual, please refer to the actual product.
Service life of the device: 8 years
Please contact us or our authorized distributors if any points in this manual are unclear or if there are any inaccuracies.
Meaning of Symbols:
🚫 Prohibition: This symbol means an action is prohibited. Ignoring this sign may cause personal injury and may result in serious injury or death.
⚠️ Warning: This symbol means risk warnings. Ignoring this sign may cause damage to the equipment and/or personal injury.
⚡ Cautions: This symbol is used for operation reminders. Special attention is required when using the device.
Warning Labels:
 Be careful not to pinch your hands.
 Be careful to prevent electric shock.
 Be careful to keep the device away from fire.
 Watch your fingers to avoid being hurt by the fan.
 Be careful to wear protective gloves when taking out and putting in items.
 Turn the handle to open the door.
2. Safety Instruction
2.1 Prohibition
🚫Only authorized technicians are allowed to install, move, disassemble, and repair this device. Do not do these by yourself. Unauthorized personnel's improper operation may cause electric leakage, shock, personal injury, or fire.🚫Do not install the device outdoors or in damp or splashing water areas. Exposure to rain and moisture will cause rust and reduce its electrical insulation properties, which may cause electric leakage, shock, and fire. If installation in a damp area is unavoidable, please use an electric leakage breaker to avoid electric shock.
🚫Do not install the device in a place with acidic or corrosive gases or liquid, otherwise, the device may be corroded and cause electric leakage or shock.
🚫Do not install the device in a location with flammable or volatile substances. Do not use any flammable or volatile substances around the device. This may cause explosions and fires.
🚫Install the device on a solid, level floor that can hold the weight of the device. Adjust the adjustable feet or casters on the bottom of the unit until they are firmly in contact with the floor (only available for the device with adjustable feet or casters). If the floor is unstable or uneven, or the device is not installed properly, it may cause unusual noise and vibration. In severe cases, device tipping or falling may cause serious personal injury.
🚫If the device has a CO2/LN2 backup system, make sure the device is installed in a well-ventilated room. Otherwise, the room may be severely starved of oxygen due to CO2/LN2 leaks.
🚫Connect the device to the power source indicated on the nameplate. Using other power sources may cause device failure, electric shock, or fire.
🚫Please connect the device to a dedicated power socket with a ground wire. Do not connect the ground wire of the socket directly to the ground, lightning rods, telephone wires, gas pipes, water pipes, and other objects, to prevent electric shock, fire, or explosion caused by poor grounding. Do not connect the device to extension cords or an electrical outlet divider as this may cause a fire due to overheating of the electric circuit.
🚫Please remove dust from the plug before connecting it. Dusty plugs may cause electrical leakage or fire. During daily use, please clean the plug regularly.
🚫Make sure the plug is fully inserted into the socket. Poor connections may cause electric shock or fire.
🚫Do not cut, shorten, scratch, convert, bend, pull, or tie the power cord. And do not put any heavy objects on it. Make sure the cord is not being pinched. Any damage to the power cord may cause fire or electric shocks.
🚫Pull on the plug, not the power cord when unplugging the device. Or it may cause overheating and fire due to the internal damage of the power cord.
🚫Use the switch to turn the device on and off, not the plug. Plugging or unplugging the device while it works may cause a short circuit or electric shock.
🚫Do not touch any electrical parts such as plugs or switches with wet hands, as this may cause electric shock.
🚫Do not pour water onto the device or clean the device with water directly, otherwise, it may cause electric shock or fire.
🚫Do not put heavy objects or containers with liquid on the device. If the object falls, it may cause serious personal injury. And the spilled liquid will cause rust and reduce the electrical insulation properties of the device. In severe cases, it may cause electric leakage, shock, and fire.
🚫Do not climb on this device, if the device tips over, it may cause serious personal injury or damage to the device.
🚫Do not hang on the door. If the door comes off or the device tips over, it may cause serious personal injury or damage to the device.
🚫Do not store acidic or corrosive substances in this device. This may cause internal components or electrical parts of the device to be corroded and damaged, and cause electric leakage or fire.
🚫Do not store any form of volatile, flammable, or explosive substances (such as ether, benzene, propane, or glue) in this device, since they may cause explosions and fire.
🚫Do not store any objects or containers with liquid in this device (unsealed). If they tip over inside the device, the spilled liquid may cause electric shock or fire.
🚫When storing hazardous or radioactive materials, use this device in a safe area. Improper use may cause serious environmental pollution and personal injury.
🚫Do not put your fingers or other objects into vents or air intakes, it may cause device failure, electric shock, or personal injury, because there is a high-speed rotating fan inside.
🚫Do not use knives or sharp tools to defrost the device. There are cooling pipes behind the inner wall of the device. If the inner pipes or electric wires are damaged, it may cause a breakdown or personal injury. Also, do not make holes in the device to install other accessories.
🚫Do not touch the condenser directly when the filter net is removed for cleaning. This may cause injury by the hot surface (Only available for the device with filters).
🚫Turn off and disconnect the power supply plug if there is something wrong with the device. Continued abnormal operation may cause electric shock or fire.
🚫Turn off and disconnect the power supply plug before moving the device. Take care not to damage the power cord. A damaged cord may cause electric shock or fire.
🚫Turn off and disconnect the power supply plug before repairing or maintaining the device to prevent electric shock or injuries.
🚫Do not touch the device when refrigerant leaks, and turn off the pipeline valves of flammable gas in the room promptly (If there are gas valves).
🚫Unplug the power cord when stop using the device for a long time. In case the aging of the power cord leads to electric shock, leakage, or fire.
🚫Do not put plastic packages where are accessible to children, or it may cause suffocation.
🚫Children are not allowed to have access to this equipment. If the device is installed in an unattended area or is unused for an extended period, make sure the device is not accessible to children to prevent possible electric shock or suffocation from being accidentally locked inside the device.
🚫It's better to exchange the device if its service is reached, aging of electrical components and circuits may cause a breakdown, electric shock, or fire. If you still insist on using this equipment, please increase the frequency of inspection and maintenance to prevent accidents.
🚫The disposal of the device should be accomplished by appropriate personnel. Always remove doors to prevent accidents such as suffocation.
2.2 Warning
⚠️Only authorized and trained operators are allowed to use this device.⚠️If the operator encounters a situation not mentioned in this manual, do not handle it by yourself, otherwise it may cause a breakdown. Please contact us or our authorized distributors to inquire about the correct handling method.
⚠️Please use the accessories provided by us, otherwise, it may cause a breakdown. If using other accessories is unavoidable, contact us to confirm whether the accessories meet the requirements.
⚠️Do not place glass bottles or jars in this device, as they may break due to freezing, and cause personal injury (only for deep freezers).
⚠️Wear protective gloves when removing frozen items from the device. Touching frozen items or the inside walls with bare or wet hands may cause frostbite.
⚠️During daily use, please ensure that there are no foreign objects in the door seal, otherwise, it will cause severe frost or ice on the device and reduce the refrigeration performance.
⚠️Always hold the handle when closing the door to prevent your fingers from being pinched.
⚠️At least 2 staff working together is necessary when moving the device. Before moving, unlock the castors or adjustable feet (if the device has them) and be careful not to tip over the device during movement to prevent damage or injury.
⚠️Do not turn on the power for 1 hour after moving, which may cause a breakdown.
⚠️Inspect and maintain the device at specified intervals.
⚠️Wear gloves when maintaining or repairing this device to avoid injury from sharp edges.
⚠️Be careful not to inhale medications or suspended matter in or around the device when maintaining or repairing this device. These may be harmful to your health.
⚠️Clean the filter or condenser of the device every 6 to 12 months (depending on the room's cleanliness. If there is a lot of dust, the filter or condenser will be blocked, and cause poor refrigeration performance or a breakdown.
⚠️Do not clean the device with scrubbing brushes, acid, thinner, solvents powdered soap, cleanser, or hot water. These agents can scratch the paint or cause it to peel. Plastic and rubber parts can be easily damaged by these materials, especially solvents. When a neutral detergent is used to clean the device, wipe off the neutral detergent with a wet cloth.
⚠️Do not change the factory setting parameters of the device, or it may cause a breakdown and damage to the device.
⚠️Check the settings before restarting the device after maintaining, repairing, power outage, or shutting off the power to prevent the loss of preset parameters. Changes to settings may damage stored items.
2.3 Cautions
⚡This device is not a quick-freezing equipment and cannot be used to quick-freeze items. This device is only used for long-term storage of temperature-sensitive materials or items.⚡This device cannot improve the status or activity of stored items.
⚡The device does not have therapeutic functions and cannot be used for treatment.
⚡This device is non-sterile and non-sealed. Do not store radiation, toxic, radioactive, or infectious items that are not isolated and sealed.
⚡The device does not discharge liquids, chemicals, or waste.
⚡Install the device in an area with low temperature and humidity. If the device is placed in direct sunlight or near a heat source, it may cause poor refrigeration performance.
⚡Leave enough space between the device and the wall. Do not block the air intake and outlet of the device. Small spacing will affect its heat dissipation and cause poor refrigeration performance.
⚡If the surrounding temperature is outside the optimum range (10°C~32°C), it may cause a breakdown.
⚡This device has an alarm system. When the device breaks down, it will have audible and visual alarms. When first used, the alarm system will stop working for 3 to 8 hours (depending on the model number).
⚡When first used, the device may keep making loud noises and its surface may overheat. This is normal and will alleviate when the device reaches the set temperature.
⚡The temperature is not the same at different points inside the device. The displayed temperature on the controller is a calculated average temperature. If you use a temperature measuring instrument to test the inner temperature of the device, the measured value may be different from the value displayed on the device, this is normal.
⚡Do not put in items until the device has reached the set temperature and the inner temperature is stabilized. During daily use, do not put too many high-temperature items in the device at one time, otherwise, the inner temperature will rise significantly and cause an alarm. For ultra-low temperature freezers, please precool the items to -20 to -40°C before put in the device.
⚡Before storing anything, make sure the inside of the device is clean.
⚡Do not store items that are too wet, otherwise it may cause frost or ice inside the device, and cause bad or abnormal refrigeration performance.
⚡Do not store living creatures in this device.
⚡The device does not involve the storage period/life of stored items.
⚡The temperature inside the device will rise during a power outage or the device fails. If it cannot be repaired in time, please take out the stored items and transfer them to other normal working devices to avoid damaging the stored items.
⚡If the device does not have a remote alarm function, please ensure that the device is patrolled 24 hours a day. Otherwise, no one may notice when the device fails or has a power outage, and cause the stored items to deteriorate due to overheating.
⚡When using the device, please follow the requirements of this manual and the tips and warning labels on the device. Otherwise, it may cause danger or cause poor performance of the device.
⚡Please consult the relevant local government authorities if you need to discard the packaging materials or the spare parts of the device.
⚡To maintain the device on time and to quickly check the maintenance and repair records of the device when it fails, please prepare a maintenance and repair record form for this device.
3. Installation Instruction
3.1 Installation Location
This product is designed at 25℃ ambient temperature, a relative humidity of 80%, and is only able to work in a specified environment, or it will affect the refrigeration performance, even causing a breakdown. Exceeding this state may cause damage to the refrigeration system.Recommend Installation Locations:
- Ambient temperature: 10 to 32°C
- Relative humidity: Below 80%
- Enough space: Leave at least 30cm between the device and the wall.
- Radiant heat: No direct source of radiant heat
- Power supply: See nameplate
- Socket: Grounded socket
3.2 Installation Steps
- Remove all packing materials.- Move the device to where it needs to be installed and then fix the castors. See the pictures below.
- Install the limit block on the back panel of the device. See the pictures below.
- Clean the device.
- Wait at least 8 hours, then power and turn on the device.
- If the compressor does not run or the machine shakes violently, please turn off the device and contact us for help.
- If the device works normally and the inner temperature starts dropping, keep it empty and running until it reaches the setting temperature.
- Put in the items, the installation is completed.
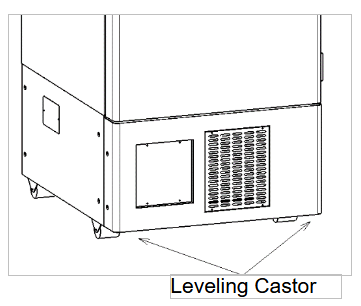
Figure 1
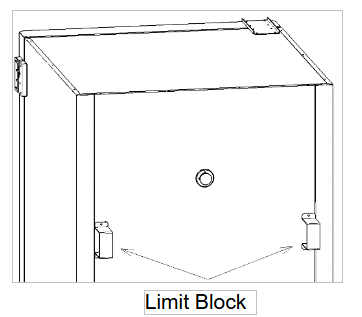
Figure 2
3.3 Application
- User can adjust the set temperature of the device according to their own needs in the allowed temperature adjustment range. After setting, lock the keyboard to avoid errors caused by incorrect operations.- Do not store items that are not allowed, see <Safety Instruction>.
- Keep your keys properly.
- It's better to control the door opening time within 1 minute.
4. Operation Instruction
4.1 Structure
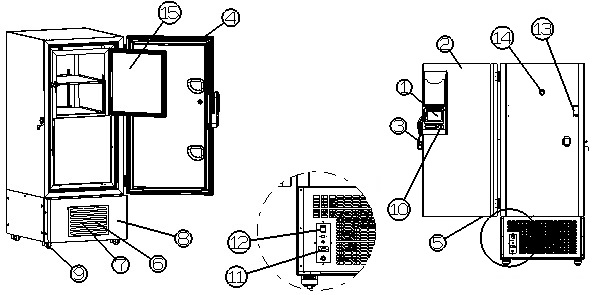
Figure 3
1. Control panel: Display the current inner temperature, running status, records, and alarms.
2. External Door: When closing the outer door, please close it tightly to prevent cold air leakage.
3. Handle: Hold the handle to open and close the external door.
4. Magnetic door gasket: Please keep it clean to prevents cold air leakage.
5. Door open sensor: Test the door is closed well or not.
6. Air intake grille: Do not block it to keep proper cooling performance.
7. Condensing filter (behind the grille): Make sure the air inlet of the refrigeration system is clear. If the condenser filter is dirty and blocked, open the grille to clean the filter.
8. Cooling system front panel.
9. Caster: The freezer height can be adjusted by the leveling castors. Keep the appliance horizontal during installation. Make sure the 4 castors are all well in contact with the floor to prevent noise and vibration.
10. USB port (below the screen): Download temperature and alarm records (10,000 records).
11. Remote alarm dry port: Connect your alarm device to the dry port, this port will supply alarm signals to the alarm device.
12. Power switch: Turn on/off the freezer with this switch.
13. Limit block: Install this part to limit the space between the back panel of the freezer and the wall.
14. Test hole (Access port): Used for leading a cable and sensor of a measuring appliance.
15. Inner door: Open and close quickly to prevent temperatures from rising too much. Lock the door latch completely when the door is closed. The door is removable for cleaning or defrosting.
16. Sensor Box: If sensor error, open this box to check and repair the sensors.
4.2 Turn On

Figure 4
Turn on the ‘Power switch’ of the freezer, and the touch screen will enter the ‘Language Selection’ interface, press ‘Next’ to enter the ‘Initial Setting’ interface (Date, Time, Temperature Unit)
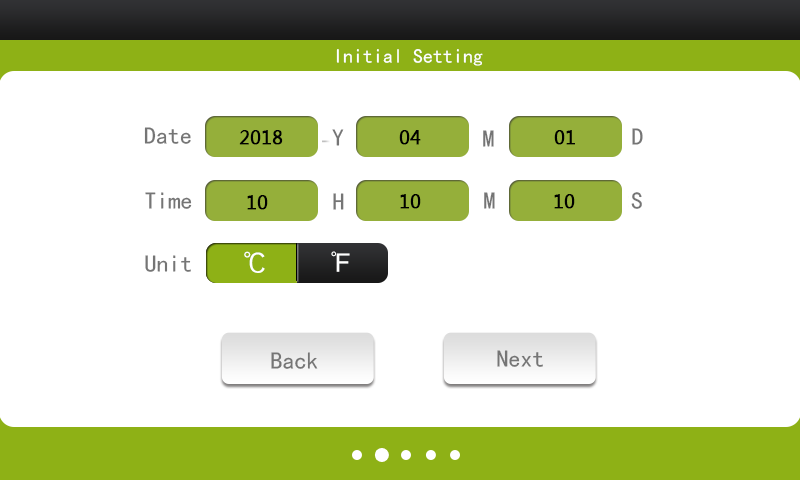
Figure 5
Click the numbers in this interface to adjust ‘Date’ and ‘Time’ values, then choose a temperature display mode (°C/°F), then press ‘Next’ to enter the ‘Mode Selection’ interface.
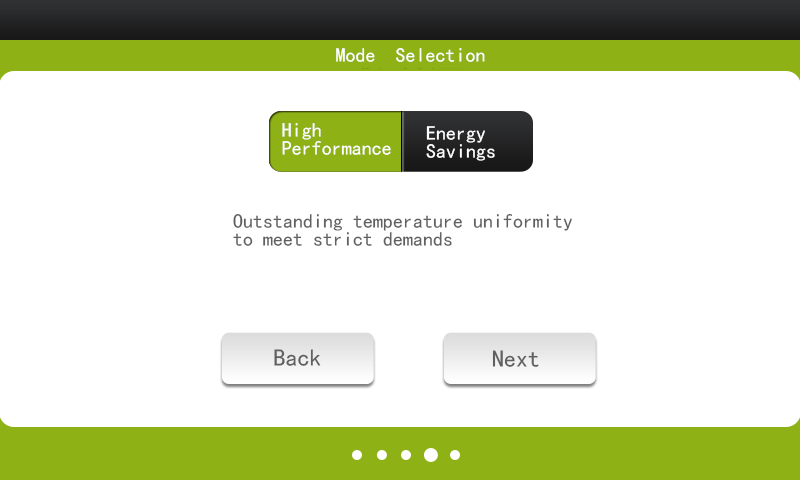
Figure 6
Please choose ‘High Performance’ mode in this interface when first used, then press ‘Next’ to enter the ‘Authorization Mode Selection’ interface.
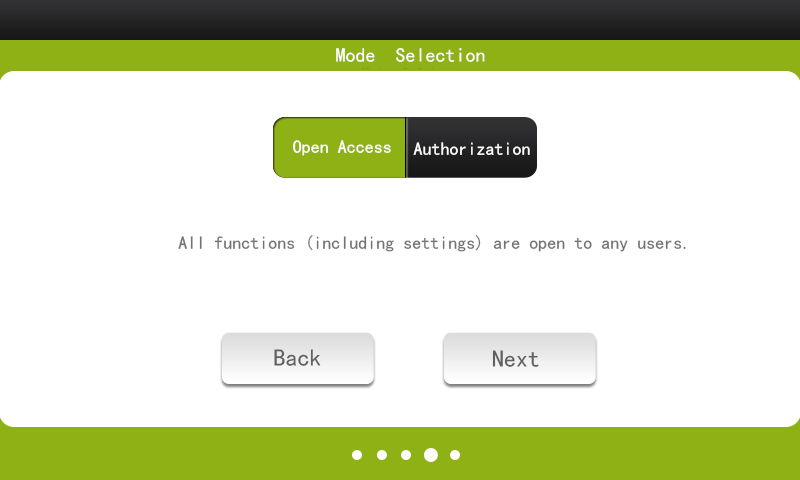
Figure 7
• Open Access: Enter the system without a password.
• Authorization: Enter the system with a password.
• Select ‘Open Access’ when first used. If you want to change to ‘Authorization’ mode, press the ‘Log in’ button on the ‘Home’ page after you enter the system, then select ‘Authorization’ mode, and set your password.
4.3 Home Interface of Temperature Controller
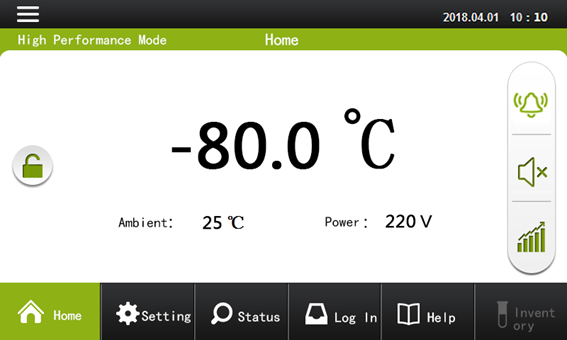
Figure 8
• The middle area displays the current inner temperature.
• Ambient displays current ambient temperature.
• Power displays current input voltage.
•
 Unlock: Unlock the screen before you can operate it, if unlocked after 3 minutes without any operation, it will automatically be locked again. This icon is red when the screen is locked.
•
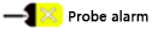
 Operating status: When the device is normally running, the color is green. Click to query all alarm information.
•
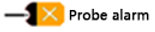
 Operating status: When the device is abnormally running, this indicator will turn yellow and flicker, and the freezer will beep at the same time. The screen will display the alarm code.
•
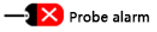
 Operating status: When the device fails, this indicator will turn red and flicker, and the freezer will beep at the same time. The screen will display the alarm code.
•
 Mute: Press the ‘Mute’ button when alarmed to stop the beeping sound.
•
 History curve: Check and download history temperature records.
4.4 Record Download
Press button on the ‘Home’ interface, and then you will enter the ‘History Curve’ interface.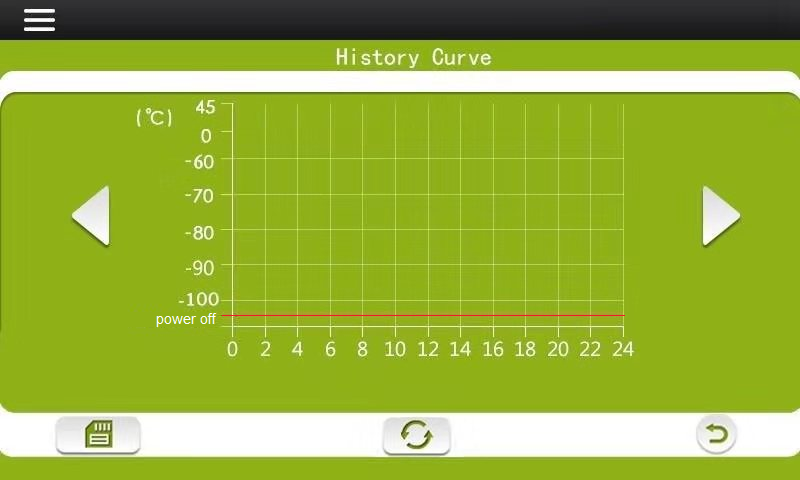
Figure 9
Insert UBS flash disk (USB port is below the touch screen). Press
 button and wait for the record download
When the interface appears: ‘Data saved, pull it out’, it means the data downloaded is finished.
4.5 Setting Interface of Temperature Controller
Press button on the ‘Home’ interface, then you will enter the ‘History Curve’ interface.
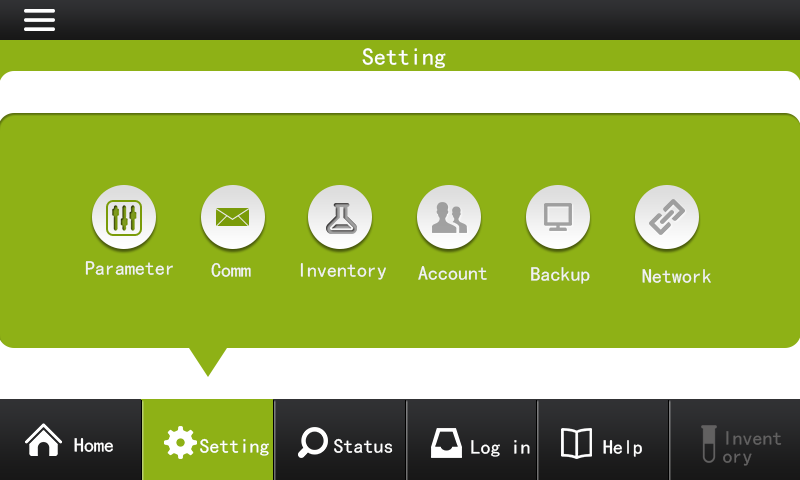
Figure 10
• Parameter: Adjust the parameters’ settings in this interface.
• Comm: Not available now.
• Inventory: Not available now.
• Account: Account setting interface.
• Backup: Not available now.
• Network: Not available now.
Press
 button to enter the ‘Parameter Setting’ interface.
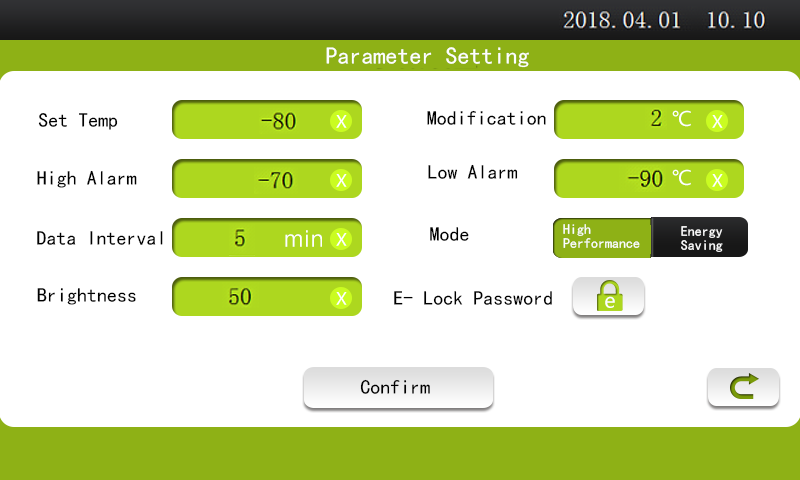
Figure 11
• Set Temp: Adjust the current setting temperature of the freezer (recommended set value is -80°C)
• High Alarm: Adjust the high-temperature alarm setting value (when the inner temperature is over this value, the freezer will have high alarms).
• Low Alarm: Adjust the low-temperature alarm setting value (when the inner temperature is lower than this value, the freezer will have low alarms).
• Data Interval: Adjust the record saving interval.
• Brightness: Adjust the brightness of the screen.
• Modification: Adjust the sensor modification value (All the sensors have been calibrated in the factory, do not adjust this value by yourself, or it may cause errors).
• Mode: Choose the running mode of the freezer.
• E-Lock Password: Not available now.
⚡ Cautions:
• After the adjustment is finished, press ‘Confirm’ to save the operation and exit.
• All the parameters have been set in the factory, if you want to change any settings, please contact us before operation to avoid wrong operations.
4.6 Status Interface of Temperature Controller
Press button on the ‘Home’ interface to enter the ‘Status’ interface.
Figure 12
• Door Open: Display the total door opened times during use, and the last door opened time in the record. Press button to clean all ‘Door Open’ records.
• Temp: Display the current inner temperature (Inner), the highest temperature in the record (Highest), and the lowest temperature in the record (Lowest). Press button to clean all ‘Temp’ records.
• Environment: Display the current voltage of input power, and the current ambient temperature. Press button to refresh this data.
• Backup Sys (Enough Liquid, Low Liquid): Not available now.
• Right Area of this Interface: Display the event records.
Press
 button to enter the freezer’s ‘Running Status’ interface.
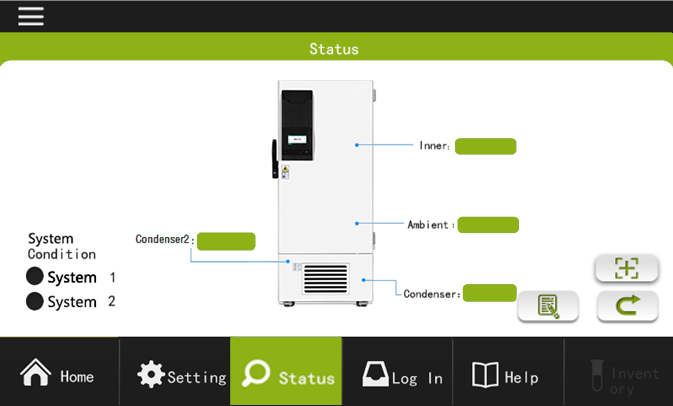
Figure 13
• Compressor Condition: Compressor running indicator of the compressor 1 and 2.
• Inner: Display current inner temperature.
• Ambient: Display current ambient temperature.
• Condenser 1: Display the current temperature of condenser 1.
• Condenser 2: Display the current temperature of heat exchange.
•
 Press this button to enter the ‘Events Record’ interface.
•
 Press this button to enter the ‘Screen Calibration’ interface, if the touch screen keys are not accurate.
•
 Press this button to back to the ‘Status’ interface.
Alarm Test: Press
 button to test the alarm system, then the screen will back to the ‘Home’ interface, and display all alarm codes one by one.
Figure 14
4.7 Log In Interface of Temperature Controller
Press button on the ‘Home’ interface to enter the ‘Log In’ interface.
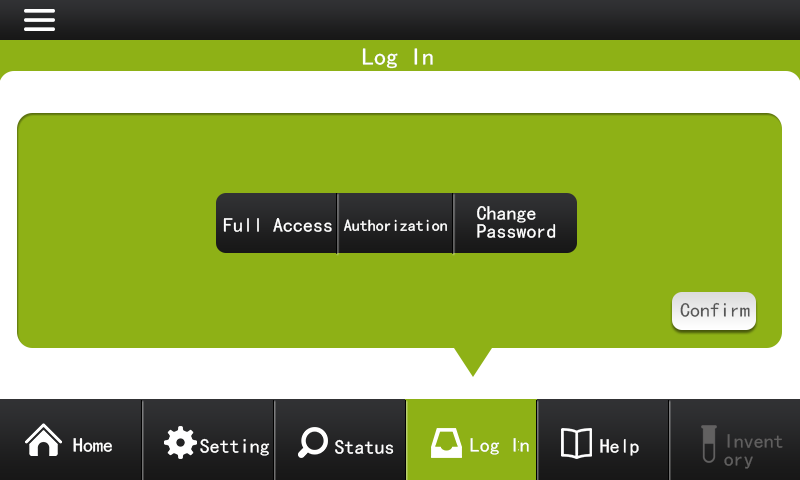
Figure 15
• Full Access: Click this button, then the freezer will enter ‘Open Access’ mode, everyone can operate this freezer without a password.
• Authorization: Click this button, then the freezer will enter ‘Authorization Access’ mode, operators should enter a password if they want to check or adjust the freezer. The initial password is 123456. After entering ‘Authorization Access’ mode, press
 button to change the password.
4.8 Remote Alarm Port
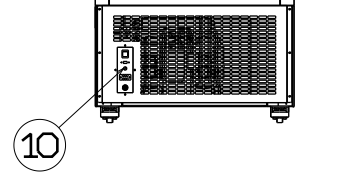
Figure 16
• Remote alarm port is on the bottom area of the back panel of the freezer.
• Remote alarm port carrying capacity is AC220V, 10A.
• Output signal: The port is in the open circuit normally, and in the closed circuit if the freezer alarms.
4.9 Alarm Code
| Code | Alarm | Status |
 | Control Sensor Error Alarm | The control sensor is short-circuited or broken. |
 | Display Sensor Error Alarm | The display sensor is short-circuited or broken. |
 | Condenser Sensor Error Alarm | The condenser sensor is short-circuited or broken. |
 | Heat-exchanger Sensor Error Alarm | The heat exchanger sensor is short-circuited or broken. |
 | High-temperature Alarm | The temperature in the freezer is too high. |
 | Low-temperature Alarm | The temperature in the freezer is too low. |
 | Low Battery Alarm | The battery is low voltage (if the alarm remains after the freezer is powered for more than 24 hours, it means the battery loss is too much, please replace the battery). |
 | Low Voltage Alarm | The voltage of the input power is too low. |
 | High Voltage Alarm | The voltage of the input power is too high. |
 | Power Off Alarm | The input power is abnormal. |
 | High Ambient Temperature Alarm | The ambient temperature is over 32°C. |
 | Door Ajar Alarm | The door is not closed well or opened too long. |
 | Condensation High-temperature Alarm | The condensation is high temperature (may be caused by filter block or system error). |
Table 1
5. Maintenance
5.1 Before Maintenance
- Inspect and maintain the device at specified intervals.- Turn off and disconnect the power supply plug before repairing or maintaining the device to prevent electric shock or injuries.
- Wear gloves when maintaining or repairing this device to avoid injury from sharp edges.
- Be careful not to inhale medications or suspended matter in or around the device when maintaining or repairing this device. These may be harmful to your health.
5.2 Clean the Freezer
- Inspect and clean the device once a month. Regular cleaning will keep your device looking like new.- Use a dry cloth to wipe dust from the external body, inner chamber, and all accessories of the device. If it is very dirty, use neutral detergent when cleaning and clean up the detergent after cleaning.
- Do not pour water onto the device or clean the device with water directly, otherwise, it may cause electric shock or fire.
5.3 Clean the Condenser Filter
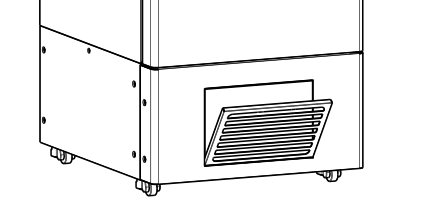
Figure 17
Filter net clean instructions, please follow the steps below:
• As shown in the picture, pull out the flip.
• Take out of the filter net.
• Clean the filter net with water and then dry it.
• Put the filter back in place and install the flip.
• Check if the alarm has been canceled if the condenser temperature alarm occurs before cleaning.
Note: Do not touch the condenser directly when cleaning the filter. The hot surface may hurt you.
5.4 Defrost
To keep a stable temperature inside the freezer, the freezer does not have the auto-defrosting function.The frost will be built at the wall of the inner chamber and around the inner door and outer door. The excessive frost may make a gap between the body and the door gasket of the freezer, which may cause poor cooling performance. So please turn off the freezer and clean the ice and frost around the door and inside the freezer manually, the recommended defrosting interval is 1~3 months. When defrosting, please follow the steps below:
• Turn off the LN2/CO2 backup system if you have.
• Turn off the freezer, and take out all the stored products inside the freezer and move them to another normal working freezer.
• Open the external door and internal door. Hold up the internal door and take it away. See the picture below.
• Keep the external door open to defrost for hours till all the ice melts.
• Clean the water inside the freezer with dry fabric.
• After cleaning, install the inner door, and then close all the doors.
• Turn on the freezer.
• When the freezer reaches the setting temperature, put the stored products inside the freezer again.
• Turn on the LN2/CO2 backup system if you have.
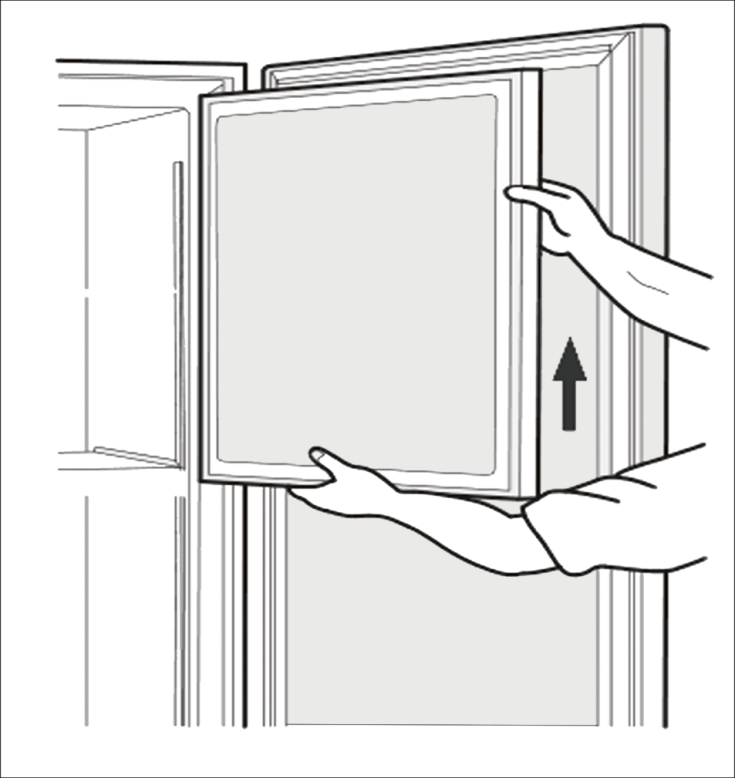
Figure 18
Caution: When defrosting, do not use a tool with a sharp edge such as a knife or a screwdriver to move the ice, keep it naturally defrosting. If necessary, use an electric fan to blow the inner chamber of the freezer to speed up defrosting.
5.5 Battery Maintenance
The device has a battery inside, which should be fully charged. Batteries are consumables. If the battery is low voltage, please replace it in time.6. Troubleshooting
| Troubles | Reasons and Solutions |
| The device does not cool down. | Is the socket powered? Is the power plug fully inserted into the socket? Is the fuse or circuit breaker disconnected? Is there a power failure? Is the power switch turned off? |
| Compressor breaks down | Is the setting temperature correct? |
| Temperature keeps decreasing after reaching the set value | Is the setting temperature correct? |
| Temperature cannot reach the set value | Is the cooling fan normally working? Is the door closed well? Has the door been opened and closed frequently? Is there enough space between the stored items for cold air circulation? Is the ambient temperature too high? The available range is 10~32°C. Is there enough space around the device for good ventilation? |
| Unusual noise | Is the device installed on a firm and level floor? Is the device leveled properly? Has the device touched the wall? Is the compressor loose? Is the fan motor abnormally working? |
Table 2
Check the above questions, if the trouble remains, contact us or our authorized distributors for help.
7. Packing List
| Model | Manual | Key | Shelf | Shelf Holder | Defrost Shovel | Stop Block |
| BFUR-86-304 | 1 | 2 | 3 | 12 | 1 | 2 |
| BFUR-86-305 | 1 | 2 | 3 | 12 | 1 | 2 |
| BFUR-86-308 | 1 | 2 | 3 | 12 | 1 | 2 |
| BFUR-86-316 | 1 | 2 | 3 | 12 | 1 | 2 |
| BFUR-86-313 | 1 | 2 | 3 | 12 | 1 | 2 |