


Turbidity Meter BMET-703
- Sea, Air, Door to Door Shipping
- 1 Year Warranty
- US & European Standards
Turbidity meters measures the amount of suspended solid particles in water. It works on the backscattering principle, wherein an infrared light is shined into the medium by infrared diode. The electronic device then based on the received signal calculates the relative turbidity of the medium.
Specification
Features
| Measuring Unit: | |
| Range | (0.000 ~20.00) NTU, (20.01 ~200.0) NTU, (200 ~2000) NTU, (2001 ~4000) NTU |
| Accuracy | ≤ ±6% |
| Repeatability | ≤ 0.5 % |
| Fluctuation | ≤ ±0.5 % FS/30xmin |
| General: | |
| Power Supply | AC Adapter, 200-240 VAC input |
| Dimension (mm) & Weight (kg) | 358x323x160, 8 |
Operating Manual for BMET-703
1. Applications
2. Working Environment
3. Specifications
4. Working Principles
5. Optical System
6. Circuit System
7. Operation Instructions
8. Restore Factory Parameters Descriptions
9. Malfunctions and Troubleshooting
10. Complete Set of Instrument
11. After Sales Service and Guarantee
Appendix I
Appendix II
Appendix III
Appendix IV
1. Applications
Model BMET-703 turbidimeter is used to measure the light scattering or attenuation generated by the insoluble particulate matter which is suspended in water (or clear liquid). The instrument can quantitatively characterize the content of the suspended particulate matter. The instrument can be widely used in many field and industries, such as water, food, chemical, power, metallurgy and environmental protection and pharmaceuticals. The equipment is commonly used in laboratory.2. Working Environment
1) Ambience temperature: 5℃~35℃2) Relative humidity: not higher than 85%
3) Place the instrument on the solid and stable station, free of vibration.
4) Keep away from high-intensity magnetic field, electric field and the occurrence of high-frequency waves of electrical equipment.
5) Prevent the instrument from high temperature.
6) The power supply is 220V ± 22V, 50Hz ± 1Hz, and must be fitted with a good ground.
3. Specifications
1) Lamp source: Tungsten halogen lamp, 6V, 10W2) Measurement range NTU: 0.00NTU-50.0NTU; 50.1NTU-200NTU; 201NTU-2000NTU; 2001NTU-4000NTU; (automatic range switch)
3) Reading Display method: LCD touch screen digital display
4) Indication error: the relative error of indication value should not exceed ± 6%.
5) Zero drift: not bigger than ±0.3%FS
6) Indication stability: not larger than ±1%FS
7) Reproducibility: ≤0.5%
8) Sample vial: φ25mm×95 mm
9) Sample volume: 20ml~30ml
10) Weight: 8kg
11) Dimensions: 358mm×323mm×160mm(1×b×h)
12) Fuse: RF1-20 1A 250V
4. Working Principles
The basic principle of a turbidimeter is when light goes through the vial containing the suspension sample, the ratio between the generated 90º scattered light signal and the sum of the forward transmitted light and forward scattered light changes in accordance with the figure of turbidity, namely:
The optical and circuit systems both are designed according to the above principle.
5. Optical System
As shown in the figure below: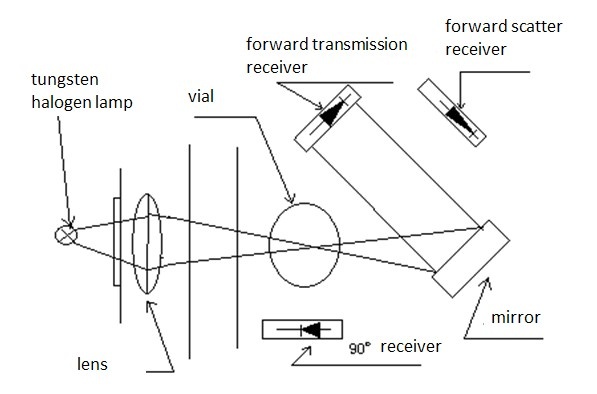
Figure 1
After the light goes through the lens and focuses on the vial, a part of the signal is received by the 90º receiver and the rest is respectively received by the forward transmission receiver and forward scatter receiver.
6. Circuit System
The tungsten halogen lamp is supplied by the voltage regulator circuit and produces stable light source. Different parts of signals are respectively received the corresponding receiver, after going through the amplifier, it enters A/D converter. The digital signal generated by A/D converter enters the SCM system. After being processed and calculated, it will show on the LCD screen.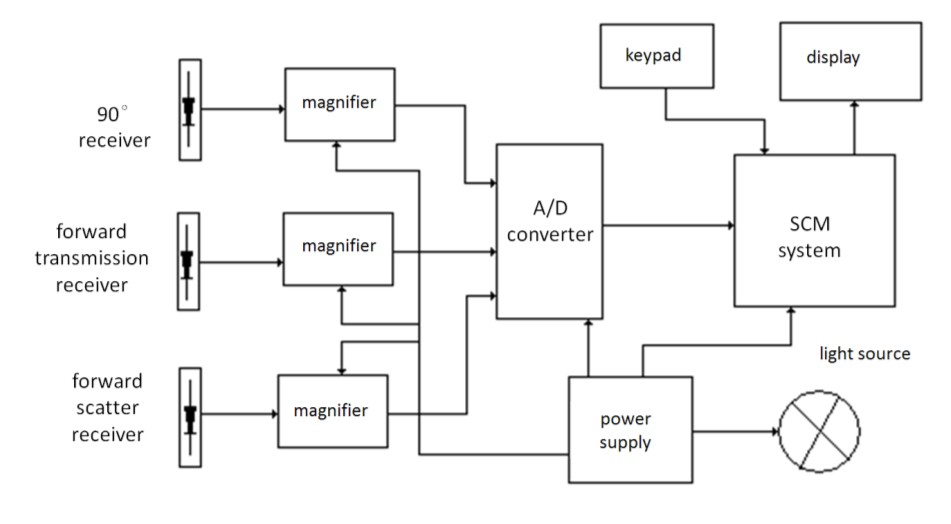
Figure 2
7. Operation Instructions
1) Connect the power cord, turn on the switch (at the rear of the instrument), the instrument will warm up for about 30 minutes.2) Use zero-turbidity water to clean the inside and outside surfaces of the vial, and with a lens cleaning paper, wipe the outer surface of the water.
3) Shake the water sample and use it to wash the vial. After loading the sample in the vial and tighten the cap, use a lens cleaning paper to dry the outer surface of the vial, and remove air bubbles from both sides of the vial.
4) Place the sample vial into the instrument chamber, while placing the bottle, please make sure the white triangle mark is aligned with the notch mark on the sample chamber. Finally cover black shield.
5) When the reading is stable, it is the turbidity value of the sample and the unit is NTU. The criteria to determine whether the reading is stable or not is when the difference between the data flashing twice is smaller, so the data can be regarded as stable. When the instrument automatically changes measurement range, the user doesn't have to select. When the mean mode is off, the response time of measurement is 3 to 7 seconds.
6) If there is floating floc or larger particle in the sample, the instrument may not generate unstable reading. You can press the System Settings -> Mean mode selection opening
function, the instrument will automatically perform measurement for several times, then it will show the average value. When the mean mode is on, the response time of measurement is 10 to 20 seconds.
7) To measure the sample with the turbidity lower than 2NTU, use zero water turbidity to calibrate zero first. The zeroing method is to put the vial with zero-turbidity water into the
sample chamber, and cover the shield. When the reading is stable, press zero button.
8) Note: Do not use the paper or cloth with coarse surface to wipe the sample vial, to avoid the surface of vial from becoming coarse, so as to affect the measurement results.
9) Press the save button at the lower right corner of the main display screen, save the current
measured value to the data storage area, the saved data can be viewed in the Saved Data. The instrument can save up to 1,000 pieces of data.
10) Press the system setting button, and enter the system parameter setting. You can adjust
the screen brightness and the time and date settings.
11) The saved data can be exported via three ways: 1) external serial printer export; 2) save to
USB; 3) uploaded to the host computer. Methods: Press the data button from the
saved data interface, select the appropriate way to export, and follow the onscreen instructions.
Note 1: The serial printer settings: 9600bps, 8, no data parity, 1 stop bit.
12) Connect with PC
a) Use a USB cable to connect the instrument and computer.
b) Put the CD-ROM into the computer and install the driver.
c) Open the WGZ-LINK (see details in floppy disk usage file).
8. Restore Factory Parameters Descriptions
If you encounter any mistakes during the process of calibration, you can restore the factory settings with the following steps.Under calibration mode, press other key enter 9999 and press restore key, the system will restore the factory settings.
9. Malfunctions and Troubleshooting
| Problems | Malfunctions | Solutions |
| The key on the touch screen doesn't work. | The touch screen needs to be recalibrated. | Tap the non-key area for about 20 times and follow the instruction to perform calibration |
| The error of measurement result is too big or the calibrated parameters can't be saved. | Fail to use the correct standard solution to perform calibration The internal IC is broken. | Prepare the correct standard solution to recalibrate with following the calibration procedures. Contact repair service |
| The light bulb is not lightening. | The fuse is broken. The light bulb is broken. | Replace the fuse. Replace the bulb (See Appendix IV) |
| When the sample is placed, the reading is flashing for a long time. | The instrument is broken. The preparation of the sample has something wrong. | Remove the sample from the chamber, and cover the shield. If the reading still keep flashing. There might be something wrong with the device. Otherwise, the sample has problem. |
| The data of the instrument seems wrong. | The calibrated parameters may be lost. | Prepare the solution again and perform calibration or restore the factory settings. |
Table 1
10. Complete Set of Instrument
(Refer to Packing List)11. After Sales Service and Guarantee
1) We follow three guarantees for product(s): "repair, replace or return", i.e., repair or replace the defective products, or refund the original purchase price.2) We provide twelve-month warranty from the date of invoice for product(s).
Appendix I
Preparation of Zero-Turbidity WaterIn accordance with the method stipulated in the international standard ISO7072, using the microporous membrane with the pore size of 0.1μm (or 0.2μm) to distill water (or
electro-osmosis pray water and ion-exchanged water), it requires to perform the filtration twice or more. The obtained filtrate is the zero-turbidity water, which can be used for verification purpose. It must be stored in clean glass bottle which has been washed with the water.
The zero-turbidity water is used to adjust zero point and dilute the Formazine standard solution of the turbidimeter.
Appendix II
Formazine Standard Solution1) The turbidimeter test applies the Formazine standard substances promulgated by the National Bureau of Technical Supervision, such as GBW12001 400 degree (NTU, FTU) and 4000 degree (NTU, FTU) turbidity (Formazine) standard substance, with the valuation uncertainty of ± 3 %, and the valid usage period of 1 year.
The Formazine standard solutions of different turbidity values are obtained with zero turbidity water and the qualified container, through accurately diluting the Formazine turbidity standard substance in accordance with the due proportion.
The 4000 degree and 400 degree Formazine standard substances should be stored in the cool room (4℃ ~ 8℃) of refrigerator. The diluted standard solution with low turbidity value has poor instability, and doesn't fit to save, it should be prepared each time before use.
2) When it's difficult to get the Formazine standard substance, the user can base on the requirements and methods stipulated by ISO7027 by strictly following the conditions and reagent consumption to make it. Here is a simple description of the method:
a) Instruments and Reagent
Analytical Balance: Load 200g, certified by a sense of the amount of 0.1mg. Flask: 100ml, 200ml, first class, qualified.
Pipette: 5ml, first class, qualified.
Hydrazine sulfate (N2H6SO4): AR, purity required by the national standard GB 698-77 analysis standard methods, and the purity should be greater than 99%.
Hexamethylenetetramine (C6H12N4): AR, purity required analysis by GB 1400-78
standard methods, and the purity should be greater than 99%.
Incubator (or water bath): volume can accommodate 200ml volumetric flask, thermostat 25℃±1℃, and can run continuously for more than 24hrs.
Zero-turbidity water: see Appendix I.
b) Formazine (C2H4N2) turbidity standard solution I (4000NTU) Preparation:
Accurately weigh 10.00g hexamethylenetetramine (C2H4N2), dissolve in approximately 80ml zero-turbidity water.
Accurately weighed 1.000g hydrazine sulfate (N2H6SO4), dissolve in approximately 80ml zero turbidity water.
Warning (in ISO7027): Hydrazine sulfate is toxic and may be carcinogenic, special attention must be paid on safety when operating.
Get the above two solutions into 200ml volumetric flask, add the zero turbidity water to the mark level and shake to make it completely mixed. The flask is placed in 25℃± 1℃ incubator or water bath, staying for 24hrs. According to ISO7027 requirements, the haze value of the suspension is set at 4000 degrees (NTU, FTU). The turbidity standard solution should be kept in the dark place.
c) Formazine (C2H4N2) turbidity standard solution II (400NTU) preparation method With a pipette to get 4000NTU standard solution 10.00ml to 100ml volumetric flask, and dilute with zero turbidity water to the mark level. After being completely mixed,
the solution is the 400NTU turbidity standard solution. The solution should be kept in the dark place.
Appendix III
Instrument calibration
Note: The equipment has been corrected before leaving the factory. When the error of measurement results is too big, please perform calibration following the below procedures.
1) Preparation
a) If you find that the instrument measurement results deviation exceeds the allowable range, you should calibrate the instrument. In accordance with the attached "Zero Turbidity Water Preparation" and "Formazine Turbidity Standard Solution", the standard samples should be prepared before calibration.
b) After the instrument is warmed up, under the measurement status, use the zero turbidity water and Zero button to calibrate the zero point of the instrument.
c) After calibration, the parameters will be saved automatically, which will not be lost when the power is off and can only be updated after next calibration.
2) Steps
a) Press the calibration button from the right of the main display to start the process, and
a pop-up window will ask for entering password "4000". Then the system enters the calibration interface.
b) Place the prepared 2NTU standard samples in the sample chamber and cover the shield. When the reading is stable, from the calibration page, select calibration point 2NTU.
Press the Apply button. When the calibration is successful, press Confirm button to
return. As the point is finished with calibration,press return button to go back to the main interface.
c) Repeat Step 2 and calibrate following points in order, 20NTU, 200NTU, 500NTU,
1000NTU, and 2000NTU (for Model WGZ-200, only 2NTU, 20NTU and 200NTU are to be calibrated).
d) As all points are finished with calibration, go back to the main interface, and press system settings or saved button to exit the calibration.
e) If there is anything wrong with any calibrated point, you can choose to restore the factory calibration value on a certain point. The method is simple, select the point, and
press restore button. When the restoration is successful, go back to the main interface.
3) Calibration at Any Point
a) If the sample turbidity range is relatively fixed, you can perform the single-point calibration with the standard solution, which has a closer turbidity to the test sample.
b) The calibration at any point can be performed as the above steps. The only difference is
to select other button when entering the calibration interface and input the required
data to start with calibration.
The input data will replace calibration value of the standard point which is the closest. If the calibration is performed in the wrong way and the instrument displays in the wrong way, you can use the following steps to restore the factory
settings: under the calibration status, press other button, enter 9999 and press restore
button, and the device will restore the factory settings.
c) It's not recommended that the user performs calibration with non-standard point.
Appendix IV
Replace The Source LampSource lamp is an important component of the instrument. The quality of the lamp directly affects the precision and stability of the instrument. The voltage of the both ends of source lamp is lowered to 5V, in order to prolong the life of the lamp. After the lamp has been used for a long time, the source lamp will be broken. So it should be replaced with the same lamp with the original specifications, to avoid the influence on the performance of the instrument.
Lamp spec: halogen lamp, 6V/100W.
Procedures:
1) Turn off the power and remove the 220V power plug;
2) Unscrew the two screws which fix the cover from the bottom of the instrument and the other two screws from the back of the instrument to remove the cover.
3) Unscrew the four screws which fix the light source shield from the internal board of the instrument to remove the shield.
4) Unscrew the two screws which fix the factory mark to remove the mark.
5) Unscrew the six screws which fix the cover the sample chamber where the vial is placed to remove the cover.
6) Loosen the two screws which fix the tungsten halogen lamp foot, replace with a lamp, then fasten the two fixing screws. Finally, loosen the two screws which fixing the lamp holder.
7) According to the Section 5 - Optical System in the manual, in the position of vial, place the optical path correction tool (can be found in the accessories) and the flat side of the tool facing the light source.
8) Turn on the power, adjust the position of lamp holder, make the image of filament aligning the little hole in the center of the correcting optical path. Finally, fasten the two fix screws on the lamp holder.
9) After the instrument is mounted well, it needs to perform recalibration.