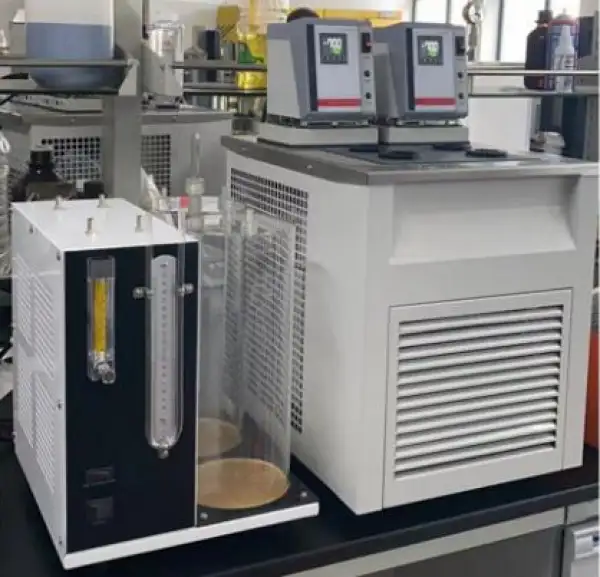
Pour Point Tester BPTL-221
- Sea, Air, Door to Door Shipping
- 1 Year Warranty
- US & European Standards
Petroleum testing is the analysis during upstream, midstream, and downstream production processes of petroleum products. It is most commonly used to test petroleum product, its product components, byproducts of crude oil, fuel, natural gas, upstream oil and gas and other formats of petroleum.
- Dry type over speed refrigeration technology without medium. Temperature of two troughs are controlled separately. Compact structure,can put on platform directly
Specification
Features
Applications
Trough | Two, temperature controlled separately |
Samples size | 2 samples in each trough |
Tempearture Range | Reach -30°C in 30 minutes and the lowest temperature is -70°C , |
Refrigeration | Dry type over speed refrigeration technology without medium |
Refrigerant | Fluorine free |
Structure | Compact structure,can put on platform directly |
- Dry type over speed refrigeration technology without medium. Temperature of two troughs are controlled separately. Compact structure,can put on platform directly
Petroleum Industry, PVC Pipe Industry
Operating Manual for BPTL-221
Download Operating Manual PDFI. Product overview
II. Method Summary
III. Apparatus and materials
IV. Preparation
V. Operation Steps
VII. Common faults and troubleshooting
VIII. Quality Assurance
I. Product overview
This instrument is mainly suitable for determine the pour point and cold filter plugging pointof petroleum products.
1. Applicable standards: GB/T3535, SH/T0248
2. Temperature control method: Imported PID digital display temperature controller, digital
display temperature (continuously displayed during testing), with an accuracy of 0.1 ℃.
3. Temperature control accuracy: -60 ± 0.1 ℃ -40 ± 0.1 ℃
4. Operating environment temperature: ≤ 25 ℃
5. Refrigeration method: metal bath refrigeration, enclosed compressor refrigeration,
environmentally friendly refrigerant, fast refrigeration speed.
6. Work unit: two troughs and four holes
7. Integrated structure, easy to move.
8. The instrument is made of cold-rolled steel plate and has a surface treated with
electrostatic spraying, which is corrosion-resistant and easy to clean.
9. The instrument welding adopts butt welding technology, without solder joints, with a
beautiful and elegant appearance.
II. Method Summary
The operating principle of pour point is: after pre heating, the sample is cooled at a specified rate, and the fluidity of the sample is checked every 3 ℃. Record the lowest temperature at which the sample can flow as the pour point.The operating principle of the cold filter point is to cool the sample under specified conditions and use a controllable vacuum device of 2KPa to allow the sample to pass through a standard filter and be sucked into a pipette. Repeat this step for every 1 ℃ lower than the previous temperature of the sample until the amount of wax like crystal precipitation in the sample is sufficient to stop the flow or reduce the flow rate. Record the temperature when the pipette is full of sample for more than 60 seconds or cannot fully return to the test cup as the cold filter point of the sample.
III. Apparatus and materials
Pour Point1. Test tube: A cylindrical shape made of transparent glass with a flat bottom. The inner
diameter of the test tube is 30.0-32.4 millimeters, and the height is 115-125 millimeters. A
long scribed line is marked 54 ± 3 millimeters from the bottom of the test tube, indicating the
height of the liquid level inside.
2. Thermometer:
2.1 High cloud point and high pour point thermometers: temperature measurement range
-38~50 ℃, with a division value of 1 ℃
2.2 Low cloud point and low pour point thermometers: temperature measurement range
-80~20 ℃, with a division value of 1 ℃
3. Cork plug: used with a test tube, with a hole for inserting a thermometer punched in the
center of the plug.
4. Sleeve: A cylindrical, flat bottomed, water tight tube made of glass or metal. Its height is
approximately 115 millimeters. The inner diameter ranges from 44.2 to 45.8 millimeters.
5. Disc: Made of cork or felt, 6mm thick, with the same diameter as the inner diameter of the
sleeve.
6. Gaskets: Annular, 5-6mm thick, made of cork, felt, or other appropriate materials,
requiring elasticity to tightly adhere to the outer wall of the test tube, but loosely attached to
the inner wall of the sleeve. At the same time, it must have sufficient hardness to maintain its
shape. The purpose of the gasket is to prevent contact between the test tube and the
sleeve.
7. Cold bath: metal bath cooling
8. Timer: The maximum error for measuring 30 seconds should not exceed 0.2 seconds.
Reagents and materials:
1. Sodium chloride: crystalline
2. Calcium chloride: crystalline
3. Carbon dioxide: solid
4. Cooling liquid: acetone, methanol, or naphtha
5. Wiping solution: acetone, methanol, or ethanol
1. Test cup: made of transparent glass, flat bottomed cylindrical shape
2. Jacket: Made of brass, flat bottomed cylindrical, waterproof, can be used as an air bath.
3. Insulation ring: Made of oil resistant plastic or other suitable materials, placed at the
bottom of the sleeve to provide insulation.
4. Positioning ring: Made of oil resistant plastic or other suitable materials, it surrounds the
test cup and provides insulation for the test cup inside the sleeve.
5. Support ring: Made of oil resistant plastic or other suitable, non absorbent, oil resistant
non-metallic materials, placed in a suitable position in a cold bath, vertically and stably
suspended outside the sleeve, and the plug should be placed in the center position.
6. Plug: Made of oil resistant plastic or other suitable, non absorbent, oil resistant
non-metallic materials.
7. Pipette: Made of transparent glass, there should be a marking line at a distance of
149mm ± 0.5mm from the bottom of the pipette.
8. Filter: composed of brass shell, brass nut, filter screen, brass filter seat, and brass tank.
9. Three way valve: made of glass, with a bidirectional inclined hole with a diameter of 3mm.
10. Vacuum source: A vacuum pump or water pump with sufficient pressure to ensure that
the air flow rate in the vacuum regulating device during the test is 15L/h ± 1L/h.
11. Vacuum regulating device: composed of a glass bottle, with a height of at least 350mm,
capable of filling at least 5L of water and sealing it with a stopper. The stopper has three
holes and is equipped with a glass tube of suitable diameter.
12. Stop watch: with an accuracy of 0.2s or higher.
Reagents and materials:
1. N-Heptane: analytically pure
2. Acetone: analytical pure
3. Lint free filter paper
4. Calibration standard
IV. Preparation
Sample preparation for cold filter plugging point1. If there are impurities in the sample, it must be heated to above 15 ℃ and filtered with lint
free filter paper.
2. If the sample contains water, it must be dehydrated before being determined.
3. Fix the sleeve with a support ring in the hole of the cold bath cover plate, and plug the
sleeve mouth tightly
4. Lower the cold bath to the following temperature:
When the cold filter plugging point of the sample is above -3 ℃, the cold bath temperature is
-17 ℃± 1 ℃;
When the cold filter plugging point of the sample is -4~-19 ℃, the cold bath temperature is
-34 ℃ ± 1 ℃;
When the cold filter plugging point of the sample is -20~-35 ℃, the two cold bath
temperatures are -34 ℃ ± 1 ℃ and -51 ℃± 1 ℃.
Throughout the entire operation, the cold bath should be stirred evenly.
5. Turn on the power switch of the instrument, add liquid, and then adjust the temperature
controller to the desired temperature according to the operating instructions.
6. Install the components according to the following diagram, Figure 1 (test component
installation diagram) and Figure 2 (vacuum source connection diagram).
Figure 1 Figure 2
V. Operation Steps
Firstly, please carefully read the user manual to confirm the ambient temperature of theinstrument (≤ 25 ℃). Then, use the matching connecting cable of this machine to connect the
host device and connect it to the power supply. Test all device switches to check if they can
display normally. If all switches are normal, immediately turn off all switches and wait for the next step of operation.
Note: The test host time cannot exceed 5 seconds at most. And the time for restarting the second time should be 10 minutes after the first time before proceeding with the operation. Please remember by the operator.
Turn on the power switch, set the temperature on the thermostat, and turn on the refrigeration
switch for cold bath treatment of the sample.
Test steps for pour point
1. Pour the clean sample into the test tube until it reaches the mark. If necessary, the sample
can be heated in a water bath until flowing, and then poured into a test tube. Samples that
have been heated to over 45 ℃ within 24 hours prior to the test, or samples whose heating
history is unknown, must be left at room temperature for 24 hours before the test can be
conducted.
2. Plug the test tube tightly with a cork with a high cloud point and high pour point
thermometer inserted. If the expected pour point of the sample is higher than 36 ℃, use a
melting point thermometer. Adjust the cork to tightly plug the test tube, ensuring that the
thermometer and test tube are on the same axis. Immerse the sample in the mercury bulb of
the thermometer, so that the capillary starting point of the thermometer is immersed 3mm
below the sample liquid level.
3. Pretreat the sample in the test tube according to point 4 or 5.
4. Samples with a pour point higher than -33 ℃ should be treated as follows:
4.1 Place the sample in a bath that has been maintained at 12 ℃ above the expected pour
point, but at least 48 ℃, without stirring. Heat the sample to 15 ℃ or 9 ℃ above the
expected pour point (whichever is higher).
4.2 Transfer the test tube to a bath that has been maintained at 24 ℃± 1.5 ℃.
When the sample reaches a temperature of 9 ℃ higher than the expected pour point
(estimated as a multiple of 3 ℃), the provisions of point 7 should be followed.
Start checking the fluidity of the sample
4.4 If the sample can still flow when the temperature has reached 27 ℃, carefully remove
the test tube from the bath, wipe the outer surface of the test tube with a clean cloth soaked
in wiping solution, and then place the test tube in a 0 ℃ bath according to point 6. Observe
the fluidity of the sample according to point 7 and cool it according to the procedure
specified in point 8.
5. Samples with a pour point of -33 ℃ and below -33 ℃ should be treated as follows:
5.1 Heat the sample in a 48 ℃ bath without stirring to 45 ℃, and then place it at 6 ℃± 1.5 ℃
Cool to 15 ℃ in a bath.
When the temperature of the sample reaches 15 ℃, carefully remove the test tube from the
water bath and wipe the outer surface of the test tube with a clean cloth soaked in wiping
solution. Then, remove the high cloud point and high pour point thermometers and replace
them with low cloud point and low pour point thermometers. Place the test tubes in a 0 ℃
bath according to point 6, and then transfer them to each low-temperature bath according to
the steps specified in point 8.
When the sample temperature reaches 9 ℃ higher than the expected pour point, observe
the fluidity of the sample according to point 7.
6. Ensure that the inner walls of the disc, washer, and sleeve are clean and dry, and place
the disc at the bottom of the sleeve. Before inserting the test tube, the disc and sleeve
should be placed in a cold bath for at least 10 minutes. Place the gasket on the outer wall of
the test tube, approximately 25mm from the bottom, and insert the test tube into the sleeve.
Except for the 24 ℃ and 6 ℃ baths, the test tube cannot be directly placed in the cooling
medium.
7. Observe the fluidity of the sample:
7.1 Starting from the first observation of temperature, the test tube should be removed from
the bath or sleeve every 3 ℃ decrease (depending on actual usage), and the test tube
should be fully tilted to determine whether the sample is flowing. The entire process of
removing the test tube, observing the fluidity of the sample, and returning the test tube to the
bath should not exceed 3 seconds.
7.2 From the first observation of the fluidity of the sample, the fluidity of the sample should
be observed every 3 ℃ decrease in temperature. Special attention should be paid not to stir
the lumps in the sample, nor to move the thermometer after the sample has cooled enough
to form paraffin crystals. Because stirring the porous network crystals in paraffin can lead to
low or incorrect results.
Note: At low temperatures, condensed water mist can hinder observation. You can use a
clean cloth dipped in a wiping solution close to the temperature of the cold bath to wipe the
test tube to remove the water mist on the outer surface.
7.3 When the test tube is tilted and the sample does not flow, the test tube should be
immediately placed in a horizontal position for 5 seconds (measured with a timer) and the
surface of the sample should be carefully observed. If the sample shows any movement, the
test tube should be immediately placed back into the bath or sleeve (depending on actual
usage), and the fluidity of the sample should be observed again when the temperature drops
by another 3 ℃.
7.4 Continue operating in this manner until the test tube is placed in a horizontal position for
5 seconds,the sample in the test tube does not move, and the thermometer reading
observed at this time is recorded.
8. If the sample is still flowing when the temperature reaches 9 ℃, transfer the test tube to
the next lower temperature bath and perform the same transfer at -6 ℃, -24 ℃, and -42 ℃
according to the following procedure.
1) The sample temperature reaches 9 ℃,move to a -18 ℃ bath;
2) The sample temperature reaches -6 ℃,move to -33 ℃;
3) The sample temperature reaches -24 ℃,move to a -51 ℃ bath;
4) The sample temperature reaches -42 ℃,move to a bath at -69 ℃.
9. For oil products whose pour point specification value is not a multiple of 3 ℃, the following
regulations can also be followed for determination. Start checking the fluidity of the sample
when the temperature is 9 ℃ higher than the pour point specification value, and then
observe the sample at 3 ℃ intervals according to the steps described in points 7 and 8 until
the specification value of the sample is reached. Report whether the sample passed or did
not pass the specification value.
10. For fuel oil, heavy lubricant base oil, and products containing residual fuel components,
the results obtained by following the steps described in points 1-8 are the upper (highest)
pour point of the sample. If it is necessary to determine the lower (lowest) pour point of the
sample, it can be heated to 105 ℃ while stirring, and then poured into a test tube. Follow the
steps described in points 2-8 to determine the lower (lowest) pour point of the sample.
11. After the above process is completed, remove the test tube from the sleeve and clean
the thermometer and test tube.
Result representation
Add 3 ℃ to the results recorded at points 7.4 and 10 as the pour point or pour point of the
sample (depending on actual usage), and take the average of the two repeated
measurements as the test result.
Precision
Use the following provisions to determine the reliability of the test results (95% confidence
level).
1. Repeatability
The difference between two consecutive test results obtained by the same operator, using
the same instrument, and using the same method on the same sample should not exceed
3 ℃.
2. Reproducibility
The difference between two test results obtained from the same sample by different
operators, using different instruments, and using the same method should not exceed 6 ℃.
Note: Precision was determined using 10 new (unused) mineral oil based lubricants and 16
blended fuel oils in 12 collaborative laboratories. The pour point range of mineral oil
lubricating oil is -48 ℃~-6 ℃, and the pour point range of fuel oil is -33 ℃~51 ℃, resulting in
the following precision.
Test steps for cold filter plugging point
1. Install the thermometer, pipette, filter according to the schematic diagram in Figure 1, and
place it in a test cup containing 45mL of sample, making the thermometer vertical. The
bottom of the thermometer should be 1.3-1.7mm away from the bottom of the test cup, and
the filter should also be placed vertically and exactly at the bottom of the test cup. Then,
place it in a hot water bath to reach a temperature of 30 ℃ ± 5 ℃. Open the plug of the
sleeve opening, Place the prepared test cup vertically into a copper sleeve placed in a pre
cooled cold bath to a predetermined temperature. (The positioning ring should be placed
inside the copper sleeve);
2. Add a water level of 100mm to U-shaped tube differential pressure gauge,and connect
the silicone hoses of two 5-liter vacuum water tanks according to the schematic diagram in
Figure 3,
Figure 3
3. When the sample cools to 5-6 ℃ higher than the expected cold filter plugging point, the
first measurement begins. Connect the silicone tube to the suction tube, turn on the suction
switch, and at the same time, the internal stopwatch of the instrument starts timing (after the
suction time reaches 1 minute, the suction will automatically stop). When the sample rises to
the 20mL mark of the pipette, it indicates that the cold filter plugging point of the sample has
not been reached. Turn off the suction switch to make the pipette the same as the
atmosphere, and the sample naturally flows back to the test cup to continue the cooling test.
4. Repeat 2-3 steps for each 1 ℃ decrease until less than 20mL of sample passes through
the filter within 1 minute. Record the temperature at this time, which is the cold filter plugging
point of the sample. If the sample drops to -20 ℃ and has not yet reached its cold filter
plugging point, after the sample naturally flows back to the test cup, quickly transfer the test
cup to a cold bath at -51 ℃± 1 ℃ for operation until it reaches its cold filter plugging point.
5. If the expected temperature for the first measurement is lower than the cold filter plugging
point of the sample, remove the test cup from the sleeve and heat it for dissolution. If the
sample is abundant, it is best to pour out the cooled and melted sample, replace it with a
new one, and then repeat the operation according to the previous method. If the sample is
not sufficient, it can be heated and melted to 35 ℃, and then operated again according to
the previous method. Heating and melting should not be repeated more than three times.
6. At the end of the experiment, remove the test cup from the sleeve, heat it to dissolve, pour
out the test, and wash the test equipment. Pour 30-40mL of solvent oil into the test cup, and
repeatedly suck the solvent oil four to five times from the three-way valve using an aurilave.
During the test, all parts of instrument wherever the sample flows through should be washed
with solvent oil. Pour out the used solvent oil and repeat the washing with clean solvent oil.
Finally, dry the test cup, filter, and pipette separately with a hair dryer. If there is coke or
water droplets on the pipette or test cup, after washing with solvent oil once, it is also
necessary to wash and blow dry with anhydrous ethanol or benzene alcohol mixed solvent.
Generally, the stainless steel wire filter after 20 tests needs to be washed and replaced.
7. When the test cup is taken out of the sleeve, a plug should be inserted at the opening of
the sleeve to prevent moisture in the air from condensing into water in the sleeve.
During summer operation, the air humidity is high, and it is necessary to strictly prevent
water condensed on the outer wall of the equipment from flowing into the sample along the
pipe wall.
Precision
Use the following provisions to determine the reliability of the test results (95% confidence
level).
Repeatability
The difference between two repeated measurements by the same operator should not
exceed the value in equation (1).
r=1.2-0.027X1.......(1)
In the equation:
X1- The average value of two results used for comparison
Reproducibility
The difference between the two results proposed by each of the two laboratories should not
exceed the value of equation (2).
r=3.0-0.060X2.......(2)
In the equation:
X2- Average value used to compare single, independent test results
VII. Common faults and troubleshooting
1. During the experiment, it is found that the host is leaking electricity. How to solve thisproblem?
a. Quickly turn off the power and check the connection points of each device and whether
the insulation material of the wires is damaged.
b. Observe if water has been poured into the heating cabinet. If any, it should be dried
before use.
2. How to deal with uneven temperature of the medium liquid during the experiment?
a. Check the mixing device.
b. Test whether the wiring of the device is in place.
c. After replacing the mixing device with a new one, proceed with debugging.
3.During the refrigeration process, the temperature controller always displays the
temperature at the beginning of heating?
a. The set temperature value is lower than the temperature specified in the test.
b. There is a problem with the temperature sensor in the constant bath.
4. Please read the instruction manual carefully before using the instrument.
5. During the experiment, it is strictly prohibited to bring items such as lighters or matches
into the laboratory to avoid a fire.
6.During the experiment, the power cord must have a good grounding terminal to ensure the
safety of electricity usage.
7.When there is a malfunction in the instrument circuit, professional personnel must be
consulted for maintenance.
8.When the host is not in use, the power supply and all switches should be turned off, and it
should be kept in a ventilated and dry place. And all mechanical parts of the instrument
should be maintained in a timely manner with lubricating oil or grease to avoid affecting their
performance.
9. When discharging the medium liquid, the temperature should reach room temperature
before proceeding with the operation.
VIII. Quality Assurance
The company has a one-year quality guarantee for the problems in the material or workmanshipof the instrument since the date of purchase. Within the specified warranty period, if the failure of the instrument is not caused by abuse and needs to be repaired, we will carry out free
maintenance. Our company will determine whether the specific failure is due to its own failure or
customer abuse. For instruments beyond the warranty period, the maintenance cost will be
charged as appropriate.
Exceptional case
The following conditions are not included in the warranty free maintenance:
1. Customer's own incorrect maintenance
2. Unauthorized change and abuse
3. Applying the instrument to an inappropriate environment
Package List