


Orbital Shaker BSOT-302
- Sea, Air, Door to Door Shipping
- 1 Year Warranty
- US & European Standards
Our product is an accurately designed, microprocessor controlled with double Decker platform to save your valuable lab space. Three eccentric shaft balancing drive ensures shaking with uniform speed. Speed adjustment settings permit both gentle and vigorous shaking. Varieties of platforms are available for different glassware and vessels.
- Compact space-saving design fits easily in incubator and refrigerator
- Simultaneous display of speed, timer and operating mode
- Brushless DC motor ensures maintenance-free, reliable and quiet operation
- Electronic time switching clock controls time or continuous operation mode
Specification
Features
Applications
| Speed Range | 100-350 rpm (Linear) 100-800 (orbital) |
| Temperature | 4-40°C |
| Permissible Ambient Temperature | 5-40°C |
| Shaking Orbit | 4 mm |
| Permissible Relative Humidity | 80.00% |
| Timing Range | 1-1199 min |
| Motion | Orbital/Linear |
| Motor rating Input [W] | 28 |
| Motor rating output [W] | 15 |
| Maximum Load Capacity | 2.5 kg |
| Operation | Continuous/Timed |
| Overall Dimension | 340x300x100 mm |
| Display | LCD |
| Weight | 8.1 kg |
| Power | 30 W |
| Power Supply | 100-240 V, 50/60 Hz |
- Compact space-saving design fits easily in incubator and refrigerator
- Simultaneous display of speed, timer and operating mode
- Brushless DC motor ensures maintenance-free, reliable and quiet operation
- Electronic time switching clock controls time or continuous operation mode
- RS232 interface enables data logging & computer control
- Over speed detection and protection
- Accommodate a variety of platforms, non-slip rubber mat, conical flasks and other sample containers
Stability, Dissolution Studies, Liquid Extractions, Protein Precipitation, Small Peptide Synthesis, Dilutions
Operating Manual for BSOT-302
1. Preface
2. Service
3. Warranty
4. Safety Instructions
5. Proper use
6. Inspection
6.1. Receiving Inspection
6.2. Listing of Items
7. Trial Run
8. Control and Set
8.1 Control
8.2 Set
9. Operating Modes
9.1 Mode A
9.2 Mode B
9.3 Switching the mode
10. Supported Load
11. Faults
12. Interface
13. Maintenance and cleaning
14. Associated standards and regulations
15. Specification
16. Accessories
1. Preface
Welcome to the “Orbital and Linear Digital Shaker User Manual”. Users should read this manual carefully, follow the instructions and procedures, and beware of all the cautions when using this instrument.2. Service
When help needed, you can always contact manufacturer for technical support.Please provide the customer care representative with the following information:
• Serial number (on the rear panel)
• Certification
• Description of problem (i.e., hardware or software)
• Methods and procedures adopted to resolve the problems
• Your contact information
3. Warranty
This instrument is warranted to be free from defects in materials and workmanship under normal use and service, for a period of 24 months from the date of invoice. The warranty is extended only to the original purchaser. It shall not apply to any product or parts which have been damaged on account of improper installation, improper connections, misuse, accident or abnormal conditions of opera local dealer. You may also send the instrument direct to our works, enclosing the invoice copy and by giving reasons for the claim. You would be solely liable for freight costs.4. Safety Instructions
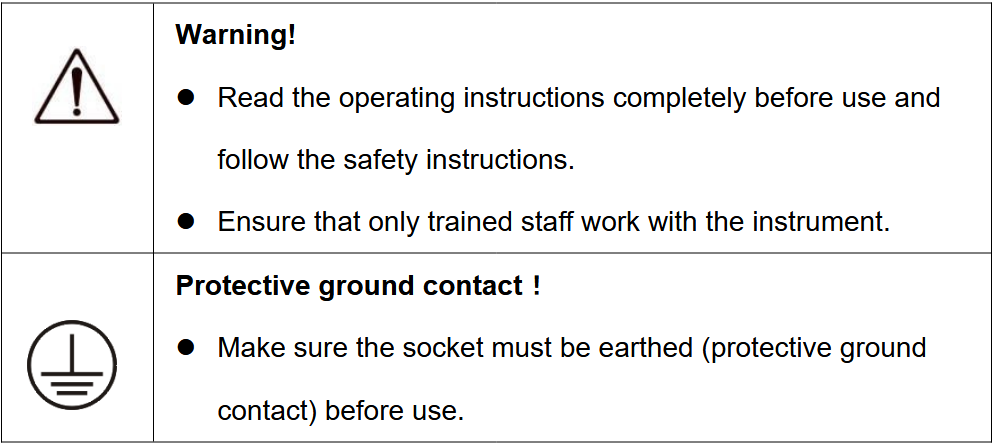
Wear the personal protective equipment in accordance with the hazard category of the media to be processed.
-Splashing of liquids.
-vibration force led to broken glass container.
- The body,hair,clothes,jewelry are inhaled.
Use the instrument following the safety instructions and profession safety rules to avoid any accident.
Users are not allowed to touch moving parts of he instrument to avoid any accidents. Pay attention to protect hands or fingers from rolling when moving the instrument.
Set up the instrument in a spacious area on a stable, clean, non-slip, dry and fireproof surface. Do not operate the instrument in explosive atmospheres, with hazardous substances or under water.
Observe the vessel on the shaking table for medium splashing out of liquid when setting the motor speed. Reduce the motor speed if the instrument is not running smoothly.
Accessories must be securely attached to the instrument so that it cannot come off by it selves and vessels must be firmly placed on the shaking table to avoid any injury.
Working with combustible media or flammable materials may result in additional hazards. Only process media that will not react dangerously to the extra energy produced through processing should be used on the instrument.
Safe operation is only guaranteed with the accessories described in the “Accessories” chapter and by following the operating instructions in full. Always disconnect the plug before fitting accessories. Check the instrument and accessories beforehand for damage each time you use them. Do not use damaged components.
The instrument may only be opened by trained technicians. And always disconnect the plug beforehand.
The operating voltage required as stated on the instrument and voltage in the supply network must match.
Do not cover the instrument. Protect the instrument and accessories from bumps and impacts.
Keep away from high magnetic field.
 Note:
Note:If there is any apparent damage to the system, please do not plug it into the power line
5. Proper use
The instrument is designed for mixing or shaking liquids in schools, laboratories or factories. These shakers are suitable for usage in various attachments for mixing liquids in bottles, flasks, test tubes for a maximum supported weight of 7.5 kg or 2.5 Kg. This instrument is not suitable for use in residential areas or other areas that may cause danger to the user or instrument as mentioned.6. Inspection
6.1. Receiving Inspection
Unpack the instrument carefully and check for any damages which may have arisen during transport. If it happens, please contact manufacturer for technical support.6.2. Listing of Items
| Items | Qty |
| Main unit | 1 |
| Power cable | 1 |
| User Manual | 1 |
Table 1
7. Trial Run
Do trial operation as follows:1. Make sure the required operating voltage and power supply voltage match.
2. Ensure the socket is securely earthed.
3. Plug in the power cable,Power ON the instrument.
4. LCD displays the safe rotary speed limit.
5. LCD displays operating mode.
6. Turn the speed knob to set the rated rotary speed
7. Press the speed knob. And the shaking function is switched ON.
8. Press the motor regulation knob again. and the shaking function is switched OFF.
9. If these operations above are normal, the instrument is ready to operate following the “operation” chapter. If these operations are not normal, the instrument may be in security protection state or be damaged.
10. If the mounting surface is not even, you can improve the stability of the instrument with the adjustable feet. To do this, turn the appropriate foot downward with the wrench until the instrument is standing securely on the surface.
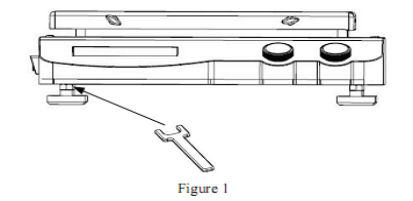
Figure 1
8. Control and Set
8.1 Control
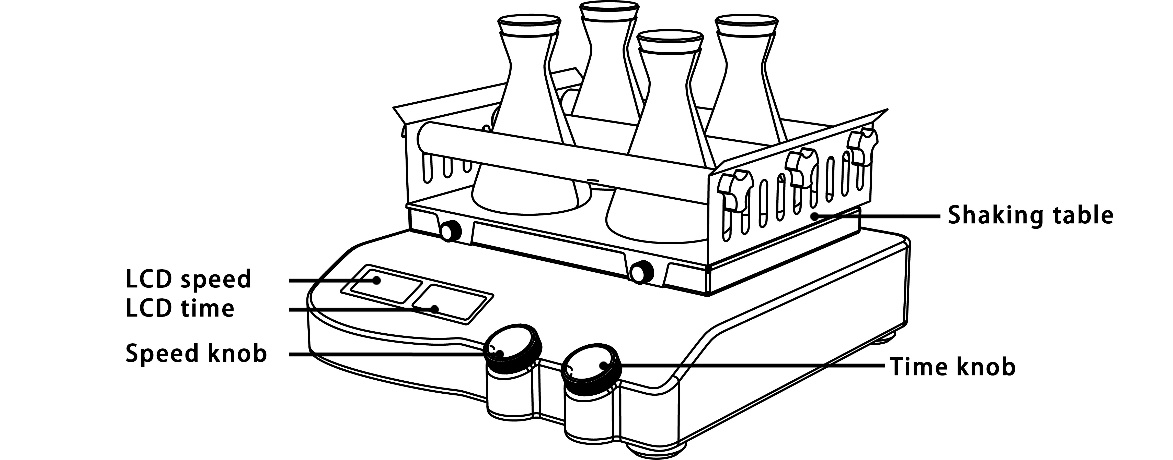
Figure 2
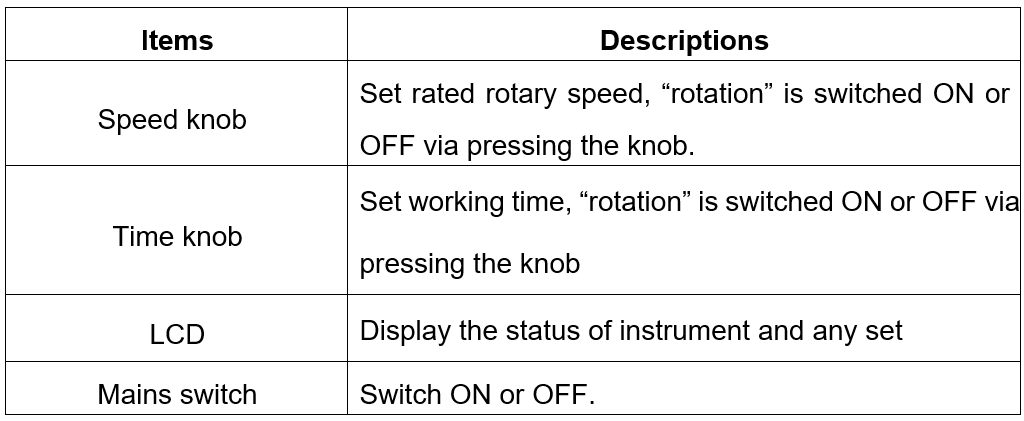
Table 2
Put the instrument on stable and safe place and plug in the mains power. Turn ON the mains switch on the left panel. The instrument starts self-test. The instrument shows rated speed and time after initialization. Turn the speed knob on the left side to set the rated speed. Press the speed knob and characters on the left LCD do not flash any more, and the shaking function is switched ON. Press the speed knob again and characters on the left LCD begin to flash, and the shaking function is switched OFF. Turn the time knob on the left side to set the rated time Press the time knob and characters on the LCD do not flash any more, and the timing function is switched ON. Press the time knob again and characters on the right LCD begin to flash, and the timing function is switched OFF.
8.2 Set
Set timeThe rated shaking time can be set by turning the time knob on the right. A distinction is made for the shaking time setting between timed mode and continuous operation. If continuous mode is selected, the shake can continue its shaking function for any amount of time with the previously set speed. If timed mode is selected, the shaker can run in the set time. After the instrument is powered OFF and restarted, the set time is erased to zero blanking and it switches into offline operating mode. If a target time (max. 19h 59min) and speed are set, users can activate the instrument with pressing the time knob,and the time begin to read, If:
A,pressing the time knob,the speed and the time will stop. Pressing the time knob again, restart the shake function, the time will use the pre-set time.
B,pressing the speed knob,the speed and the time will stop; Pressing the time knob again, restart the shake function, the time not (There are flashing on the right of the LCD ), pressing the time knob again restart the time function. The time will use the pre-set time.
Set speed
The rated speed and upper speed limit can be set by turning the speed knob.The continuous mode can be switched ON with pressing the left knob without the time setting and switched OFF with pressing the knob again. Adjust the motor speed knob slowly in order to keep the instrument running smoothly.

Figure 3
 Note:
Note:The current set speed can be varied at any time.
9. Operating Modes
9.1 Mode A
Operating mode A is the default mode set in factory. After turning ON the instrument with the mains switch, the shaking and timing functions are turned OFF. The LCD displays the set time and speed values. They are adopted or varied when the corresponding functions are turned ON. Note:The current set time can be varied at any time.
After turning ON the instrument, the following process will be shown on the display.
The left LCD displays “SAF” and the right displays the upper speed limit( rpm)which can be set by pressing the speed knob and turning at the same time.
The LCD displays run modes “StA”、“A” or “B” for about 2 seconds.

Figure 4
The set or stored speed value is shown in the left display, and the set or stored time value is shown in the right display. Turn the speed knob and time knob can set the speed and time.

Figure 5
After pressing the speed knob or time knob, the instrument begins to run at the set speed. The actual speed and time remaining are shown in the LCD. If the remaining has reached zero, the shaker stops its motion. Pressing the speed knob alone, the instrument will work at continuous mode (The time function is OFF)

Figure 6
Note:The set values can be varied during shaking. Shaking can be stopped by pressing the left or right knob.
9.2 Mode B
When the instrument is turned ON and values for speed and time are erased to zero, users can set. The upper speed limit that has been set is taken over from operating mode A and cannot be modified. After the power has been turned OFF, the instrument will no longer automatically start up in operating Mode B by itself.After turning ON the instrument and selected run mode, the following process will be shown on the display.
The left LCD displays “SAF” and the right displays the upper speed limit( rpm)which cannot be changed.

Figure 7
The LCD displays run modes “StA” for 2 seconds.

Figure 8
The set speed value is shown in the left display, and the set time value is shown in the right display. Then set the motor rotary speed and time.
Figure 9

Figure 10
After pressing the speed knob or time knob, the instrument begins to run at the set speed. The actual speed and time remaining are shown in the LCD. If the remaining has reached zero, the shaker stops its motion.

Figure 11
Note:The set values can be varied during shaking. Shaking can be stopped by pressing the left or right knob.
9.3 Switching the mode
Switch the operating mode as follows:Turn OFF the instrument with the mains switch.
Hold down both knobs and turn ON the instrument with the mains switch. After 5 second, you can let go of the knobs.
Switch between operating Modes A and B in order.
10. Supported Load
In order to ensure safe, the shaker must only be operated within the supported weight.Make sure the holding surface of the shaker is always clean and level. Ensure the individual shaking vessels must be placed evenly and fastened securely in the middle of the shaking table no matter one or multiple shaking vessels are placed.
11. Faults
When switched ON, the instrument doesn’t workCheck whether the power cable fitted well
Check whether the fuse is broken
The speed cannot reach set value
Check whether it is overloaded
The motor does not start via pressing the speed knob and time knob
Check whether the time is set to zero
12. Interface
The Orbital and Linear Digital Shaker, special adapter and cable are used to link to external device. and the standard 9- pin interface to connect with the PC.The cable between the shaker and the computer used EIA Standard RS232C communication line,corresponding to the DIN 66020 interface.
Transmission method: Asynchronous signal transmission.
Mode of transmission: Fully Duplex. 1 start bit; 8 character bits; 1 stop bit.
Transmission speed: 9600 bit/s
Note:Forbid to plug in and off the power cable when instrument works.
13. Maintenance and cleaning
Use and maintain the instrument in right way to keep it in good operating state in order to lengthen its life time and avoid the damage to the instrument. Only use the cleaning agents which have been approved by manufacturer to clean the instrument. Only use cleanser that we advised as below:| Dyes | Isopropyl alcohol |
| Construction materials | Water containing tenside /Isopropyl alcohol |
| Cosmetics | Water containing tenside /Isopropyl alcohol |
| Foodstuffs | Water containing tenside |
| Fuels | Water containing tenside |
Table 3
For materials which are not listed, please request information from manufacturer or your supplier. Before using another than the recommended method for cleaning or decontamination, the user must ascertain that this method does not destroy the instrument. Wear the proper protective gloves during cleaning of the instrument.
14. Associated standards and regulations
Construction in accordance with the following safety standards:EN 61010-1
UL 3101-1
CAN/CSA C22.2(1010-1)
EN 61010-2-10
Construction in accordance with the following EMC standards:
EN 61326-1
Note:Electrical instrument may not be placed in the cleansing agent for the purpose of cleaning.
The instrument must be cleaned and put it into the initial packaging carton before sending to service for repair, avoiding the contamination of hazardous.
Switch OFF the instrument and put it in the dry, clean, stable place at room temperature in long-term disuse.
15. Specification
| Items | Specifications |
| Voltage [VAC] | 100~240 |
| Frequency [Hz] | 50/60 |
| Power [W] | 30 |
| Shaking movement | Orbital/ linear |
| Orbital diameter [mm] | 10(7.5kg Models) 4.5(2.5kg Models) |
| Max. shaking weight (with attachment) [kg] | 7.5(7.5kg Models) 2.5(2.5kg Models) |
| Motor type | External rotor brushless motor |
| Motor rating input [W] | 28 |
| Motor rating output [W] | 15 |
| Permissible ON time [%] | 100 |
| Speed range [rpm] | 100-350(7.5kg Linear Shaker) 100-500(7.5kg Orbital Shaker) 100-350(2.5kg Linear Shaker) 100-800(2.5kg Orbital Shaker) |
| Speed display | LCD |
| Timer | Yes |
| Timer display | LCD |
| Time setting range [min] | 1–1199 |
| Run type | Time / Continuous operation |
| Dimensions [D×W×Hmm] | 420×370×100 (7.5kg Models) 340×300×100 (2.5kg Models) |
| Weight [kg] | 13.5 (7.5kg Models) 8.1 (2.5kg Models) |
| Permissible ambient temperature [°C] | 5-40 |
| Permissible relative humidity | 80% |
| Protection class acc. To DIN EN60529 | IP21 |
| RS232 interface | Yes |
Table 4
16. Accessories
| Descriptions | |
 | Dish plate form with non- slip mat and fixed string (8 pcs) |
 | Universal attachment |
 | Fixing clip attachment |
 | Lengthways roller Attachment |
 | Fixing clip for flask volume 25 ml |
 | Fixing clip for flask volume 50 ml |
 | Fixing clip for flask volume 100 ml |
 | Fixing clip for flask volume 200/250 ml |
 | Fixing clip for flask volume 500 ml |
 | Universal attachment, black |
Table 5