
Get Price
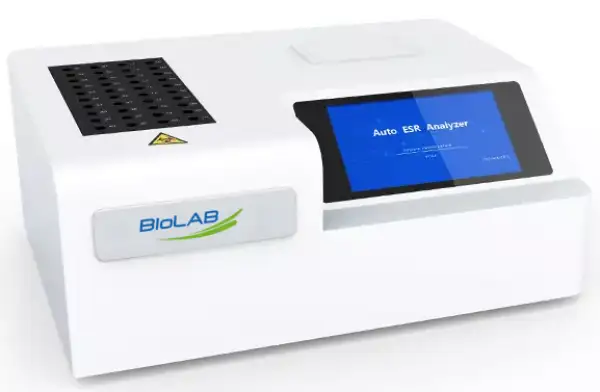
ESR Analyzer BANA-1400
ESR testing has important guiding significance for many clinical diseases, but the traditional standard Westergren method has complicated operation, low work efficiency and large cross-contamination. Automatic ESR analyzer uses advanced infrared light color difference interpretation technology to automatically scan the whole process of red blood cell...
- 1. 7.0-inch color touch screen, real-time display of sample status.
- 2. Randomly insert sample positions for testing at any time.
- 3. Built-in thermal printer, can print dynamic ESR curve.
- 4. Infrared optical detection and precise measurement, the test results automatically complete temperature compensation, pressure volume compensation, and ESR equation K value.
- Up to 3-Year Product Warranty
- US & EU Compliance Standards
- Door-to-Door Shipping
Technical Specifications
Detailed operating and construction parameters for this model.
| Model | BANA-1400 |
| Application | Erythrocyte sedimentation rate analysis |
| Measurement Method | Infrared detection |
| Analysis Result | Westergren ESR value(mm/hour) |
| Throughput | Maximum 80 tests/hour |
| Analysis Channels | 40 (load up to 40 samples for analysis at the same time) |
| Loading Type | Load samples at any time, measure at any time |
| Analysis Time | 30 minutes or 60 minutes selectable |
| Sampling Interval | 3min |
| Measurement Range | 0~150mm/h |
| Temperature Compensation | The result is automatically corrected to the result at 18°C |
| Result Resolution | 1mm/1h and 1mm/2h |
| Blood Level Range | 46mm~64mm |
| HCT Range | 0.2~1.0 |
| Repeatability | 0~10mm/h, SD≤1.5mm/h; >10mm/h, CV≤15% |
| Channel Consistency | 0~10mm/h, SD≤1.5mm/h; >10mm/h, CV≤15% |
| Reading Accuracy | ±0.1mm |
| Display | 7-inch color LCD touch screen |
| Communication Interface | Type-C, USB interface |
| Printer | Built-in thermal printer |
| Power Supply | AC110~220, 50/60Hz |
| External Size(W*D*H) | 284*355*208 mm |
| Net Weight | 6.3kg |
| Package Size(W*D*H) | 339*544*249 mm |
| Gross Weight | 9.4kg |
Product Features
Key design, performance, usability, and safety advantages.
Applications Explore common laboratory, research, industrial, and process applications.
Applicable to hospital inspection departments, medical laboratories, research institutes, universities, disease control centers, etc.
Operating Manual View instructions, operating procedures, safety information, and maintenance guidance.
1. Instructions
1.1 Users
1.2 Instrument Size and Weight
1.3 Transport and Storage
1.4 Storage
1.5 Warranty and Repair Services
1.6 Sales Service
1.7 Safety Symbol
1.8 Safety Precautions
2. Overview
2.1 Main Parameters and Features
2.2 Product Structure
3. Measurement Principle
3.1 Principle
3.2 Method
3.3 Formula
3.4 Result Correction
4. Installation
4.1 Installation Requirements
4.2 Unpacking
4.3 Installation Acceptance
5. Software Operation
5.1 Power on
5.2 Main Menu
5.3 Patient ID
5.4 Data Query
5.5 Data Edit
5.6 Setting
6. Instrument Operation
6.1 Principle of Reading
6.2 Sample Preparation
6.3 Sample Mixing
6.4 Sample Loading
6.5 Sample Removal
6.6 SOP
6.8 Print
7. Maintenance
7.1 Daily Maintenance
7.2 Common Faults
7.3 Fuse Replacement
8. Safety Protection and Handling
1. Instructions
1.1 Users
The audience of this user manual is the following laboratory professionals:
Personnel who perform the daily operation of the instrument;
Personnel who perform instrument maintenance and troubleshooting;
A person who learns the operation of an instrument.
Before using this instrument, please read the user manual carefully and then operate the instrument correctly. Please keep this user manual for reference at any time. Warranty is voided if the precautions described in this user manual are not followed during use.
In order to keep the instrument protection effective, the operator should consult and follow the instructions in this manual.
 Warning : This instrument is for use by inspection professionals, physicians or laboratory technicians who are trained by the company or company agent only.
1.2 Instrument Size and Weight
Instrument Size: 284mmx355mmx208mm
Instrument Weight: 6.3kg
1.3 Transport and Storage
Transportation
The equipment should be protected from rain and snow splashing, inversion and mechanical collision during transportation, and must not be mixed or transported with corrosive substances. The signs on the packing box of this equipment meet the requirements of ISO 780 "Packaging - Distribution packaging - Graphical symbols for handling and storage of packages ". The packing box is equipped with simple shockproof facilities, which are suitable for air, railway, road and ship transportation.
1.4 Storage
The instrument should be stored in a place or warehouse where the ambient temperature is -20°C~55°C, the relative humidity is ≤93%, clean and ventilated, and can prevent the sun, rain and chemical corrosive harmful gases.
When the instrument is stored for more than 6 months, the instrument should be taken out of the box, and after 4 hours of power on, the instrument should be put into the box according to the direction shown on the box and placed in the warehouse. When storing the instruments, do not stack them, and keep them away from the ground, walls and roofs.
1.5 Warranty and Repair Services
The warranty period of the purchased instrument is subject to the sales contract. Consumables: Refers to disposable consumable materials that need to be replaced after each use or fragile materials that need to be replaced regularly. Consumables have no warranty service.
Please note that the following situations will not be covered under warranty:
The serial number of the instrument provided by the customer is incorrect (our company confirms the warranty with the serial number).
Our company is not responsible for equipment failure and damage in the following circumstances, or direct or indirect damage during use:
Failures or damages caused by violation of the usage, precautions and purpose of use described in this user manual.
Failures or damages caused by violation of the usage, precautions and purpose of use described in this user manual.
Failures or damages caused by the operation of inspection professionals, doctors or laboratory personnel not trained by our company or the agent designated.
Failures or damages caused by maintenance or modification by companies other than those designated by our company.
Failures or damages caused by using instruments not specified by our company.
Failures or damages caused by the operating environment (power supply conditions, installation environment, etc.) not specified by our company.
Failures or damages caused by irresistible natural disaster.
Failures or damages caused by the company's unwitting movement or transfer (transportation) after installation.
Other failures not caused by the product itself.
During the warranty period, if the fault is caused by the defects of our company's design and manufacture, it will be repaired free of charge, and our company will take corresponding countermeasures according to the content of the fault.
After the warranty period expires, the company can continue to provide maintenance services for a fee.
Please order consumables or accessories from our company one month in advance.
1.6 Sales Service
After-sale service
Please contact our customer service center.
Keep in repair
Confirmation of the fault and maintenance method: First contact the customer service center, confirm the fault, and confirm the maintenance method is door-to-door maintenance or back to factory repair.
Maintenance cost: Negotiate with the company according to the specific situation.
Freight rate: If the instrument is shipped to the company for maintenance, the user shall bear the freight rate (including customs costs).
Return
Get the right to return the license. Contact the customer service center of the company and inform the product serial number (see on the instrument nameplate for details) to explain the reason for the return. If the serial number of the product cannot be clearly recognizable, the company will not return the return.
On the premise of obtaining the right to return permission, please go through the relevant procedures according to the requirements of the company.
1.7 Safety Symbol
Various safety symbols are used in this user manual and on the instrument to remind you of matters needing attention during operation. As shown in the table below:
Symbol | Title | Meaning |
| Biological risk | Used for sample injection probe and waste liquid drain. Indicates that there are potential biological risks associated with the medical device. |
| Warning | Indicates the need for the user to consult the instructions for use for important cautionary information such as warnings and precautions that cannot, for a variety of reasons, be presented on the medical device itself. If the user does not use the instrument in accordance with the instructions in the manual, the protective measures provided by this instrument may become invalid. |
| This way up | This is the correct upright position of the distribution packages for transport and/or storage. |
| Fragile, handle with care | Contents of the distribution packages are fragile therefore they shall be handled with care. |
| Keep dry | Distribution packages shall be kept away from rain and be kept in dry conditions. |
| Do not roll | Distribution packages shall not be rolled or turned over. |
| Do not stack | Stacking of the distribution packages is not allowed and no load shall be placed on the distribution packages. |
| Marking of WEEE | Indicates the waste electrical and electronic equipment (WEEE), which is designed for use with a voltage rating not exceeding 1000V for alternating current and 1500V for direct current, when marked with this marking the waste management should be in accordance with Directive 2002/96/EC(WEEE). |







1.8 Safety Precautions
To use this instrument safely, please read the following safety precautions carefully. Any operation that violates the following safety precautions may cause personal injury or damage to the instrument.
Electricity Safety
For effective protection against electrical hazards, please observe the following precautions.
 WARNING:
• This instrument is only suitable for non-household use and cannot be directly connected to the residential low-voltage power supply network.
• If there are external switches or fuses or over current protection devices, these switches or circuit breakers should be located close to the equipment.
• Do not place the device in a location where it is difficult to access the disconnect device, and if the power plug cannot be disconnected immediately in an emergency, make sure that the wall socket to which the instrument is connected is accessible by hand at all times.
• After the installation is completed, the customer is not allowed to move the instrument without authorization. If it must be moved, please contact our engineer for on-site service or remote guidance.
• The system is grounded through the ground wire on the power cord. To avoid electric shock, the ground wire of the power supply must be grounded.
• The AC power supply must be stable, and it is forbidden to share the power supply with high-power electrical appliances.
• When the user is running or maintaining the instrument, do not touch the power interface at the rear of the system, otherwise there may be a risk of electric shock.
• When the main power of the instrument is on, non-authorized service personnel should never disassemble the instrument case.
• If the solution is spilled into the instrument, it may cause instrument malfunction and electric shock. Please do not place objects on the instrument. In case of accidental spillage, please turn off the power immediately and contact our service center or local agent.
• Do not plug in or unplug the power supply with wet hands.
• Disconnect the instrument from all power sources before opening it for any maintenance or repair. If such work must be carried out, maintenance should only be carried out by skilled personnel who understand the dangers.
• Make sure that the replaced power supply meets the requirements of this instrument.
• If the instrument may have been damaged, it should be disconnected from the power outlet and not operated again.
Fire and Explosion Protection
To prevent fire and explosion, please observe the following precautions.
WARNING:
Alcohol is flammable, use it with care.
Biohazard Protection
For effective protection against biological risks, please observe the following precautions.
 WARNING:
• All liquids and solids in the laboratory are considered biohazardous and the user must take the usual laboratory precautions.
• All clinical samples are considered to be potentially infectious. Improper use may lead to infection. Do not touch the samples directly with your hands. Be sure to wear gloves and work clothes when operating to prevent infection, and wear protective glasses if necessary.
• If the sample accidentally comes into contact with the skin, please handle it according to the operator's work standards immediately and consult a doctor.
Waste Disposal
To prevent environmental pollution and personal injury caused by waste disposal, please observe the following precautions.
WARNING:
• Please comply with the relevant local laws and regulations for the disposal of used samples and other wastes.
Device out of Service
To reduce or eliminate the risks involved in taking the equipment out of service, such as during service, transportation, or disposal, observe the following precautions.
WARNING:
• In the process of equipment maintenance, transportation or processing, please clean and disinfect the surface of the instrument and other components with biological risks, and remind relevant personnel of the risks of the instrument to avoid biological risks or other hazards during the transportation or maintenance process.
Operation Precautions
In order to use this instrument correctly and effectively, please read the following precautions carefully.
WARNING:
• Don't smoke or eat near the apparatus.
• During operation, avoid direct sunlight.
• Don't change the system date and time during user software startup or operation.
Instrument Use
WARNING:
• This instrument is used to analyze the sedimentation rate and cell volume of erythrocytes in blood.
• When making clinical judgments based on analytical results, please also consider clinical symptoms or other test results.
Use Environment
CAUTION:
• The electromagnetic environment should be assessed before operating the equipment.
• Please install the instrument correctly according to the installation environment specified in the user manual. Do not place the device in a location where it is difficult to access the disconnect device. Installation and use of this instrument outside the specified conditions may give unreliable results and may result in damage to the instrument.
Electromagnetic Interference
CAUTION:
• In order to ensure the normal operation of the instrument, it is the user's responsibility to ensure the electromagnetic compatibility environment.
• Electromagnetic interference may affect the normal operation of the equipment. It is forbidden to install in an environment with strong electromagnetic interference.
• It is forbidden to use other medical equipment that may generate electromagnetic interference around the instrument, otherwise it may affect the normal operation.
• This device complies with EMC requirements. The device may cause radio frequency interference in indoor environments. Appropriate measures should be taken to reduce the interference.
Parameter Settings
CAUTION:
• The instrument needs to set parameters such as sample size and sample type. When setting these parameters, please follow the relevant instructions in the user manual.
Instrument Maintenance
CAUTION:
• Please follow the relevant instructions in the user manual for instrument maintenance. Improper maintenance measures may result in incorrect analytical results and may even result in instrument damage or personal injury.
• If the instrument is placed for a long time, dust may accumulate on the surface. When cleaning, please use a clean soft cloth soaked in water and wring it out, gently wipe the surface, and dip a small amount of medical alcohol if necessary. Do not use organic solvents. After cleaning, dry the surface with a dry cloth.
• Before cleaning, turn off all power to the instrument and unplug the power cord. During the cleaning process, please take necessary measures to prevent water droplets from entering the instrument, otherwise it may cause instrument damage or personal injury.
• If the instrument needs to be repaired due to failure, please contact the company's customer service center. During the maintenance period, the instrument may need to be out of use or transported. Please operate with care to avoid the risk of biological infection, electric shock, and moving parts due to maintenance.
2. Overview
BANA-1400 adopts indirect measurement method to realize fast measurement of ESR. Its measurement results have good correlation with the values measured by Westergren method. The whole measurement process is completely controlled by a microcomputer, and the operation is extremely simple. This instrument can not only measure the curve of the entire sedimentation process, but also realize the automatic correction of the temperature of the ESR value, as well as the storage, display and printing of the ESR sedimentation process curve and the ESR value.
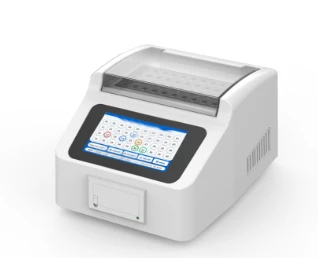
Figure 1
2.1 Main Parameters and Features
Scope of application | Blood erythrocyte sedimentation rate determination (measurement range: 0-150mm/h) |
Measurement methods | Infrared detection |
System function | Data Query, Patient ID, Correct, Abnormity warning, Power-off protection |
Analysis time | 30 minutes and 60 minutes optional (sampling interval: 3min) |
Analysis capacity | Maximum 80 tests/hour |
Analysis channels | 40 (load up to 40 samples for analysis at the same time) |
Loading type | Load samples at any time, measure at any time |
Analysis results | ESR value measured by Westergren method (mm/h) |
Temperature correction | The result is automatically corrected to the result at 18°C |
Result resolution | 1mm/1h and 1mm/2h |
Height range of anticoagulated blood | 45mm~64mm |
Compaction measurement range | 0.20-1.00 |
Test pass rate | ≥90% |
Repeatability | SD≤1.5mm/h (ESR≤10mm/h) CV≤8% (ESR>10mm/h) |
Channel consistency | SD≤1.5mm/h (ESR≤10mm/h) CV≤8% (ESR>10mm/h) |
Reading accuracy | ±0.1mm |
Report accuracy | ±1mm |
Display | 7 inch color LCD touch screen |
Communication Interface | USB ,Type-c |
Printing | Built-in thermal printer |
Instrument size (W x H x D) | 284mmx355mmx208mm |
Instrument weight | 6.4kg |
Voltage | AC220V 50Hz |
Rated power | 60VA |
Maximum storage capacity | 20,000 data entries |
Table 1
2.2 Product Structure
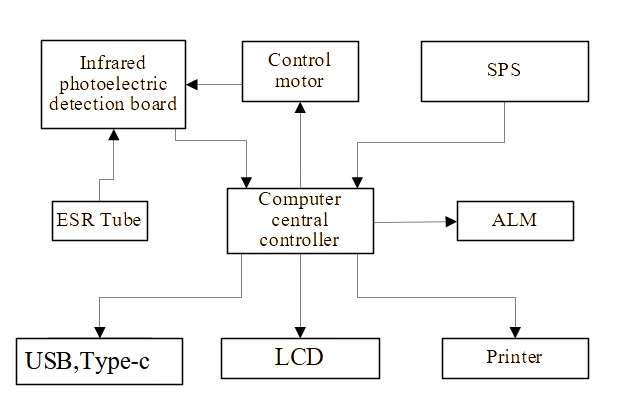
Figure 2
(1) Computer central controller: by controlling the actions of each component of the instrument, and processing and calculating the ESR value collected by the detection board, to complete the work procedure set by the instrument.
(2) SPS: Convert the input 220V AC voltage into various DC voltages and send them to each working part.
(3) LCD: Display output measurement results, display instrument operation prompts, and confirm user instructions.
(4) USB Type-c: transmit sample data to computer.
(5) Printer: out the test results.
(6) ESR Tube: Place the blood sample.
(7) Infrared photoelectric detection board: The detection board equipped with infrared transmitting and receiving tubes (TX-RX) moves up and down to measure the interface height of red blood cells and transparent plasma.
(8) Control motor: precisely drive the infrared photoelectric detection board to move up and down.
(9) Temperature Detector: Detects the internal temperature of the instrument in order to perform temperature correction on the measurement results.
(10) ALM: Alarm prompts for misoperation of the instrument, etc.
3. Measurement Principle
3.1 Principle
Collect blood samples into ESR tubes containing anticoagulant, and place them vertically on the sample holder after mixing. Under the action of gravity, the blood cells will gradually settle, leaving a clear section of plasma in the upper part of the ESR tube. This instrument measures the interface between blood cells and transparent plasma by moving up and down the infrared sending and receiving tubes (TX-RX) on the detection board, and can measure the dynamic sedimentation changes of red blood cells within a certain period of time.
3.2 Method
The reading principle of the ESR analyzer is described as shown in Figure 2-1. The moving range of the infrared transmitting and receiving tubes (TX-RX) is C, and the reading terminals of the ESR tubes are: L is the bottom end, and H is the highest end.
During the movement of the infrared sending and receiving tubes from the bottom end (L) to the highest end (H), if the infrared light cannot reach the receiving tube, it means that the infrared light is blocked by the high density of red blood cells. If the infrared light can pass through the ESR tube to the receiver tube, the signal from the receiver tube tells the computer to start calculating the distance required to reach the mobile terminal.
L1: The height of the blood in the ESR tube at time zero (blood sample initial height). L2: The erythrocyte sedimentation surface in the ESR tube is at the height of 30 minutes. L3: The height of the erythrocyte sedimentation surface in the ESR tube at 60 minutes. K: The height of blood in the ESR tube when the infrared sending and receiving tubes are moved to the bottom. K is determined by the ESR analyzer itself and can be set in the software.
Even if 1.6 mL of anticoagulated whole blood is constantly placed in the ESR tube, the blood height in the ESR tube may vary slightly from sample tube to sample. In order to compensate for this change, the ESR analyzer takes into account the initial height value within a certain height range, and uses the principle of percentage settlement to correct for these changes.
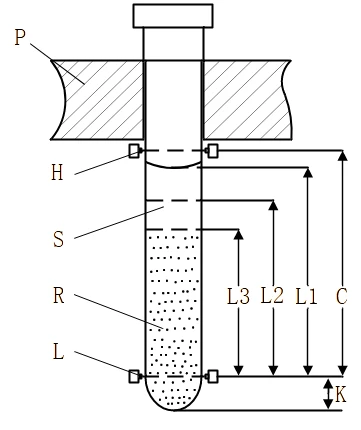
Figure 3
P: ESR tube sample holder.
H: The highest position of the infrared transmit and receive tubes (TX-RX).
L: The bottom position of the infrared transmit and receive tubes (TX-RX).
R: Red blood cells.
S: Clear plasma.
C: Detection range.
K: The distance from the bottom of the ESR tube to the bottom of the infrared sending and receiving tubes.
L1: Initial height (at time zero).
L2: The altitude position of the RBC at 30 minutes.
L3: The altitude position of the RBC at 60 minutes.
3.3 Formula
The formula for calculating the percentage of sedimentation in 30 minutes is as formula:
%S30=100(L1-L2)/(L1+K) (1)
The formula for calculating the percentage of sedimentation in 60 minutes is as formula:
%S60=100(L1-L3)/(L1+K) (2)
After summarizing a large number of experimental data from several hospitals and laboratories, the sedimentation percentage corresponding to 30 minutes in the ESR tube was converted to the ESR value of the Westergren method in 1 hour and the calculation formula for converting the sedimentation percentage corresponding to 60 minutes to the ESR value of the Westergren method in 2 hours is the formula:
Y=ax+b (3)
In the formula: Y is the ESR result of the Westergren method, x is the sedimentation percentage, and a and b are constants. That is, selecting (a1, b1) and %S30 values can calculate the ESR value of the Westergren method at 1 hour, and selecting (a2, b2) and %60 values can calculate the ESR value of the Westergren method at 2 hours.
Hematocrit =RBC height after centrifugation / (L1-11.32) x 100%
Notice: 11.32 means the height occupied by 0.32mL of anticoagulant in the ESR tube.
3.4 Result Correction
The ESR value at different temperatures can be obtained from the formula (3), and the ESR value of the standard Westergren method at 18°C can be obtained by temperature correction. The temperature result correction adopts interpolation correction, which is automatically carried out by the instrument, and the method is as shown in Table 2-1 (manual correction reference table). If the temperature correction is not set during measurement, manual correction can also be performed. For manual correction, please refer to the following table:
18°C Correction value | ≤16°C Measurements | 17-19°C Measurements | 20-23°C Measurements | 24-26°C Measurements | 27-32°C Measurements |
Note 1 | 1-7/+20% | No correction required | 1-7/-5% | 2-9/-16% | 1-12/-37% |
8-13/+12% | 8-15/-5% | 10-18/-16% | 13-22/-37% | ||
14-22/+11% | 16-26/-5% | 19-31/-20% | 23-36/-35% | ||
23-31/+11% | 27-36/-4% | 32-43/-19% | 37-50/-33% | ||
32-40/+11% | 37-47/-4% | 44-58/-18% | 51-64/-31% | ||
41-50/+9% | 48-57/-4% | 59-64/-17% | 65-74/-29% | ||
51-59/+9% | 58-67/-3.5% | 65-72/-16% | 75-87/-26% | ||
60-67/+11% | 68-77/-3% | 73-84/-15% | 88-98/-24% | ||
68-76/+11% | 78-87/-2.5% | 85-98/-14% | 99-109/-23% | ||
77-85/+11% | 88-98/-3% | 99-108/-13% | 110-119/-21% | ||
86↑/+11% | 99↑/-3% | 109↑/-13% | 120↑/-20% |
Table 2
The BANA-1400 ESR Analyzer has a result correction range of 15°C-32°C. When the temperature is lower than 15°C, please manually correct it to below 16°C, and when it is higher than 32°C, please perform manual correction at 27-32°C.
It is recommended that the temperature working range of the ESR analyzer is 15°C-30°C.
Note 1: The value in the table is the range of the measured value, followed by / is the data to be corrected a%, the correction value at 18°C is the measured value at the measured temperature of the instrument plus or minus the measured value x a% (recommended to be rounded to an integer ).
4. Installation
4.1 Installation Requirements
The installation of the ESR Analyzer BANA-1400 is very convenient, but the following points must be paid attention to during installation:
1. The power cord of the ESR Analyzer BANA-1400 is a three-core power cord, and the socket must be well grounded to ensure safety and reliable operation.
2. The ESR Analyzer BANA-1400 should be placed horizontally to ensure that the ESR tube can remain vertical after being inserted into the sample holder, and the instrument should be placed stably, reliably, and to prevent vibration.
After completing the above preparations, the instrument can be powered on for self-checking and system initialization. Instrument settings include date, time, working mode, initial measurement number, temperature correction, and volumetric measurement. We suggest:
(1) Please read the operating instructions carefully before setting up the instrument.
(2) The working mode of the instrument is usually set to 30 min.
(3) Instrument temperature correction function is off by default
(4) The instrument is usually set to off for the compaction measurement.
Use environment requirements:
a) Indoor use only.
b) Power supply voltage: AC220V 50Hz.
c) The altitude does not exceed 2000m.
d) Ambient temperature: 0°C~+40°C.
e) Relative humidity: ≤93%.
4.2 Unpacking
After the instrument arrives, please check the packaging carefully to see if there is any physical damage and check whether the anti-vibration label has turned red. If there is any damage or if the label has turned red, please contact our company or the local agent. After confirming that there is no damage to the package, unpack as follows:
• Make sure the arrow on the box is upright.
• Open the accessory box and check whether the accessories are complete against the packing list. If there are any missing, please contact the company or local agent in time.
• Check the appearance of the instrument carefully to see if there is any damage to the parts caused by improper transportation. If there is any damage during transportation, please contact the company or local agent immediately.
Carry method
• Make sure that the appearance of the instrument is undamaged and all parts are in good condition before carrying.
• During all moving and transportation, the instrument must be kept upright, not inclined or sideways.
• When carrying, try to avoid vibration. After carrying out , you should check and debug it first, and then use the instrument after it is normal.
4.3 Installation Acceptance
1. Connect the power supply and earth wire, after the power switch is turned on, the instrument passes through initialization and then enters the standby state.
2. Operate each function menu according to the user manual. If each function operates normally, it is judged that the instrument is operating normally.
3. Take the QC product for the actual test. If the test result meets the requirements and can be printed correctly, the performance of the instrument is judged to be qualified.
5. Software Operation
After the instrument is turned on, it will automatically perform a system self-check. Make sure the instrument is warmed up for 15 minutes to keep the instrument in optimal working condition.
5.1 Power on
Turn on the power switch, put it in the "I" position, the screen will light up.
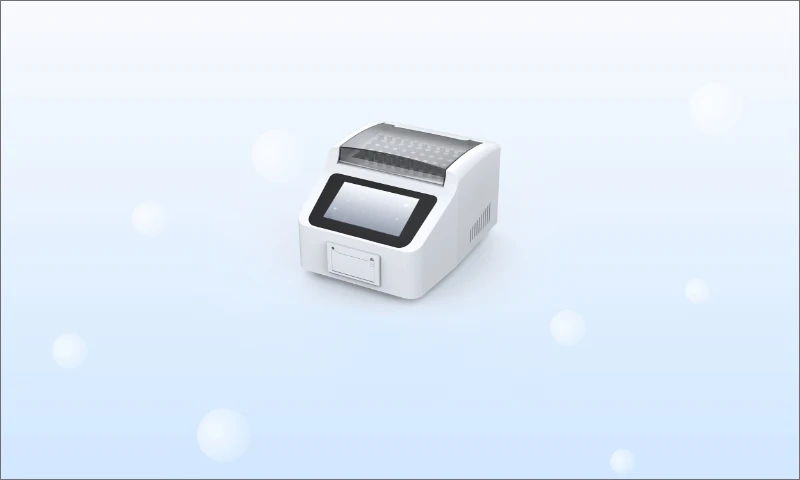
Figure 4
The system starts to perform self-check inside the instrument, and the interface displays the real-time temperature. At this time, the system checks the connection of the power supply, memory, and printer, and makes the internal circuit reach a thermally stable state.
5.2 Main Menu
After the instrument self-test is completed, it will enter the main interface, and the screen will display the working mode, temperature, time, working status and other information of the instrument. The working mode can be modified from the SETTING menu. In the lower left corner is the temperature correction indicator box, which displays the current temperature of the tested sample corrected to 18°C. In the middle is the status mark, the waiting status as shown in the figure means that the detection board is not running, and the status mark shows the working status during the running process. The lower right corner is the time and date. You can click the time position to enter the time and date setting page.
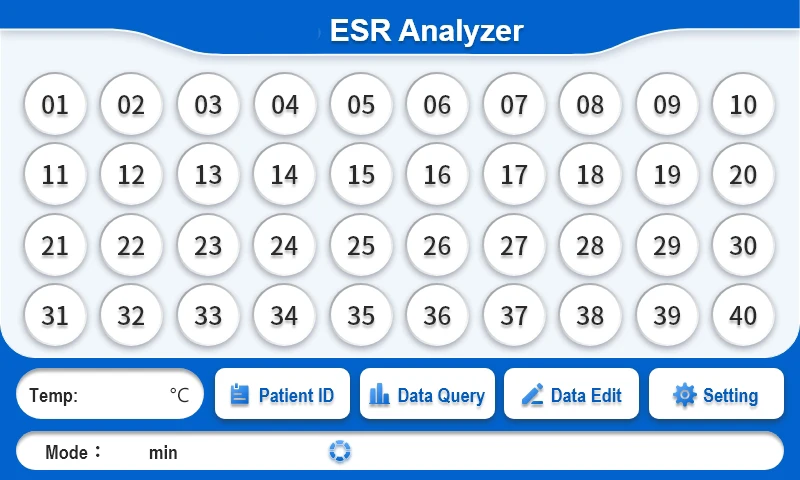
Figure 5
The following figure shows the function display box of the main interface. You can directly click the screen to select the function. The numbers on the screen represent the instrument channels. Before the ESR tube is placed, there is no sign below the numbers. The color of the flag indicates the state of the channel during the test.
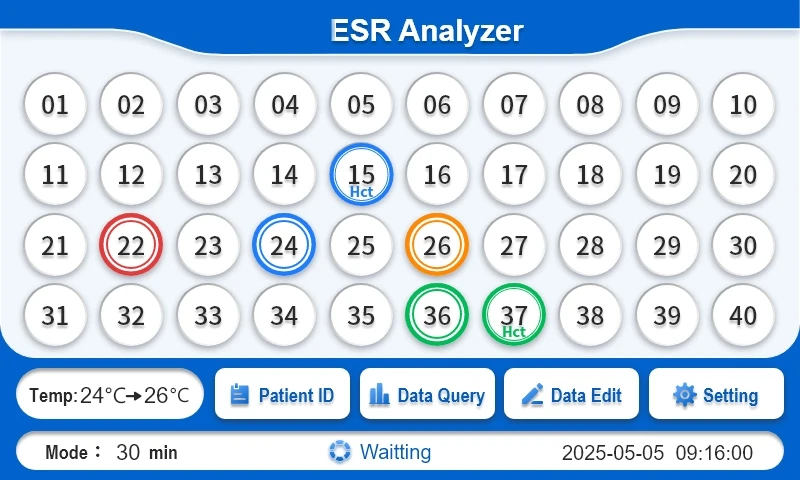
Figure 6
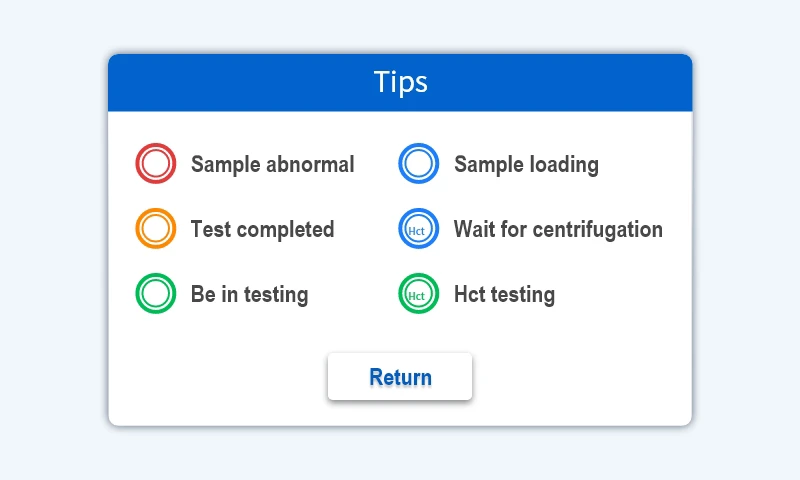
Figure 7
Blue: Indicates that an ESR tube has just been inserted in this channel, and the instrument detects the sample.
Green: Indicates that the channel sample is being tested, please do not remove the ESR tube during the test.
Red: Indicates that the channel test is abnormal and the blood height is out of range, please remove the ESR tube.
Yellow: Indicates that the channel sample test is completed and the ESR tube can be removed.
Hct blue: This channel can be used for Hct test, please centrifuge the sample and put it back.
Hct green: Indicates that the channel is undergoing a volumetric measurement, please do not remove the ESR tube.
Notice:
(1) The ESR tube cannot be pulled out at will during the test.
(2) The ESR tube cannot be detected when the instrument is in the standby state.
Click the area of the channel on the main interface to enter the single-channel test interface, which is displayed as follows:
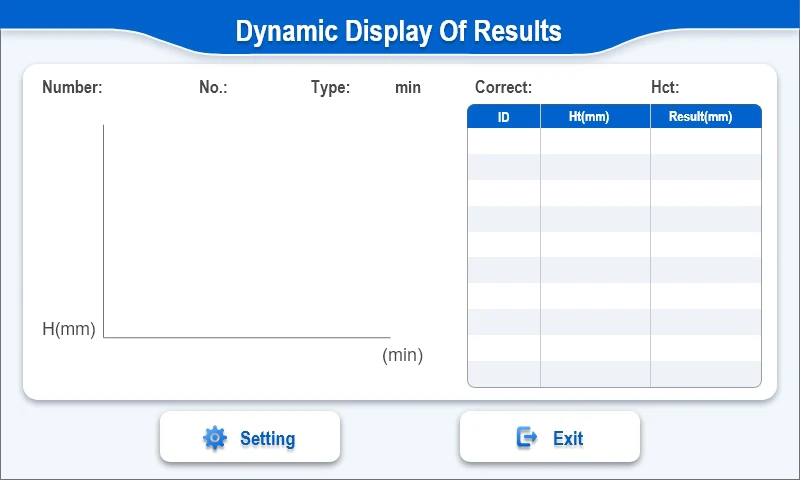
Figure 8
In this interface, you can view the test mode, result, test curve, channel number, sample number and other basic settings. If the relevant settings are incorrect, you can click [Setting] on this interface to change. Before the sample test is completed, the test mode, temperature correction, Hct and the K value of the erythrocyte sedimentation equation settings can be modified in this interface. After the test is completed, the data will be printed automatically.
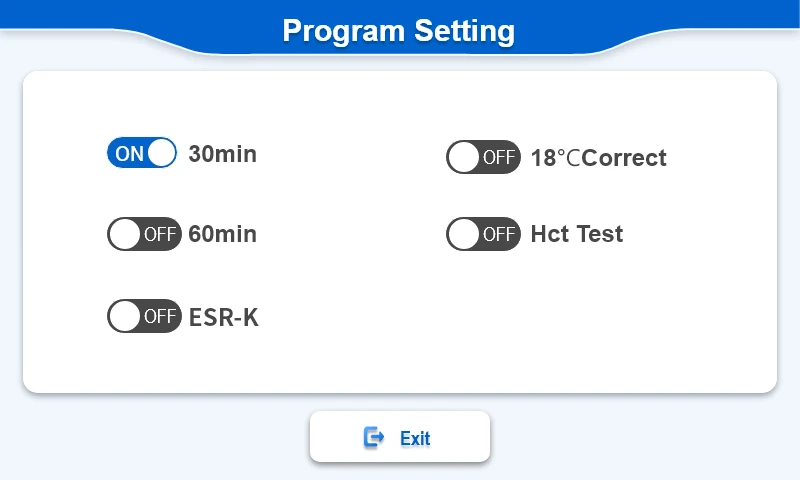
Figure 9
5.3 Patient ID
Press the Patient ID key in the main menu, the analyzer enters the Data Edit interface, The scanning function (optional) needs to be accessed in this interface before the test. Click the blank space before the number ( it will remain at the selected position). The scanning gun will move in a sequential backward order from the position indicated (1 ~ 40 in a cycle). After scanning once, the position will automatically advance to the next one.
The settings interface is as follows:
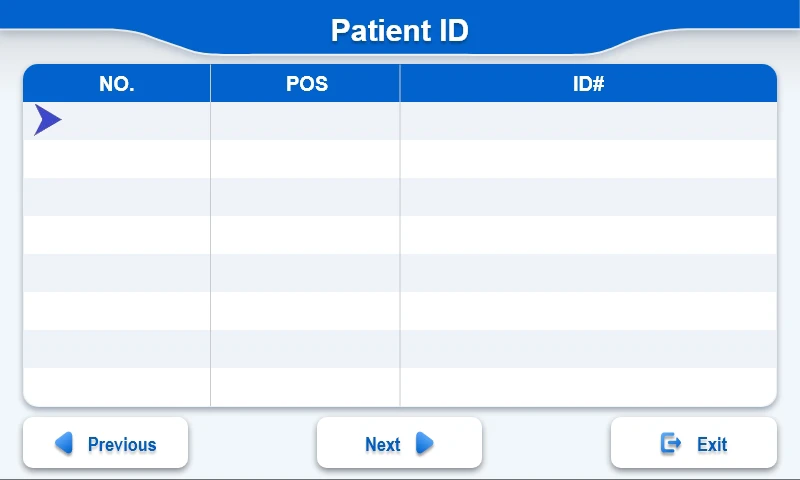
Figure 10
The "Next" and "Previous " buttons in the data query function bar allow you to query the results by time sequence. For example, as shown in Figure 4-7, the "NO." on the left represents the sample number, "POS" shows the channel number, and the "ID#" column is for entering the patient number. After placing the sample, you can enter the patient number in this interface. The lower part of the interface contains the function keys for performing forward page, backward page and exit operations.
5.4 Data Query
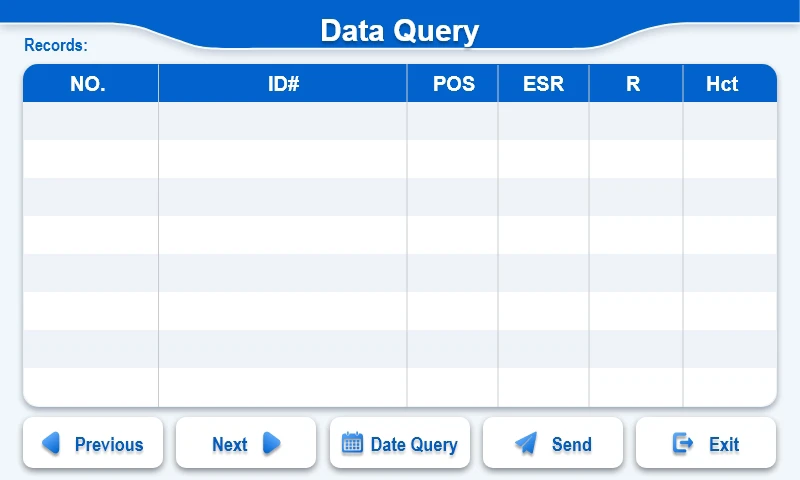
Figure 11
[Next] and [Previous] in the function button of Data Query can query the results by time. The "NO." column is the sample serial number, and the "ID#" column is the patient number."POS" indicates the position of the corresponding sample within the channel. (1 - 40), "ESR" refers to the measurement result of the westergren method "T", "ERR", "R", and "T" can be displayed in the [R] status bar. "ERR" indicates the result of an error sample. "T" indicates the sample being tested; "R" means the temperature correction of 18°C for the results during testing; "N" indicates that the temperature of 18 °C is not corrected for the result. The specific data below "Hct" is the calculated value of the pressure measurement.
The data query displays the data of the current day. After entering the date query section, you can view historical data by entering specific dates. (When entering the year, use the last two digits for the query. For example, to query the data of July 25, 2024, enter 24/07/25).
In the data query interface, you can click the test result you want to query, and enter the "Result Review" interface to view the sample test curve and other detailed information,No.: Indicates the sample number, which is the serial number of test result storage and result printing.
Pat-ID: Entered patient ID.
Mode: 30min/ 60min
POS: The test channel where the ESR tube is placed.
ESR: The uncorrected temperature corresponds to the results of the Westergren method.
ESRc: 18°C after calibration corresponds to the result of the Westergren method.
Vm: The maximum settlement value within a certain period of time.
Hct: The results of the test for hematocrit.
K: K represents the constant in the erythrocyte sedimentation equation, which is a value used in the formula relating erythrocyte sedimentation rate (ESR) to hematocrit.
Date: The length of time the sample was placed.
Print: print the result information of this interface.
Send: Lis uploaded.
Exit: Return to Data Query.
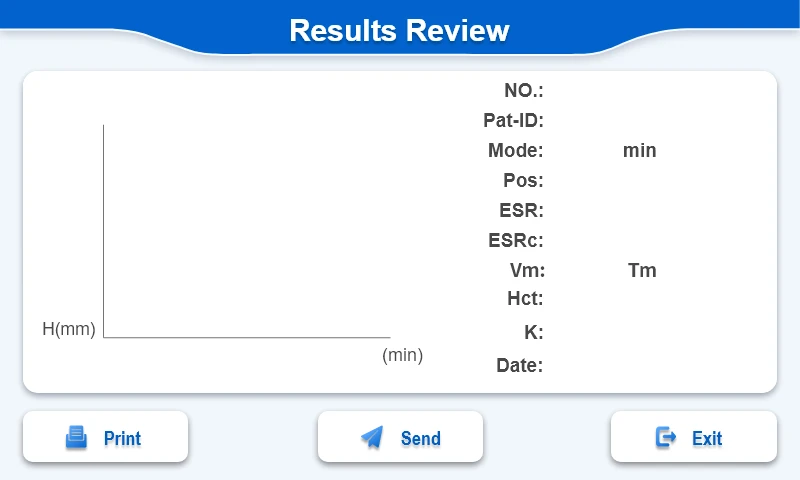
Figure 12
5.5 Data Edit
Select "Data Edit" on the main menu to enter this page, edit or modify the sample number with the result in the ID column of this interface, other information is the same as the data query.
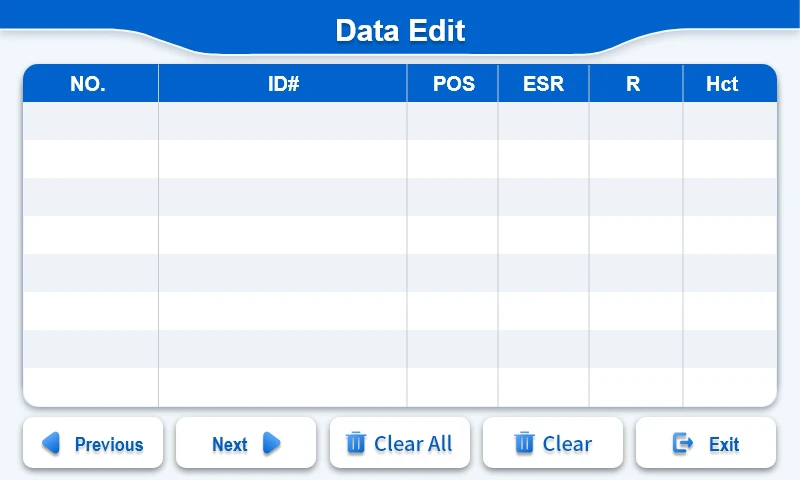
Figure 13
Clear All: Clear all data results with one click. Note: Results cannot be recovered after clearing them.
Clear: Delete results from early to latest.
Exit: Return to the main interface.
5.6 Setting
Select "Setting" in the main menu to enter the following interface.
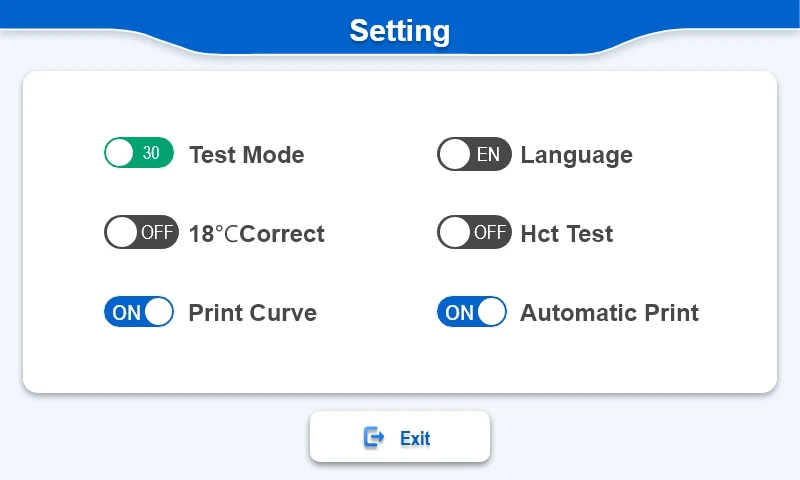
Figure 14
The instrument has 30 min (corresponding to 1 hour under the Westergren method) or 60 min (corresponding to 2 hours under the Westergren method) two working modes to choose from. 18°C Correct can choose to enable or disable the temperature correction function (the test curve will display the corrected curve when enabled, and the uncorrected test curve will be displayed when disabled).
The Language function can switch between Chinese and English languages.
Hct Test can choose to enable or disable this function, and customers can choose to disable the function when Hct test is not needed to save testing time.
6. Instrument Operation
6.1 Principle of Reading
We use the method of vertical movement of the detection board with infrared photocells to monitor 40 ESR tubes synchronously. The detection board collects one data every 0.16mm movement (ie the instrument resolution), and the detection period is 3 minutes. When the ESR tube is inserted into the sample holder of the instrument, the instrument automatically detects the ESR tube and starts timing, and monitors the blood level in the ESR tube. The acceptable range of blood height set by the instrument is 45mm-64mm (calculated from the bottom of the ESR tube), and the recommended height is 55mm (the corresponding volume is 1.6ml, that is, 0.32mL of anticoagulant, 1.28mLof whole blood). If the blood level in the ESR tube exceeds the acceptance range of the instrument, the instrument will alarm. If the blood height of the ESR tube is within the acceptable range, the instrument will perform height detection. The whole process will be detected 10 times in the working mode of 30 min, and 20 times in the working mode of 60 min.
6.2 Sample Preparation
The ESR Analyzer BANA-1400 only needs a sample volume of 1.28mLto complete the measurement. In order to ensure the measured blood level in the ESR tubes, 0.32mLof anticoagulant has been injected into each ESR tube in advance. Observe the marking line on the ESR tube, the blood of the test sample can be directly injected into the ESR tube until the total height of the anticoagulant and blood reaches the marking line. Plug the rubber ESR cap, and slowly invert the ESR tube upside down 10-20 times to mix the anticoagulant and blood thoroughly. Be careful not to have air bubbles in the anticoagulation.
WARNING:
• When labeling the ESR tube, do not place the label on the blood area; but should place it above the blood area.
• In order to ensure the accuracy of the test, please complete the test within 3h after blood collection.
6.3 Sample Mixing
The sample can be thoroughly mixed before testing by the following methods: shake the ESR tube upside down at least 5 times, or use a rotary laboratory mixer or a special mixer.
6.4 Sample Loading
The sample needs to be loaded into the sample holder of the ESR Analyzer BANA-1400 as soon as possible after mixing, so we recommend mixing the sample near the instrument. Loading of samples can be performed when the instrument is in the working state or in the standby state. After inserting the sample, please pay attention to the monitoring window corresponding to the sample insertion position on the main menu of the instrument. The insertion position should display a blue icon and have a sound prompt, indicating that a new sample has been inserted at that position.
CAUTION: Inserting a sample in a working state requires waiting for the current run of the assay plate to complete before the sample can be recognized.
6.5 Sample Removal
It is strictly forbidden to pull out the ESR tube during the ESR Analyzer BANA-1400 testing the sample (that is, when the green mark is displayed on the sample position in the monitoring window). If the ESR tube is pulled out at this time, the corresponding green mark disappears. Remix. After the test is over (that is, the position corresponding to the monitoring window displays a yellow mark), the sample can be removed. At this time, the yellow mark at the corresponding position of the monitoring window disappears, indicating that the position is open, and a new sample can be reinserted for testing. As long as the sample testing is over, the printer will automatically print out the sample serial number, patient number, ESR value, ESR curve and testing time of the tested sample.
If the user needs to perform Hct test, the sample can be removed and centrifuged after the blue Hct mark appears. A green Hct mark will appear during the compaction test. After the measurement is completed, the position will be displayed as a yellow mark, indicating that the Hct test of the sample has been completed.
The ESR curve of the analyzer is a curve drawn according to the sedimentation percentage value obtained by detecting the ESR tube every 3 minutes, so the ESR curve is divided into 30 min and 60 min working modes.
6.6 SOP
1. Power on the analyzer.
2. Check the setting in main menu: 30min working mode. The results were corrected to the ESR measured at 18°C using the Westergren method for 1 hour. If the main menu settings are incorrect, enter the [Setting].
NOTICE: Do not change the working mode of the instrument while the instrument is running.
3. Load the sample into the sample holder and pay attention to the display of the corresponding position of the monitoring window.
4. Click Patient ID to enter the interface and enter the Patient ID of the corresponding location (maximum 9 digits).
5. Storage of sample ESR value: After 30 minutes, the sample measurement ends, the instrument automatically stores and prints the ESR value and curve. If a yellow mark is displayed in the monitoring window, it means that the sample at this position has been tested and the sample can be removed. A new sample test can be performed again after the yellow mark disappears at this position.
NOTICE: With the Hct Test feature enabled, the sample can be removed and centrifuged after the blue Hct mark appears. The centrifuged sample needs to be placed in the original position for measurement (the green Hct mark is displayed at this time).
6.7 ESR Curve
The ESR curve of theESR Analyzer BANA-1400 r is directly drawn according to the detection of the ESR tube every 3 minutes, so the ESR curve has two working modes: 30 min and 60 min. The ESR curve is shown in the figure below:
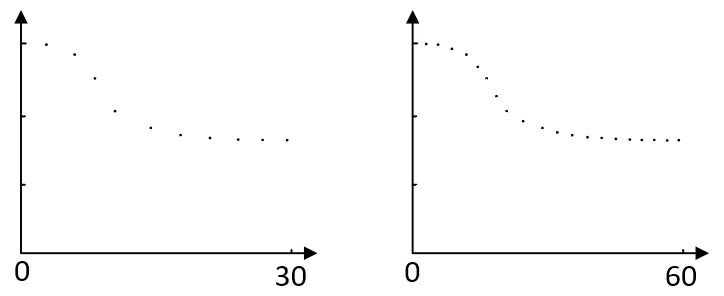
Figure 15
6.8 Print
After the sample detection is completed, the printer automatically prints the ESR value (mm/h) and ESR curve of the tested sample, as well as the date, time, serial number and patient ID. The format of the result printed by the printer is as follows:
Results review
NO. : | 50 | (The test result is numbered 50.) |
Pat-ID : | 123 | (Patient ID is 123.) |
Pos : | 01 | (The test channel is No. 1.) |
Mode : | 30 min | (Work mode is 30min.) |
ESR : | 23mm/h | (The test result is that the settlement in one hour is 23mm.) |
Vm | 17mm/h | (The maximum settlement value during a certain time period***) |
Hct : | 0.63 | (Results of Hct test.) |
Date: | 2025-04-01 08:30 | (The test time is 8:30 on April 1, 2025) |
K | 30 | (A value of the formula for erythrocyte sedimentation rate and hematocrit***) |
Table 3
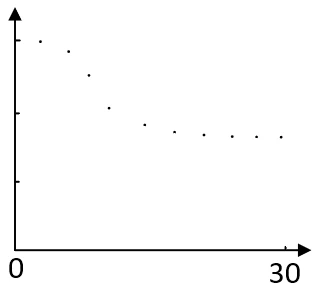
Figure 16
Note:
• After enabling temperature correction, the test results will be displayed as corrected values.
• *** indicates a default disabled option; after selecting "ON" in the "Project Settings" interface to enable it,the relevant content can be displayed.
5.9 Barcode Scan Mode (Optional)
Click "Patient ID" on the screen to enter the ID editing interface (switch to the "Date Edit" interface when scanning is required).
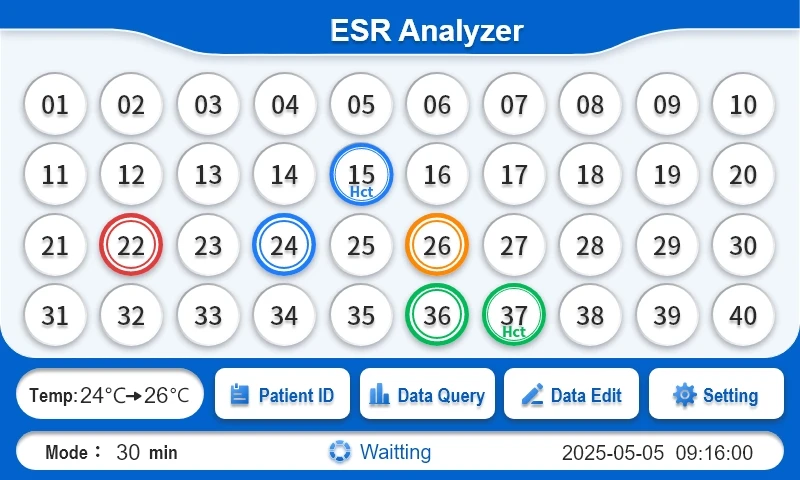
Figure 17
Figure 18
Use the scanner to scan the barcode and enter the corresponding number.
7. Maintenance
7.1 Daily Maintenance
1. The ESR Analyzer BANA-1400 does not require special maintenance and maintenance, but it needs to keep the working environment dry and clean to prevent dust from falling into the ESR tube loading hole and causing unreliable measurement results of the infrared transmitting and receiving tubes (TX-RX). Be careful when inserting and removing the ESR tube to prevent the ESR tube from breaking and causing blood to flow inside the instrument. It is recommended that the instrument be turned off when not in use and covered with an instrument cover to avoid direct sunlight.
It is not allowed to wipe the upper surface of the instrument with a damp cloth or corrosive liquid to prevent the liquid from flowing into the instrument from the insertion hole of the ESR tube and causing damage to the instrument.
Surface cleaning of the instrument: Use a dry cloth or medical alcohol cotton to clean the surface of the instrument.
2. If there is abnormal noise during the operation of the machine after half a year, the casing needs to be removed and lubricating grease should be applied to the screw rod.
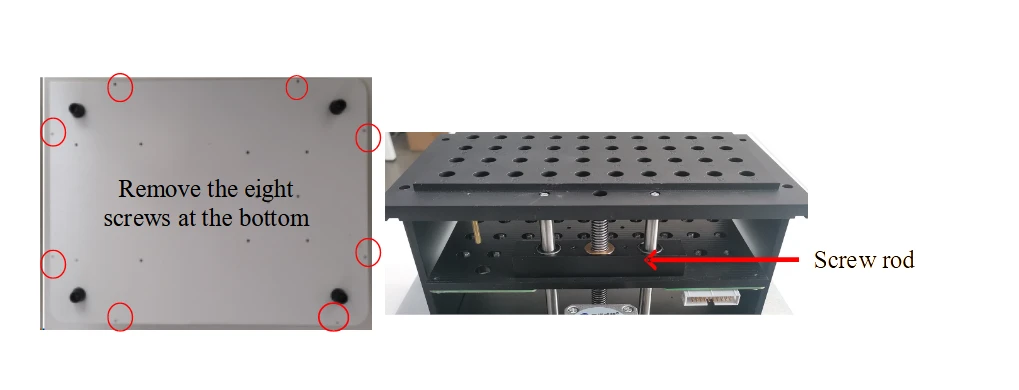
Figure 19
7.2 Common Faults
Fault description | Troubleshooting |
Results are not printed after the instrument test is over. | Check if the printer is jammed or out of paper. |
When the ESR tube is put into the test instrument, the buzzer continuously alarms. | The blood level is beyond the measuring range of the instrument. |
During the test, the motor vibrates and hits. | (1) The limit detector of the detection board is faulty, it is recommended to notify our service center for repair. (2) The left and right limit rods of the detection board are stuck, and it is recommended to notify our service center for repair. |
No display when power on. | (1) Plug and unplug the power socket and restart. (2) Check whether the power connection of the user is normal. (3) It is recommended to notify our service center for repair. |
Table 4
7.3 Fuse Replacement
A burnt fuse will prevent the instrument from turning on.
Purpose
Replace the fuse.
Time for Maintenance
Perform this maintenance when the instrument's power plug is in good contact, but does not respond when turned on.
Maintenance Tool
Flat-blade screwdriver.
Instrument Status
Make sure the instrument is turned off when performing this maintenance operation.
Precautions
WARNING:
• It cannot be replaced with a fuse of a different specification.
Steps
1. Make sure the instrument is turned off and unplug the power cord.
2. Prepare a new fuse.
3. Use a flat-blade screwdriver to lift out the fuse socket at the power male head on the right side of the instrument, and take out the fuse.
4. Observe whether the fuse is blown, burnt black and other abnormal phenomena.
5. If it is blown or burnt black, replace the new fuse to the current position.
6. Install and tighten in the reverse order of removal.
 CAUTION:
• This analyzer is valid for 8 years in normal use. Please read this user manual carefully, and must operate according to the operation method specified in the manual and use the original electrodes and reagents, otherwise the adverse consequences will be borne by the user.
8. Safety Protection and Handling
1. The instrument must be connected to a ground wire, and the ground wire must be grounded reliably.
2. It is not allowed to touch the external plug of the instrument with conductive metal objects.
3. Non-professionals are not allowed to open the instrument back cover and instrument shell.
4. When checking the fuse of the instrument, the power plug of the instrument must be unplugged.
5. Pay attention to the marks set on the instrument, and do not remove various marks artificially. Marks include:
A. Product name, model.
B. The name and trademark of the manufacturer.
C. The rated working voltage, rated working frequency and rated input power of the product.
6. Identify the on-off state of the power switch.
The "I" of the power switch is marked as the power-on state, and the "O" is marked as the power-off state.
7. If you find that the instrument has abnormal operation procedures and faults, please cut off the power immediately and contact our service center.
8. Before communicating with the external computer, it must be confirmed that the external computer meets the IEC 60950-1:2005 national information technology equipment safety requirements or has a safety certification mark, and the external computer is reliably grounded.
9. Because the used ESR tube waste liquid may contain harmful substances to human health, the ESR tube waste liquid should be treated in accordance with the hospital's requirements for the treatment of hazardous substances.
10. Because the ESR tube is a glass product, it must be kept properly, and the used ESR tube must be disposed of in accordance with the hospital's requirements for the disposal of hazardous materials.
Appendix A Function Menu
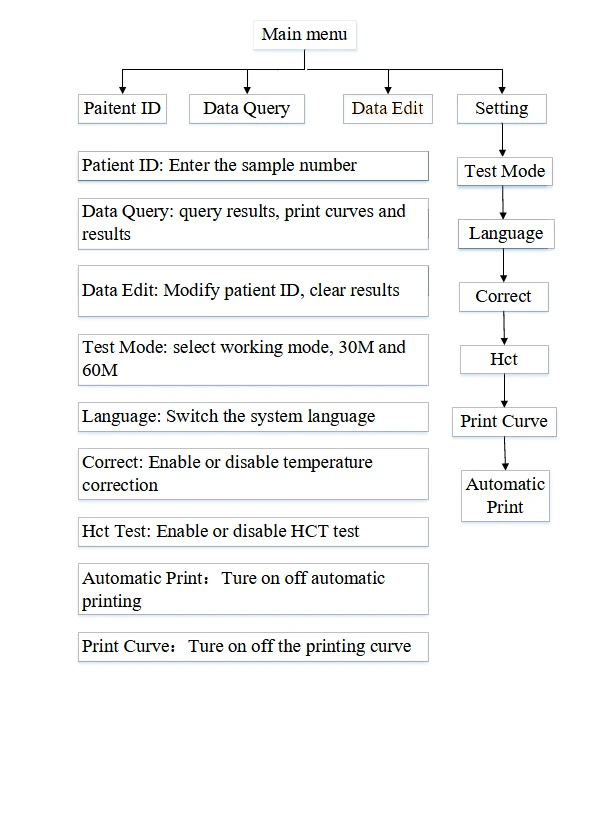
Figure 20