
Get Price
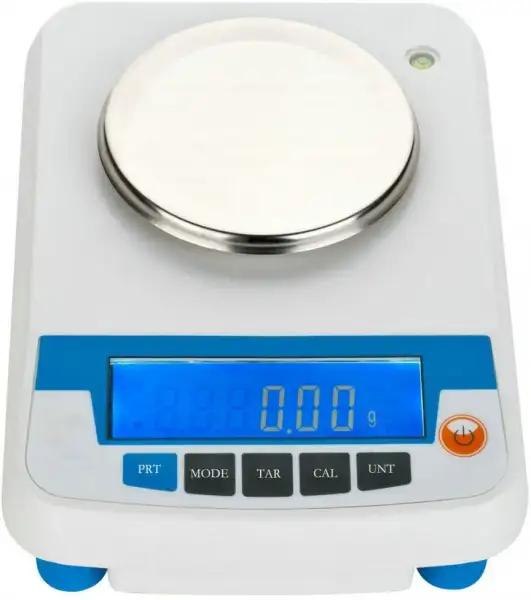
Weighing Scale BFU-6223
- Functions: weighing, parts counting, percent weighing.
- Up to 3-Year Product Warranty
- US & EU Compliance Standards
- Door-to-Door Shipping
Technical Specifications
Detailed operating and construction parameters for this model.
| Model | BFU-6223 |
| Weighing Range | 0-5000g |
| Readability | 1g |
| Pan Size | Φ165mm |
| Dimension/N.W. | 280*200*60mm/ 1.8kg |
| Shipping Size/G.W. | 320*280*150mm/ 2.5kg |
| Standard Accessaries | Calibration Weight (optional), Adapter, Manual, Dust cover |
Product Features
Key design, performance, usability, and safety advantages.
Operating Manual View instructions, operating procedures, safety information, and maintenance guidance.
1. Environment Conditions
2. Operation
3. Calibration
4. Weighing
5. Tare
6. Backlight
7. Zero-Tracking and Auto Tare (only useful at 0 point or after tare)
8. Other Functions:
9. Note in use
10. Complete Kit:
1. Environment Conditions
1.1. Place the balance in stably and smooth avoiding vibration, sunlight, airflow and strong electromagnetic wave .
1.2. Temperature: 5°C ~35°C
Temperature Fluctuation:≤5C°/h
Humidity: 50%~85%
2. Operation
2.1. Plug in the electronic balance, please!
2.2. Press turn-on key, it displays "8.8.8.8.8.8.", "Maximum capacity", "S-CAL" in turns. At last, it shows "0", "0.0","0.00" or "0.000" under weighing mode.
3. Calibration
3.1. Single-range calibration
Press "CAL" for 3 seconds (enter into calibration mode)  Show "CAL*** " "g" flicker Put a standard weight on the pan Show "-CAL- " Show weight value Enter into weighing mode. After calibration, if you found it still shows not exactly, please re-calibrating.
3.2. Multi-range calibration
Press "CAL" for 3 seconds (enter into calibration mode) Press "CAL" again and again, it will show different weight value and "CAL L" , you can choose one kind of weight values to calibrate on the basis of single-range calibration, or you also can choose "CAL L" to perform the linear calibration.
When the screen shows "no CAL" ,it means you didn't put weight on the pan in 10 seconds.iIt will leave calibration mode automatically.
If screen show " E100 " , that means your former calibration method is WRONG and original correct calibration data is DISAPPEAR. In such case, calibration based on above steps.
4. Weighing
4.1. Read the value on the screen after the black spot what is at the bottom left disappeared. (That means the value is stable)
4.2. The Max weighing is the showing largest value after turn on add 9d. (e=10d,"d" is minimum reading) If overloading, it will show "------"and you must take away the goods at once, or the balance (load cell, especially) will be broken.
5. Tare
Press the "TARE" key, the balance pan can be tared if the blank spot disappears. But if there is the black spot, the tare function is no effect.
6. Backlight
Press the "BL (backlight)" button. You can turn off the backlight.
7. Zero-Tracking and Auto Tare (only useful at 0 point or after tare)
7.1. Turn off the balance, one hand press and hold "CAL" key at the same time, another hand turn on the balance again, "-Zero-" will show, then loose the key, and press "TARE" key. It will show "Zero*d". Press "TARE" key can adjust the " * " from 0 to 5, "Zero0d"means no Zero-tracking function (sensitivity is the highest), "Zero5d" means Zero-tracking is the largest. "Zero5d" is factory-set.
7.2. Then press "CAL" key, it will show "-tArE-", press "TARE" key, "tArE*d" will be shown, press "TARE" key can adjust the " * " from 0 to 9. "tArE0d" means no Auto Tare, "tArE9d" means Auto Tare Function is the largest.
"tArE9d" is factory-set.
7.3. Press "BL"(back light) key, the setting is done after it shows "0" or "0.0" or"0.00" or "0.000".
It is convenient to use because the electronic balance can remember the latest setting when you turn on next time.
8. Other Functions:
8.1. Units Convert: Press "MODE" about 3 seconds. Then press "TARE" key to confirm, "Unit*" flickers. Press the "MODE" key to select the unit which you need, and press "TARE" key to confirm.
8.2. Counting: Press "MODE" key about 3 seconds up to the display flashing. Press "MODE" key again to choose "Count" unit. Then press "TARE" key to confirm, show "pcs" unit. Press "MODE" key once again, "pcs" can be changed from "10pcs"to "500pcs". The larger the number, the higher count accuracy. Put the relevant goods what need to count on the balance pan, follow to press the "TARE" key to confirm. It will show "------". Setting count is done.
When the counting unit weight is less than 2d, it will display "no-Cou" which means cannot counting. In this case, you should choose several goods together as a Unit to reset.
8.3. Percentage: Press "MODE" key about 3 seconds up to the display flashing. Press the "MODE" key again to choose "PER" unit. Then press the "TARE" key to confirm, show "100%" unit. Put the goods on the pan and press "TARE" key, the goods are set as a unit "100%".Take away the goods and put on other goods, it will display "###%". When the set goods weight what is divided by 100 is less than 2d, it cannot work and only show "no-PER". It should add to goods weight.
8.4. Print: Press "MODE" button till "Prt" shinning. Then press "TARE" to confirm. Press "MODE" button to change it in "hAnd", "AUto" and "Contin". Press "TARE" to choose the mode you need.
"hAnd" means when you press "PRT" once, the printer will work once.
"AUto" means when the objects placed on the pan is >3d, and when the value is stable, then the printer will work
"Contin" means no matter how heavy the object is placed on the pan, and no matter the value is stable or not, the printer will work continuously *RS232 port Parameter:
Transmission data format: Every 10BIT as a Data frame, the format : BIT1, BIT2, BIT3, ……,BIT8, BIT9, BIT10.
BIT1: start bit, BIT2---BIT9: Data bit, BIT10: Stop bit
Baud rate: 9600 bps
All the words are the ASCII code
8.5. Speed adjustment of weighing: Press "TARE" for 3 seconds, it will show "SPEED!", drop the key, and enter weighing model. Although the speed is slow, the accuracy is good. The same way, if you choose "SPEED2",the speed is faster, but less accuracy
8.6. Low voltage indication: When the screen shows battery symbol in the upper left side, it is time to replace the new battery.
9. Note in use
9.1. Warm up 30 minutes before using and calibration
9.2. The tare and object weight must not be beyond the limit.
9.3. If the weighing results are not exact, calibration again.
10. Complete Kit:
BFU-6223 Electronic Balance x 1
Scale pan x 1
AC adapter x 1
User's manual x 1
Calibration weight(Optional) x 1