
Get Price
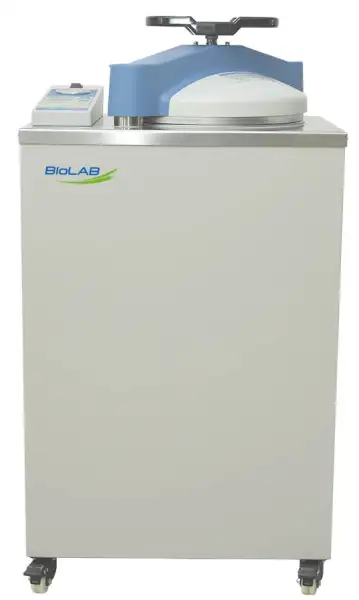
Vertical Autoclave BAVT-504-B
- 1.Simple and easily understandable control panel to show the sterilization temperature, sterilization time, drying time, press separate keys to set the temperature and time makes the operation easier
- 2. Each sterilization stage is displayed with LED lights, making the sterilization process clear at a glance.
- 3.Microcomputer intelligent control system ,achieves fully automatic control of the sterilization process.
- 4. The system automatically monitors the discharge of cold air to ensure a pure steam sterilization environment and the best sterilization effect.
- 5.Up to 20 error information records can be stored, facilitating instrument management.
- Safety
- 1. Lid closing checking:
- Machine can not start if lid is not locking well,the self-induction interlock device can avoid risk of misuse
- Up to 3-Year Product Warranty
- US & EU Compliance Standards
- Door-to-Door Shipping
Technical Specifications
Detailed operating and construction parameters for this model.
| Model | BAVT-504-B |
| Capacity | 100L |
| Sterilization Temperature | 105°C~135°C |
| Working Pressure | 0.29 MPa |
| Features | |
| Dimension(L*W*H)(mm) | 730x625x1200 |
| Chamber dimension(Dia*H)(mm) | Φ 400 x 800 |
| Power requirements | 220V ± 10% 32A 50HZ / 60HZ |
| Rated power(W) | 4600W |
| Sus304 basket size(pcs) | (Φ 360 x 215) x 3 |
| Chamber material | SUS304 stainless steel |
| Sterilization time range | 1~300min |
| Pressure gauge range | -0.1MPa~0.5MPa |
| Pulse times | 0~9 times(SE/SR only) |
| Exhaust temperature range | 105°C~130°C(Solid mode) |
| Safety valve set pressure | 0.29MPa |
| Drying | Drying temperature: 80°C~160°C Drying time: 1~300 min |
| Controller | Microcomputer control system |
| Safety device | Lid closing checking, over temperature protection system,dry scorch protection, over pressure protection, safety valve, over current/short circuit/electric leakage protection,scald protection, automatic failure-inspection system |
| Packing Dimension | 88*77*150 |
| CBM | 1.02 |
| Net Weight | 167 |
| Gross weight | 195 |
Product Features
Key design, performance, usability, and safety advantages.
Accessories For Purchase View compatible optional accessories and additional items available separately.
| Images | Name | Description |
 | Micro printer | To print temp.,time and FO value Printing set:printer+digital pressure sensor:can print temp. and pressure in data and flow chart way |
 | Stainless steel bucket | |
 | Digital pressure sensor | Printing set:printer+digital pressure sensor:can print temp. and pressure in data and flow chart way |
 | 1Q/0Q/PQ (3Q)adapter joint | |
 | Tray | |
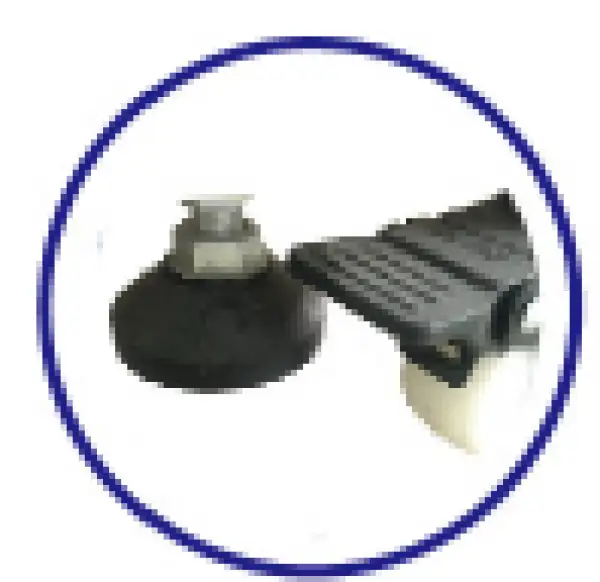 | Adjust foot |
Operating Manual View instructions, operating procedures, safety information, and maintenance guidance.
1. Precautions on Safe Operation
2. External Features & Controller
2.1 External look
2.2 Display panel function
3. Technical Specification
4. Installation of Instrument
4.1 Placement of Instrument
4.2 Connection
4.3 Setting
4.4 Water quality requirement
5. Operation Instruction
5.1 Turning on the power
5.2 Opening the sterilizer chamber cover
5.3 Adding water
5.4 Loading articles to be sterilized
5.5 Closing the sterilizer chamber cover
5.6 Selecting sterilizing program
5.7 Starting sterilization
5.8 Opening the cover & Program finished
5.9 Taking the sterilized articles out
5.10 Turning off the power
5.11 Clock Setting
6. Troubleshooting
7. Maintenance and Care
7.1 Daily care
7.2 Weekly care
7.3 Monthly care
7.4 Yearly care
8 Setting of Administrator
1. Precautions on Safe Operation
Precaution:
• For your safety and to operate the instrument properly, please read this operation instruction carefully before using and operate the following requirements in this manual. Where you violate the instruction of manufacturer in this manual, it is possible to damage the protection of this instrument.
• This instrument can be used in labs for sterilization purpose, shall not be used for purposes other than sterilization, drying,and it shall also not be used for sterilizing the flammable, explosive and readily oxidization products or strong acid, alkali and saline solutions to avoid explosion and corruption of sterilizer chamber or pipelines.
• The power supply of sterilizer should be properly connected according to nameplate on the instrument. In case of excessive voltage fluctuation, the regulated power supply shall be used to ensure optimum performance of the instrument. IF you are using other types of voltage, a transformer must be used to prevent the instrument from being damaged.
• It is necessary to ground the instrument properly, and never connect the ground wire to plastic pipeline, gas pipe, telephone ground wire and lightning rod.
• Never block the steam exhaust hole on the safety valve with articles, so that the safety valve may work properly under abnormal conditions.
• Always ensure that the reading of pressure gauge is "0Mpa" before opening the chamber cover. Never attempt to open the chamber cover and drainage valve, or draw out the steam trapping bottle when the pressure inside the sterilizer chamber is over "0Mpa" to avoid injury from ejected pressurized steam.
• Avoid dripping water to the control circuit when adding distilled water to the sterilizer chamber to against electric shock or other faults.
• When using waste processing bags or other type of bags, please put the bags into the stainless steel basket before put into the sterilizer chamber to avoid affecting the precision of temperature.
• If the handle is turned by mistake during sterilization, it will not continue turning as it has been locked by the interlocking device, and there will be a little steam exhausted to release. In this case, press the"STOP" button to stop the instrument immediately. When opening the chamber cover, turn the handle slightly toward the opposition direction that it is wrongly operated, and then turn the handle counter-clockwise until the cover is released.
• Observe the temperature variation inside the sterilizer chamber. The temperature is relatively high when operation has been finished, keep the face and hands away from the sterilizer chamber when opening the cover to avoid injury from ejected pressurized steam. Gloves must be used when taking articles out of the sterilizer chamber.
• Liquid does take some time to get cooling, verify whether the temperature is low enough or not, when taking the liquid after sterilization out of the chamber to avoid scalding.
• Use only distilled water as sterilizing water to avoid affecting the service life of sterilizer.
• When using the instrument continuously, 15 minutes and above interval is required before next operation to allow the instrument to cool down, so that it will be able to produce adequate saturated steam.
• In case of abnormal conditions, such as noise, odor and smog, please turn off the power immediately, and observe until the abnormal condition stops, and then contact the local dealer or customer service department of our company.
• The user shall observe the local regulations related to the pressurized vessels.
2. External Features & Controller
2.1 External look
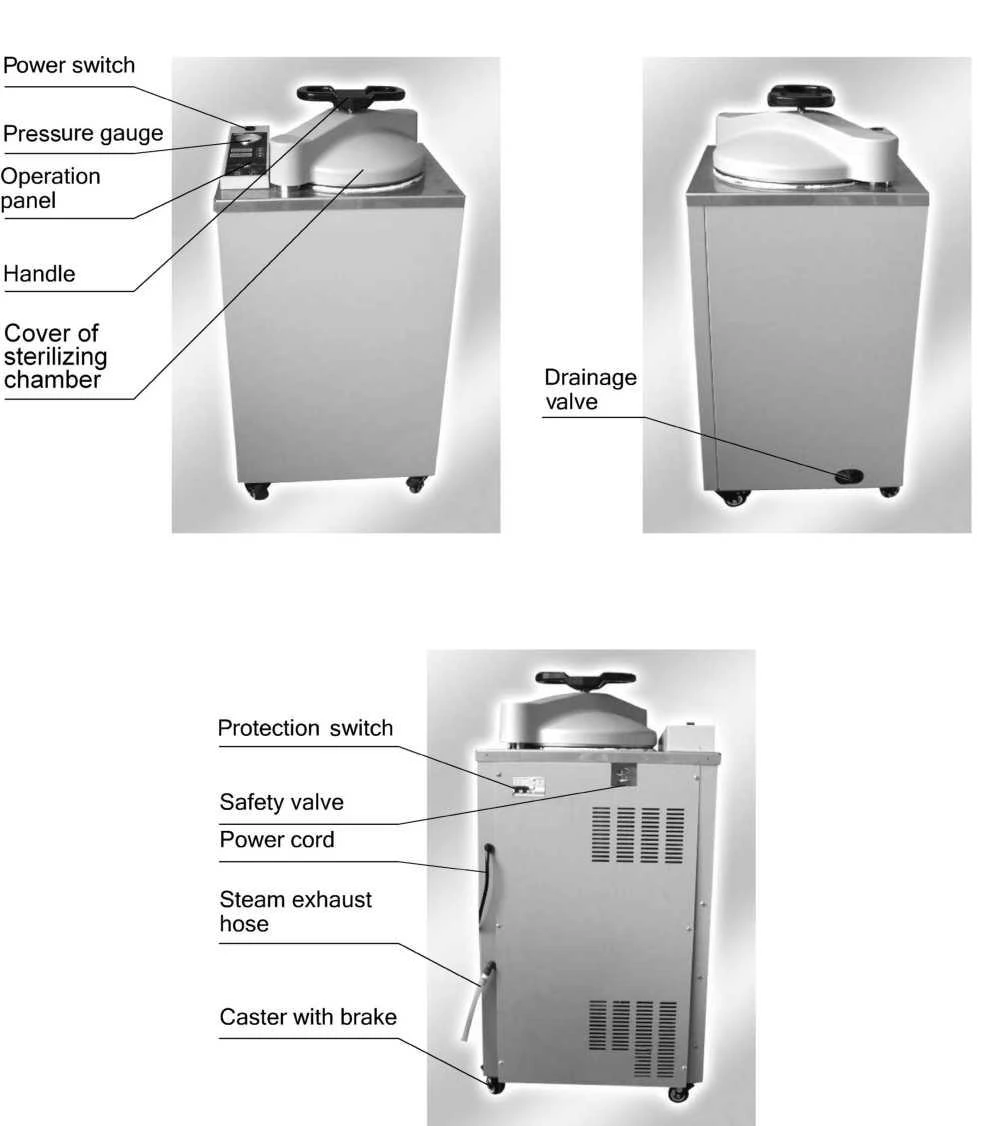
Figure 1
2.2 Display panel function
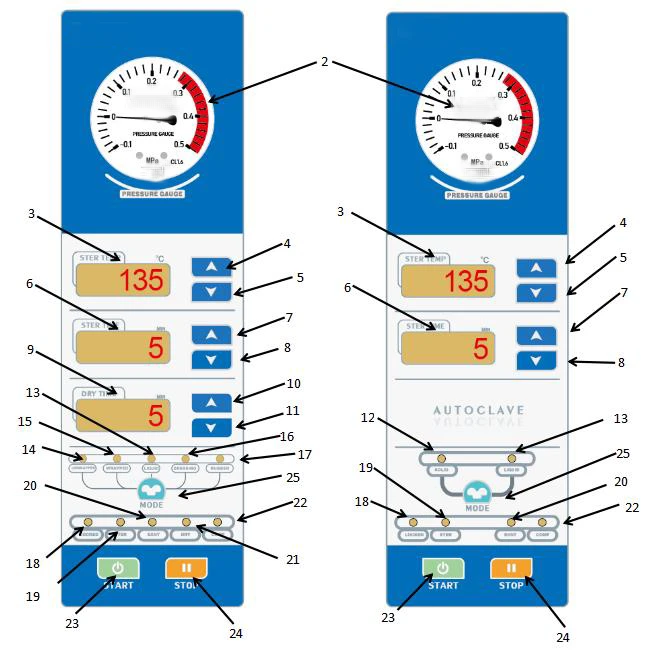
Figure 2
2. Pressure Gauge
3. Sterilization Temperature Display: Unit in °C
4.Sterilization Temperature Up Key
5. Sterilization Temperature Down Key
6. Sterilization Time Display: Unit in minutes. The value counts down to zero when
sterilization starts
7. Sterilization Time Up Key
8. Sterilization Time Down Key
9. Drying Time Display: Unit in minutes. The value counts down to zero when drying
starts
10. Drying Time Up Key
11. Drying Time Down Key
12. SOLID Mode Indicator: Illuminates when the solid mode i s selected
13. LIQUID Indicator: Illuminates when the liquid mode is selected
14. UNWRAPPED Indicator: Illuminates when the unwrapped instrument mode is selected
15. WRAPPED Indicator: Illuminates when the wrapped instrument mode is selected
16. DRESSING Indicator: Illumi nates when the dressing mode is selected
17. RUBBER Indicator: Illuminates when the rubber mode is selected
18. LOCKED Indicator: Illuminates when the chamber door is closed and the machine
is ready for operation
19. STER Indicator: Illuminates steadily when the machi ne enters the sterilization
phase; flashes when the machine enters the temperature raising phase
20. EXHT Indicator: Illuminates when the machine enters the exhaust phase
21. DRY Indicator: Illuminates when the machine enters the drying phase
22. COMP Indicator: Illum inates when the machine enters the sterilization completion
phase
23. START Key: The "START" key is used to initiate sterilization or melting operations;
it only functions when pressed and held for more than 2 seconds. (A delayed response
function is built in to prevent misoperation.)
24. STOP Key: The "STOP" key is used to interrupt sterilization or melting operations;
( A delayed response function is built in to prevent misoperation; It only
functions when pressed and held for more than 2 seconds.)
25. MODE Key : Used to select the sterilization mode. Press and hold the MODE key to
view the pressure value during pressure sensor assembly.
3. Technical Specification
Model | BDN-201/BDN-205 | BAVT-502-A/BAVT-502-B/BDN-206 | BAVT-503-A/BAVT-503-B/BDN-207 | BAVT-504-A/BAVT-504-B/BDN-208 |
Capacity | 29(L) | 50(L) | 80(L) | 100(L) |
External dimension(mm) | 586*513*960 | 580*513*1085 | 739*648*1095 | 739*651*1195 |
Size of sterilizer chamber mm | φ320 x378 | φ320x725 | φ400x697 | φ400x797 |
Power supply | 220V 50/60HZ | |||
Rated power | 2600W | 2600W | 4600W | 4600W |
Range of pressure gauge | -0.1-0.5MPa | |||
Working environment | 5-40°C relative humidity 10-85% | |||
Rated working pressure | 0.25MPa | |||
Designed pressure | 0.3MPa | |||
Sterilization temperature | 105-135°C | |||
Sterilization timer | 1-300min | |||
Drying timer | 1-300min ① | |||
Operation mode | Solid Mode, Solid& Drying Mode, Liquid Mode | |||
safety equipment | Safety valve, over temperature and temperature abnormal protection system, over pressure protection system, electric leakage protection equipment, chamber cover checking system, self- induction interlocking device | |||
Accessories | Stainless steel baskets, water plate, waste water tank | |||
Table 1
drying mode for solid, drying time can be pre-set
4. Installation of Instrument
4.1 Placement of Instrument
1.Place the instrument on the level ground with the brakes of four casters pressed down before installation. Do not place any objects within 10cm around for ventilation.
2.Connect the drainage pipe between machine and wastewater receiving bottle or pipe.
3. Take out the water plate, remove the packaging, place it in the bottom of the chamber in a horizontal position.

Figure 3

Figure 4
4.2 Connection
1. The instrument must be grounded reliably, if the power socket does not have the ground terminal, it is required to connect the instrument with independent ground wire before powered on.Connect the red or brown wire to the live wire, the green or blue wire to the neutral wire, and the yellow-green wire to the ground wire.
2.Power supply: single-phase AC 220V±22V,(50/60)Hz±1Hz.
3. Requirement for current intensity:
BDN-201/BDN-205 ≥14A
BAVT-502-B/BAVT-502-A/BDN-206 ≥14A
BAVT-503-B/BAVT-503-A/BDN-207 ≥25A
BAVT-504-B/BAVT-504-A/BDN-208 ≥25A
4.3 Setting
Caution:
If the elevation is not set properly, machine can not work normally.
4.4 Water quality requirement
Sterilizing water quality requirement | |
Item | Standard |
Evaporation Residue | ≤10 mg/L |
Silicate (SiO₂) | ≤1 mg/L |
Iron | ≤0.2 mg/L |
Cadmium | ≤0.005 mg/L |
Lead | ≤0.05 mg/L |
Other Heavy Metals (Excluding Iron, Cadmium and Lead) | <0.1 mg/L |
Chloride Ion (Cl⁻) | ≤2 mg/L |
Phosphate (P₂O₅) | ≤0.5 mg/L |
Conductivity (25°C) | ≤5 μS/cm |
pH Value | 5~7.5 |
Appearance | Colorless, Clean and Free of Precipitates |
Hardness (Total Amount of Alkaline Metal Ions) | ≤0.02 mmol/L |
Note: The results of the consistency check shall comply with the provisions of the known analytical methods. | |
Table 2
5. Operation Instruction
5.1 Turning on the power
Turn on the leakage protection switch and the power switch on the control panel
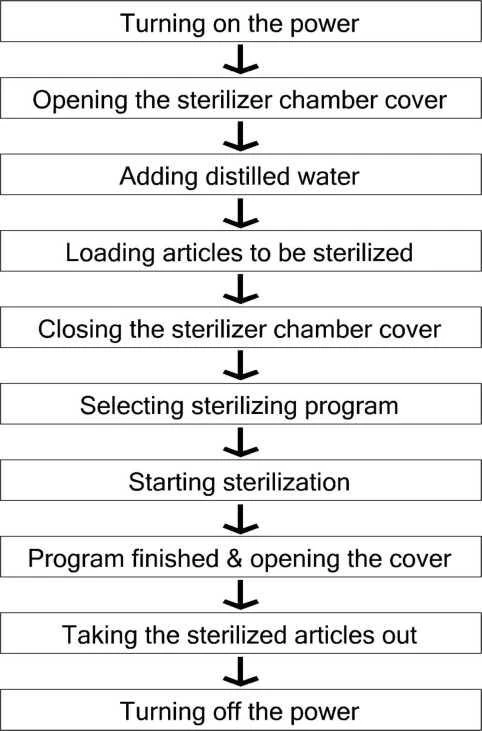
Figure 5
5.2 Opening the sterilizer chamber cover
1. Turn the handle counter-clockwise until the chamber cover is loosened
2. Push the handle rightward slightly to move the cover to one side
Note:
The indicator "locked" is off at this time, and the sterilizer will not be able to work until the chamber cover is closed and secured.
Do not open the chamber cover too fiercely, so that it will not be extruded and broken.
5.3 Adding water
Adding distilled water into the sterilizer chamber until the water flows into the observation hole in the middle of the water plate.
5.4 Loading articles to be sterilized
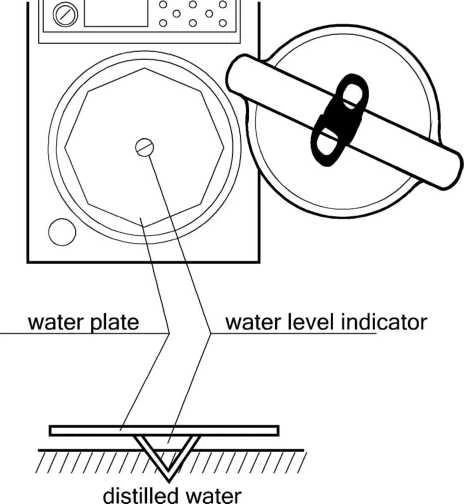
Figure 6
1. Put the articles to be sterilized into the baskets and close the cover
2. Make sure the water plate is placed well, in case baskets place on the heater directly.
3. Put the baskets lightly into the chamber.
Note:
When placing instruments into the autoclave's stainless steel basket, the following precautions shall be observed:
Instruments shall be arranged neatly with intervals between them; overlapping is strictly prohibited, as this will result in inadequate sterilization. Instruments of different types shall be classified and placed in separate stainless steel baskets (e.g., stainless steel, carbon steel, etc.)
If carbon steel instruments are placed in a stainless steel basket, the basket shall be lined with several layers of sterile paper or cotton gauze. Meanwhile, instruments of the same type should be grouped together to avoid direct contact between carbon steel and stainless steel.
For instrument sterilization, breathable packaging materials (such as sterilization pouches, sterilization wrap, and gauze fabric) should be used. The packaged instruments shall be placed with the opening facing downward or sideways.
Verify whether the water plate is in place or not before putting the baskets back into the sterilizer chamber, so that they will not be put on the heater directly.
When plastic bag is used for sterilizing, please put some water into the bag and keep the bag open, and make sure the bags do not contact with the inner wall of the sterilizer. Sealed bags will result in inefficient sterilization. If the sterilization chamber is over crowded, steam can not reach every corner, will result in incomplete sterilization.
When sterilizing the glassware like beaker, conical flask and test tube, the vessel must be put up side down or across. If the vessel can only be in vertical direction, put a little water in the vessel before sterilizing.
When sterilizing the liquids like chemical reagent or menstrual, care must be taken to the volume of liquid inside the container (3/4 of total volume of flask, and 1/2 of total volume of test tube), so that the liquid will not overflow from the container during sterilizing.
The cover of container to be sterilized should be loosened for air exhaust to prevent container broken.
When melting the agar, each container should be less than 2 L, otherwise the melting may not be completed thoroughly.
The DURHAM TEST TUBE with over 6mm caliber should be used, otherwise air bubble may stay in the tube.
Please put article temperature sensor properly if the instrument is attached article thermometer.
When sterilizing waste, the water must be replaced and the equipment cleaned for each batch. When sterilizing garbage bags, a sterilization bucket or a stainless steel basket with a solid bottom shall be used.
Loading Capacity: (Loading Capacity per Basket * Number of Baskets)
Container Type | 100ml Blue-Cap Bottle | 150ml Blue-Cap Bottle | 250ml Blue-Cap Bottle | 500ml Blue-Cap Bottle | 1000ml Blue-Cap Bottle | 2000ml Blue-Cap Bottle |
Dimensions (ØxH/mm) | Ø56x105H/mm | Ø62x115H/mm | Ø70x143H/mm | Ø86x181H/mm | Ø101x230H/mm | Ø136x265H/mm |
BDN-201/BDN-205 | 20 pcs/batch | 16 pcs/batch | 12 pcs/batch | 8 pcs/batch | 5 pcs/batch | 2 pcs/batch |
BAVT-502-B/BAVT-502-A/BDN-206 | 20 pcsx3 batches | 16 pcsx3 batches | 12 pcsx3 batches | 8 pcsx3 batches | 5 pcs/batch | 2 pcs/batch |
BAVT-503-B/BAVT-503-A/BDN-207 | 30 pcsx2 batches | 24 pcsx2 batches | 19 pcsx2 batches | 12 pcsx2 batches | 8 pcsx2 batches | 4 pcsx2 batches |
BAVT-504-B/BAVT-504-A/BDN-208 | 30 pcsx3 batches | 24 pcsx3 batches | 19 pcsx3 batches | 12 pcsx3 batches | 8 pcsx3 batches | 4 pcsx3 batches |
Container Type | 100ml Erlenmeyer Flask | 150ml Erlenmeyer Flask | 250ml Erlenmeyer Flask | 500ml Erlenmeyer Flask | 1000ml Erlenmeyer Flask | 2000ml Erlenmeyer Flask |
Dimensions (ØxH/mm) | Ø64x105H/mm | Ø74x118H/mm | Ø85x145H/mm | Ø105x180H/mm | Ø131x220H/mm | Ø166x280H/mm |
BDN-201/BDN-205 | 15 pcs/batch | 11 pcs/batch | 8 pcs/batch | 5 pcs/batch | 3 pcs/batch | 0 |
BAVT-502-B/BAVT-502-A/BDN-206 | 15 pcsx3 batches | 11 pcsx3 batches | 8 pcsx3 batches | 5 pcsx3 batches | 3 pcs/batch | 1 pc/batch |
BAVT-503-B/BAVT-503-A/BDN-207 | 22 pcsx2 batches | 17 pcsx2 batches | 12 pcsx2 batches | 8 pcsx2 batches | 4 pcsx2 batches | 2 pcs/batch |
BAVT-504-B/BAVT-504-A/BDN-208 | 22 pcsx3 batches | 17 pcsx3 batches | 12 pcsx3 batches | 8 pcsx3 batches | 4 pcs/batch | 2 pcs/batch |
Table 3
5.5 Closing the sterilizer chamber cover
1) Push the handle leftward slightly until the arm leans against the arm stopped.
2) Turn the handle until it is secured and the cover closed indicator " Locked" is on. The cover closed indicator may change repeatedly in course of tightening. When it is nearly secured, turn the handle slowly while observing whether the cover closed indicator is on or not.
Note: Before closing the sterilization lid, ensure there are no foreign objects on the chamber lid sealing ring or the contact surface it mates with. Otherwise, the sealing ring may be damaged and air leakage could occur.
5.6 Selecting sterilizing program
Select the sterilization mode, set up the Sterilization time and drying time according to your needs.
Model | StSterilization Parameter | S Setting Way |
BDN-201/BDN-205/ BAVT-502-B/BDN-206/BAVT-503-B/BDN-207/ BAVT-504-B/BDN-208 | 1. Sterilizing mode Solid mode Liquid mode | Press"MODE"button to switch between solid mode and liquid mode |
2. Main Parameter Sterilizing temperature 105-135°C Sterilizing time 1-300min | Press sterilizing temperature up or down button to set Press Sterilizing time up or down button to set | |
BAVT-502-A/BAVT-502-A/BAVT-503-A/BAVT-504-A | 1. Sterilizing mode Unwrapped mode wrapped mode Liquid mode 4) Dressing mode 5) Rubber mode | Press"MODE"button to switch between these 5 modes |
2. Main Parameter Sterilizing temperature: 105-135°C Sterilizing time: 1-300min Drying time:1-300min | Press sterilizing temperature up or down button to set Press Sterilizing time up or down button to set Press drying time up or down button to set |
Table 4
Note:
For sterilization of liquids, set a sterilization time longer than desired, taking a delay time into account: For example, if the volume of water in the flask is 3L , when the internal temperature of the sterilizer chamber reaches the set value, another 33 minutes shall be required for the water in the flask to reach this temperature, therefore, the sterilizing time must be set to 53 minutes.
Actual required sterilizing time (53min)=Delay time(33min) + Normal sterilizing time(20min)
BAVT-502-B Sterilizing Delay Time Reference Value (Every Flask) | |
Liquid Volume | Delay Time |
3L | 30min |
2L | 25min |
1L | 20min |
500cc | 15min |
Table 5
Never press the "STOP" button casually to stop the running program during sterilizing of liquids to avoid the liquid overflowing into the sterilizer chamber and even blocking the valve and pipe lines.
5.7 Starting sterilization
After setting the sterilization parameter, press "START" button to start work, "STER" indicator will start to blink, when reaching the setting sterilization time, the sterilizing time on the screen start to count down.
Note:
In order to prevent misuse, "START" and "STOP" button have a delayed response function. Keep the button for 2 seconds to start work.
5.8 Opening the cover & Program finished
1. When the set sterilizing time is up, the system will send out a sound alarm, and the steam will be exhausted to release automatically "EXHT" indicator starts to blink.
2. Under solid mode with drying, when the temperature is lower than the boiling point, the system will send out a sound alarm, and the screen will show "OPEN" to indicate the opening of the cover. After opening the cover, system will start drying function, "DRY" indicator starts to blink, drying time on the screen starts to count down.
3. When program finished and the temperature is below 97 C (Solid mode or solid+drying mode) or below 80°C (liquid mode), the "COMP" indicator will blink, which means the sterilization is finished.
5.9 Taking the sterilized articles out
1. Always wear the heat insulation gloves when taking articles after sterilizing out of the sterilizer chamber, and wait until the steam disperses before reaching into the sterilizer chamber.
2. When sterilizing the liquids, verify the temperature is low enough before taking it out to avoid scald due to low cooling speed of liquid.
5.10 Turning off the power
1. Power must be switched off after the completion of daily operations or the instrument will not be used for a long period of time.
2. When sterilization is completed of a day, it is recommended to drain out all water in sterilization chamber.
5.11 Clock Setting
1. Under standby condition, press the STOP+▽(beside STER TIME), enter into clock setting and calibration mode,the screen will show below content:
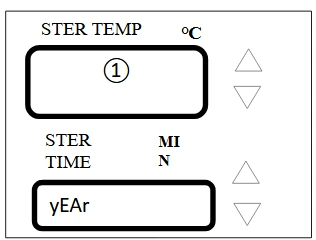
Figure 8
Screen 1
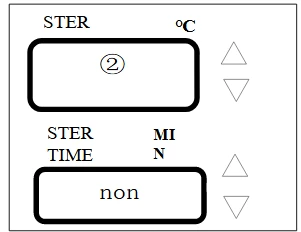
Figure 9
Screen 2
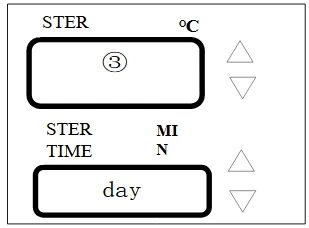
Figure 10
Screen 3
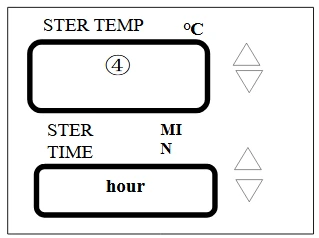
Figure 11
Screen 4
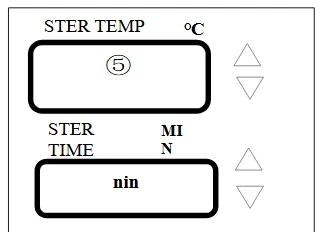
Figure 12
Screen 5
default specification and the adjustable range
Name | No. | Default setting | Adjustable range |
YEAR (year) | 1. | 2011 | 2000--2099 |
Mon (month) | 2. | 1 | 1-12 |
Day (day) | 3. | 1 | 1-31 |
Hour (hour) | 4. | 1 | 0-23 |
Min (minute) | 5. | 1 | 0-59 |
Table 6
1. If you set the time correctly, press STOP to exit
2. If you didn't set the time correctly, press MODE to enter into data changing screen: screen 1 will blink 2011 or the current year setting, screen 2 will show yEAr, means you can change the year, press the ▲or ▼ to change the setting. Press the MODE to save the change, if you do not want to save the change,you can press STOP to exit to standby condition. You can change the month,day,hour and minute in this way.
6. Troubleshooting
1.The automatic control system of the sterilizer monitors the real time operation of the instrument. Whenever any failure occurs, the system may send out alarm and display the error code, then, please press the STOP button to return to standby status, and turn off the power, check the error code and handle on time.
2.To insure the safety, the chamber cover can be open under the circumstance that no pressure in the chamber and the temperature is below 80°C at the same time
3.Under liquid mode,do not press STOP button before the temperature is lower than the boiling point,so as to avoid the liquid loads overflowing.
Error code | Possible causes | Suggested solution |
E01 | Lid lock error | Check the handle is placed well(either horizontally or vertically) |
E02 | Local altitude is not set correctly | Reset the local altitude(P009) |
The temp. sensor is blocked by articles | Read the articles loading part of manual | |
Heating system problem | Check the heater, wires | |
E03 | Water level sensor is dirty | Clean the water level sensor |
Pressure gauge display doesn't match temperature | 1.Check if solenoid valve and pipe is blocked 2.Check temp. sensor and wires 3.Check pressure switch and its wires | |
Temperature control switch is abnormal | Change the temperature control switch | |
E04 | Temp. floating due to abnormal power floating | Check the power voltage, must be 198V-242V |
Cold air is not purged out completely | Check if the pipe is blocked, or the articles put in a right way | |
E06 | The temp.sensor is not connected well to the electronic board | Re-plug the temp. senor to the board |
Chamber temp. sensor is having problem | Change the temp. sensor | |
E07 | Short circuit on chamber temp. sensor | Change the chamber temp. senor |
E10 | Sudden power off during sterilization | Start the cycle again |
E14 | Drying system or temp. control problem | Contact local dealer |
E18 | Solenoid valve and piping blocked | Clean the solenoid valve and piping |
Temp. /pressure sensor is abnormal | Re-plug the temp./pressure sensor | |
E20 | Safety valve testing wires problem | Contact local dealer |
E26 | The pressure sensor is not connected well to the electronic board | Re-plug the pressure sensor |
Chamber pressure sensor is having problem | Change pressure sensor | |
E27 | Short circuit on chamber pressure sensor | Contact local dealer or change pressure sensor |
E36 | Open circuit or short circuit for heating prevention sensor | Re-plug the temp. sensor |
E37 | No enough water in chamber | Add water to chamber |
Water level sensor is dirty | Clean the water level sensor | |
Water level sensor is having problem | Contact local dealer |
Table 7
Below is the note code, you can press STOP very shortly(just touch and go) to go back to standby condition:
Note code | Display content | Suggested solution |
n-02 | Chamber temperature exceeds boiling point when sterilization starts or power is turned on | Wait for the temperature to drop before starting operation. |
n-03 | Invalid system time | Reset the system time. |
n-06 | Sterilizer chamber door not properly locked at startup | Re-lock the sterilizer chamber door securely. |
n-11 | Water level sensor contaminated | Clean the water level sensor, heating tube, and sterilization chamber, then drain all water from the chamber completely. |
n-13 | Water change reminder for sterilization chamber water | Clean the water level sensor, heating tube, and sterilization chamber, then drain all water from the chamber completely. |
Table 8
The above error codes and reminders may vary by equipment model.
The table above describes relatively simple early-stage fault phenomena, causes, and maintenance suggestions. If you are unable to resolve these issues, please contact your local distributor and provide the following information:
1. Equipment model and serial number
2. Faulty part and fault phenomenon (error code, if applicable)
3. Date of equipment purchase
4. Operation details (including the type of items being sterilized)
When the instrument is powered off, if it is necessary to open the chamber lid: ensure the instrument pressure is 0 MPa before rotating the chamber lid handle to open it.
7. Maintenance and Care
7.1 Daily care
Sterilization chamber and chamber cover should be cleaned with soft cloth every day.
7.2 Weekly care
1. The water in the sterilizer chamber must be changed every week, or change at any time within one week if the water is dirty.
2. When changing the water, connect one end of the drainage hose with the drain port of sterilizer chamber, and put the other end into a water collector, release the drainage valve to drain, and turn off the valve counter-clockwise after the drainage.
Note:
Make sure that the water in the sterilizer chamber is at room temperature before changing the water.
If the sterilizer will not be used for a long period of time, the water in the sterilizer chamber must be emptied to avoid blocking the pipeline.
Wipe the surface of the sealing ring and its contact parts with soft and clean cloth at least once a week.
7.3 Monthly care
Take out the water plate to check the heating pipe. If dirt can be gently scrub with a soft brush and flush, and then discharge the dirty water.
7.4 Yearly care
1. Check the wires damage and problem of fuse and connector.
2. Check the pipe for leaks
3. Check if there is leaking of the solenoid valve or lose of coil.
4. Check the indicator and process indicators (check the security of cover)
5. Press the testing button of leakage protection switch, if the leakage protection switch trips means everything is normal, otherwise turn off the power switch and contact local dealer. Press the reset switch, make the position up right,the power will be on.
No. | Spare Parts |
1 | Mainboard |
2 | Control Panel |
3 | Safety Valve |
4 | Solenoid Valve |
5 | Gasket Ring |
6 | Heater |
7 | Temperature Sensor |
8 | Temperature Switch |
9 | Pressure Gauge |
10 | Voltage Transformer |
11 | Power Switch |
12 | Leakage Protector |
13 | Pressure Switch |
14 | Beam Micro Switch |
15 | Chain Switch |
16 | Solid State Relay |
17 | Heating Relay |
18 | Solenoid Valve Relay |
19 | Drying Plant |
Table 9
8 Setting of Administrator
1. Under standby condition, press and hold MODE and STOP buttons,the digital display shows "000000" with the first "0" flashing, indicating it is ready for modification. Press the ▲ (Up) or ▼ (Down) key on the first segment of the digital display to set the first digit to "6", then press the ▼ (Down) key on the second segment to confirm. At this point, the second "0" will flash, indicating it is ready for modification. Repeat this process to enter the password sequentially. Press the "MODE" key to confirm and access the user administrator settings.
2. After entering into the parameter modification menu, press the ▲ or ▼ button to select the menu you want to modify.
3. Administrator menu:
P001 Printer enabled or not (Yes: enabled No: disabled)
P002 Button sound enabled or not (Yes: enabled No: disabled)
P003 Setting of pressure unit: 1: Kpa; 2: bar; 3: psi;4: No ( Not available or no operation for pressure sensor,do not choose the pressure unit if the equipment is not added with pressure sensor, it will cause alarming)
P005: Printing language: 0: English 1: Chinese
P006: Safety valve test enabled or not (Yes: enabled No: disabled)
P007: Chamber temp sensor,temp compensation: the temp compensation scope is -5°C - +5°C
P008: Setting of max working temp: the temp range is 135°C-145°C
P009: Setting of local altitude: (0-3000m)
P010: Boiling point temp corresponding to altitude ( according to P009)
P011: Version of system, unmodified
P012: Solid mode: exhaustion temperature setting (105°C-130°C)
P016:Does it need a password to create, modify or delete the program (Yes: enabled No: disabled, same as P017 Admin password)
P017: Adminitrator menu password
P018: Total cycle number,each time you press START will adding one cycle number
P019:Pressure sensor compensation ,compensation scope is -5-5kPa.
P022:Drying temperature setting,scope:80°C-160°C
P030: Pulse times setting, P+ numbers, range:0-9 times
P031:Exhaust temperature scope for liquid mode:73°C-104°C
P032:Water drainage scope for solid mode:105-135°C,or OFF.(Only for R)
P033: YES: open lid drying, NO: closed lid drying(Only for R, closed lid drying require extra setting by manufacturer)
P035: Days for repeated water change. Default value: 30. Adjustable range: 0-35.
P036: Year of last water change. This value is read-only.
P037: Month + date of last water change (separated by a dot). Example: Display "12.31" indicates the last water change was on December 31. This value is read-only.
P038: Batch number printing setting. YES = Print batch number; NO = Do not print batch number.
P039: Handle rotation level when the LOCKED light is on. Default level: 3. Adjustable range: Level 1-8.
P040: Sterilization indicator printing setting. YES = Print sterilization indicator; NO = Do not print sterilization indicator.
P041: Number of times water change was skipped. This value is read-only.
P042: Water change reminder count. Default value: 30. Adjustable range: 0-60. 0 = Disable water change reminder based on count.
Note: The setting sequence and options of the above-related parameters may vary depending on the model and the functions of optional accessories.