
Get Price

Tissue Embedding System BHTP-609
- The round tissue bath has black non-stick coated interior to reduce glare and improve visibility. The top ledge allows space for preheating or for evaporating away any remaining water. A durable fiberglass insulated body prevents heat loss. Glass lid and detachable power cord for easy cleaning.
- Up to 3-Year Product Warranty
- US & EU Compliance Standards
- Door-to-Door Shipping
Technical Specifications
Detailed operating and construction parameters for this model.
| Model | BHTP-609 |
| Capacity | 2.5 L |
| Temperature range | RT to 75 °C |
| Outside Size | 270 mm (D) x 210 mm (H) |
| Interior Size | 210 mm (D) x 65 mm (H) |
| Power consumption | 400 W |
| Power supply | AC 110V/220V ±10%, 50/60Hz |
| Net Weight | 3 kg |
| Package Info | |
| --Packing | Wooden Case |
| --Gross Weight | 4 kg |
| --Package Dimensions | 340x350x160 mm |
Product Features
Key design, performance, usability, and safety advantages.
Operating Manual View instructions, operating procedures, safety information, and maintenance guidance.
1. Safety
2. Contents
3. Accessories
4. Specifications
5. Notes of Operation
6. Control Panel
7. Setup
8. Operations
9. Packing List
1. Safety
 Before using the Tissue Floating Bath, please read this instruction manual carefully. Incorrect or inappropriate use may result in equipment damage or personal injury!
This Tissue Floating Bath is designed for floating paraffin sections along with assisting in placing the paraffin section on a slide and helping the section dry. The sole purpose of this Tissue Floating Bath is for histology use along with research, instruction, and experiments in the universities and technical secondary schools. The Tissue Floating Bath is not recommended for any other uses than the ones described in this manual.
When the Tissue Floating Bath is running (unit is heating), Please keep an area of about 12 inches around the Tissue Floating Bath clear while operating it.
To avoid injury to personnel; do not use the following materials in the Tissue Floating Bath:
• Flammable and explosive materials
• Strong chemical materials
• Toxic or radioactive materials
2. Contents
Number | Name | Qty | Note |
1 | Tissue Floating Bath With Glass Lid | 1set | |
2 | AC Power Cord | 1pc | |
3 | Thermometer Holder | 1pc | |
4 | Fuse | 1pc | 10 AMP |
5 | Operating manual | 1pc |
Table 1
 Upon receipt, please examine the package, if there's anything wrong, please kindly contact your dealer promptly.
3. Accessories
If you need optional auxiliary parts, please contact our company or authorized dealers.
Name | Use |
Thermometer Holder | Attach the holder with the three holes facing inside the heating bowl. Place a laboratory thermometer (not included) through the three holes into the water. Avoid allowing the thermometer to touch or rest on the bottom of the bowl to ensure the most accurate reading of the actual water temperature. |
Table 2
4. Specifications
Function / Parameter | Technical Data |
Environment of Use | Clean, dry, and flat surface |
Work Surface | Stable work surface |
Altitude | ≤2000 m |
Relative Humidity | ≤80% |
Temperature Range | Room temperature to 75°C ±1°C |
Applicable Voltage | AC 110V, 60Hz |
Power | 400 W |
Maximum Capacity | 0.6 gallon (2.3 L) |
Dimensions (Machine) | 11½ x 10¾ x 4 in. (29.5 x 27 x 10 cm) |
Net Weight | 5 lbs |
Dimensions (Package) | 13⅛ x 13 x 7 in. (33 x 33 x 17.5 cm) |
Gross Weight | 8 lbs |
Table 3
5. Notes of Operation
Do not heat the unit when empty.
Users may add as much water as needed to their comfort level (avoid overfilling or risk of overflow).
Use only with accessories provided or parts designed specifically for use with this model.
HAZARD - Having water near or in contact with power supply may cause electrical shock.
6. Control Panel
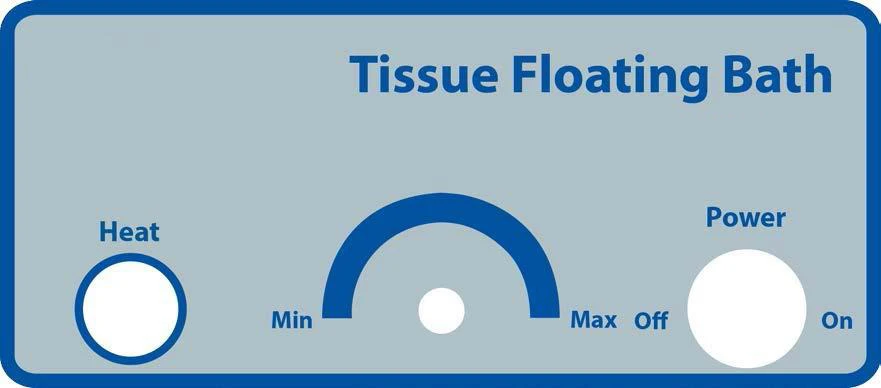
Figure 1
HEAT: Heating Indicator Light
MIN to MAX:Temperature Control Dial
POWER ON/OFF:Power Switch
7. Setup
1. Open box and remove Tissue Floating Bath from packaging.
2. Place the Tissue Floating Bath onto a flat surface.
3. Attach the thermometer holder on the side of the Tissue Floating Bath.
4. Place the glass lid onto the unit.
5. Plug AC Power cord from back of unit into power supply.
8. Operations
Heating
1. Prior to use fill with water at least halfway full - use care to avoid overflowing (Note: type of water - tap, distilled, purified, etc. is optional based on user requirements)
2. Turn on the power switch and heat indicator light (see section 6.1) will illuminate indicating the unit is heating. Adjust the temperature control dial to the proper setting and allow ample time for the Tissue Floating Bath to warm up. The temperature range is from room temperature to 75°C. Use a laboratory thermometer (not included) to determine actual water temperature based on dial setting and increase or decrease as desired.
3. Once the Tissue Floating Bath reaches your predetermined set temperature the heat indicator light will turn off indicating that the heater is off and the unit is holding temperature.
Making Sure Your Floating Section Is Flat
1. Swipe a slide underneath the floating paraffin section to pick up the section on the slide. After drying the bottom of the slide, place your slide on the outer edge of the Tissue Floating Bath. This will help the paraffin section to dry, flatten out and stick firmly to slide. A slide warmer might be needed for large quantities of slides or extended drying time.
2. Between floating paraffin sections you can use a lint-free disposable towel to wipe across the water to remove any leftover floating paraffin.
3. Add additional water as needed by pouring slowly into the basin; allow several minutes for temperature to adjust and/or increase temperature control setting as needed.
9. Packing List
No. | Each configuration name | Quantity | Unit |
1 | Main unit (with glass cover) | 1 | unit |
2 | Power cord | 1 | pcs |
3 | Thermometer holder | 1 | pcs |
4 | Fuse (10A) | 1 | pcs |
5 | Operation manual | 1 | pcs |
Table 4