
Get Price
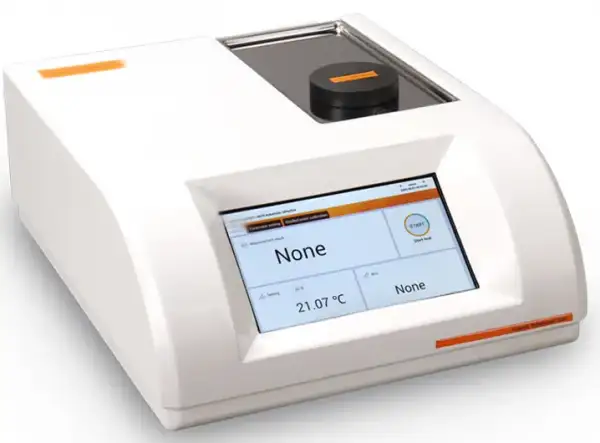
Refractometer BREF-102
Automatic Refractometer adopts high-performance CCD light-sensitive part, it can automatically measure the refractive index(nD) of transparent, translucent, dark, viscous and other types of liquid sample, also can measure sugar degree(Brix) of sugar solution. It' s accurate, reliable, fast, easy operation.Full compliance with FDA 21CFR part.11.
- Completely meet the requirements of user ID classification & tracking, E-signature,
- and Data tamper-proof, which is listed in FDA 21CFR part.11.
- A Peltier accurate temperature control system is built-in, accuracy up to 0.02°C.
- Measuring prism is made of high hardness sapphire glass, of excellent properties
- Up to 3-Year Product Warranty
- US & EU Compliance Standards
- Door-to-Door Shipping
Technical Specifications
Detailed operating and construction parameters for this model.
| Model | BREF-102 |
| Refractive index measuring range (nD) | 1.3000-1.7000 |
| Measured value error (nD) | ±0.0002 |
| Measurement resolution (nD) | 0.0001 |
| Scope of sugar solution mass fraction (Brix) | 0-100% |
| Measured value error (Brix) | ±0.1% |
| Measurement resolution (Brix) | 0.1% |
| Temperature control mode | Peltier |
| Scope of temperature measuring | 0-100°C |
| Temperature control range | 10-50°C |
| Temperature control accuracy | ±0.05°C |
| Interface | RS232 / USB / SD card / U disk / Internet |
| Data storage capacity | 4 GB |
| Display modes | 7" TFT touch screen |
| Power supply (Power adapter) | 110-240 V (15 V 7.0 A) |
| Power | 45 W |
| Net weight | 5 kg |
| Dimensions | 365 mm * 300 mm * 150 mm |
| Measuring resolution | - |
Product Features
Key design, performance, usability, and safety advantages.
Applications Explore common laboratory, research, industrial, and process applications.
Automatic refractometer has a wide range of use, within the field of factories, university and related scientific research institutes, petroleum, oil, pharmaceutical, paints, food,daily chemical, sugar and geological prospecting industries.

Food
Cosmetics
Pharmaceutical
Oil Chemical
Operating Manual View instructions, operating procedures, safety information, and maintenance guidance.
1. Instructions
2. Overview
2.1 Features of fully automatic refractometer
2.2 Out-of-box audit
2.3 Special warning
3. Technical Parameters
4. Working Principle
4.1 Principle framework
4.2. Principle
5. Guide of Use and Operation
5.1 Apparatus component names
5.2 Introduction to apparatus interfaces
5.3 Data interface
5.4 Setting interface
5.5 Help
6. Apparatus Maintenance and Service
7. Precautions for Use
8. After-sales Services and Producer Responsibility
1. Instructions
 Warning: The responsible person shall be aware that if the apparatus is not used in a way required by the manufacturer, protection provided by itself may be deteriorated.
 Warning: Carefully handle various solutions used for analysis according to the laboratory safety regulation. Refer to the corresponding material safety data sheets. Always wear the lab coat, goggles and rubber gloves. Avoid being scalded when handling hot reagent.
 Warning: Electric shock hazard. Only professional personnel are allowed to open the covers and panels.
2. Overview
As one of important optical constants of substances, refractive index can be used to know the optical properties, purity, etc. of substances. The apparatus allows to measure mass fraction of sugar solution (Brix) (0-100%). Therefore, it is applied in a broad range, as an inevitable commonly used device in plants, schools and research institutes in the petroleum, oil, pharmacy, painting, food, daily chemical, sugar production and geological survey industries.
fully automatic refractometer researched and produced by us is an apparatus capable of measuring the refractive index (nD) of various liquid like transparent, semi-transparent, dark and viscous liquid as well as the mass fraction (Brix) of sugar solution. It provides humanized operations, friendly full-color interfaces, quick, stable and accurate fully automatic measurement, accurate constant temperature control and mass data storage, etc.
2.1 Features of fully automatic refractometer
• The cloud service system realizes interconnection between the cloud database and apparatus via the network interface, without storage restriction anymore (top model only)
• Built-in accurate Peltier temperature control system
• High-hardness sapphire glass is used for the measuring prism in the sample cell, with good corrosion resistance, abrasion resistance and durability, easy to clean
• The high-resolution CCD detector is able to do fully automatic measurement of various liquid like transparent, semi-transparent, dark and viscous liquid, thus avoiding human error, and providing higher measurement precision
• High-brightness LED light source with service life over 100,000 hours
• Super-large 4G storage capacity, with automatic storage of up to 1,000 sets of data information
• Wide 7-inch color touch screen, innovative software interfaces, one-touch measurement, and easier apparatus control and data reading
• Two USB interfaces, RS232 interface and Ethernet interface provide easy connection to the printer and network and support Wi-Fi top model only, to make the users' data export or backup easier
• User level audit trail, electronic signatures and tamper-proof data output in complete compliance with 21CFR part 11
• The whole apparatus conforms to TART quality certification standard for laboratory analytical instrument.
2.2 Out-of-box audit
1. Unpack the transport case carefully.
Notice: maintain the apparatus packing case and packing foam for future transportation.
2. Lift the apparatus out and put in onto the experiment table. Check the apparatus and accessories against the packing list. If wrong apparatus or accessory or incomplete or abnormal accessories is found, contact the retailer or manufacturer.
2.3 Special warning
▪ Please read the Manual carefully for safe proceeding of your experiments! Experimenters not having used such apparatuses shall receive basic training.
▪ Keep the Manual properly. Hand it over with the apparatus when its operator is to be changed. We reserve the right to upgrade products. Content of the Manual might be changed without prior notice.
3. Technical Parameters
Parameter | BREF-101 | BREF-102 |
Measurement range of refractive index | 1.30000-1.70000 nD | 1.30000-1.70000 nD |
Reading error | ±0.0001 nD | ±0.0002 nD |
Measurement resolution | 0.0001 / 0.00001 nD optional | 0.0001 nD |
Brix measurement range | 0-100.0% | 0-100.0% |
Brix reading error | ±0.1% Brix | ±0.1% Brix |
Brix measurement resolution | 0.1% / 0.01% Brix optional | 0.1% Brix |
Temperature control mode | Built-in Peltier temperature controller | Built-in Peltier temperature controller |
Measured temperature range | 0°C-100°C | 0°C-100°C |
Temperature display resolution | 0.01°C | 0.1°C |
Temperature control range | 5°C-80°C | 10°C-50°C |
Temperature control precision | ±0.02°C | ±0.1°C |
Output mode | Two USBs, RS232, Ethernet interface | Two USBs, RS232, Ethernet interface |
Data storage capacity | 4G at apparatus side + cloud | 4G at apparatus side |
Display mode | 7-inch TFT color touch screen | 7-inch TFT color touch screen |
Wi-Fi | Supported | Not supported |
Power adapter | 100-240VAC, 15V 7.0A | 100-240VAC, 15V 7.0A |
Rated power | 45W | 45W |
Net weight | 5 kg | 5 kg |
Overall dimensions (L x W x H) | 365 x 300 x 150 mm | 365 x 300 x 150 mm |
Table 1
In standard refractometer conditions (T20°C, λ589nm, and environment temperature = 23°C).
Requirements on working environments and conditions
▪ Environment temperature: 10°C~30°C.
▪ Environment humidity: relative humidity below 85%.
▪ Protect against direct sunlight, corrosive gas and water.
▪ Avoid violent mechanical vibration and strong magnetic field, and locate in a well-ventilated and dry place.
4. Working Principle
4.1 Principle framework
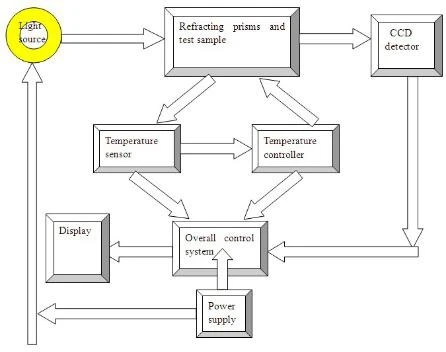
Figure 1
4.2. Principle
Fully automatic refractometer measures refractive index of transparent or semi-transparent substances by the principle that on the basis of measuring the critical angle, a linear array CCD detects the formed image, the data is processed by a microcomputer system to judge the boundary between the light and dark sides where the critical angle is located, and then the refractive index or Brix of the test sample is displayed numerically.
5. Guide of Use and Operation
5.1 Apparatus component names
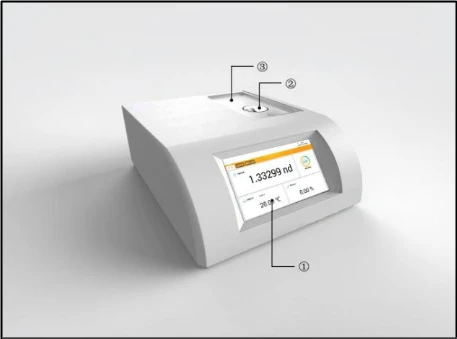
Figure 2 (Front view)
Description of apparatus front view
(1) Screen
(2) Sample cell
(3) Tray
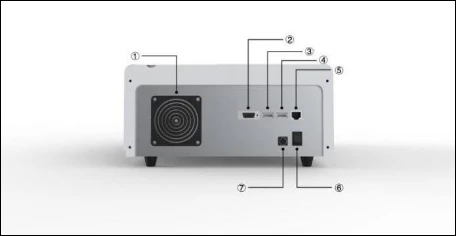
Figure 3 (Rear view)
Description of apparatus rear view
(1) Fan
(2) RS232 serial interface
(3) USB interface
(4) USB interface
(5) Network interface
(6) Power switch
(7) Power interface
5.2 Introduction to apparatus interfaces
5.2.1 Login interface
Before startup, keep the prism surface clean. If there's residual sample left in the last test, clean it completely, or else it will affect the apparatus's accuracy. After the above step is done, close the cover, connect the power, start it up, and the login interface will show, as shown in Fig.4 (login is not necessary by default; the login interface can be set in the user management interface).
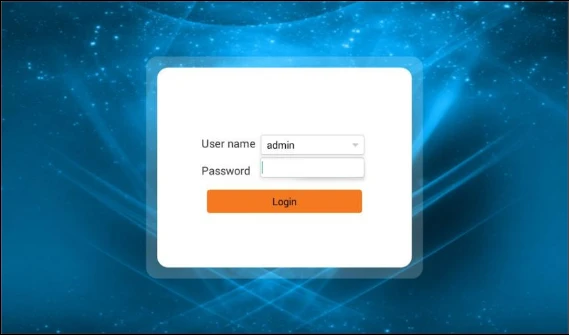
Figure 4
On the login interface, input the user name and password, and click "Login" to go to the interface shown in Fig. 5.
Note: user name: Admin Password: 888888.
5.2.2 Measurement interface
Swipe right on the interface, and the navigation bars Test, Data, Setting, Help and User will show on the left side. Click Test, and the Test interface will show, as shown in Fig. 5
Test
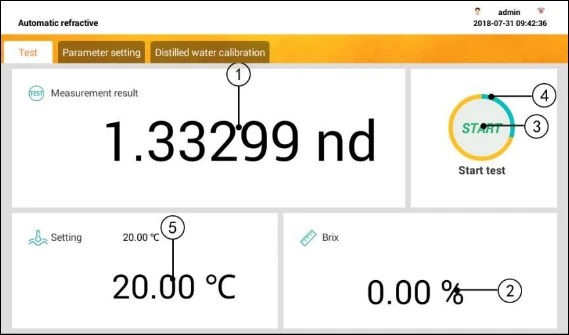
Figure 5
①: The content field shows the measured value 1
② : The content field shows the measured value 2 or defines the upper and lower limits for the measured value
③: Start test
④: Progress bar (indicating if the apparatus is measuring or if measurement is completed)
⑤: The content field shows the current temperature
Parameter setting
Before test, click the secondary menu "Parameter setting" to set the parameters, as shown in Fig. 6
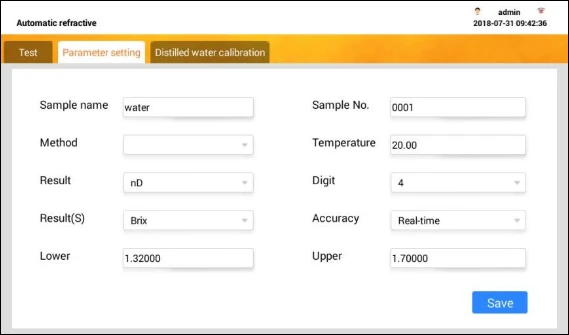
Figure 6
Parameters can be set in one of two methods:
Method 1: set temporary parameters for you experiment
You only need to select the parameters you want to set, without selecting the test method.
Method 2: click the drop-down menu of Method, and select a measurement method that has been saved (the test methods can be set or added in Method Management in the Setting page), as shown in Fig. 7
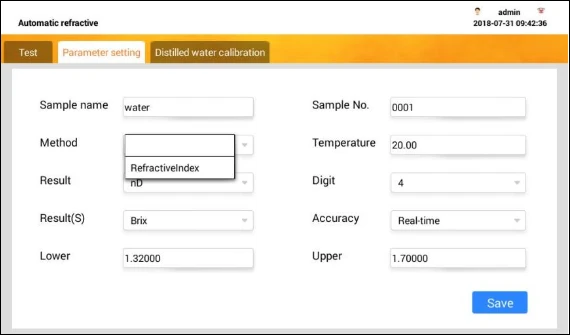
Figure 7
Notes:
No matter which setting method is selected, the last setting will be reserved for the next startup. After all the parameters are set, click Save, and the screen will go to the interface shown in Fig. 8.
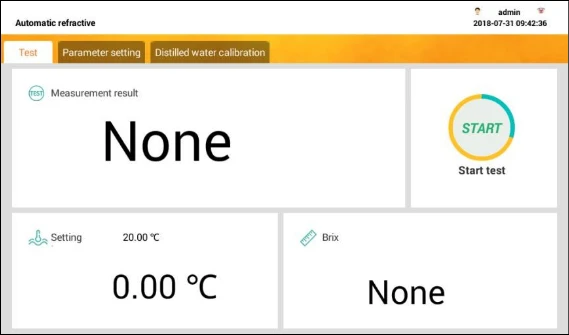
Figure 8
After the temperature reaches the set value, charge the sample cell with the test liquid, close the cover, and wait until the test result becomes stable.
Description of use of key 
Case 1: on the test parameter interface, if Accuracy is set to Real-time, it is not necessary to press the key START on the test home page. Test will be started automatically, as shown in Fig. 9.
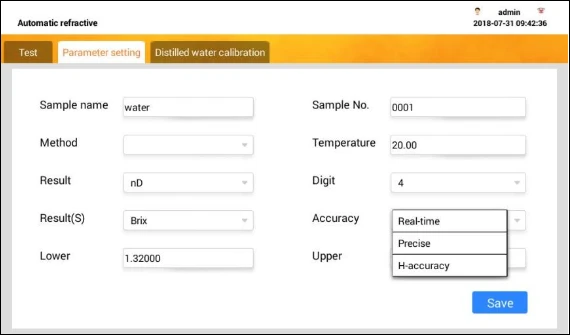
Figure 9
Distilled water calibration
When the distilled water error is found over 0.0001, distilled water calibration can be performed on this interface, as shown in Fig. 10.
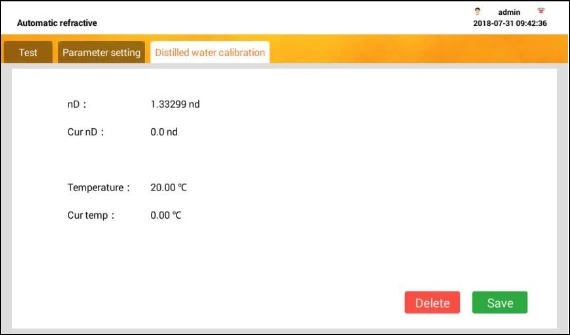
Figure 10
Drop distilled water in the sample cell. When the temperature becomes stable at 20°C, click Save.
5.3 Data interface
Swipe right on the interface, and the navigation bars Test, Data, Setting, Help and User will show on the left side. Click Data and the Data interface will pop up, as shown in Fig. 11.
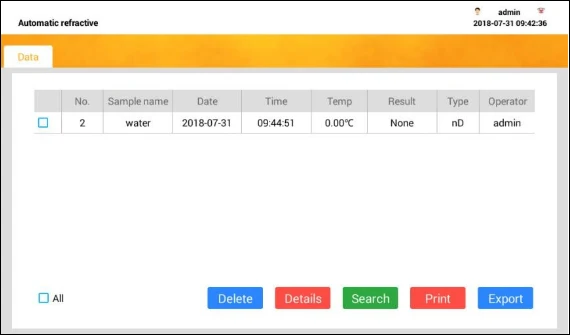
Figure 11
Description of key functions in the interface of Fig. 11
Print: after connecting to the WIFI laser printer of your designated model, print the selected test
report on A4 paper via this printer; select at least one piece of data, click Print, and a box will pop up. Enter the titles (optional) to be printed in the pop-up box, and click Print, as shown in Fig. 12.
Note: the designated printer for this apparatus is HP DIRECT-95-HP LaserJet M104W (USB interface).
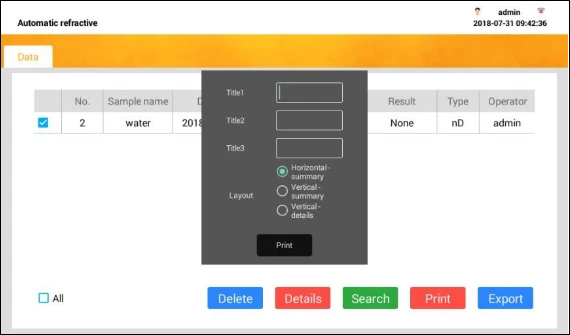
Figure 12
Export: insert the USB disk (into the user interface; see the rear view of the apparatus), press Export, and a box will pop up. Enter the file name in the pop-up box, press Save to export it in PDF format, as shown in Fig. 13.
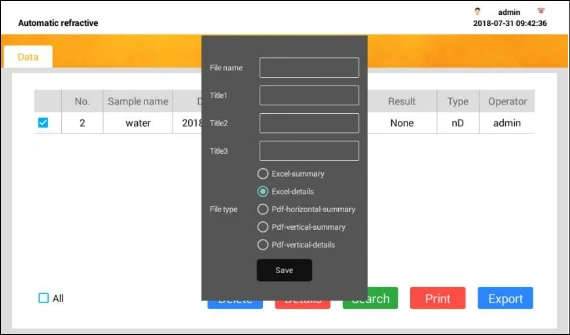
Figure 13
Details: select one piece of data in the database, press Details, and the detailed content of it will be displayed, as shown in Fig. 14.
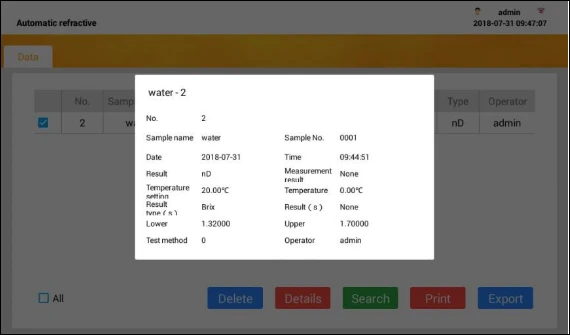
Figure 14
Delete: press Delete and the interface shown in Fig. 15 will pop up for you to determine whether to delete the selected data.
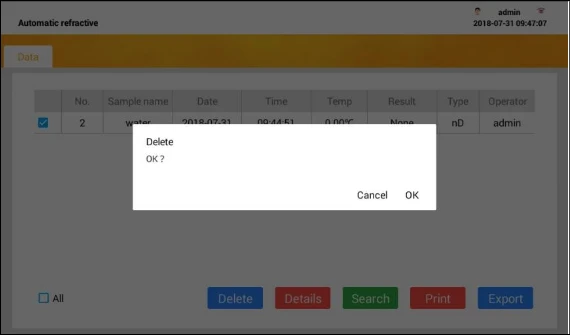
Figure 15
5.4 Setting interface
Swipe right on the interface, and the navigation bars Test, Data, Setting, Help and User will show on the left side. Click Setting, and the Setting interface will pop up, as shown in Fig. 16.
System setting
Click Setting in the left navigation bar of the interface, the screen shown in Fig. 16 will appear.
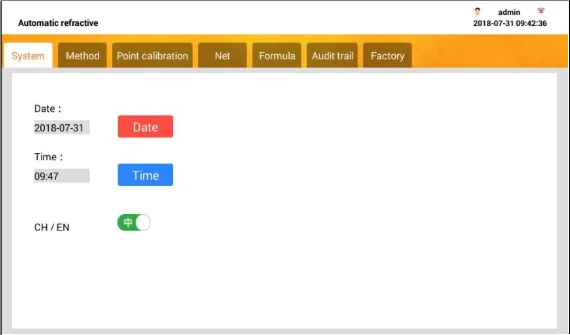
Figure 16
The interface in Fig. 16 is used to set the apparatus date or time. The user can edit them as needed. Press Done after completion of edition to complete such setting.
Point calibration
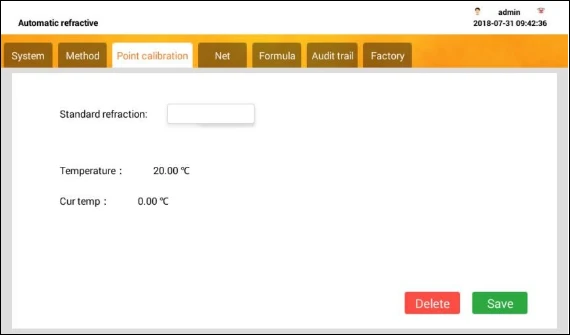
Figure 17
In Fig. 17, when the current temperature is stable, the input refraction is the standard refraction of the liquid in the sample cell, and click Save. The refraction will be more accurate when a sample with similar refraction is measured.
Method management
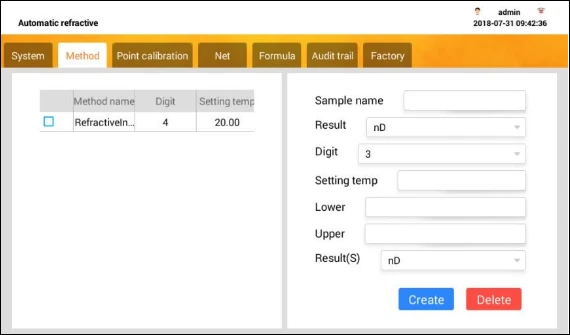
Figure 18
Set the test method content in the right content bar in the Method interface in Fig. 15, and click Create to add the test method into the method base on the left side. The test method in the method base can be directly selected from the test method drop-down menu in the "Parameter setting" page.
User-defined formula
If the user wants to have a new index related to refractive index, a user-defined formula can be added. The new index is equivalent to a dependent variable (f(x)), and refractive index is equivalent to an independent variable x. The interface can be seen in Fig. 19.
Click Add to edit a new formula. After edition, it can be selected from the test results in the "Parameter setting" page.
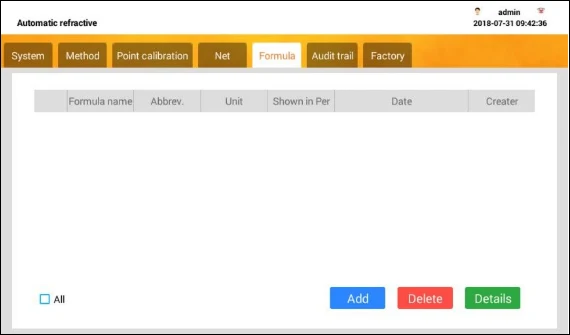
Figure 19
Factory correction
Factory correction is only available for the manufacturer. The user does not need to use it.
Network
Click Net to connect to a network via the setting.
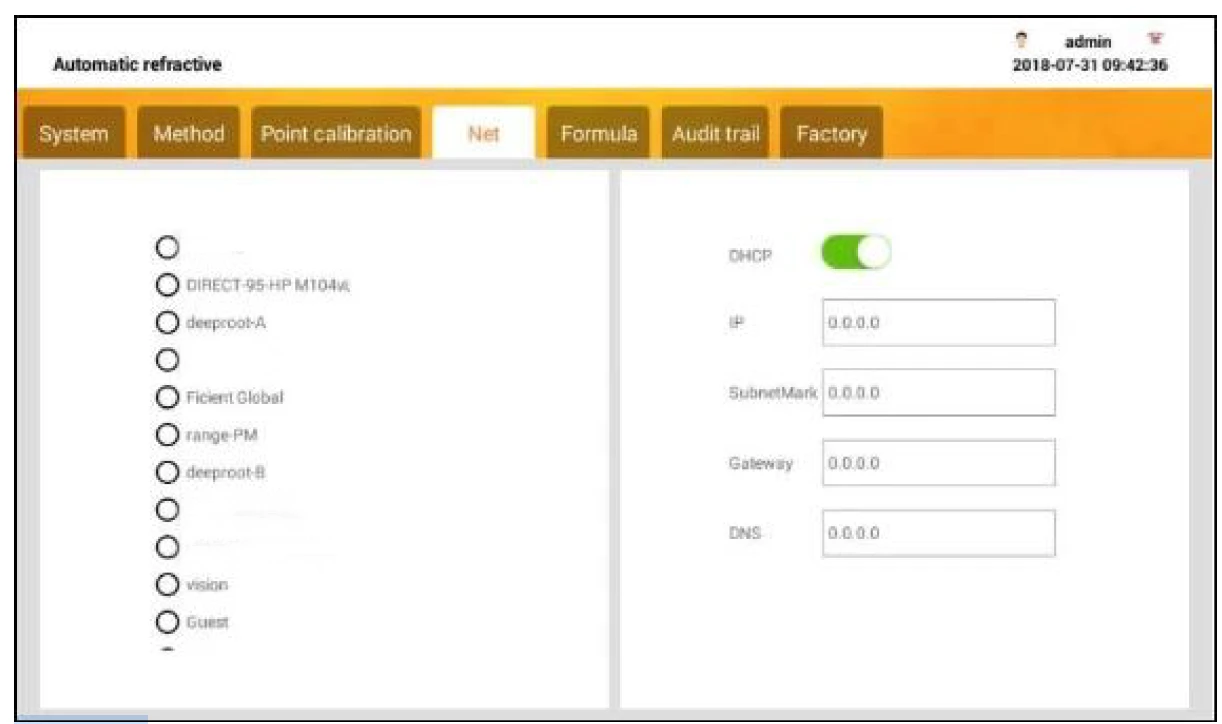
Figure 20
Audit trail
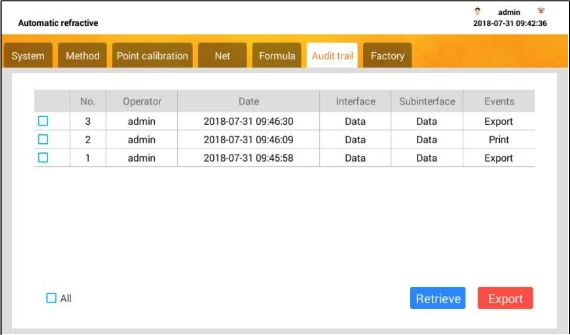
Figure 21
Open the Setting interface, and click "Audit trail". The interface can be seen in Fig. 21. Settings or operations influencing the test results and not recorded in data are recorded in audit trail, from which the user can search for related content.
Export: click this button to export the audit trial record sheet in MD5-encrypted Excel format to the external USB disk in the back of the apparatus (it will not be successfully exported if there's no USB disk)
5.5 Help
Swipe right on the interface, and the navigation bars Test, Data, Setting, Help and User will show on the left side. Click Help and the Help interface will appear, as shown in Fig. 21.
5.5.1 MD5
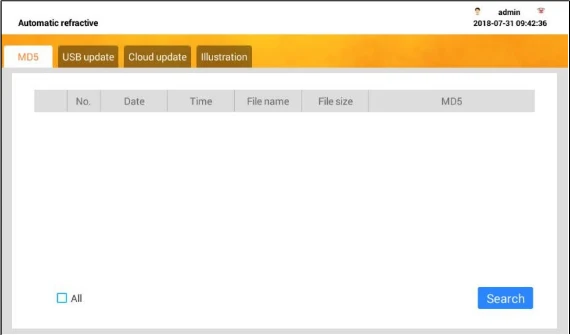
Figure 22
Open the Help interface, click MD5, and the interface shown in Fig. 22 will appear. When a file of Excel format is exported, the system automatically saves a record about the MD5 code. The user can check if the Excel file has been modified by referencing the MD5 code.
5.5.2 USB update
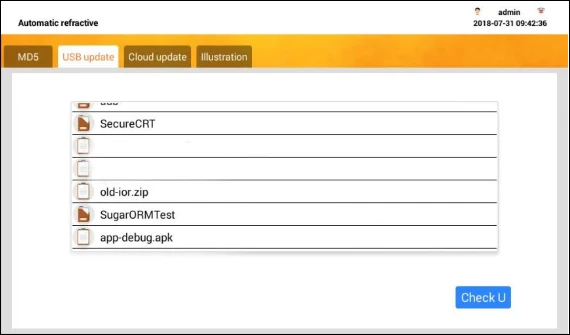
Figure 23
Open the Help interface, click "USB update", and the interface shown in Fig. 23 will appear. Insert the USB disk, click "check USB" to read files in it, and click the corresponding update program for update; after update, restart the apparatus.
5.5.3. Cloud update
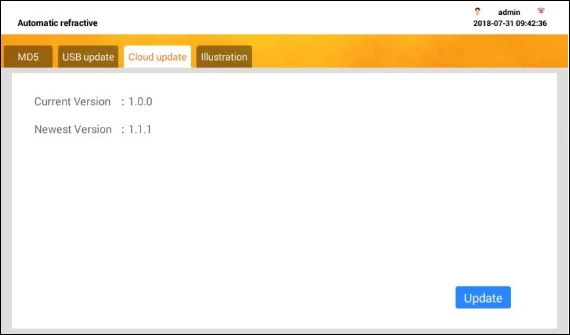
Figure 24
Open the Help interface, click "Cloud update", and the interface shown in Fig. 24 will appear. The current edition does not support cloud program update.
5.5.4 Instruction
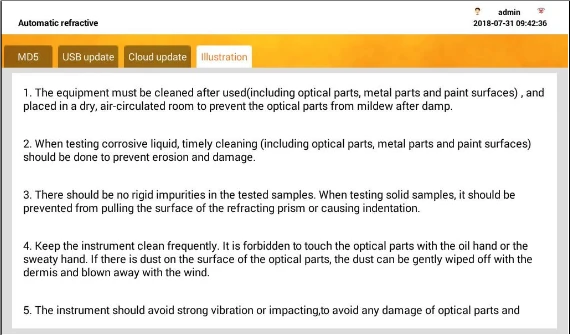
Figure 25
Open the Help interface, click "Illustration", and the interface shown in Fig. 25 will appear. Content in this interface informs you of precautions about the apparatus.
5.5.5 User
Swipe right on the interface, and the navigation bars Test, Data, Setting, Help and User will show on the left side. Click User, and the User interface will appear, as shown in Fig. 26.
User management
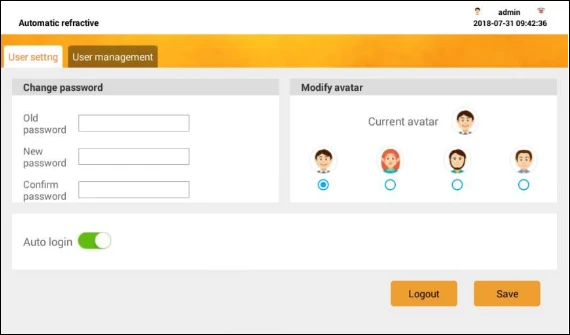
Figure 26
Open the User interface, click "User setting", and the interface shown in Fig. 26 will appear. The current user can modify the login password in the page. After that, click Save to save the current settings. Then click Logout to return to the login interface and re-enter the new password.
When [Auto login] is enabled, this account will be automatically logged in without the need of inputting the password at the time of each switch-on, and each operation performed is recorded in the name of this account. Operation steps can be reduced for login. However, it is not suggested to enable this function if there's a high requirement on FDA audit trail.
User management
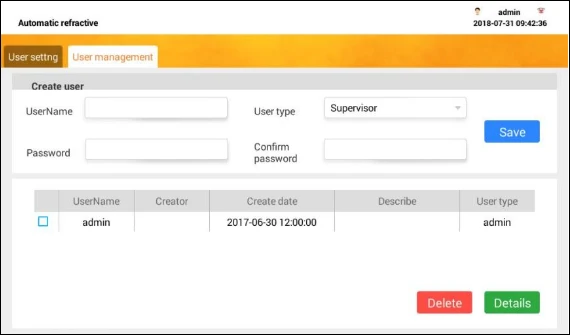
Figure 27
Open the User interface, click "User management", and the interface shown in Fig. 24 will appear. An account having the permission to create new users is allowed to perform addition operation in the current page while an account having no such permission is allowed to view only. After entering the user name and password, click [Save] and a window will pop up to inquire the permission to be given to the new account. After permission assignment, click Save again.
6. Apparatus Maintenance and Service
The apparatus is a precision measuring apparatus. In order to guarantee its accuracy and avoid damages in use, the user is expected to do the following maintenance and service:
1. When the apparatus is not in use, put it in a dry and well ventilated indoor place, without too much indoor-outdoor temperature difference to avoid the optical elements from getting molded after being dampened.
2. Clean the working surfaces of the sample vessels of the refractometer before and after using the apparatus and when replacing the samples.
3. Clean the apparatus promptly after testing corrosive liquid.
4. It is strictly forbidden to use the apparatus for measuring strongly corrosive liquid.
5. Keep the apparatus clean; it is strictly forbidden to touch the prism surface with naked hands; in case of dust on it, wipe it with high-end chamois leather or long-fiber degreasing cotton. If there's oil stain on the surface, clean it with ethyl alcohol/diethyl ether mixed solution promptly.
6. Prevent corrosive liquid from dropping on the plastic parts of the apparatus casing to avoid apparatus appearance from being damaged.
7. It is strictly forbidden to disassemble or assemble the apparatus by yourself. In case of failure, have it repaired promptly.
7. Precautions for Use
According to the features of the fully automatic refractometer, e.g., there are high requirements on surface cleanness of the sample test cell and prism, and temperature affects the refractive index of liquid greatly during tests, to help the user obtain more accurate data, the following suggestion is provided:
1. Carefully clean the sample cell before each test to make sure that there's no other liquid remaining in it.
2. When setting the temperature, minimize the difference between the environment temperature and set temperature so as to improve temperature control speed and stability.
3. During tests, let the liquid in the sample cell stand still for some time, and conduct measurement after the liquid temperature is exactly the same as the set temperature.
4. Keep away from cold and hot sources during measurement, to avoid direct sunlight and high-humidity environments.
5. After completion of measurement, clear the liquid in the sample cell promptly, rather than remaining it for long.
6. After completion of measurement, set the temperature to the room temperature, rather than keeping an ultra-high or ultra-low temperature for long.
8. After-sales Services and Producer Responsibility
The apparatus is guaranteed for a year since the date of sale (invoice date), excluding the following circumstances:
1. The warranty period has elapsed;
2. The apparatus is damaged due to misuse;
3. The apparatus is damaged due to disassembly without the manufacturer's permission;
4. The apparatus is damaged due to inappropriate transportation and keeping.