
Get Price
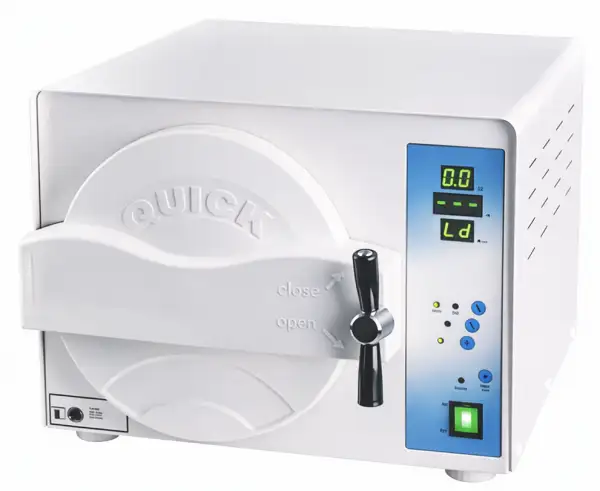
Medical Autoclave BAMN-404
Designed for sterilization of solid instruments, medical class N autoclave is a non vacuum sterilizer which removes air from the chamber by thermodynamic air displacement. Safety features with a door locking system, these autoclaves are ideal for small spaces.
- Up to 3-Year Product Warranty
- US & EU Compliance Standards
- Door-to-Door Shipping
Technical Specifications
Detailed operating and construction parameters for this model.
| Model | BAMN-404 |
| Capacity | 23 L |
| Product Size | 450x550x350 mm |
| Chamber Dimension | φ249x450 mm |
| Package Size | 670x550x500 mm |
| Gross Weight | 33 Kg |
| Net Weight | 26 Kg |
| Power | 800 W |
| Voltage | AC220/110V+10%, 50/60 Hz+ 1Hz |
Applications Explore common laboratory, research, industrial, and process applications.
Medical, Dental, Laboratory, Pharmaceutical, Research.
Operating Manual View instructions, operating procedures, safety information, and maintenance guidance.
1. General Introduction
2. Application Scope
3. Technical Parameter
4. Diagram Specification
5. Installation
6. Control Panel
7. Operation
8. Emergency Condition
9. Maintenance and Service
10. Transportation and Storage
11. Accessory
Appendix
1. General Introduction
This steam sterilizer is a precision instrument specializing in the operation occasion in need of simple, fast and efficient sterilization by the doctor or his/her assistants, and the doctor shall take the responsibility for such work.
This steam sterilizer is equipped with the microprocessor for intelligent control and man-
machine interface for convenient operation. With the distinctions in displaying parameter and condition actively, evaluating malfunction automatically, shutting off for self-protection automatically in case of excessive temperature and pressure, this type of steam sterilizer is a reliable product in sterilizing.
2. Application Scope
This product is N-level sterilizer for dental, ophthalmology, operating room, laboratory, small dental equipment, surgical instruments sterilization 121°C/134°C for rapid sterilization of items.
3. Technical Parameter
Chamber size of the Steam Sterilizer (Diameter X Depth) 16L…230mmX360mm
Chamber size of the Steam Sterilizer (Diameter X Depth) 18L…249mmX355mm
Chamber size of the Steam Sterilizer (Diameter X Depth) 23L…249mmX460mm
Rated Voltage………………………………………230V~, 50Hz; 110V~, 60Hz
Sterilizing (Pressure/temp.)…………………………………0.9~1.1Bar/121°C
2.0~2.3Bar/134°C
(Both of above are Under Standard Atmospheric pressure)
Rated Power 750VA
Fuse-Melting pipe … … … … … ..… … … ..… … .… … .…… T15A/T30A
Operating Temp…………………………………………………………0-40°C
4. Diagram Specification
Symbol | Meaning |
| CAUTION |
| Warning: dangerous voltage |
| WEEE MARKING |
| DATE OF MANUFACTURE |
| SERIAL NUMBER |
| CONSULT INSTRUCTIONS FOR USE |
| Earthing |


Table 1
5. Installation
The clearance between the exterior side surface of the steam sterilizer and the ambient neighboring articles shall be 10cm as retained, and the top surface shall be 20cm retained.
The air-cooling window attached to the exterior surface of the steam sterilizer shall be non-clog by dust or articles, and the steam sterilizer shall be located in the proper air flowing environment by recommendation of the supplier.
The steam sterilizer shall be installed on the horizontal working base.
PREPARATION BEFORE OPERATION
Before operation, please connect well to the power source. Connect the power source hole under the back left side of the steam sterilizer and the power socket by the attached power
cable inside the product's package so as to switch on the steam sterilizer. Push down the main power button at the right bottom corner of the front side, when the Switch indicator is bright it means that the steam sterilizer get through with the electric power, and the process then is in initialization status with "LD" being shown on the screen. The steam sterilizer is not heated while under such initialization status.
6. Control Panel
1. Pressure display window
Real-time display the air pressure inside the cavity. Unit: Bar
2.Temperature display window
Real-time display the temperature inside the cavity. Unit: °C
3. Status/ malfunction code number display window
Applied for displaying the status of the steam sterilizer during its working time. See more details in "Appendix working status display form".
When an alarm occurs to the steam sterilizer, the digital pipe of the display will show the alarm code number, the user can find out the malfunction. (Once the
malfunction occurring to the steam sterilizer, please contact the service center or distributor immediately).
4."Temperature"button
It used to be the choice especially for the working temperature.There are two working temperatures for choice:121 °C or 134 °C,whose light will turn on after being chosen.
5. "UNWRAPPED"button
It's used as the sterilization choice especially for the unwrapped devices.The working temperature is 121°C or 134°C.
After having been chosen,its indicator light is on.
6. "WRAPPED"button
It's used to be the sterilization choice especially for the wrapped devices.The working temperature is 121°C or 134°C.
After having been chosen,its indicator light is on.
7. "START/STOP" button
Press down the starting button for starting the sterilizing process.If you want exit Process, please turn off the electric power.
Note: If forced exit or outage, please wait for 10 minutes, then open the door, In case of the air pressure indoors.
Must wait for the pressure display "0 Bar" can open the door!
8. "READY" indicator light
Door lock indicator light. When the indicator light light, it means can start sterilizing, After launching the indicator light to put out.
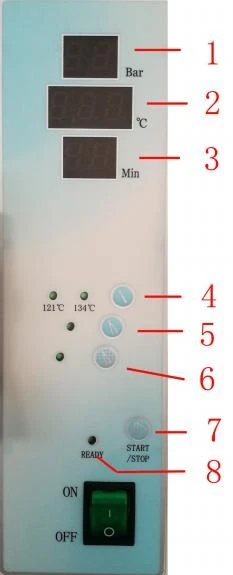
Figure 1
7. Operation
Before operation, please connect well to the power source. when display bright it means that the steam sterilizer get through with the electric power, and the
process then is in initialization status with "LD" being shown on the screen. The
steam sterilizer is not heated while under such initialization status. Otherwise, you need to close the door completely. Then press the "Start" button to start the sterilizing.
1. Water filling
Please use the measuring cup provided with the sterilizer to pour distilled water directly into the chamber, ensuring that the water level of the distilled water can cover the heating tube and does not exceed the water fender at the door of the sterilization chamber.
 Make sure there is enough water in the chamber before each time working!
2. Connect the drain pipe and put one end into a container, put the apparatus to be sterilized onto the mesh trays which are inside the chamber, then close the door and make sure to revolve the door handle to the maximum position.
3. Lock indicator "READY" light,press the "START" key to start working.
Note: If the door is not completely closed, the machine can't work when you press down the "START" button. If the door is opening during the working process, the working status display will flash "E5"as an alarm and the steam sterilizer will stop working until restart again by switching off the power and dismissing the alarm.
4. Status displays "ED" and has a beep after the sterilizing process, then you can open the door and take the sterilized apparatus out. Must wait for the pressure display "0 Bar" can open the door!
5. Please shut off the main power supply when you don't use the steam sterilizer. (The light of power is off).
6. Sterilizing cycle
PROCEDURE | TEMPERTURE | PRESSURE | TIME |
UNWRAPPED | 134°C | 2.1Bar | 4 minutes |
121°C | 1.1 Bar | 10 minutes | |
WRAPPED | 134°C | 2.1 Bar | 8 minutes |
121°C | 1.1 Bar | 20 minutes |
Table 2
8. Emergency Condition
During the running time, the steam sterilizer will automatically raise the alarm,
release pressure, stop heating and display the warning code. (The definition of the warning code is as the below: malfunction code and resolving method) for ensuring the safety of the operator if the emergencies occur.
Any emergencies happen, please check the warning code table for resolving the according malfunctions. If not possible to resolve, please contact the dealers. We will try our best to provide help to you in a short time.
Must wait for the pressure display "0 Bar" can open the door,
There will be set aside heat and residual hot water, Operators also need to keep away from it , to prevent burns!
Malfunction code and resolving measures.
0 | E | Heating failure | Check the heating heater Check vent valve of water is normal Check water level Check for gas leaking away |
Failure to maintain the temperature | Check temperature | ||
0 | E | sensor Check vent valve of | |
water is normal | |||
Check water level | |||
0 | E | Excessive Temperature (temperature sensor fault) | Check temperature sensor |
0 | E | Pressure can not be released | Check the exhaust, drain valve |
0 | E | Door switch bounce | Check the door knob, microswitch |
Table 3
Others:
1. Turn on the power, display board doesn't show.Check if the display board loosen or not.
2. When or after closing the door, Lock indicator not light, check if the feeler lever of micro switch touches the micro switch well.
9. Maintenance and Service
1. Disinfect and clean the interior surface of the steam sterilizer room by Medicinal alcohol once a month.
2. Replace the fuse-melter.
(1) Shut off the power
(2) Revolve the fuse base by counter-clockwise by screwdriver to bring out the melting fuse to be replaced;
(3) Replace the new fuse and reset the fuse base on the original position, then use the screwdriver to fasten the base by clockwise.
(4) Check the correctness of the parameter of the new fuse replaced.
3. Clean the sealing ring periodically
The user shall clean the sealing ring periodically for avoiding the influence to the seal caused by the dust/dirt left due to the long period of use. Use the smooth cloth with distilled water to wipe the surface of the sealing ring or sealing cap gently.
The user shall discharge the sealing ring for further cleaning or replacement if the air-leaking problem can not be resolved after the above process (The user shall
discharge the sealing ring periodically for cleaning and inspection as recommendation by the supplier). Put back the ring to the original door groove after cleaning. Most Important: the inset work must be done equably to the groove During the installation, the laid four equal points of the ring must be
inserted to the groove firstly, later for the same work for the remaining segments of the ring. After finishing, press the sealing ring equally by the force of hand.
4. Shut off the power before service or components' replacement, and the service or replacement work shall be done by the supplier or his designated technician.
10. Transportation and Storage
The steam sterilizer shall be transferred and stored with the below conditions: Ambiance temperature: -40°C -+55°C
Relative humidity: < 85%
Atmospheric pressure: 500HPA-1060HPA
11. Accessory
1. | Draining pipe | 1 pc |
2. | Tray | 3 pcs |
3. | Plug | 1 pc |
4. | Bracket | 1 pc |
5. | Manual holder | 1 pc |
6. | Fuse | 2 pcs |
7. | Operation manual | 1 pc |
8. | Measuring cup | 1 pc |
9. | Sealing ring | 1 pc |
10. | O ring of tap | 2 pcs |
Table 4
Appendix
I Working status display table
NO. | Display | Explain |
1 | Ld | Prepare/preheating state |
2 | He | Heating state |
3 | working time | Sterilization state |
4 | Ed | end-of-job |
Table 5
II Steam Way:steam ff Map
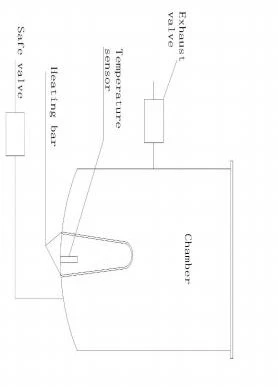
Figure 2
III Wiring Map
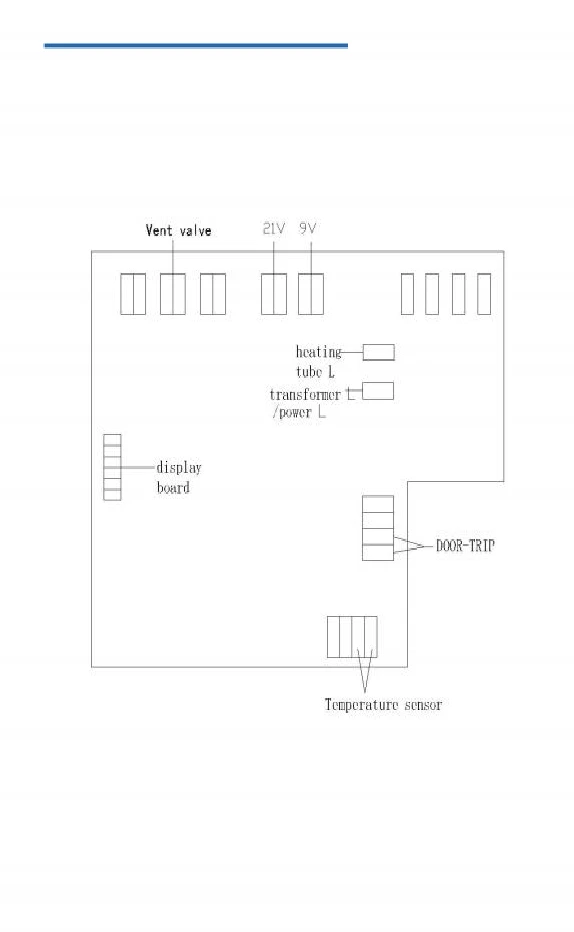
Figure 3