
Get Price
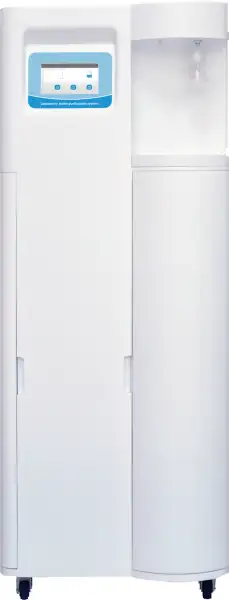
Laboratory Water Purification System BLPS-402
Laboratory water purification system uses double stage reverse osmosis technology. It produces double stage RO water, Deionised, EDI and ultrapure water. These systems have 3 way on-line water quality sensor, multiple alarm with unique design and it has easy-to-replace cartridges pack unit.
- Integration design
- Integrating pretreatment, reverse osmosis, deionization, ultraviolet, ultrafiltration, microfiltration, 250 liters stainless steel tank and pure water supplying and circulation system together.
- Perfect control, monitor and alarm
- This series could monitor and alarm, including shortage of water, leaking, water pressure, water level, flow velocity and water quality etc.
- Up to 3-Year Product Warranty
- US & EU Compliance Standards
- Door-to-Door Shipping
Technical Specifications
Detailed operating and construction parameters for this model.
| Model | BLPS-402 |
| Water Inlet | Tap water |
| Temperature | 5-45°C |
| Pressure | 1.0-4.0 Kgf/cm² |
| Bacteria | <0.1 cfu/ml |
| DimensionLxWxH | 570x600x1500 mm |
| Weight | 60 kg |
| Power Consumption (W) | 240 W |
| Power Supply | AC110-220 V, 50/60 Hz |
| Note | *The quality of output water accords with the quality of inlet water. |
| Deionized water quality: | |
| Resistivity | >10 MΩ.cm |
| Conductivity | - |
| Particle(>0.2μm) | - |
| Ultrapure Water Quality: | |
| Heavy metal ion | <0.1 ppb |
| Feed Water Requirements: | |
| Output | 90 L/hrs |
| Conductivity of RO water quality | < tap waterx4% |
Product Features
Key design, performance, usability, and safety advantages.
Applications Explore common laboratory, research, industrial, and process applications.
Laboratory, Manufacturing, Reefkeeping, Aquarium
Operating Manual View instructions, operating procedures, safety information, and maintenance guidance.
1. Preface
2. Specification
3. Water Flow Chart
4. Working Environments
5. Installation
5.1 Preparation for installation
5.2 Tube and adapter's connection
5.3 Installation steps
6. Usage Guide
6.1 Starting Up & Release Air
6.2 Getting Corresponding Pure Water
6.3 Standby
6.4 Releasing internal air of terminal filter (Optional)
6.5 Shutdown
6.6 The Usage to Keep High Quality Pure Water
6.7 Water leakage protector
7. Microcomputer Controller
7.1 Specification at the beginning of working process
7.2 Specification of the main menu interface
7.3 Record query and data export of water dispense and alarm history
7.4 Sanitization and cartridges replacement
8. Water Quality Test
9. Consumables
10. Normal Trouble Diagnosis
11. Warranty & Repair Regulation
1. Preface
Dear customer, in the beginning, we sincerely thank you for choosing our water purification system. This water purification system has incorporated new cutting-edge technology. It is installed and used easily, and can provide you with RO water and ultrapure water for science research. So, it will benefit your work.
For the water purification system's maximum efficiency, it is suggested that the user manual should be read before installation. Any questions in the installation process, please contact our technology engineers or dealers.
2. Specification
Model | BLPS-402 | |
Output(25°C)* | 90 Liters/hour* | |
Flow rate | Up to 2 liters/minute (with pressure tank) | |
Deionized water quality | ||
Resistivity(25°C) | >10MΩ.cm | |
Silicone rejection rate | >99.9% | |
Bacteria | <0.01cfu/ml | |
Particle(>0.2μm) | <1/ml | |
RO water quality | ||
Conductivity - 1st stage RO water | Feed water conductivityx5%* | |
Conductivity - 2nd stage ROwater | 1-5μs/cm* | |
Feed water requirements | Tap water, temperature:5-35°C,pressure:1.0-4.0bar | |
Dimension and weight | LengthxWidthxHeight:610x585x1580mm / Weight: about 70Kg | |
Electrical requirements | AC220V, 50Hz | |
Power | 480W | |
Standard configuration | Main body (Including 1 set of cartridge) | |
Purification System | ||
Sequence number | Specification | Quantity/set |
LV.1 | 20" high flux pleated PP cartridge filter | 1 |
LV.2 | 20" high flux carbon fiber cartridge filter | 1 |
LV.3 | 800GPD RO membrane | 1 |
LV.4 | 600GPD RO membrane | 1 |
LV.5 | 20L Mixed bed resin cartridge filter | 1 |
Table 1
REMARKS : The value will be influenced by temperature and feed water's quality.
3. Water Flow Chart
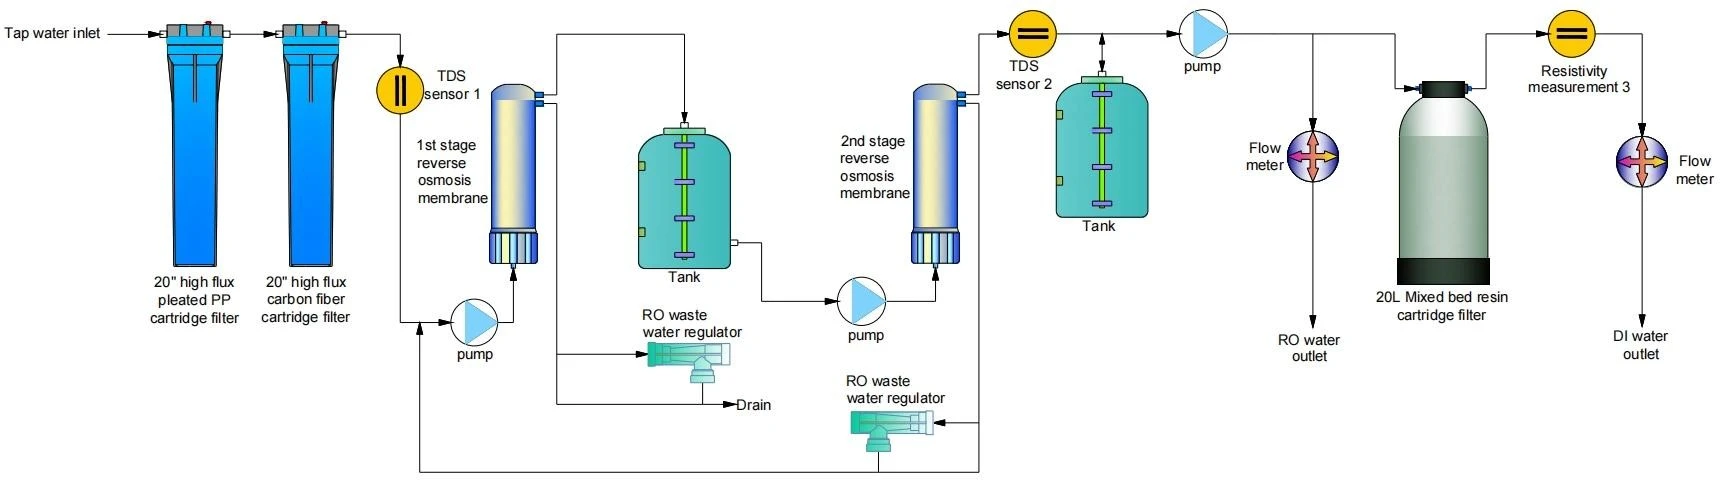 Figure 1
4. Working Environments
1. Inlet water : Tap water (Conductivity<400us/cm will be suggested).
2. If inlet water Conductivity<400us/cm, pretreatment is recommended. Water with higher TDS will affect the quality of outlet water and life of purification cartridge.
3. Work temperature : 5-45°C
4. Pressure : 1.0-4.0bar
5. Power : AC220V, 50Hz, 480W
【Clean, dry working environments would be suggested! 】
5. Installation
5.1 Preparation for installation
The purification system should be installed horizontally and near to tap.
5.2 Tube and adapter's connection
The adapter of the machine is a high quality easy-put adapter. And the material of tube is high quality PE.
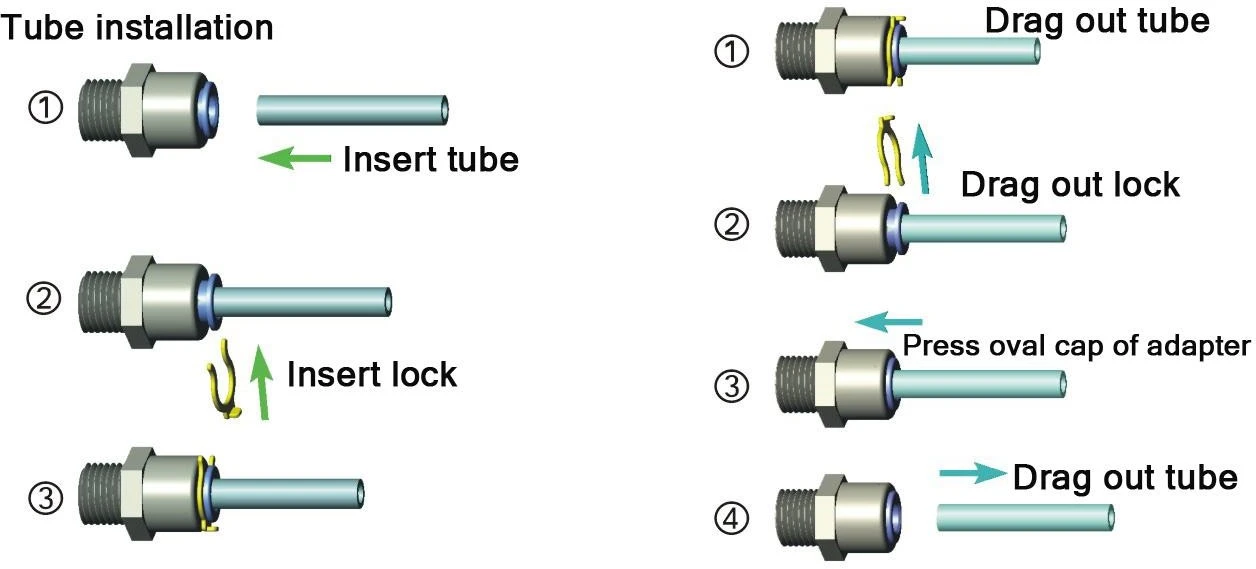
Figure 2 (Tube installation and drag diagram)
 ATTENTION:
1. The tube should be cut with a special tube cutter for the rounded cut section. And rounded cut sections should be guaranteed as much as possible with other cut tools.
2. Connect the tube-press the oval cap of the interface strongly, then insert the tube to the bottom of the adapter.
3. Take off the tube-press the oval cap of the interface strongly, then drag out the tube. Do not drag when the tube can't be dragged out any more.
4. The fore-end of the tube, which has been inserted to the adapter, should be cut, when it will be used again.
5. Sufficient PTFE thread seal tape should be used in all the threaded joints for water leakage inhibitor or prevention.
5.3 Installation steps
Open the packing-case, take out the main body, accessory box, water tank (optional).
Take out adapters and tubes from the accessory box, and read the Instruction Manual carefully.
External interfaces are on the back of the machine, and it is labeled with different color's label. Moreover, its adapters are inserted with different color's stop plug.
 ATTENTION
The stop plug should be pulled out before the following steps.
Connect to tap water
1st. Step
Shut off the chief valve of tap water. Connect the water supply hose in the accessories with the tap water pipe.
2nd. Step:
Connect the other end of the 1/2 inch water supply hose to the interface with a blue label marked "To water inlet" on the back of the machine.
Connect to RO wastewater:
Use 3/8" PE tube with a suitable length. Insert one side into the interface with black label marked "To drain" at the left side of the machine, and the other side is directed to drain.(DO NOT JAM!!)
Connect To RO or DI water outlet(additional outlet):
Use 1/4″PE tube with a suitable length. One side connects to the interface with white label marked "RO" or "DI" on the back of the machine, and the other side is directed to pure water consumption points.
Connect to water tank(Optional):
Install the plastic adapter and plastic ball valve to the pressure water tank. Use 1/4" PE tube with a suitable length. One side connects with the interface with a yellow label marked "To tank" at the left side of the machine, and the other connects with the plastic ball valve.
 ATTENTION
The ball valve on the top of the tank should be open all the time except for maintenance.
Thus the installation is OK.
Installation Guide Chart
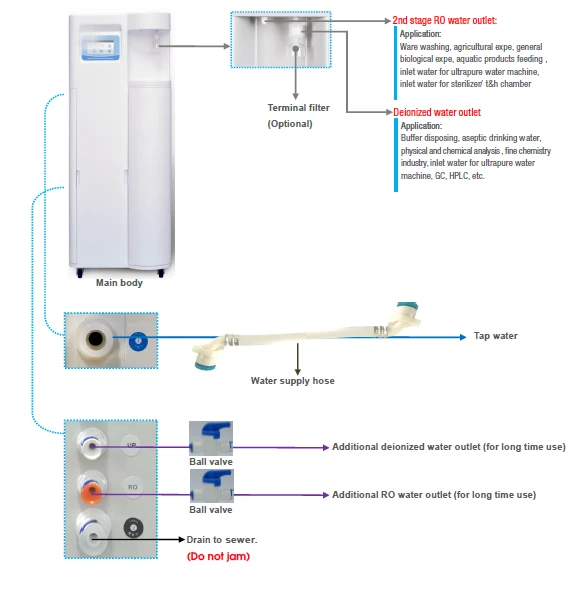
Figure 3
6. Usage Guide
All data has been set in the factory.
The machine will operate smoothly without any data-setting and debugging.
All work states will display on the LCD. If there is an abnormal state, the system will alarm automatically. If data modification is necessary, a specific step is in "Microcomputer Controller".
The power switch is on the side of the shell. Specific picture is as follows :
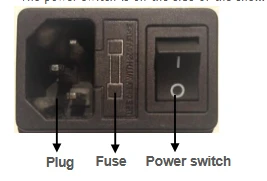
Figure 4
6.1 Starting Up & Release Air
First, make sure that the source water is connected to the main body's inlet.
Then insert the power line into the power source and turn on the power switch.
Touch anywhere on the touch screen's boot screen. Then the system will switch to the main interface to produce pure water.
Turn on the tap water valve and open the side door of the machine.
Unscrew the "1", "2" blue bolt in sequence, which is on the hanger plate of pretreatment filters, to release the internal air of the bottle of pretreatment filters, until water goes out from the bottom of the red button.
Attention:Prevent water from splashing into the electrical components of the cabinet.
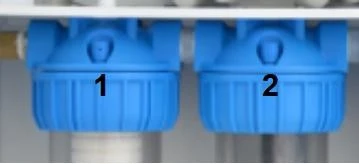
Figure 5
6.2 Getting Corresponding Pure Water
There are 2 kinds of dispensing models to get pure water, instant dispense and quantified dispense.
In the main interface, touch the icon "Dispense-pure water" or "Dispense-ultrapure water" to switch to the interface of "Dispense-pure water (2-stage RO water)" or "Dispense of ultrapure water (DI water)".
Instant dispense
In the interface of "Dispense- pure/ultrapure water", touch the icon "Instant" to switch to the interface of "Instant dispensing-pure/ultrapure water", then pure/ultrapure water goes out. When dispensing water is ok, touch the icon "Stop" to stop pure/ultrapure water going out.
Quantified dispense
In the interface of "Dispense- pure/ultrapure water", touch the icon "Quantified" to switch to the interface of "Setting-quantified dispense". Input the amount and confirm it, at last touch the icon "Dispense" to switch to the interface of "Quantified dispense-pure/ultrapure water". Touch the icon "Start" to get pure/ultra-pure water, touch the icon "Pause" to pause, and touch the icon "Pause" again to regain water. Touch the icon "Cancel" to stop getting water.
When the dispensing water process is ok, touch the icon "Back" to switch to the main interface.
 ATTENTION
The value of quantified dispensing water will be more accurate, when the pure water in the external pressure tank is enough.
6.3 Standby
When DI water is not for use, the system will be in standby state. The system still produces RO water to store in the water tank (optional). Until the tank is full, the system will automatically stop. The system will begin to produce pure water again when any pure water is used.
6.4 Releasing internal air of terminal filter (Optional)
Unscrew the rounded nut, which is on top of the terminal filter, open the valve of DI water (Additional DI water outlet, which is on the back of the machine, should be closed at this time, or all the DI water will go out from this outlet).
When DI water goes out, the internal air of the terminal filter will be released. Until the terminal filter is nearly full of DI water, then tighten the rounded nut.
ATTENTION
If the internal air of the terminal filter is not released,pure water can not go through the terminal filter for air resistance, then the system will stop working for high pressure.
6.5 Shutdown
Turn off the tap water valve and turn off the power switch. Then it is ok.
ATTENTION
Make sure that the source water and power source is not connected, when the system is not in the use state for a long time (for example, off duty).
6.6 The Usage to Keep High Quality Pure Water
1. The pure water is easily polluted by the surrounding environment. So getting fresh pure water is suggested.
2. Keep the water tank from sunlight for microbes reproducing.
3. When get high pure water, initial high pure water is suggested to drain to get steady pure water.
4. Avoid air bubbles when getting pure water to reduce air pollution.
ATTENTION
The microbe's reproduction will reduce the life of the cartridge, when the machine does not work for a long time. So the machine's work every 7-10days is necessary.
6.7 Water leakage protector
This series of pure water machines is equipped with a water leakage protection system. Once water leakage is detected in the pure water system, the protection system will automatically close the ball valve, cut off the water source, and constantly sound and light an alarm, prompting the user to check in time and press the button to restore after eliminating water leakage.
When the water leakage problem is removed, remove the water leakage sensor switch and wipe the water stains on it. Otherwise, it will cause misjudgment, and the water leakage problem is not removed and the alarm will be kept.
7. Microcomputer Controller
7.1 Specification at the beginning of working process

Figure 6
When the system is powered on, the boot screen (Figure 6) will appear for about 5 seconds.
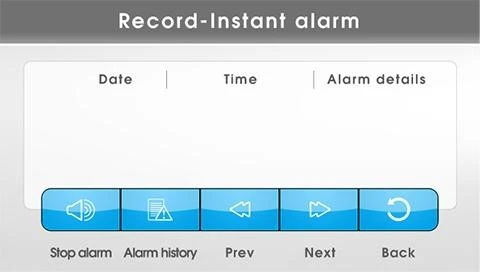
Figure 7
Touch anywhere on the display system will detect the status of feed water automatically. No feed water or low pressure of feed water, the system will alarm instantly (Figure 7). If the status of feed water is normal, the system will implement the following program.
Figure 8
Detect the usage amount and cartridges' life, judge whether any value is overrange. If so, the system will alarm instantly to remind cartridges' replacement (Figure 8). Touch the icon "Stop alarm" to ignore the alarm. If not, the system will switch to the status of flushing RO membrane directly.
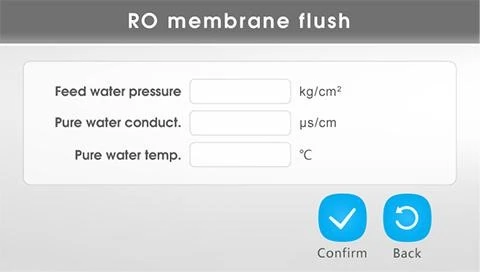
Figure 9
The system starts to flush the RO membrane automatically. Flushing duration time: 1 minute. (Figure 9)
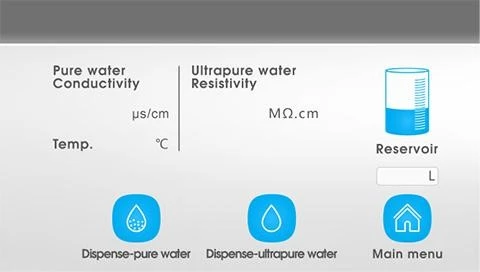
Figure 10
After finishing the RO membrane's flushing, the system will switch to the main interface (Also, touch the icon "Back" to switch to the main interface). (Figure 5)
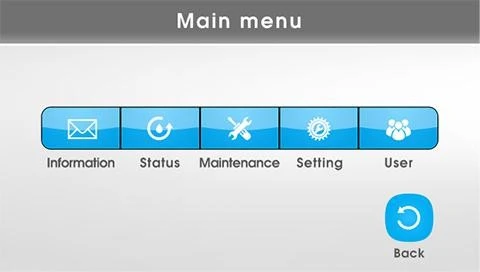
Figure 11
In the main interface, touch the icon "Main menu" to switch to the interface of the Main menu. (Figure 11)
7.2 Specification of the main menu interface
Figure 12
Touch menu item to switch to corresponding interface of different menu item.
1. Information
Touch the icon of the sub-menu item of "Information query" to switch to the corresponding interface of the sub-menu item. (Details in Figure 12)
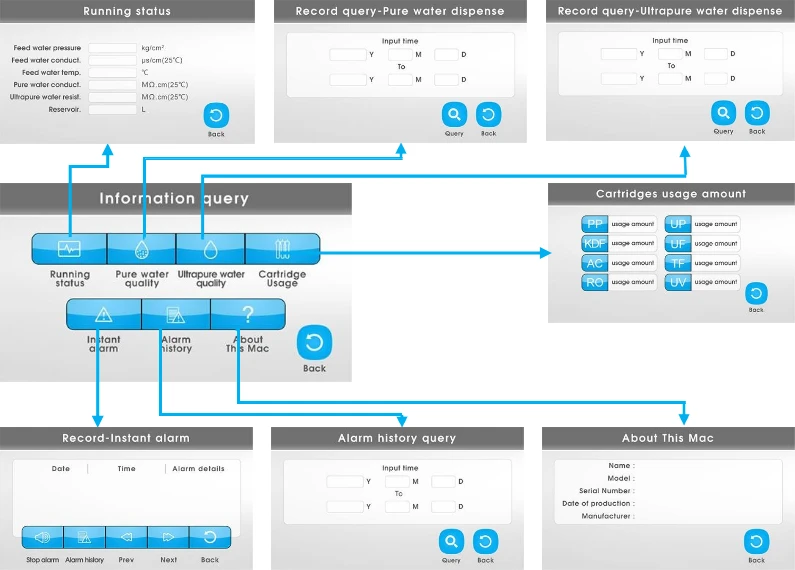
Figure 13
"Information query" includes the following sub-menu items:
Running status : Feed/pure/ultrapure water's temperature, water quality etc.
Pure water quality :Record query of pure water dispense
Ultrapure water quality : Record query of ultrapure water dispense
Cartridge usage : Record query of each cartridge usage amount
Instant alarm : Record query of every instant alarm
Alarm history : Record query of every alarm history
About this mac : Information of this mac
2. Status
System status (Details in Figure 14)
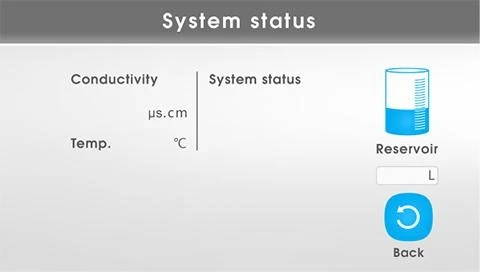
Figure 14
3. Maintenance
Cartridges' replacement, system sanitization, RO membrane flushing. (Details in Figure 15)
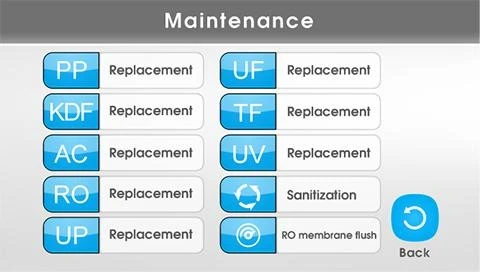
Figure 15
4. Setting
Touch the icon of the sub-menu item of "System setting" to switch to the corresponding interface of the sub-menu item. (Details in Figure 16)
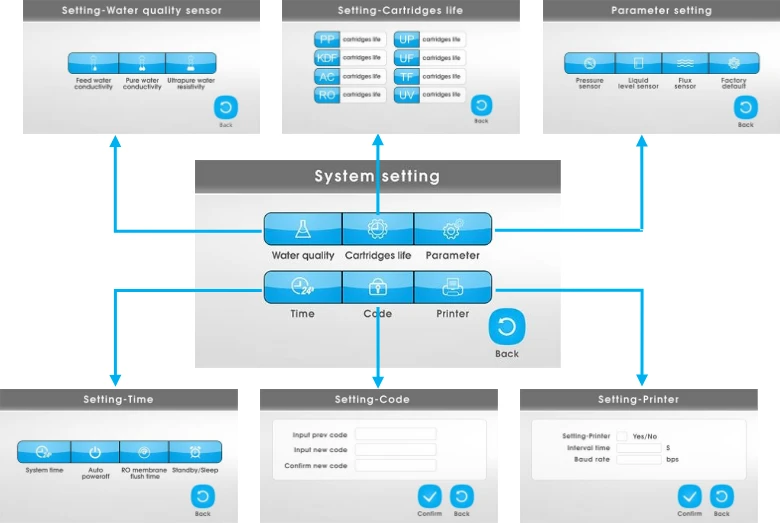
Figure 16
"Setting" includes the following sub-menu items
Setting-water quality sensor:
Setting of feed/pure/ultrapure water's measurement range and alarm
parameter. (Details in Figure 17)
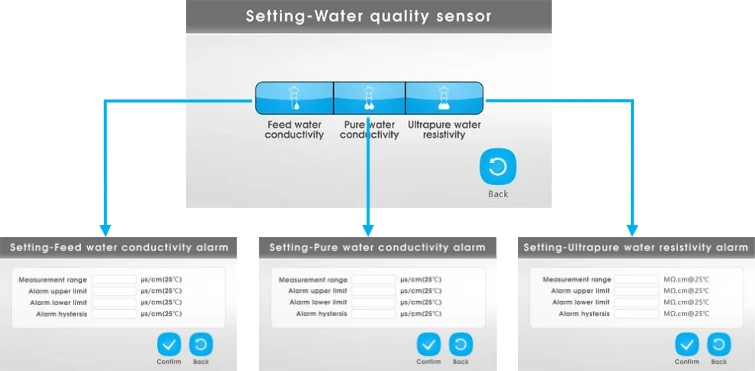
Figure 17
Setting-cartridges life : Setting of each cartridge's service life
Parameter setting : Setting of pressure, liquid level, flux and factory default. (Details in Figure 18)
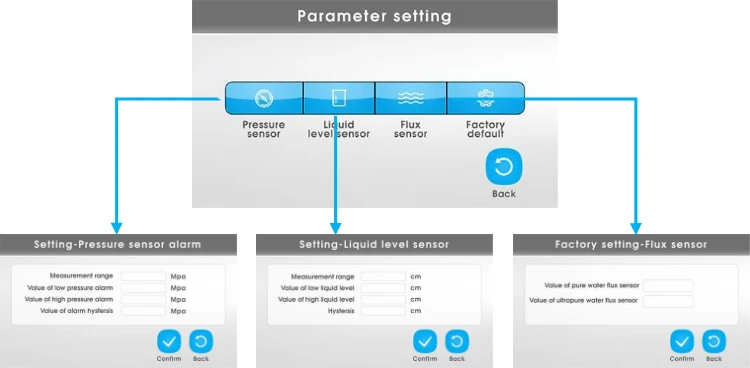
Figure 18
Setting-Time : Setting of system time, auto power-off, RO membrane flush time, standby/sleep time. (Details in Figure 19)
System time : Setting of system time
Auto power-off : Setting of auto power-off time (Time range:0-24 hours, "0" hour means that auto power-off is unavailable)
Time of RO membrane flush : Setting of RO membrane flushing's interval and duration time. (Interval time range:1-10 hours,duration time range: 1-60 minutes)
Standby time:Setting of standby or sleep time.(Time range:0-60 minutes. "0" minutes means that standby is unavailable.
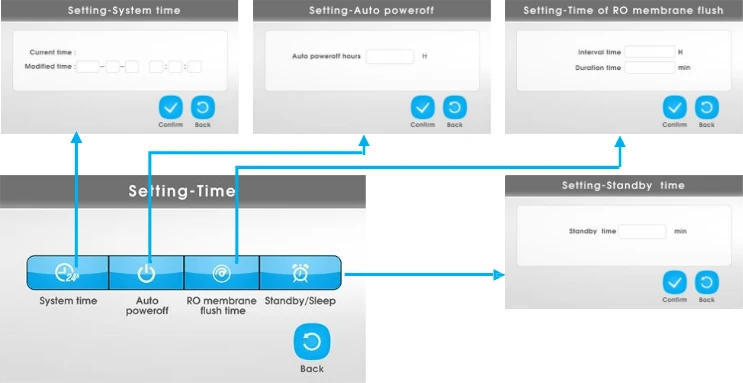
Figure 19
Setting-Code : Setting of code modification
Setting-Printer : Not available at present
7.3 Record query and data export of water dispense and alarm history
The system can query records of pure/ultra-pure water dispense and alarm history. And all the data can be exported into USB flash cards through the Interface of USB. Operation details are as follows :
1. Record query and data export of pure/ultrapure water dispense
Record query of pure/ultrapure water dispense
In the interface of "Record query-Pure/Ultrapure water dispense"( Pictures as shown below ), input starting and ending time's value of year, month and day.(No time's inputting will show all the records )
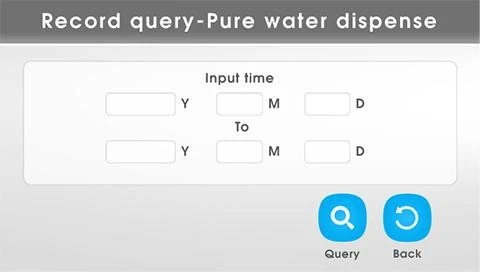
Figure 20
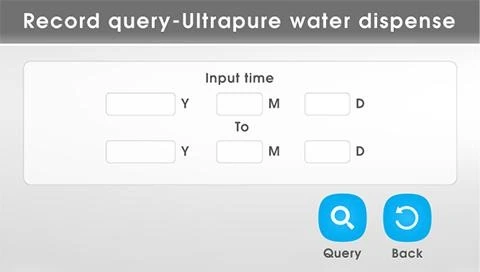
Figure 21
Then touch the icon "query" to switch to the interface.
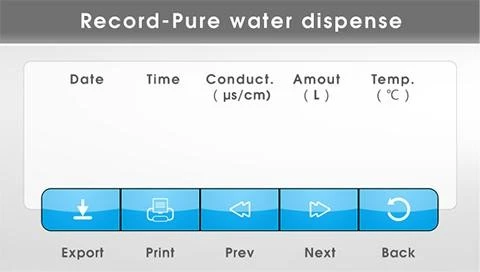
Figure 22
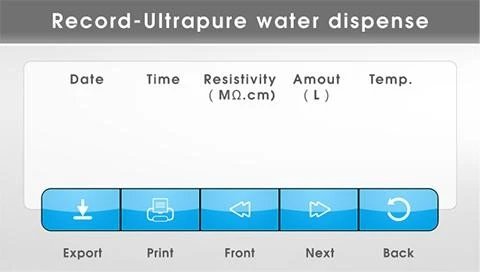
Figure 23
In the above interface of "Record-Pure/Ultrapure water dispense", the water dispense information, such as date, time, conductivity/resistivity, amount (liters) and temperature, will be shown.
Data export of pure/ultrapure water dispense
If date exporting is necessary, just input starting and ending time's value in the interface of Figure 24 (as shown below), and touch the icon "Export", then the data can be exported into external USB flash cards through the Interface of USB.
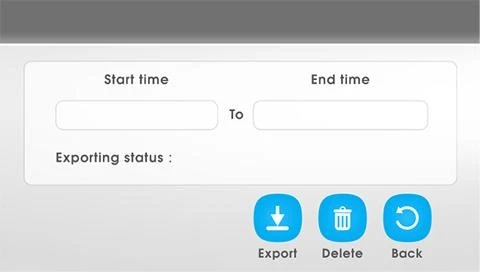
Figure 24
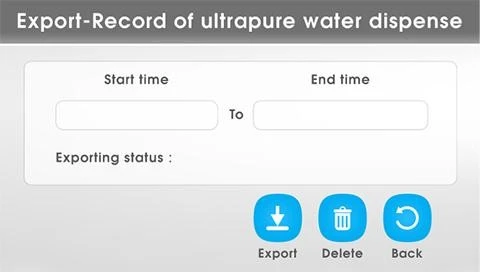
Figure 25
ATTENTION
Make sure that the USB interface has been connected with external USB flash cards before exporting.
2. Record query and data export of alarm history
Record query of alarm history
In the interface of "Alarm history query"( Pictures as shown below ), input starting and ending time's value of year, month and day.(No time's inputting will show all the records )
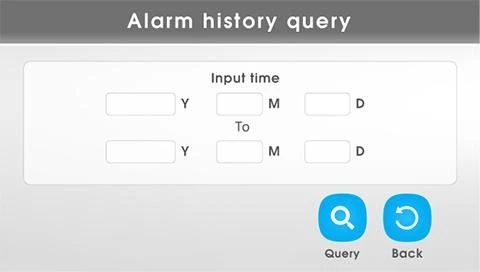
Figure 26
Then touch the icon "query" to switch to the interface of Figure 28 (as shown below).
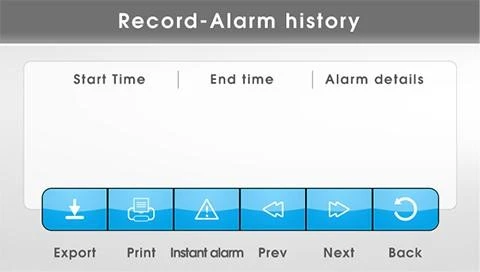
Figure 27
In the above interface of "Record-Alarm history", the alarm details will be shown.
Data export of alarm history
If date exporting is necessary, just input starting and ending time's value in the interface of Figure 28 (as shown below), and touch the icon "Export", then the alarm data can be exported into external USB flash cards through the Interface of USB.
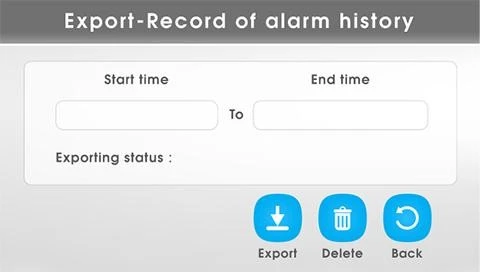
Figure 28
ATTENTION
Make sure that the USB interface has been connected with external USB flash cards before exporting.
7.4 Sanitization and cartridges replacement
1. Sanitization
The system has an optional manual sanitization function.
In the main menu interface, touch the icon "Maintenance" to switch to maintenance interface, then touch the icon "sanitization" to switch to the sanitization interface of Figure 29 (as shown below).
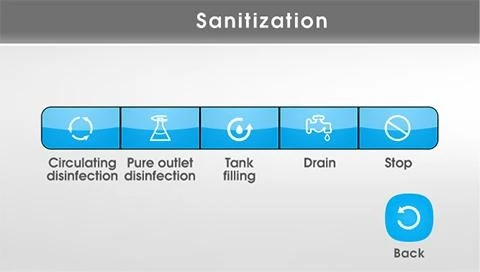
Figure 29
There are 2 kinds of disinfection model: Circulating disinfection and Pure water outlet disinfection, 2 kinds of auxiliary function, and 1 stop button.
ATTENTION
During the whole sanitization process, RO membrane flushing and water dispensing function is unavailable;
Touching the icon "Stop" can end all the sanitization process;
For more information about sanitization, please contact our support engineer.
2. Cartridges replacement
When the service life of cartridges is over, the system will show the reminder interface of cartridges replacement.
After replacing new cartridges, please switch to the interface of maintenance through the main menu interface. Touch the corresponding icon (such as: PP) to switch to the interface of replace, at last input the cartridge's code.
All the interface of cartridges are as follows:

Figure 30

Figure 31
8. Water Quality Test
The system has 3 monitor sensors of water quality measuring.
The first, monitors source water's quality (Source water). Measure unit: Conductivity (us/cm)
The second, monitors 2-stage RO water's quality (2-stage RO water). Measure unit: Conductivity (us/cm)
The third, Resist, monitors DI water's quality (DI water). Measure unit: Resistivity (MΩ.cm)
REMARKS
Under normal conditions, new RO membrane's desalination rate is above 97%. It means that TDS of RO water should be less than TDS of inlet tap waterx5%.
If TDS of RO water > TDS of inlet tap waterx10%, it means that RO membrane's desalination can't meet the minimum requirements. RO membrane should be replaced at once.
Conversion relations between TDS and conductivity rate(μs/cm): If TDS<50ppm, conductivity rate (μs/cm) ≈TDSx2
If TDS>200ppm, conductivity rate (μs/cm) ≈TDSx(1.5~1.7).
9. Consumables
Item No. | Specification | Suggested replacement term |
PC-20BPP-F | 20" high flux pleated PP cartridge filter | About 8-12 months |
PC-20BAC-F | 20" high flux carbon fiber cartridge filter | About 12 months |
C-RO-800 | 800GPD RO membrane | About 12-24months |
C-RO-600 | 600GPD RO membrane | About 12-24months |
C-Decart1 | 20L Mixd bed resin cartridge fiter | About 35000 liters pure water |
Table 2
REMARKS
Worse inlet feed water quality or big dosage will reduce cartridge life.
Consumables Guide Chart
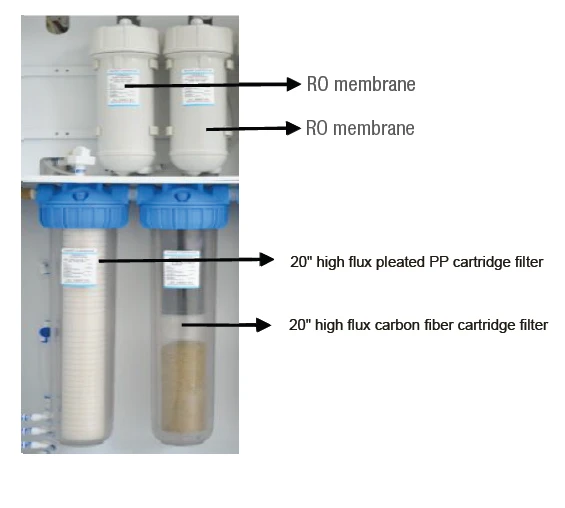
Figure 32
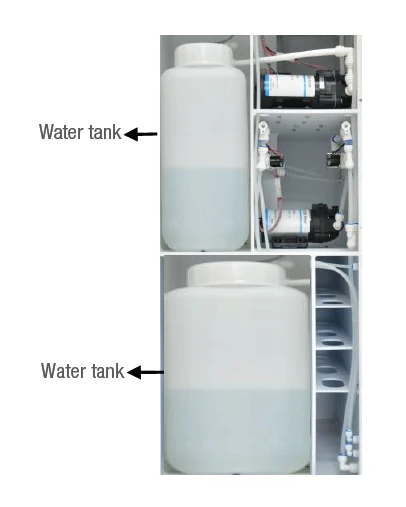
Figure 33
10. Normal Trouble Diagnosis
Normal trouble | Cause | Diagnosis |
No power | -No plug in -Power adapter broken | -Check the power connecting -Replace new adapter |
No pure water goes out or a little amount of pure water | -Valve of pure water outlet broken -Pump broken -Cartridges or filters' life ends | -Replace new valve -Replace new pump -Replace new cartridges or filters |
Cartridges' life warns | -Cartridges' life ends | -Replace new cartridges |
Water leakage | -Adapter or something broken | -Check, insert and drag out again, replace |
Water quality deteriorate | -Cartridges or filters' life ends -Water quality sensor broken | -Replace new cartridges or filters -Replace new water quality sensor |
Table 3
All other matters not mentioned herein, please contact us directly.
11. Warranty & Repair Regulation
The products enjoy repair service from the day of purchase. In one year from the purchasing day, we are obliged to replace
components for customers free of charge, due to non-human-behavior factors, exceptfor:
1. All the consumables;
2. Damage caused by maloperation or use in abnormal situations;
3. Disassembly any part of the machine or human-behavior damage;
4. Not repaired by our serviceman.