Get Price
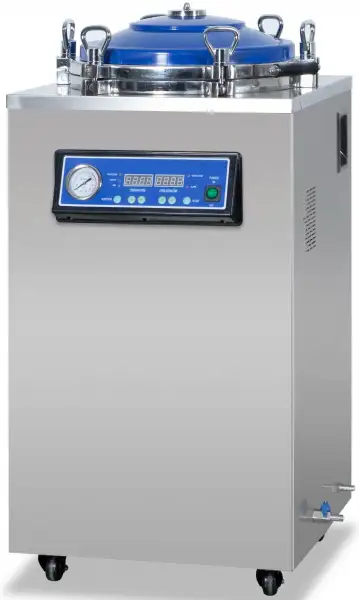
Laboratory Vertical Autoclave BAVT-3306
- Bolt structure
- High quality stainless steel material
- Microcomputer automatic control, arbitrary set of sterilization parameters
- Digital display and touch buttons
- Standard test interface
- The container with automatic protection function: over temperature protection; over pressure protection self discharge; low water level protection, anti dry burning
- With stainless steel bucket or basket
- Buzzer reminder after sterilization, automatic stop.
- Up to 3-Year Product Warranty
- US & EU Compliance Standards
- Door-to-Door Shipping
Technical Specifications
Detailed operating and construction parameters for this model.
| Model | BAVT-3306 |
| Capacity | 150 L |
| Power | 6.0 kW |
| Voltage | AC 220V. 50HZ |
| Design pressure | 0.25 Mpa |
| Design temperature | 139°C |
| Rated working pressure | 0.22 Mpa |
| Rated working temperature | 134°C |
| Sterilization temperature setting range | 116°C~134°C |
| Sterilization time setting range | 4 ~ 120 min |
| Chamber volume | Ø 500x780 |
| Bucket dimension | Ø 470x720 |
| Basket dimension | Ø 460x350x2 |
| Outer dimension | 605x649x1210 |
| Packing size | 750x700x1370 |
| Net weight | 90 Kg |
| Gross Weight | 116 Kg |
Product Features
Key design, performance, usability, and safety advantages.
Operating Manual View instructions, operating procedures, safety information, and maintenance guidance.
1. Introduction
2. Structural characteristics
Technical parameters
3. Installation requirements
4. Usage
5. Operating steps
6. Caution and Maintenance
7. Common failure analysis and troubleshooting
8. EMC requirements
1. Introduction
The vertical steam sterilizer produced by our company is a device for disinfecting and sterilizing medical devices, dressings, medicinal liquids, glassware, etc. using saturated steam. It has novel and beautiful appearance, reasonable structure, complete functions, rapid heating, and thorough sterilization. Etc.
Intended use of the product: It is used by clinical institutions to sterilize medical devices, dressings, glassware, and solution culture media by steam.
Product contraindications: None.
Expected locations: health care facilities, operating rooms, laboratories, etc.
Applicable people: medical staff and other units.
2. Structural characteristics
1.The vertical steam sterilizer is mainly composed of the shell, the sterilization room, the steam generator, the piping system and the control system
2.The shape is a square vertical structure, and the sterilizer shell, sterilization room, and sterilization inner cylinder (or net basket) are made of stainless steel. The sterilization room (pressure vessel) and its safety accessories should comply with GB 150, " The Regulations on the Safety Supervision of Special Equipment and the national statutory pressure vessel regulations stipulate that there shall be product nameplates and product quality certificates registered by legal pressure vessel safety supervision agencies.
3. Equipped with a safety valve. When the pressure in the container exceeds 0.24MPa, the safety valve can automatically release excessive pressure, which is safe and reliable.
4.During the heating process, the vent valve will open to automatically discharge cold air. When the temperature exceeds 102 °C, the vent valve will automatically close and then switch to the automatic intermittent venting function to improve the steam saturation in the container so sterilization effect is better.
5.The operation panel is equipped with a pressure gauge with a pressure reading indication for clear observation.
6.This container has an automatic protection function.When there is no water in the container, the circuit will be automatically cut off, the heater will stop working, and the equipment will be effectively protected. At the same time, the water level indicator will be red to remind the user to replenish the amount of water in time.
Technical parameters
No. | Volume | Working pressure | Maximum sterilization Operating temperature | Sterilization time adjustment range | Power |
1 | 50L | 0.22Mpa | 134°C | 4 ~ 120min | 3.5kW |
2 | 75L | 4.5kW | |||
3 | 100L | 4.5kW | |||
4 | 120L | 6.0kW | |||
5 | 150L | 6.0kW |
Table 1
1. Power supply: AC220V/50Hz or AC110V/60Hz
2.Working pressure: 0.22MPa; Working temperature: 105 °C ~ 134 °C.
3. During normal operation within the normal sterilization cycle, the noise should be no more than 65dB (A-weighted).
4. Set the sterilization time range: 4 ~ 120 minutes.
5. Equipment safety category: category Ⅰ.
6.Using ambient temperature: + 5 °C ~ + 40 °C; relative humidity: no more than 85%; atmospheric pressure 70kPa ~ 106kPa.
7. The water source used in the sterilizer should not affect the sterilization process and damage the sterilizer or sterilized materials.
3. Installation requirements
1.Please read this manual carefully before use.
2. This equipment is classified as Ⅰ according to the protection against electric shock, and the installation site should be free of flammable and explosive anesthetic gas and articles.
3. The power supply of the sterilizer is permanently connected to the network power supply. The user must install a circuit breaker at a location that is 60 cm away from the building and has a height greater than 1.2 meters. As a disconnection device for the power supply of the sterilizer, and clearly marked on and off (such as for the sterilizer). The power cord should be fixed on the building before it is connected to the circuit breaker to prevent it from falling off. 2.5mm² x 3, L is the live wire, N is the neutral wire, and the yellow and green color G is the protective ground. After the work is completed, close the circuit breaker.
4. The ground of this device must be flat and firm. The user should connect the device to the specified power source according to the parameters specified on the product nameplate and instructions, and the device should be reliably grounded (the grounding resistance must not exceed 2Ω).
5. Connect the drain pipe to the drain port. The drain end of the drain pipe must not be submerged in the water to prevent the water from sucking back into the sterilizer bucket.
4. Usage
All documents of the equipment must be supplied to the local inspection organization to register on record. Sterilizer operators must accept professional training and be familiar with pressure vessel operation according to manual strictly. Special operator must look after the equipment and record the operation state during the sterilizing process, to prevent accidents. Sterilizers must be checked one time per year at least by an inspection organization. The machine can be used after proving to be qualified.
NOTES:
Please don't put inflammable goods into the sterilizer's barrel.
Please don't put following goods into the barrel: explosive goods, inflammable goods, oxidizing goods, incendive goods, or flammable goods. Otherwise, the equipment will explode, fire or breakdown.
Please don't put the following goods into the barrel such as culture medium that can corrode stainless steel. Otherwise, the equipment will explode, fire, or breakdown.
• Please don't touch the switch or circuit breaker with wet hands, to prevent electric shock or accident.
• Please don't touch the vessel's cover in the sterilizing state as it is high temperature.
• "Please don't open the cover before releasing steam completely": after sterilization, please don't open the cover before the pressure gauge's pointer doesn't return to 0 place. Otherwise, high-temperature steam can burn the operator.
(I) Symbols related to safety requirements in this machine and their meanings.
Symbol | Meaning | Symbol | Meaning |
~ | Alternating current | Attention! Consult the random files | |
Be careful of burns | Protective grounding | ||
Test interface |
Table 2
5. Operating steps

Figure 1
(1) Function: press this button for 5s can choose a function, press one time to display the A model ( sterilization function); press again to B mode (sterilization, air release function); press again to display the A model, cycle like that.
(2) button: press this button to adjust the temperature display high-temperature setting (range: 50.0~134.0°C), the sterilization time (range: 4 ~ 120 minutes) can increase the set time range.
(3) button: press this button to adjust the temperature display low-temperature setting (range: 50.0~134.0°C), the sterilization time (range: 4 ~ 120 minutes) can reduce the set time range.
(4) START: press this button can open the working function.
(5) Water level indicator: turn red when water is too little in the sterilizer. When the water reaches to a low water level, it turns flashing green. When the water is enough, it displays green light.
(6) Gated indicator: turns off when the sterilizer lid is opened.
(7) Alarm indicator light: turns on when there is an over-temperature alarm or error occurs during work.
(8) Temperature display window: set the state display of set temperature, the working state display current measuring temperature sterilizer.
(9) Sterilization display window: set state display of sterilizing time, display the current surplus of sterilization time working state.
◆METHOD OF FUNCTION SETTING
After turning on the power supply and the self-test, the control panel displays the current temperature in the container and the last run program. Press the "Function" button to select the program operation mode. Then you can use the corresponding key to set temperature and sterilization time. After pressing the "start" button, sterilization indication light will flash (expressed in heating). Until temperature rises to the set value, the sterilization indicator light will turn bright and start the countdown (expressed in sterilization). Automatic bleed after sterilization and the deflation indicator lights. Bleeding after END, window display, the "End"indicator light turns on and a beep indicates the end. Then it allows to remove the goods.
a,Setting Sterilization function
(1) Press "FUNCTION" button. Display the currently selected working procedure of PROGROM A and sterilization temperature and sterilization time.
(2) Set the temperature by pressing the button which is under the temperature display window.
(3) Set the sterilization time by pressing the button which is under the sterilization time display window.
(4) Press START button after setting well.
b,Setting sterilization, air release function:
(1) Press the "Function" button. Display the currently selected working procedure PROGLAM B, temperature of sterilization and sterilization time.
(2) Set the temperature by press the button which is under the temperature display window.
(3) Set the sterilization time by press the button which is under the sterilization time display window.
(4) Press "START" button to start work after setting well.
Note: For glassware and solution culture medium sterilization, the steam cannot be automatically exhausted after sterilization.
A. Adding water and Stacking
(1) Turn the ring nut on each bolt counterclockwise, pull each bolt out of the flange slot, open the sterilizer cover, and remove the sterilization basket.
(2) Close the water drain valve, pour fresh water into the sterilization barrel, and the water level indicator lights up. Generally add water to the bottom edge of the footrest (under the shelf) in the sterilization barrel. For continuous use, it must be replenished after each sterilization Water volume.
(3) Put the items to be sterilized properly and put them in the sterilization net basket in order, leaving a gap between each other. This will help the penetration of steam and improve the sterilization effect. Pay attention to leaving the air vent hole of the safety valve, otherwise, the pressure of the safety valve air hole is blocked and the pressure is not released, which will cause the pot to burst.
B. Power on
Switch on the power supply consistent with the label on the sterilizer, and press the switch on the control panel to "On", the control panel display will all light up, and the self-test status will be displayed for 3 seconds.
C. Seal
Close the lid of the container, pull up each bolt into the corresponding slot of the upper cover flange, and tighten each ring nut clockwise (recommended diagonally), so that the sterilizer cover is pressed against the lower flange. Apply force to make it fully close.
D. Function setting
The user selects the required keys to set the required sterilization temperature and time according to different sterilization items (see the description of the operation panel)
[The sterilization temperature and sterilization time of different items refer to the "Disinfection Technical Specifications" of the Ministry of Health.]
Confirm sterilization performance:
The sterilization performance varies depending on the type, quantity, placement method, and container type of the sterilized material, so please confirm with a sterilization indicator such as an OK card; otherwise, it may cause accidents or poor sterilization effects.
E. Heating
After the power is turned on, the device starts to work. The heating indicator on the operation panel flashes and starts to heat up. When the temperature rises to 102 ° C, the air vent valve is automatically closed.
F. Sterilization
When the temperature rises to the set temperature, the sterilization indicator on the operation panel stops flashing (steady on), and sterilization starts.
G. Pressure Relief (Strictly prohibited when sterilizing glassware and solution culture media)
After sterilization, automatic pressure relief begins (applies to programs in setting mode b).
After sterilization, no pressure relief is needed (applies to programs in setting mode a). Allow for natural cooling and pressure reduction.
H .Completion
The display window on the panel shows "END," accompanied by a prompt sound, indicating the end. Wait until it cools until the pressure gauge pointer returns to zero, then open the lid and remove the items (be sure to wear protective gloves during retrieval. Due to the temperature drop, extra caution is advised during retrieval. Direct contact with hands may cause burns.) One sterilization cycle is complete. For sterilized glassware and items like solution culture media, open the lid slightly after the pressure gauge returns to "0," wait for 10-15 minutes, and then fully open the lid to remove the sterilized items.
H. Manual Water Drainage
When necessary, manually open the side drain valve for water drainage. Caution: Be careful to avoid burns during water drainage.
During the program execution, if an alarm sounds, the alarm light is on, and the digital display shows a warning symbol (refer to Section VII, Common Fault Analysis and Troubleshooting in this manual for resolution methods), it indicates an error. The errors are as follows: [Missing information about specific errors].
ERR-1: indicates that the door is not closed.
ERR-2: indicates that the water level is below the low water level.
ERR-3: indicates that the sterilization temperature is too high.
ERR-5: indicates a protection mode for the heating element.
ERR-6: indicates excessive pressure.
ERR-7: indicates an unexpected interruption during the sterilization process.
ERR-8: indicates a manual interruption during the sterilization process.
ERR-9: indicates indoor temperature sensor malfunction.
ERR-10: indicates pot wall temperature sensor malfunction.
ERR-20: indicates a timeout during the heating process.
ERR-21: indicates sterilization failure.
ERR-30: indicates Water inlet failure.
If incorrect settings are noticed after running, press and hold any adjustment key (except "Function" and "Start") for 5 seconds to interrupt the program. Alternatively, turn the switch to the "Off" position, then back to the "On" position, and reselect the desired sterilization temperature and time settings.
NOTE:
For the sterilization temperature correction/sterilization intermittent discharge time and cycle adjustment during the sterilization process: The parameters of this step are related to the equipment working performance. The user should not change the setting easily. If the user does need to adjust the parameters, please adjust as follows:
Temperature Correction Adjustment: Press and hold the start button while turning on the switch. Press the start button once, and the temperature window will flash. Use the plus or minus keys below the temperature window to make corrections. Press the start button again, and the sterilization time window will flash. Use the plus or minus keys below the sterilization time window to adjust the upper limit of the emission gas temperature (105-120°C). Press the start button three or more times, turn off the switch, then turn it on again to complete the correction or adjustment.
Emission Gas Frequency / Intermittent Emission Time and Cycle Adjustment: For Program A: Hold the function button and the temperature window plus or minus key. Press the start button once, and the temperature window digits will flash. Use the plus or minus keys below the flashing digits to adjust the emission frequency (1-3 times). Press the start button again to adjust the emission time (0-5s). Press the start button once more to adjust the emission cycle (1-60s). Press the start button again to adjust the emission time during gas release (0-10s). Press the start button once more to adjust the emission cycle during gas release (0-10s). Press the start button again to adjust the emission end temperature (110-120°C).
For Program B: Hold the function button and the temperature window plus or minus key. Press the start button once, and the temperature window digits will flash. Use the plus or minus keys below the flashing digits to adjust the emission frequency (1-3 times). Press the start button again to adjust the emission time (0-5s). Press the start button once more to adjust the emission cycle (1-60s).
6. Caution and Maintenance
When stacking sterilized items (with the upper cover completely open), the mesh basket should be placed at the center of the barrel (the mesh baskets should be concentric and stacked up and down). It is strictly prohibited to block the vent holes of the safety valve. Sufficient space must be left to ensure smooth ventilation of the equipment. Otherwise, if the vent holes of the safety valve are blocked, it cannot function, leading to accidents.
1. Before each use, check whether the water level in the sterilization barrel is maintained at the specified level.
2. When the sterilizer is in continuous operation and a new sterilization operation is to be performed, allow a 5-minute interval and open the upper cover to give the equipment time to cool down.
3. When sterilizing liquids (only for program A), the liquid container should be placed in a heat-resistant glass bottle, not exceeding 3/4 of its volume. Use a cotton plug for the bottle mouth, and avoid using rubber or cork plugs without holes.
Special note: Do not release steam immediately after the sterilization of liquids. The residual air can only be discharged after the pressure gauge pointer returns to zero.
4. When sterilizing containers such as beakers, flasks, and test tubes, the opening must face downward or be placed horizontally. Placing the opening upward not only makes it difficult to vent but also hinders steam from penetrating the interior, resulting in poor sterilization effectiveness.
5. For items with different types and sterilization requirements, such as dressings and liquids, do not sterilize them together to avoid damage.
6. Confirm sterilization performance: Sterilization performance varies depending on the type of items, quantity, loading method, and container type. Therefore, use sterilization indicators such as an OK card to confirm. Failure to do so may result in accidents or poor sterilization effectiveness.
7. Do not leave sterilized items in the product: This product does not have a storage function for sterilized items. To prevent recontamination, after sterilizing items such as culture media and instruments, promptly remove them and store them in a dedicated safe box.
8. At the end of sterilization (or in case of malfunctions), the pressure gauge pointer must return to zero. Open the manual vent valve (or place the vent valve lever in the vent position) to allow outside air into the sterilizer. Once the vacuum is eliminated, the container lid can be opened (do not approach the lid with your face). When fully opening the lid and removing the mesh basket, be cautious of burns and pinching fingers. (Be sure to wear protective gloves when removing items. Due to the time required for the liquid temperature to decrease, extra care is needed during removal. Direct contact with hands after the operation may cause burns.)
9. After prolonged use, if the pressure gauge shows inaccuracies or cannot return to zero, it should be promptly inspected. Regular checks are recommended (ideally every 6 months) by comparing it with a standard pressure gauge. If abnormalities are found, a new gauge should be replaced. Every six months, apply an appropriate amount of high-temperature grease to the horizontal beam screw.
10. Keep the equipment clean and dry at all times. The rubber sealing gasket may age over time and should be replaced regularly (recommended every 12 months).
11. During operation, if the pressure gauge indicates over 0.24 MPa and the safety valve does not activate, immediately cut off the power, open the manual vent valve, wait for the pressure gauge to indicate 0 MPa for 1-2 minutes, then open the container lid and promptly replace the safety valve.
12. When troubleshooting requires the replacement of components, it must be done by qualified personnel with professional training or authorized personnel from the manufacturer. Disconnect the power circuit breaker, release the residual air in the container, zero the pressure gauge pointer, and send the safety valve for inspection at least once a year. Lift and lower the handle on the safety valve core several times each week to prevent valve core scaling and air leakage.
13. Do not modify for use: Unauthorized disassembly or repair is strictly prohibited, except for maintenance technicians. Otherwise, injuries may occur due to fire or abnormal operation. If screws or nuts are found to be loose during routine use, tighten them promptly to ensure normal operation.
14. Cleaning (recommended monthly): Empty the water from the container and disconnect the power circuit breaker. After the container has cooled, remove the shelves and mesh basket from the container. Use a brush to remove scale deposits on the inner walls, heating elements, and water level probes. Then, use a towel dipped in alcohol or distilled water to wipe the inner surfaces. After drying, place the shelves and mesh basket back into the container. Store the equipment in a well-ventilated room with non-corrosive gases.
15. The interlock device of the door is composed of a self-locking mechanism and a door control switch. During regular use, ensure the flexible extension and retraction of the self-locking mechanism (recommended quarterly inspection). Do not forcefully open the container lid before the pressure inside the container has been released to zero, as it may damage the self-locking mechanism. The door control switch should maintain flexible contact points. If contact points are stuck or indicator lights are not working properly, prompt maintenance is required.
16. Do not allow children to use or play with the equipment: Otherwise, it may result in burns, electric shock, or injuries.
17. Do not open the drainage valve while the equipment is in operation: When draining the heated water, wait for at least 2 hours after sterilization is complete and ensure that the lid is open before starting the drainage operation. Failure to do so may result in burns or accidents due to the release of high-temperature hot water.
18. Fuse replacement: If the power indicator light does not illuminate after connecting the sterilizer power cord to the power source, disconnect the circuit breaker. Using a Phillips screwdriver, open the back cover of the sterilizer to inspect the fuse (specifications: R015, 10x38, 32A). If the fuse is damaged,replace it immediately.
19. Before moving, transporting, or storing, drain the water from the container, seal the sterilizer lid, disconnect the circuit breaker, and remove the power cord. When moving (release the caster locks first), push the sterilizer on a flat surface. During transportation and storage (secure the sterilizer in the packaging box), prevent loosening and abrasion. Avoid tipping to prevent injuries or accidents.
20. Transportation and storage environmental conditions:
Ambient temperature: -40°C to +55°C
Relative humidity range: 10% to 80%
Atmospheric pressure range: 500 hPa to 1060 hPa
21. At the end of its service life (8 years from the production date indicated on the product label), this product and its accessories should be voluntarily handed over to qualified entities or individuals for recycling and disposal.
22. Wiring diagram:

If necessary, you can provide the circuit diagram and necessary information for repair. If there is any problem in the maintenance of the electrical circuit, please contact our company.
7. Common failure analysis and troubleshooting
Packing List:
No. | Fault Symptoms | Cause Analysis | Troubleshooting Methods |
1 | Water level light on, temperature not rising on display | a.The sterilization time is not set b.Circuit board damaged c.Heat tube damaged | Set the sterilization time Be replaced by professional personnel Be replaced by professional personnel |
2 | Operating status, shell electrified | a.Heat tube damaged b.Power supply without grounding line. | Be replaced by professional personnel Grounding wires by professionals. |
3 | Temperature display shows - - - - | a.The temperature sensor damaged b.Circuit board damaged | Be replaced by professional personnel Be replaced by professional personnel |
4 | Digital display shows - O O O or garbled characters | Circuit board damaged | Be replaced by professional personnel |
5 | Pressure gauge with water vapor inside | The pressure gauge spring tube leak | Be replaced by professional personnel |
6 | Pressing the shift key, no blinking in the corresponding position | The control panel damaged | Be replaced by professional personnel |
7 | Display ERR-1 or door control light not on | a.The cover is not closed in place b.Light chain broken | a.Open the cover,and close the cover in place. b.Change the light chain |
8 | Display ERR-2 | Water level below low water level | Add enough water |
9 | Display ERR 3 | Sterilization temperature too high | SCR failure and the temperature sensor failure |
10 | Display ERR 5 | Heating element overheating protection | Temperature control switch failure (Professional repair) |
11 | Display ERR 6 | Pressure too high | Pressure switch, safety valve failure (Professional repair) |
12 | Display ERR 7 | Power outage during sterilization process | Manually unlock by pressing the function key |
13 | Display ERR 8 | Manual reset during sterilization process | Manually unlock by pressing the function key |
14 | Display ERR 9 | Indoor temperature sensor malfunction | Replace the sensor (to be done by a professional). |
15 | Display ERR 10 | Wall temperature sensor malfunction. | Replace the sensor (to be done by a professional). |
16 | Display ERR-20 | Timeout for heating | Replace heating element |
17 | Display ERR-21 | Sterilization temperature lower than set temperature, temperature sensor damaged; heating element damaged | a. Replace heating element (Professional replacement) b. Replace temperature sensor (Professional repair) |
Table 3
No. | Item | Quantity | Note |
1 | Vertical Steam Sterilizer | 1 | |
2 | Operating Manual | 1 | |
3 | Gloves | 1 pair | |
4 | Bucket/Basket | 1 | |
5 | Air releasing tube | 1 | 2m |
Table 4
8. EMC requirements
Guide and manufacturer's statement -- electromagnetic emission | ||
The desktop sterilizer is expected to be used in the following specified electromagnetic environment, and the purchaser or user shall ensure that it is used in such electromagnetic environment: | ||
Launch test | Conformity | Electromagnetic Environment -- Guide |
RF GB4824 | Group 1 | Desktop sterilizers use RF energy only for their internal functions. Therefore, its RF emission is very low and the possibility of interference with nearby electronic devices is very small |
RF GB4824 | B category | Desktop sterilizers are suitable for use in all facilities, including household facilities and public low-voltage power supply networks directly connected to residential homes |
Harmonic Emission GB17625.1 | A category | |
Voltage fluctuation, flicker emission GB17625.2 | Compliance | |
Table 5
Guide and manufacturer's statement -- electromagnetic immunity | |||
The desktop sterilizer is expected to be used in the following specified electromagnetic environment, and the purchaser or user shall ensure that it is used in such electromagnetic environment: | |||
Disturbance test | IEC60601 test level | Level of compliance | Electromagnetic Environment -- Guide |
Electrostatic discharge GB/T17626.2 | ±4 kV Contact discharge ±4 kV Air discharge | ±4 kV Contact discharge ±4 kV Air discharge | The floor shall be wood, concrete or ceramic tile, and the relative humidity shall be at least 30% if the floor is covered with synthetic material |
Electric Fast Instantaneous Pulse Group GB/T17626.4 | ±2 kV Power cord ±1 kV to input/output lines | ±2 kV Power cord Not applicable | Power supply should be of typical commercial or hospital quality |
Surge surge GB/T17626.5 | ±0.5 kV line alignment ±1 kV Line to ground | ±0.5 kV line alignment ±1 kV Line to ground | Power supply should be of typical commercial or hospital quality |
Voltage sag on power input line, short time interrupt and voltage change GB/T17626.11 | ﹤5%UT For 0.5 weeks (at UT﹥95% the temporary drop) 40% UT40 5 weeks (at UT 60% the temporary drop) 70 %UT For 25 weeks (at UT ,30% the temporary drop) ﹤5UT For 5 s (at UT﹥95 %the temporary drop) | ﹤5%UT For 0.5 weeks (at UT﹥95% the temporary drop) 40% UT40 5 weeks (at UT 60% the temporary drop) 70 %UT For 25 weeks (at UT ,30% the temporary drop) ﹤5UT For 5 s (at UT﹥95 %the temporary drop) | Network power should have the quality of use in a typical commercial or hospital environment. If the user of the desktop sterilizer needs continuous operation during the power outage, it is recommended that the desktop sterilizer be powered by an uninterruptible power supply or a battery |
Power frequency magnetic field 50Hz GB/T17626.8 | 3A/m | 3A/m | The power frequency magnetic field should have the power frequency magnetic field horizontal characteristic in the typical commercial or hospital environment |
Note1:UT Refers to the AC network voltage before the test voltage is applied | |||
Table 6
Guide and manufacturer's statement -- electromagnetic immunity | |||
The desktop sterilizer is expected to be used in the electromagnetic environment specified below, and the purchaser or user shall ensure that it is used in this electromagnetic environment. | |||
Disturbance test | IEC60601 test level | Level of compliance | Electromagnetic Environment - Guide |
RF conduction GB/17626.6 Radio frequency radiation GB/17626.3 | 3V (valid values) 150 kHz ~ 80MHz 3V/m GHz 80MHz ~2.5 | 3V( valid values) 3V/m | Portable and mobile RF communication equipment shall not be closer to any part of the desktop sterilizer (including cables) than the recommended isolation distance, which shall be calculated using a formula corresponding to the frequency of the transmitter. recommended isolation distance d =1.2 d =1.2 MHz 80MHz ~80 0 d =2.3 GHz 800MHz ~2.5 The maximum output power of the transmitter, in watts (W), is P- provided by the transmitter manufacturer d--- recommended isolation distance, in meters (m); and The field strength of the fixed RF transmitter, determined by the survey of the electromagnetic field, should be lower than the conformance level in each frequency range. Interference may occur near the device that marks the following symbols. |
Table 7
Note 1: the formula of higher frequency band should be used in 80 MHz and 800 MHz frequency.
Note 2: These guidelines may not be suitable for all situations. Electromagnetic propagation is affected by the absorption and reflection of buildings, objects and human bodies.
Fixed transmitters, such as radio and ground mobile radio base stations, amateur radios, AM and FM radio broadcasts and television broadcasts, whose field strength is theoretically unpredictable. In order to evaluate the electromagnetic environment of fixed RF transmitter, the survey of electromagnetic field should be considered. If the field strength of the place where the desktop sterilizer is measured is higher than the above RF conformance level, the desktop sterilizer should be observed to verify its normal operation. If abnormal performance is observed, supplementary measures may be necessary, such as readjusting the direction or location of the desktop sterilizer.The field strength should be less than 3 V/m. MHz the full frequency range of 150KHz~80MHz