Get Price
Laboratory Low Speed Centrifuge BFS-205
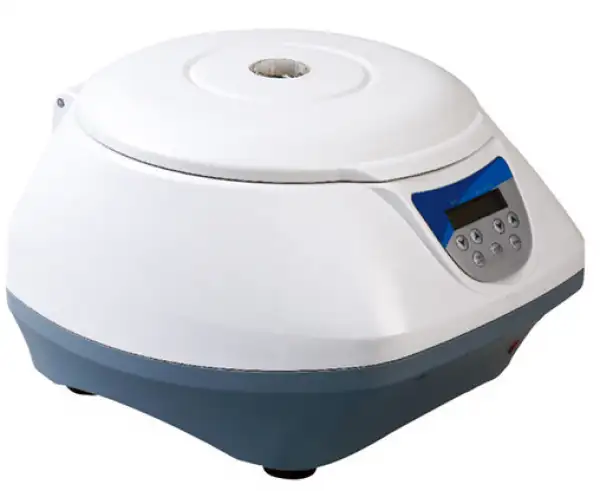
- Safety lid-lock
- LCD display showing
- Open lid automatically
- The operation interface simple and easy
 Get Quote
Specifications
| Model | BFS-205 |
| Power supply | 220V-50Hz |
| Power requirement | 40W |
| Max. speed | 400-5000 rpm (in 100 rpm increments) |
| Relative centrifugal force (rcf) | 3074xg |
| Timer | 15 sec-99 min |
| Acceleration time to max. speed | 20-80 seconds available |
| Braking time from max. speed | 20-80 seconds available |
| MOQ-10PCS |
Features
LCD display showing
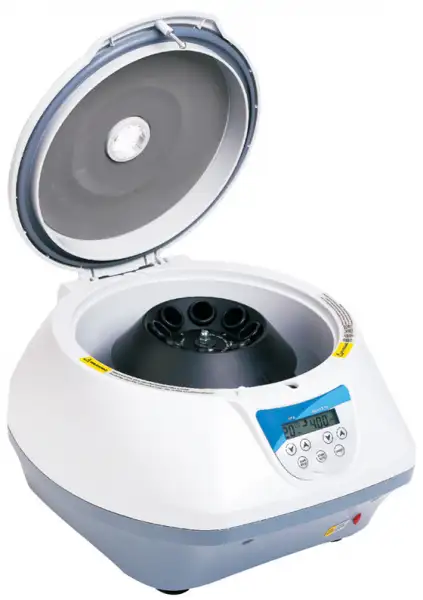
Open lid automatically
The operation interface simple and easy
RPM and RCF can be switched in display showing
6/8 of 15 ml conical centrifuge tubes with screw caps can be placed
Gentle deceleration for efficient sample separation.
Automatic lid opening system saves operating time.
The LCD display indicated time /speed for clear and easy operation.
Available for Shortspin operation mode, timed operation mode, and improve efficiency.
Safety lid-lock prevents opening the centrifuge lid until the rotor has stopped spinning.
The operation timer ranges from 10 seconds to 99 minutes, with a bell signal after finish operation.
The acceleration and deceleration can be controlled between 20-80 seconds at speed of 0-5000RPM.
1 year warranty.

Accessories For Purchase
| Images | Name | Tube type | Tube sizes (ml) | Tube count |
 | X6 rotor | centrifuge tube (MOQ-10PCS) | 15 | 6 |
 | X8 rotor | centrifuge tube (MOQ-10PCS) | 15 | 8 |
 | X12 rotor | vacuum blood collection tube (MOQ-10PCS) | 3, 5, 8 | 12 |
Operating Manuals
 Download Manual (PDF)
1. Introduction
1.1 Delivery package
1.2 Structure Description
1.3 Installing The device
2. Technical data
3. Safe y precautions
3.1 Place the cubes
3.2 Main ain of ro or
4. Operation guide
4.1 Control elements
4.2 Rotor insertion and removal
4.3 Loading the rotor
4.4 Centrifugation with a preset time
4.5 Short spin centrifugation
4.6 Switching to the rcf display
4.7 Open the centrifuge in the event of a power failure
5. Maintenance and cleaning
6. Troubleshooting
1. Introduction
This centrifuge is suitable for 15ml , 5ml centrifuge, Vacuette Blood Collection tubes and 100mm glass tube for centrifuging .
Before starting up this centrifuge for the first time, please read the rest of this operations manual.
1.1 Delivery package
Low speed benchtop centrifuge 1unit
Rotor 1unit
Centrifuge tube adapter 1unit
Operations manual 1unit
1.2 Structure Description

Figure 1

Figure 2
1.3 Installing The device
1.3.1 Place the centrifuge onto a level , horizontal surface. Make
sure that the ventilation slits are not blocked.
1.3.2 Insert the column connector of the adapter to power
connector of the device ,and insert another connector of the adapter to mains power supply.


220-240V
Figure 3
1.3.3 A safety distance of 30 cm should be observed around the centrifuge during operation. No objects which could cause additional damage in the event of a cen rifuge crash should be positioned in his space.
1.3.4 Power on the main switch. The centrifuge is ready to
operate when the display becomes visible. Place the rotor
onto the rotor axle and tighten using the rotor nut.
Before starting up the centrifuge for the first time, make
sure the rotor nut is securely fastened.
2. Technical data
Model | Spin plus |
Power supply | 100 240 V~ 50-60Hz |
Power | 40W |
Max. speed | 5000rpm |
Max. cen rifugal force | 3074rcf |
rpm rcf | ok |
ime | 10sec ~ 99min |
Max. load | 8x(6)15ml ubes |
Max. permi ed densi y | 1.2g ml |
Accelera ion ime o max. speed | 20-80 seconds available |
Braking ime from max. speed | 20-80 seconds available |
Ambien temperature | 5°C ~ 35°C |
Dimensions(WxDxH) | 35mmx40mmx32mm |
Weigh (wi h ro or) | 5.0kg |
Table 1
3. Safe y precautions
 he ro or and he ro or lid must always be securely fastened. If the centrifuge makes unusual noises when s are red , he ro or or ro or lid is not fastened correctly. Switch the device off immediately by pressing the "S AR S OP" key.
 Do not use damaged rooms!
Do not move the centrifuge during the run!
3.1 Place the cubes
3.1.1 A liquid densi y of 1.2g ml must not be exceeded the max speed.
3.1.2 Damaged tubes can not be centrifuged. This is because broken tubes can, in addition to sample loss, result in further damage to the centrifuge.
3.1.3 Close the tube lids before centrifuging. Open lids can be ripped off during centrifuging and damage the centrifuge.
3.1.4 Mus load he es ubes symme rically.
3.2 Main ain of ro or
3.2.1 Even slight scratches and ears of the rod can lead to serious internal material damage。
3.2.2 Avoid damage caused by aggressive chemicals, including among o hers: s rong and weak alkali, s rong acids.
3.2.3 In the event of con amina ion caused by aggressive agen s, he ro or must be cleaned immedia ely using a neu ral cleaning liquid.
4. Operation guide
4.1 Control elements
START/STOP
for start or stop centrifugation
SHORT SPIN for reduced time centrifugation
OPEN to open the lid
for setting the time and speed
4.2 Rotor insertion and removal
Fit the rotor onto the motor shaft, followed by the rotor nut.
Tighten the rotor nut by turning clockwise. To release the rotor, turn the rotor nut counterclockwise. Before each start, check that the rotor is firmly tightened!
4.3 Loading the rotor
Rotor must always be loaded symmetrically. Minimize differences in weight between the filled sample tubes taring with a scale is recommended. This will reduce wear on the drive and
cut running noise.
4.4 Centrifugation with a preset time
4.4.1 Turn on the mains switch, pressing "OPEN" to open the lid, load the rotor symmetrically. Fasten the rotor lid and close the centrifuge lid.
4.4.2 Pressing Time's change the run time, the time can be pre selected between 20 seconds and 99minutes, and pressing speed's to change the run speed the max. speed is 5000rpm.
4.4.3 Pressing the first "START/STOP" to start the run . Pressing the second "START/STOP" to end the run prematurely. The remaining run time appears in the display. After the run , the lid lock of centrifuge opens automatically. The time setting and the rotational speed may be changed during the run. The remaining run time appears in the display.
4.5 Short spin centrifugation
4.5.1 Turn on the mains switch, pressing "OPEN" to open the lid, load the rotor symmetrically. Fasten the rotor lid and close the centrifuge lid.
4.5.2 Pressing "SHORT
SPIN". Short spin centrifugation is possible for as long as this key is held down. The maximum rpm is 5000
4.6 Switching to the rcf display
Pressing speed's simultaneously the display switches from rpm to rcf. Also pressing speed's simultaneously again, the display switches from rcf to rpm.
You can calculate with the following formula
rcf=1118 * 10-5 * n2 * rmax
n: rotational speed in 1/min
rmax = 11 cm, max. centrifuging radius in cm
4.7 Open the centrifuge in the event of a power failure
Disconnect the centrifuge from the mains supply. Wait until the rotor has come to a standstill, Then left up the device, remove the lock pole to the right , the lid lock will be opened.

Figure 4
5. Maintenance and cleaning
 The ro or and he ou side of centrifuge should be cleaned regularly with a moist cloth. Disconnect the centrifuge from he mains supply, remove the rotor and clean it separately. Only neutral agents may be used for cleaning.
Please check he ro or and especially he ro or bores regularly for deposits or damage, then reinsert the rotor and tighten the rotor nut .
6. Troubleshooting
Error | Cause | Solution |
No display showing | No main power connection. Power failure. | Re-connect the power or contact manufacturer service. |
Lid can't be opened. | Power failure. Rotor is still spinning. Lid lock failure. | Emergency lid release . Stop centrifuge run. contact manufacturer service. |
Centrifuge shakes during acceleration | Rotor or centrifuge tube not loaded symmetrically. | Re-load the rotor or Re-load centrifuge tube |
Er=01 | Open lock failure | Contact manufacturer service. |
Er=02 | Close lock failure | Contact manufacturer service. |
Er=08 | Motor failure | Contact manufacturer service. |
Er=09 | Imbalance failure, or centrifuge tube/weight not loaded symmetrically. | Re-load centrifuge tube symmetrically, keep the loading weight symmetrically. or contact manufacturer service. |
Er=10 | Motor failure or hall sensor failure | Re-connect hall sensor line. or contact manufacturer service |
Er=11 | Motor driving board failure | Re-connect driving board or contact manufacturer service |
Table 3

Figure 5
Packing List
No . | Item | Type | QTY |
1 | Low speed benchtop centrifuge | Spin Plus | 1unit |
2 | Rotor | 1unit | |
3 | Centrifuge tube adapter | 1set | |
4 | Rotor lid | 1unit | |
5 | Operations manual | 1unit |
Table 4