Get Price
Laboratory Benchtop Freeze Dryer BFBT-104-B
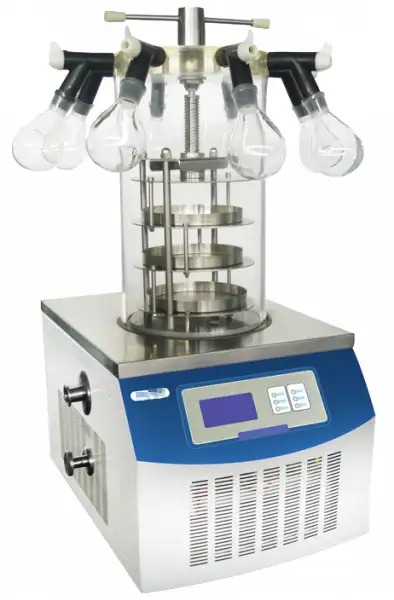
- Condenser, control panel, shelves and trays are made of stainless steel
- Low noise compressor with a long shelf life
- The drying chamber is equipped with organic glass for safety and visibility
- Condenser features pre-freezing function
 Get Quote
Specifications
| Model | BFBT-104-B |
| Capacity | 1.2 L |
| Condenser Temperature | -80°C |
| Water Holding Capacity | 3-4 /24h |
| Freeze Drying Surface Area | 0.08 m² |
| Pre Freeze Shelf Dimension | φ 180 mm |
| Vacuum Degree | < 10 Pa |
| Pump Flow Rate | 3 L/sec |
| Vial φ 22 | 165 |
| Vial φ 16 | 285 |
| Vial φ 12 | 560 |
| Overall Dimension (mm) | 831 x 680 x (400 + 430) |
| Shelves | 3 |
| Weight | 105 kg |
| Power | 970 |
| Power Supply | 110-220V, 50/60Hz |
Features
Low noise compressor with a long shelf life
The drying chamber is equipped with organic glass for safety and visibility
Condenser features pre-freezing function
Features vacuum freeze drying technology
Drying curves are displayed on LCD screen
Tray spacing can be customized
Eco-friendly CFC free refrigeration system
Features nitrogen valve and eutectic test device (optional)
Applications
Accessories For Purchase
| Name | Description | Trays | Temperature |
| Nitrogen inflation valve | |||
| Exhaust filter/ Oil mist filter for pump | |||
| Air inlet filter for pump | |||
| Anti oil return valve for pump | |||
| Electricity heating defrosting | |||
| Electric heating shelf | |||
| Trays | Trays: dia. 180mm / dia. 200mm | Diameter 180mm / 200mm | |
| RS232 and software | Check and keep freeze drying data on computer; control freeze dryer through PC | ||
| -80°C Condenser | Minimum condenser temperature as -80°C | Min. condenser temperature as -80°C |
Operating Manuals
 Download Manual (PDF)
1. Summary
2. Characteristics and technical parameters
3. Conditions in use
4. Installation and preparations for freeze-drying
4.1 Structure of freeze dryer and name of partition
4.2 Installation of freeze dryer
4.3 Test of freeze dryer
5. Operation of pre-freezing and drying process
6. Turn off machine operation
7. Control system operation
8. Notices
9. Common breakdown and elimination
1. Summary
The vacuum freeze-drying technology, which is also called sublimation drying, is a technical method that freezes the samples in advance, and then sublimates its moisture in the vacuum state. Goods are easier for long-term preservation after freeze-drying processing. They can be restored to the original state and maintain their chemical and biological characteristics after being watered. So the freeze-drying technology is widely used in medicine, food, chemistry industry and biological products etc.
2. Characteristics and technical parameters
1. Main characteristics
(1) Refrigeration process is rapid and condenser temperature is low.
(2) LCD touch screen control system, simple operation and good function.
(3) The control system automatically stores data, and data can be viewed in form of curves. Whole freeze-drying process is clear.
(4) The drying chamber uses the transparent organic glass drum. So you can clearly view sample state and observe the whole drying process.
(5) vacuum pump is connected with host by international standard KF quick joint.
(6) Performance of machine is stable, easy to operate and low noise.
2. Technical parameter
(1) Min. condenser temperature: -80°C(no-load)
(2) Final vacuum: < 10Pa ( no-load)
(3) Material tray: Φ180mm, 3 layers;
(4) Drying area: 0.08㎡
(5) With stoppering device: by hand
(6) With 8 manifold ports: 8 pieces of flask in total
3. Conditions in use
1. Ambient temperature in normal working condition: 10°C-25°C.
Relative humidity: ≤70%.
Power supply: 120V/60Hz/Single phase
The working environment should be no conductive dust, explosive and corrosive gases and strong electromagnetic interference.
2.Transport and storage conditions
environment temperature: -40°C~50°C.
Relative humidity: ≤93%.
The storage conditions should be well-ventilated, no corrosive gases.
4. Installation and preparations for freeze-drying
4.1 Structure of freeze dryer and name of partition

Figure 1
Structure of host
1,condenser
2,sealed ring
3,workbench
4,vacuum port
5,drain valve (air inlet valve)
6,control panel
7,switch
8,general power
9,vacuum pump power
10,fuse

Figure 2
Structure of vacuum pump
1, oil drain
2,oil level glass
3, oil filler hole
4,gas ballast valve
5,exhaust port
6,air inlet
7,connecting terminal
8,capacitor
9,vacuum pump power cord

Figure 3
Structure of clamp
1,screw nut
2,support
3, gasket ring
4.2 Installation of freeze dryer

Figure 4
Connection of the machine
1,vacuum pump
2,clamp
3,tube (connecting host with vacuum pump)
4,host
Installation steps:
1) Check accessories complete and undamaged after unpacking box;
2) Add vacuum pump oil to middle of level glass
3) Connect the air inlet on pump and tube by clamp; the other end of tube connected with vacuum port on host;
4) Connect "vacuum pump power cord" with "vacuum pump power "interface on host;
5) One end of the power line is inserted into "general power" interface on host; the other end is connected to power supply 120V/60Hz (the power should be connected with ground lead)
6) Turn on switch and test the index of freeze dryer.(vacuum degree<10Pa, condenser temperature-80°C).Then the device is put into use.
4.3 Test of freeze dryer
• Test of condenser temperature
1) Cover the pre-freeze lid
2) Turn on switch, to enter control system. Touch the screen, to go to main interface.
Press "compressor" to turn on compressor to test refrigeration.
3) Condenser temperature drops to -80°C within 60 minutes, test is ok.
• Test of vacuum degree
1) Press"vacuometer"to turn on vacuum gauge, standard atmosphere is displayed;
2) Put on sealed ring
3) Tighten the air inlet valve
4) Place organic glass drum, drum bottom full contact with sealed ring.
5)Turn on vacuum pump by pressing"vacuum pump"key,vacuum degree rapidly decline.
6) Vacuum degree goes down below 10 Pa within 10 minutes, test is ok.
7) After finishing tests, open air inlet valve on host to inflate host and restore normal pressure. Then the machine is ready for running.
Notices:
1. There are no obstructions behind and at sides of host within 30cm;
2.Make sure that the vacuum pump oil has been filled before starting up.
5. Operation of pre-freezing and drying process

Figure 5
pre-freezing process
1,vacuum pump
2,control panel
3,pre-freeze shelf
4,material tray
5,pre-freeze lid
The general pre-freezing process with steps:
(If you have low-temperature refrigerator, this process may be canceled.)
1.Turn on machine and start compressor.When condenser temperature drops below -50°C, you begin to freeze material ;
2.Put material into material tray (liquid directly into tray, solid material and vials evenly put on tray );
3.Put material tray into pre-freeze shelf and put the temperature sensor into material with full touch, to reduce error of sample temperature and actual temperature;
4.Put pre-freeze shelf into condenser;
5.Cover the pre-freeze lid;
6.When temperature of all parts of material drop below eutectic point, this condition will be still keeping about one hour .Then pre-freezing process is over and ready to make drying process.

Figure 6
Drying process
1. vacuum pump
2. host
3. drying shelf
4. tray
5. organic glass drum
6. T-handle
7. manifold port
8.flask
Drying process with steps:
1 .Take out the material from condenser and put trays on drying shelf;
2. Put the drying shelf on condenser (as shown in above diagram); Put temperature sensor into material.Please note that sensor should be taken out through half round hole reserved at side of flange , in order to prevent damage by drying shelf
3. Check sealed ring intact and without raffle ,put on organic glass drum ;
The bottom of drum should be completely in touch with "O" sealed ring.
4. Close the air inlet valve on host ;
5.Turn on vacuum pump and vacuum gauge by pressing "vacuum pump" key and "vacuometer" key on main interface. The vacuum degree declines. It's normal that the vacuum degree is less than 20Pa during drying process;
6.Put on flask one by one and open rubber valve. When material in flask dried, close rubber valve, take off flask.
(When you want to seal vials at vacuum state, please turn T-handle on top. Then rubber stopper will be pushed into vial and seal it. )
7. When drying process is over, first open air inlet valve to inflate host, then turn off vacuum pump by pressing "vacuum pump" key. Press "vacuometer" key, the vacuum degree display will vanish. Turn off compressor by pressing "compressor" key.
8.Take off organic glass drum and collect dried material.
9.Close drain valve , machine begins to defrost. After finishing defrosting, open drain valve to drain water. Clean the equipment.
Notice: a. Compressor can not be turned off in whole freeze drying process;
b. Drying time is different for material property. Generally speaking, material would be dry when its temperature reaches room temperature.
6. Turn off machine operation
1 .Turn off power switch;
2. Unplug the power cord;
3. Clean condenser, drying shelf ,acrylic drum and other parts; Keep machine dry.
4. When vacuum pump does not work, please cover the exhaust port to prevent dust from entering.
7. Control system operation
The control system uses LCD touch screen display, easy to operate and the running status is clear. The system displays sample temperature curve, condenser temperature curve and vacuum degree curve. System adopts a variety of stable measures so that the control system runs stable and reliable.
The control system contains following display screens:
1. Turn on switch,system goes into initial interface. Touch the screen center, it enters main interface.

Figure 7
initial interface
2.On main interface, touch"compressor",compressor starts to work.
Touch"vacuum pump", pump starts to work.
Touch"vacuometer",vacuum degree displays.
Touch "Real-time curve" for curves check. "History record" for earlier data check.

Figure 8
Main interface
3.Touch"real -time curve", to enter real-time curve interface.On right side, there are "sample","condenser"and "vacuum"buttons to control relative curves.Please check interfaces as follows:

Figure 9

Figure 10
"real-time curve"interface
4. Click"history record"on main interface, it goes into "history select" interface. User can choose specific file, to check this curve,delete it or output it to U flash disk.

Figure 11
"history select" interface
5.Click "confirm" on "history select" interface, user can see "history curve" interface.

Figure 12
"history curve" interface
6. Click"Delete"button on "history select" interface. Selected file can be removed.

Figure 13
"Delete" interface
7. Click"export to USB"button on "history select" interface.
User needs to insert U disk in advance, then turn on switch to export data. Data can be checked by Excel format.

Figure 14
"export to USB" interface
8. System time set
Please press system time place for some seconds, then you can see a system time set screen.

Figure 15

Figure 16
8. Notices
1.The vacuum pump should be put on ground so that it maintains a certain height difference with the host(at least 50cm), to prevent oil return if power is suddenly off. If power off,you should open the air inlet valve to inflate the host, take out the samples as soon as possible and properly store the samples.
2.Working environment temperature should be≤25°C. Humidity should be ≤70%.
3.When turn off the machine, user should inflate the host first, later turn off the vacuum pump to prevent oil return and sample pollution.
4.Sealed ring should be kept clean , do not use organic solvent clean;
5.Grounding power socket must be used.
6.The vacuum pump oil should be replaced regularly after working 200 hours continuously.
7.Please don't frequently turn on and turn off the power supply and compressor. If the compressor stops working because of wrong operation, user needs to restart the compressor after waiting for at least 3 minutes.
9. Common breakdown and elimination
1.The vacuum degree can not achieve below 15Pa.
(1)Check connection between vacuum pump and host, to make sure clamp is tight
(2)Check whether the "O" sealed ring is clean , and whether its placement is correct.
(3)Check whether the vacuum pump works normally and whether pump oil is clean .
(4)Check whether the air inlet valve is screwed tightly
(5)Check whether bottom of organic glass drum is clean, whether there is damage on the touch surface
2.High condenser temperature
Ambient temperature is too high , leading to bad heat dissipation.please place the machine in a proper environment with a well ventilated condition.