
Get Price

Homogenizer BLHM-1001
Benchtop homogenizer is a fast high-throughput homogenizer, combines the functions of grinding, cracking, homogenization as one. It is through the three-dimensional high-speed vibration, grinding beads (glass beads, ceramic beads, steel balls, etc.) beating, to achieve the sample grinding, cracking and homogenizing purpose.
- Exquisite design, stable body, man-machine angle design, easy to operate.
- Adopting 4.3-inch color screen, display parameters of the indicators, parameter setting is convenient and fast.
- The program built-in 10 groups commonly used parameter settings, one key call, convenient and quick.
- Different materials grinding beads and corresponding programs can be selected for different samples.
- Up to 3-Year Product Warranty
- US & EU Compliance Standards
- Door-to-Door Shipping
Technical Specifications
Detailed operating and construction parameters for this model.
| Model | BLHM-1001 |
| Oscillation speed | 2460~6000rpm, Increment in 10rpm |
| Operation time | 1s~90s, Increment in 1s |
| Interval time | 1s~90s, Increment in 1s |
| Cycle index | 10 |
| Stored program | 10 |
| Sample capacity | 24 piece 2ml/1.5ml grinding tube |
| Acceleration time | <7s @6000rpm |
| Deceleration time | <7s @6000rpm |
| Noise level | <75db |
| Max. input power | 500W |
| Input power | AC100~240V, 50/60Hz |
| Dimension(WxDxH) | W.300mmxD.350mmxH.300mm |
| Net weight | 28kgs |
Product Features
Key design, performance, usability, and safety advantages.
Accessories For Purchase View compatible optional accessories and additional items available separately.
| Name | Specs | Quantity |
| Cryotube | 2.0mL | 50 |
| Stainless steel beads | Φ3 | 150 |
| Zirconium beads | Φ3 | 150 |
| Zirconium beads | Φ1.5 | 100g |
| Glass bead | Φ3 | 150 |
| Glass bead | Φ1.2 | 100g |
| Glass bead | Φ0.5 | 100g |
Operating Manual View instructions, operating procedures, safety information, and maintenance guidance.
1. Safety Warnings and Guidelines
1.1 Important operation information of the security
1.2 Security
2. Introduction
3. Specifications
4. Basic Operating Instructions
5. Operation Guide
6. Failure Analysis and Trouble Shooting
1. Safety Warnings and Guidelines
1.1 Important operation information of the security
Before the users' operation, they should have a perfect conception of how to use the Instrument. Therefore, read this Manual carefully before using it.
 It is forbidden to operate before reading the operation manual. If you do not follow the instructions in the manual, the instrument may cause accidental injury during operation, and electric shock may occur. Read the guidelines and directions below and carry out the countermeasure according to them.
1.2 Security
The operation, maintenance and repair of the Instrument should comply with the basic guidelines and the remarked warning below. Otherwise, it will affect the scheduled using life of the Instrument and the protection provided.
This product is a normal and an indoor Instrument which conforms to Standard B style- I type- GB9706.1. This instrument is for indoor use.
Please read this operation manual carefully before operating the instrument, otherwise it may cause personal injury. Only qualified inspectors trained in how to install and use electrical equipment can operate this instrument.
The operator should not open or repair the instrument by himself.Otherwise, the instrument will lose the qualification of repair guarantee or cause accidents. The company will repair the instrument based on the warranty description.
Before connecting the power supply, make sure that the voltage of the power supply is the same as that required by the instrument. And ensure that the rated load of the power socket is not less than the requirements of the instrument. If the power cord is damaged, it must be replaced. The replacement must be replaced by a power cord of the same type and size. Do not put anything on the power cord when the instrument is in use. Do not place the power cord where people move.
Be sure to hold the plug when plugging and unplugging the power cord. Make sure that the plug is fully inserted into the socket when plugging in, and do not pull the power cord hard when unplugging.
The instrument should be put in the place of low humidity, little dust, no water, no sunshine or hard light, and of good aeration, no corrosively gas or strong disturbing magnetic field, and far away from central heating, camp stove and other hot resource. Do not put the instrument in a wet and dusty place.
Power off when operation finished. If you do not use the instrument for a long period, pull off the connector plug, cover a piece of cloth on the instrument to prevent dust.
Pull the connector plug from the jack at once in the following case, and contact the vendor:
• There is some liquid flowing into the Instrument;
• The instrument has been drenched in rain or water.
• Abnormal operation: such as abnormal sound or smell.
• Instrument dropping or outer shell damaged.
• The function has obviously changed.
Instruments Maintenance
The instrument and the accessories should be cleaned by cloth drenched with alcohol.
If there is any stain on the surface of the instrument, it can be cleaned with a soft cloth dipped in cleaning paste.
After Service
1) Warranty Description
Within one month of delivery, the company is responsible for breakdown caused by material or manufacture.
Within 12 months of delivery, the company is responsible for free repair for breakdown caused by material or manufacture. Proven with defects under warranty, the company will exchange the instrument or free repair it alternatively.
Instruments under warranty period should be delivered to the appointed maintenance department by the user. Freight from the user to the maintenance department will be borne by the user. Freight for instruments present to the user will be borne by the company.
Repairs out of warranty will be charged a reasonable cost.
2) Warranty Coverage
Breakdown due to improper use, operation in inappropriate conditions, maintaining or refitting without authorization are not in warranty coverage.
2. Introduction
BLHM-1001 Benchtop homogenizer is a fast high-throughput homogenizer, combining the functions of grinding, cracking, and homogenization as one. It is through the
three-dimensional high-speed vibration, grinding beads (glass beads, ceramic beads, steel balls, etc.) beating, to achieve the sample grinding, cracking and
homogenizing purpose. It can effectively homogenize plant and animal tissues, bacteria, fungi and other samples. It is very effective for the samples difficult to be processed by general instruments, such as spores, hair, bone, feces, soil and so on. With the relevant kit, it can quickly, efficiently, stably and batch extract DNA/RNA/ protein from the samples, and retain the integrity of these biomolecules.
Feature
• Exquisite design, stable body, man-machine angle design, easy to operate.
• Adopting 4.3-inch color screen, display parameters of the indicators, parameter setting is convenient and fast.
• Precise setting of homogeneous time and running speed, the program built-in 10 groups of commonly used parameter Settings, one key call, convenient and fast. Different materials can be selected for different samples grinding beads and corresponding procedures.
• Up to 24 2ml/1.5ml samples can be processed simultaneously. Good homogenization effect, time-saving and efficient, not only save time and labor, but also smaller differences between batches and batches.
• A separate crushing tube is used for each sample to prevent cross contamination.
• A variety of materials and diameters of grinding beads are available for different types of samples.
• Most samples can be homogenized and the integrity of biomolecules (DNA, RNA, proteins) and drug molecules can be preserved.
3. Specifications
1. The Normal Operation Condition
Ambient Temperature: :5C 45C
Relative Humidity:≤70% Power: AC100240V 50/60Hz
2. The Basic Parameters and Specifications
Model | BLHM-1001 |
Oscillation speed | 550~6000rpm (Increment in 10rpm) |
Operation time | 1s~90s, Increment in 1s |
Interval time | 1s~90s, Increment in 1s |
Cycle index | 10 |
Stored program | 10 |
Sample capacity | 24 piece 2ml/1.5ml grinding tube |
Acceleration time | <7s @6000rpm |
Deceleration time | <7s @6000rpm |
Noise level | <75db |
Max.input power | 500W |
Input power | AC100~240V, 50/60Hz |
Dimension(WxDxH) | W.300mmxD.350mmxH.300mm |
Net weight | 28kgs |
Table 1
4. Basic Operating Instructions
This chapter mainly introduces the structure of the instrument, the function of the operating panel, and the preparation before starting. When using the instrument for the first time, familiarize yourself with the contents of this chapter before starting the machine.
1. Structure Description
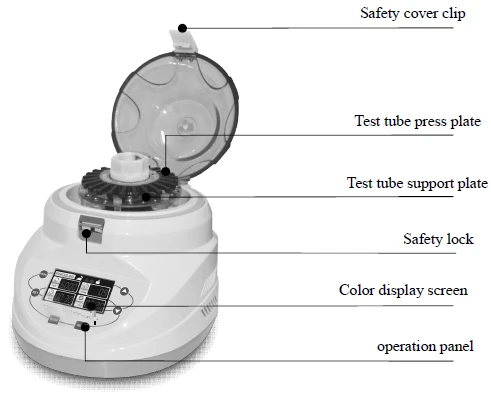
Figure 1
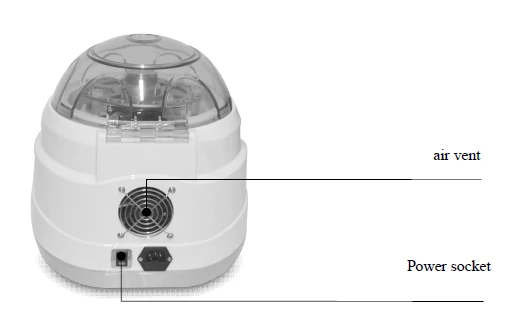
Figure 2
2. Operation Panel
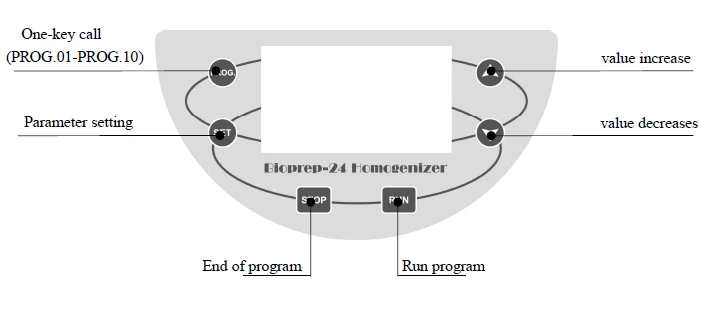
Figure 3
3. Display Interface
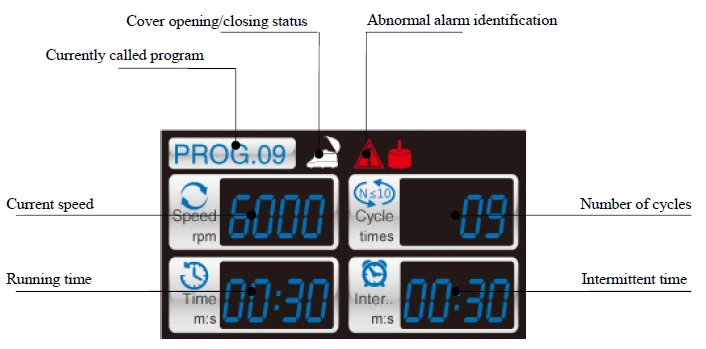
Figure 4
5. Operation Guide
1. Sample tube clamp
1.1 Pull the lock column outward(Unlock), turn the knob counterclockwise, and remove the test tube pressure plate upward.
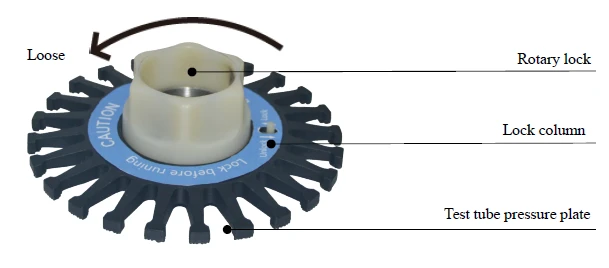
Figure 5
1.2 Take out the test tube support plate, and completely press the sample tube into the test tube support plate. The sample tubes shall be evenly and symmetrically distributed during each experiment.
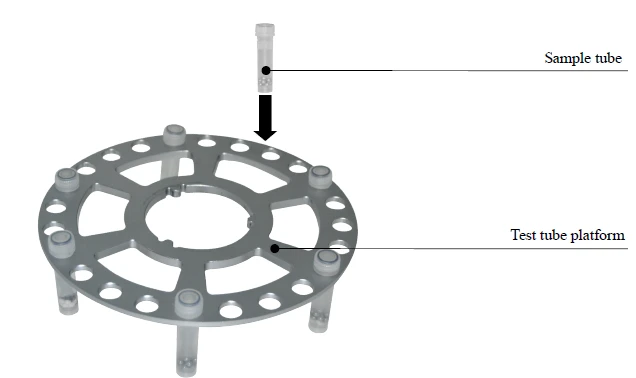
Figure 6
1.3 Put the test tube tray and test tube pressure plate in turn, turn the knob clockwise tightly, push the lock column inward, and hear a "click", indicating that the lock column is locked. If the lock column cannot be pushed forward, turn the knob 2 degrees, and push the lock column in again.
Note: The lock pillar must be pushed to the "LOCK" position.
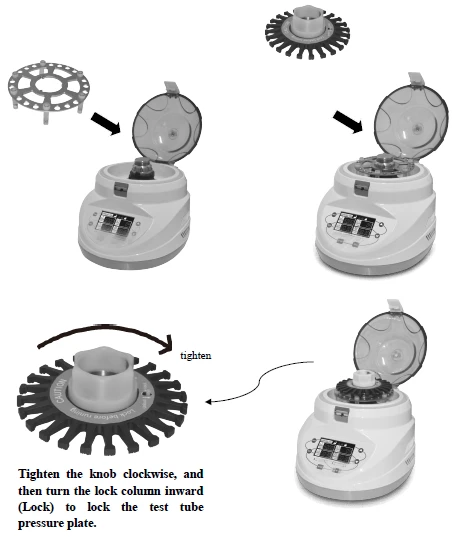
Figure 7
1.4 After the sample tube is installed, close the transparent cover and close the buckle of the safety protection cover, and then the program can be run.
2. Program settings
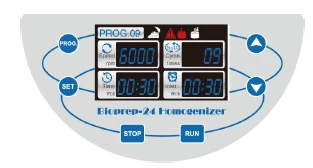
Figure 8
Press "  " and"
 "simultaneously for more than 3 seconds to switch the linear speed. (Amplitude linear velocity: 4.00m/s~7.00m/s)
Press" "and" "for more than 3 seconds to switch back to the speed display.
Press the SET key once, the Speed value on the screen turns yellow. Press or to set speed.
Then press the "SET" key once, and the "Cycle" parameter value in the display screen turns yellow. At this time, press the " " or " " key to set the number of cycles to run.
Then press the "SET" key once, and the "Time" parameter value in the display screen turns yellow. At this time, press the " " or " " key to set the running time.
Then press the "SET" key once, and the "Inter" parameter value in the display screen turns yellow. At this time, press the " " or " " key to set the running interval time.
Parameter setting range
linear speed | Cycle number | Running time | Interval time | Secondary operation interval |
4.00m/s-4.50m/s | 1-10 | 5-90s | 5-120s | 2-5 minutes |
4.60m/s-4.90m/s | 1-3 | 5-90s | 5-120s | 2-5 minutes |
5.00m/s-5.90m/s | 1-3 | 5-60s | 5-120s | 5 minutes |
6.00m/s-7.00m/s | 1-3 | 5-30s | 5-120s | 5 minutes |
Table 2
3. Run and stop programs
Press the "RUN" key to run the program, and press the "STOP" key to stop the program.
Note: In case of abnormal noise during operation, please immediately press the "STOP" key to stop operation or directly turn off the power switch on the back of the instrument. (Check whether the rotary lock is loose, and it can continue to operate after being screwed)
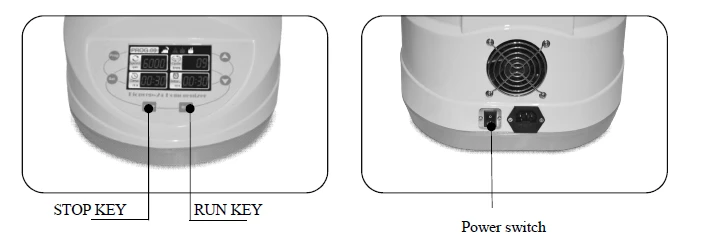
Figure 9
4. Motor overtemperature protection
The instrument is equipped with overtemperature protection. When the temperature of the motor exceeds the protection temperature, the built-in cooling fan will start to cool the motor. At the same time, the screen displays a red motor temperature alarm icon (as shown in the figure). At this time, the instrument cannot run. When the red warning icon disappears, it can run again.  .
5. Grinding bead selection
a) The general rule of grinding bead selection is: the stronger the sample hardness, the higher
the toughness, the larger the density and diameter of the selected bead.
b) Bead selection is not absolute, a sample can be used for a variety of beads.
c) Glass beads are usually the most selected grinding bead, because the price is moderate and can meet the needs of general experiments.
d) The researchers often choose beads that are close to the particle size of the sample, and those with high density are preferred.
e) Beads of the same texture and different diameters can be used together according to the volume ratio.
f) Beads can be used repeatedly within a limited range, but do not use acid when cleaning. Just soak the beads with detergent overnight, then rinse them repeatedly with tap water, and finally rinse them with pure water.
Application | Splitting | RNA | Homogeneity | Grind | ||||
Sample Type | Splitting Glass Bead | Splitting Glass Bead | RNA Carbonized Bead | Ceramic Bead | Ceramic Bead | Garnet Bead | Metal Bead | |
Grinding Volume | 0.1 mm | 0.5 mm | 0.25 mm | 1.4 mm | 2.8 mm | 0.70 mm | 2.38 mm | |
Sample Tube Volume | 2 mL | 2 mL | 2 mL | 2 mL | 2 mL | 2 mL | 2 mL | |
Microorganism | Bacteria | ✓ | ✓ | ✓ | ||||
Yeast | ✓ | ✓ | ✓ | |||||
Fungus | ✓ | ✓ | ✓ | |||||
Spore | ✓ | ✓ | ✓ | |||||
Animal | Skin | ✓ | ✓ | ✓ | ✓ | |||
Nerve | ✓ | ✓ | ||||||
Artery | ✓ | ✓ | ||||||
Gut | ✓ | ✓ | ||||||
Tumour | ✓ | ✓ | ||||||
Muscle | ✓ | ✓ | ✓ | ✓ | ||||
Brain | ✓ | ✓ | ✓ | |||||
Liver | ✓ | ✓ | ✓ | |||||
Kidney | ✓ | ✓ | ✓ | |||||
Lungs | ✓ | ✓ | ✓ | |||||
Heart | ✓ | ✓ | ✓ | ✓ | ||||
Bones | ✓ | ✓ | ||||||
Hair | ✓ | ✓ | ✓ | |||||
Cartilage | ✓ | ✓ | ||||||
Corneal | ✓ | ✓ | ||||||
Fish and Insects | Insect | ✓ | ✓ | ✓ | ||||
Zebrafish | ✓ | ✓ | ||||||
Plant | Leaf | ✓ | ✓ | |||||
Seed | ✓ | ✓ | ||||||
Rice | ✓ | ✓ | ||||||
Wheat | ✓ | ✓ | ||||||
Stem | ✓ | ✓ | ||||||
Root | ✓ | ✓ | ||||||
Mosses | ✓ | ✓ | ✓ | |||||
Soil | Soil | ✓ | ✓ | ✓ | ✓ | ✓ | ||
Sediment | ✓ | ✓ | ✓ | ✓ | ||||
Table 4
6. Sample Preparation
As heat will be generated in the grinding process, some tissues of some samples will be damaged. It is recommended to put some samples into the sample tube and store them at a low temperature (below -60°C) for 12 hours before taking them out for grinding, so as to achieve the best grinding effect.
6. Failure Analysis and Trouble Shooting
Fault analysis and handling methods
No | Phenomenon | Possible Causes | Processing Procedure |
1 | No signal display when power on. | power supply is not connected | Check the power supply and connect it |
The switch is damaged | Switch exchange | ||
Fuse damage | Replace the fuse(5x20 250V 10A) | ||
other | Contact with the seller | ||
2 | The display window remains open after the protective cover is closed | Protective cover switch fault | Contact with the seller |
3 | Display icon | Sensor fault Motor overtemperature | Contact with the seller |
4 | Display icon | Motor fault | Contact with the seller |
5 | The instrument cannot operate | Motor temp. is too high | When the motor temp. drops to the protection temp., it can resume operation |
Controller damaged | Contact with the seller | ||
Motor damage | Contact with the seller | ||
6 | Abnormal running sound | Bearing damage | Contact with the seller |
The test tube pressure plate is loose | Tighten the test tube pressure plate | ||
7 | The keys don't work | Connecting plug is loose | Contact with the seller |
The key is damaged | Contact with the seller |


Table 5
Appendix A:Wiring Diagram of BLHM-1001
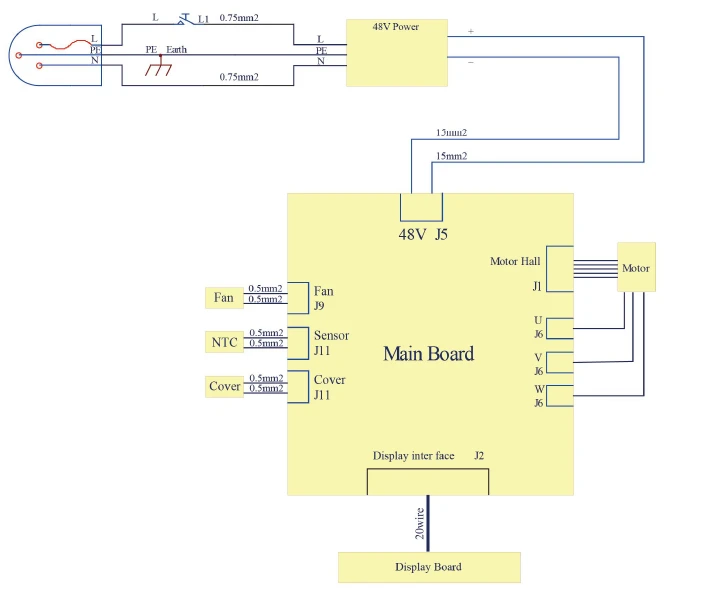
Figure 10