Get Price
Fluorescence Immunoassay Analyzer BANA-1203
- 1. 12 independent constant temperature incubation channels, which can detect 12 different items at the same time.
- 2. Automatic induction of reagent card insertion, automatic printing of test results, and automatic card loss.
- 3. Built-in thermal printer, can also be connected to an external printer.
- 4. 10.1-inch large LCD screen with a resolution of 1024*600 or more, the visual experience is better.
 Get Quote
Specifications
| Model | BANA-1203 |
| Excitation Light Source | LED |
| Wavelength | Excitation wavelength λ0=365nm; Detection wavelength λ1=615nm |
| Detection Channel | 1 |
| Incubation Position | 12 |
| Sample Type | Serum, plasma, whole blood and urine, etc |
| Detection Mode | Supports multiple items in one card |
| Testing Speed | < 10s/test |
| Repeatability | CV≤5% |
| Stability | σx̄±8% |
| Linear Correlation | (r)≥0.98 |
| Accuracy | Δx̄±8% |
| Display | 10.1-inch color touch screen |
| Language | Chinese, English, Spanish, Other languages can be customized |
| Interface | RS232, USB, ethernet port |
| Printer | Built-in thermal printer |
| Power Supply | 100~240V, 50/60Hz |
| External Size(L*W*H)mm | 333*418*408 |
| Net Weight(kg) | 17 |
| Package Size(L*W*H)mm | 600*520*687 |
| Gross Weight(kg) | 36.5 |
Features
2. Automatic induction of reagent card insertion, automatic printing of test results, and automatic card loss.
3. Built-in thermal printer, can also be connected to an external printer.
4. 10.1-inch large LCD screen with a resolution of 1024*600 or more, the visual experience is better.
5. The temperature range can be manually set to quickly achieve the predetermined temperature effect and improve the reaction rate.
6. The operation is convenient, the data is automatically read, and the single detection time is less than 10s.
Applications
Operating Manuals
 Download Manual (PDF)
Product Instruction
1. Product Overview
1.1. Instrument introduction
1.2. Main structural composition
1.3. Scope of application
1.4.Basic principle
1.5 Software
1.6. Network Security
1.7.Contraindications
2. The basic parameters and the conditions of use
2.2. Function
2.3. Transport and storage conditions of the instrument
3) Instrument installation
3.1. Package
3.2. Unpack
3.3. Packing List
3.4.Installation requirements
4. Operation interface instructions
4.1. Item interface function description
4.2. Test interface function description
4.3. Record interface function description
4.4. User interface function description(Administrator permissions)
4.5.System interface function description
Product Instruction
Thank you for choosing Fluorescence Immunoassay Analyzer. This instrument is an immunofluorescence automatic detection system based on the principle of photoelectric detection, which needs to be used with special fluorescent immunoreagents. It is widely used in many fields such as disease detection, medical care, epidemic monitoring, food inspection and quarantine. To reduce the risk of fire, electric shock and personal injury, please read and understand all instructions, follow the warnings and instructions indicated on the instrument itself, and always follow basic safety precautions. The protection provided by the equipment may be impaired if the equipment is used in a manner not specified by the manufacturer. In all cases marked with a warning sign, the instruction manual should be consulted to clarify the nature of the potential hazard and any countermeasures that must be taken.
This instruction manual is applicable to the model BKP2000, and the actual interface operation shall prevail.
Date of preparation/revision of the manual: Apr., 2024
Manual version number: V1.3
This manual gives the following two safety warning signs to guide the instrument operator to avoid injury or damage to the instrument and to obtain wrong test results. In order to remind the operator to avoid potentially dangerous and hazardous conditions, we have given different prompt signs depending on the degree of hazard of the operation.
 WARNING: Failure to follow the operating procedures may result in greater harm to the operator, the environment, or both.
NOTE: Emphasizes the operation method that must be followed to avoid possible danger or damage to the instrument and possible erroneous test results.
NOTE: Emphasize important information.
All personnel who may use, maintain, move and maintain the instrument should read this manual carefully. If any unexpected failure occurs during the operation and use of the instrument, please refer to the contact information in this manual and call the company for technical support.
Intellectual property rights
The intellectual property rights of this instruction manual and its corresponding products belong to Bioscientific Lab.
Bioscientific Lab. All rights reserved
Without the prior written consent of the company, no individual or organization may copy (including any means of photography, reprint, transcription, etc.), copy, modify or translate any part of this instruction manual.
If the contents of this manual are changed, the user will not be notified separately.
Statement
Bioscientific Lab has the final right to interpret this instruction manual.
The company believes that it is responsible for the safety, reliability and performance of the product only when all the following requirements are met, namely:
• Assembly operation, expansion, readjustment, improvement, maintenance and replacement of parts are all carried out by professionals recognized by the company;
• All repairs involve the replacement of parts and the accessories and consumables used for them are the original equipment (original) of the company or approved by the company;
• The relevant electrical equipment conforms to the national standards and the requirements of this instruction manual;
• The operation of the product is carried out in accordance with this instruction manual.
Use Objects
The audience of this instruction manual is the following:
Personnel who carry out the daily operation of the system; Personnel who perform system maintenance and troubleshooting; Personnel who learn system operation.
Before using the product, please read the contents of this instruction manual carefully and use the product correctly. Please keep this instruction manual in a safe place for reference at any time. Warranty is voided if the precautions described in this instruction manual are not followed during use.
In order to keep the protection provided by the equipment effective, the experimenter or operator should consult and operate according to the requirements of this instruction manual.
WARNING: This instrument is limited to the operation and use of inspection professionals, doctors or laboratory personnel trained by the company or its agents.
Safety Symbols
Various safety symbols are used in this manual and the analyzer to remind you of matters needing attention during operation. As shown in the table below:
NO. | Symbol | Signs | Explain |
1. | | WARNING | Documentation must be consulted in all cases marked with this symbol in order to ascertain the nature of the potential hazard and any countermeasures that must be taken. If you do not use the instrument in accordance with the instructions in this manual, the protective measures provided by this instrument may become invalid. |
2. | | IVD | Used in the nameplate position; indicates that the medical device is an in vitro diagnostic medical device. |
3. | | Risk of biological infection | Used in the card carrier to indicate a biological contamination hazard, which may be present if instructions are not followed. |
4. | | UThis way up | It indicates that the correct position of the transport package is vertical upward. |
5. | | Fragile | It indicates that the transport package contains fragile items, so it should be handled with care. |
6. | | Keep away from rain | It indicates that the transport package should be protected from rain. |
7. | | Do not roll | It indicates that the transport package cannot be rolled over. |
8. | | Stacking Layer Limit | Indicates that the maximum number of layers that can be stacked for the same shipping package is 3. |
9. | | CE mark | At the nameplate position. Indicates this medical device has been assigned to class A according to Annex II + Annex III + Article 17 of IVDR (EU) 2017/746. |
10. | | European Authorized Representative | At the nameplate position. Represents the authorized representative of the European Union. |
11. | | Marking of WEEE | Indicates the waste electrical and electronic equipment (WEEE), which designed for use with a voltage rating not exceeding 1000V for alternating current and 1500V for direct current, when marked with this marking the waste management should be in accordance with Directive 2002/96/EC(WEEE). |


Table 1
The user uses this product voluntarily, and the operation, maintenance, repair and transportation of this product must strictly follow the safety precautions listed below. The design of this product fully considers biological pollution protection, electrical safety protection and mechanical movement protection. Any operation that does not comply with the safety precautions or other prompts in this manual may cause protection failure, or may undermine the safety standards of design and manufacture and the intended range of use of the instrument.
Safety Notes
Bioscientific Lab does not assume any responsibility for any loss caused by the user not reading this manual or operating in accordance with the contents of this manual! To use this instrument safely, please read the following safety precautions carefully. Any operation that violates the following safety precautions may cause personal injury or damage to the instrument.
WARNING: In all cases marked with this warning sign, the instruction manual should be consulted in order to clarify the nature of the potential hazard and any countermeasures that must be taken. If you do not use the instrument in accordance with the instructions in this manual, the protective measures provided by this instrument may become invalid.
Biological Protection
For effective protection against biological hazards, please observe the following precautions.
 Risk of biological infection
• Improper use of samples can lead to infection. Do not touch reagent cards, samples, quality controls, and waste cards with bare hands. Be sure to wear gloves, work clothes to prevent infection, and protective glasses if necessary.
• If the sample accidentally comes into contact with the skin, please handle it according to the user's work standards immediately and consult a doctor.
Protection against chemical hazard
In order to prevent personal injury caused by dangerous chemicals, please observe the following precautions.
WARNING:
Some reagents may damage the skin. Please use reagents carefully to prevent direct contact between hands and clothes. In case of contact with hands or clothes, wash immediately with soap and water. In case of eye contact, rinse immediately with plenty of water and consult an ophthalmologist.
Waste liquid treatment
To prevent the waste liquid from causing environmental pollution and personal injury, please observe the following precautions when disposing of the waste liquid.
Risk of biological infection:
Some substances in the reagent are regulated by pollution regulations and discharge standards. Please comply with local emission standards and consult the relevant reagent manufacturer or distributor. Please dispose of used reagent cards in accordance with the "Medical Waste Management Regulations" to avoid biological hazards.
When handling waste liquid, be sure to wear gloves, work clothes to prevent infection, and protective glasses if necessary.
Prevent Fire And Explosion
To prevent fire and explosion, please observe the following precautions.
WARNING:
Alcohol is flammable and must be handled with great care.
Disposal of waste immunoassay analyzer
Please dispose of the discarded immunoassay analyzer according to the following requirements.
WARNING:Some of the substances in the discarded immunoassay analyzer are subject to pollution regulations. Please comply with the local waste disposal standard to dispose of the abandoned immunoassay analyzer.
Instrument out of use
To reduce or eliminate the risks involved in taking the equipment out of service, such as during service, transportation, or disposal, observe the following precautions.
WARNING:
During equipment maintenance, transportation, or processing, please clean and disinfect the surface of the instrument and other components with biological risks, and remind relevant personnel of the risks of the instrument to avoid biological risks or other hazards during transportation or maintenance.
Operation precautions
In order to use the immunoassay analyzer correctly and effectively, please read the following notes carefully.
Instrument use
WARNING:
• The instrument is used in conjunction with fluorescent immunochromatography reagents labeled with fluorescent microspheres, and is used for in vitro quantitative detection of analytes in human samples.
• When making clinical judgments based on analytical results, please also consider clinical symptoms or other test results.
Instrument installation
WARNING:
• Please place the instrument firmly in a stable and safe place to prevent the instrument from falling.
• Please operate the instrument in an environment where the ambient temperature is within the range of 10°C~30°C, the humidity is within the range of ≤70%RH, and the atmospheric pressure is within the range of 86kPa~106kPa.
• Do not place anything on the power cord, and place the instrument in a place where the power cord will not be stepped on or tripped over.
• Do not place the device in a location where it is difficult to access the disconnect device.
Please keep the instrument away from the source of fire, otherwise the instrument may be deformed and there is a risk of fire.
Use environment
WARNING:
• Please install the instrument correctly according to the installation environment specified in the instruction manual. Installation and use of this instrument outside the specified conditions may give unreliable results and may result in damage to the instrument.
• At least 10cm of space should be left around the instrument to ensure air circulation and facilitate the heat dissipation of the instrument.
• Please keep the environment where the instrument is used clean and avoid dust, otherwise there will be a danger of destroying the instrument.
• Electromagnetic environment should be assessed before operating equipment.
• If you need to change the system status, please contact the company customer service center or the distributor in your area.
Protection against electromagnetic waves and noise
Be careful:
• Do not place equipment that emits abnormal noise near the instrument. Keep the instrument away from other electrical equipment, such as stereos; speakers in stereos may generate strong magnetic fields, and open magnetic fields may cause damage to data or displays.
• Do not use other medical equipment near this instrument. Electromagnetic waves emitted by this instrument may cause malfunctions of other medical instruments in its vicinity.
Electromagnetic Compatibility Related Precautions
Be careful:
• This instrument is designed and tested according to Group 1 Class A equipment in GB 4824. In a domestic environment, this equipment may cause radio interference, requiring precautions.
• Do not use this device near strong radiation sources (such as unshielded radio frequency sources), otherwise it may interfere with the normal operation of the device.
• Users are responsible for ensuring the electromagnetic compatibility environment of the equipment so that the equipment can work normally.
• It is recommended to evaluate the electromagnetic environment before using the equipment.
• This instrument complies with the immunity and emission requirements specified in this part of GB/T 18268.26.
Instrument use
Be careful:
• Please use the instrument according to the relevant instructions in the instruction manual. Improper use may result in inaccurate test results and may even cause instrument damage or personal injury.
• Please unplug the power cord on the instrument during thunderstorms, otherwise there is a danger of electric shock or fire.
• If your instrument falls, please unplug the power cord and seek help from the company's customer service center, otherwise there will be a risk of electric shock or fire.
• Please do not put lit cigarettes or candles on the instrument, otherwise there will be a risk of fire or damage to the instrument.
• Please do not block foreign objects in the fan exhaust port of the instrument, otherwise it will cause the risk of fire or damage to the instrument.
• Please do not scratch the display with sharp objects, otherwise the display may be damaged.
• This instrument is designed and tested according to the Class A equipment in GB 4824. In a domestic environment, this equipment may cause radio interference, requiring precautions.
• Non-professional medical laboratory personnel of medical institutions should not operate it.
Instrument maintenance
Be careful:
• Please maintain the instrument according to the relevant instructions in the instruction manual. Improper maintenance measures may result in incorrect analytical results and may even result in instrument damage or personal injury.
• If the instrument is placed for a long time, dust may accumulate on the surface. When cleaning, please use a clean soft cloth soaked in water and wring it out, gently wipe the surface, and dip a small amount of 75% ethanol if necessary. After cleaning, dry the surface with a dry cloth. Please use mild instrument-specific products to clean the instrument, and do not use the instrument until the instrument is completely dry, otherwise there will be a risk of electric shock or fire. If in doubt about the compatibility of disinfectants or cleaning agents with equipment parts or materials contained within the equipment, the manufacturer should be consulted.
• Before cleaning, please turn off all power of the instrument and unplug the power cord; during the cleaning process, please take necessary measures to prevent water droplets from entering the instrument, otherwise it may cause damage to the instrument or personal injury.
• If the instrument needs to be repaired due to failure, please contact the company's customer service center. When repairing or suspending use, please confirm that there is no reagent card left in the instrument; before the instrument is repaired, please carry out routine sterilization and disinfection.
• During the maintenance period, the instrument may need to be stopped or transported. Please operate with care to avoid the risk of biological infection, electric shock, and moving parts due to maintenance.
• After completing any inspection or repair, ask a technical service engineer to perform a safety test. Neglecting the safety test may result in electric shock or fire.
Sample
Be careful:
◦ Please use the correct sample storage measures. Improper sample storage practices may alter the composition of the sample and lead to incorrect analytical results.
◦ To prevent the sample from volatilizing, do not leave the sample open for a long time. If the sample volatilizes, it may lead to incorrect analytical results.
◦ Some samples may not be analyzed based on test parameters and reagents used. For these samples, please consult the relevant reagent manufacturer or distributor.
Other Notes
a. Please do not use loose or damaged power sockets, otherwise there will be danger of electric shock and fire.
b. Use the correct grounding. If the socket is not properly grounded, there is a danger of electric shock and damage to the instrument.
c. Do not touch the power socket when your hands are wet, otherwise there will be a risk of electric shock
d. Please use your instrument under the appropriate voltage/current standard. Working under the unsuitable voltage/current will result in the danger of electric shock, fire or damage to the instrument.
e. If you hear noise from the power cord and power interface, please unplug the power cord immediately and seek help from your company's customer service center, otherwise there will be a risk of fire or electric shock.
f. Please keep the power socket and power interface in close contact, loose contact may cause fire hazard.
g. Do not bend the power cord or place heavy objects on the power cord to avoid damage to the power cord by persons and animals. Damaged power cords may cause electric shock or fire.
h. Please keep the power cord and plug clean, otherwise there will be a risk of fire.
i. If foreign objects or liquids enter the instrument, please remove the power cord and any other cables from the instrument, and seek help from the company's customer service center, otherwise there will be danger of electric shock, fire and damage to the instrument.
j. Limit requirements for toxic and hazardous substances
k. This instrument complies with the limit requirements of toxic and hazardous substances stipulated in SJ/T11363-2006.
NOTE:
In all cases marked with a warning sign the instruction manual should be consulted to clarify the nature of the potential hazard and any countermeasures that must be taken.
Warranty and Maintenance Services
The warranty period of the purchased instrument is subject to the sales contract. Consumables: Refers to disposable consumable materials that need to be replaced after each use or fragile materials that need to be replaced regularly. Consumables have no warranty service.
The warranty period starts from the "purchase date" filled in the "Warranty Card" attached to the instrument. The "Warranty Card" is the only proof for calculating the warranty period. In order to protect your rights, please fill in the warranty card after the instrument is installed, and hand over the second copy ("B") of the warranty card to the installer or mail it back to the company's customer service center.
Please note that the following situations will not be covered under warranty:
• The customer fails to fill in and return the equipment warranty card within 30 days after the completion of the installation and acceptance;
• The factory number of the instrument provided by the customer is incorrect (our company confirms whether the warranty is guaranteed by the factory number of the instrument);
• The company is not responsible for the failure and damage of the instrument in the following circumstances, or for direct or indirect damage during use:
• Failure and damage caused by violation of the method of use, precautions and purpose of use described in this instruction manual;
• Failure and damage caused by the operation of inspection professionals, doctors or laboratory personnel not trained by the company or the agent designated by the company;
• Failure and damage caused by maintenance or modification by companies other than those designated by the company;
• Failure and damage caused by the use of instruments other than those designated by the company;
• Failure and damage caused by the inconsistent operating environment and the
operating environment (power conditions, installation environment, etc.) specified by the company;
• Failure and damage caused by irresistible natural disasters;
• Failure and damage caused by the company's unknowing movement or transfer (transportation) after the instrument is installed;
• Instrument failure caused by the use of reagents and other consumables not approved by the company does not belong to the scope of maintenance services provided by the company;
• Other faults not caused by the instrument itself.
During the warranty period, if the fault is caused by the design and manufacturing defects of our company, it will be repaired free of charge, and our company will take corresponding countermeasures according to the fault content.
After the expiration of the warranty period, the company can continue to provide fee based maintenance services.
After-sales service
Please contact our after-sales service department.
Repair
◦ Confirm failure and repair method: First, contact the company's after-sales service department to confirm the fault situation and confirm whether the repair method is on-site repair or return to the factory for repair.
◦ Repair fees: Negotiate with the company according to the specific situation.
◦ Freight: If the immunoassay analyzer is shipped to the company for repair, the user shall bear the freight (including customs fees).
Return
◦ Get permission to return goods. Contact after-sales service department of the company and inform product serial number (see the nameplate of immunoassay analyzer for details), explain the reason for return. If the product serial number cannot be clearly identified, the company will not return the goods.
◦ On the premise of obtaining the right to return goods, please go through the relevant procedures according to the requirements of the company.
1. Product Overview
1.1. Instrument introduction
(1) Instrument Name:Fluorescence Immunoassay Analyzer
(2) Model:BKP2000
(3) Specification: 1 unit/box
(4) Software Name:Fluorescence Immunoassay Analyzer Software
(5) Software release version: V1
(6) Software full version: V1.0.0
(7) Production date: See the nameplate
(8) Service life: The service life of the immune analyzer is 8 years from the date of installation of the instrument (NOTE: excluding man-made damage). The expected service life of the instrument is determined according to the high temperature and high humidity accelerated life test. The instrument should be maintained, serviced and repaired in accordance with the instructions. Instruments that have been confirmed to maintain their basic safety and effectiveness after maintenance, upkeep and repair can be used normally.
1.2. Main structural composition
Fluorescence Immunoassay Analyzer consists of host (including optical detection module (fluorescence), scanning module, data processing module, liquid crystal display module, incubation module, information acquisition module, printer, housing) and embedded software (software release version V1), power cord .
The main component of the optical detection module is an optical path box, which is mainly composed of a light source, an optical path platform, and a detection component.
The scanning module is mainly composed of a code scanner, a scanning head connecting plate, a scanning head mounting seat and its fixing parts.
The data processing module is mainly composed of the measurement circuit board and its fixing parts.
The LCD module is mainly composed of LCD screen and control board.
The incubation module includes structures such as a stepping motor, a pulley, a dial-card turntable, a disc, a spindle module, a clip-card module, and a turntable detection switch assembly.It can carry 12 reagent cards at one time.
The information collection module mainly refers to the ID card reader.
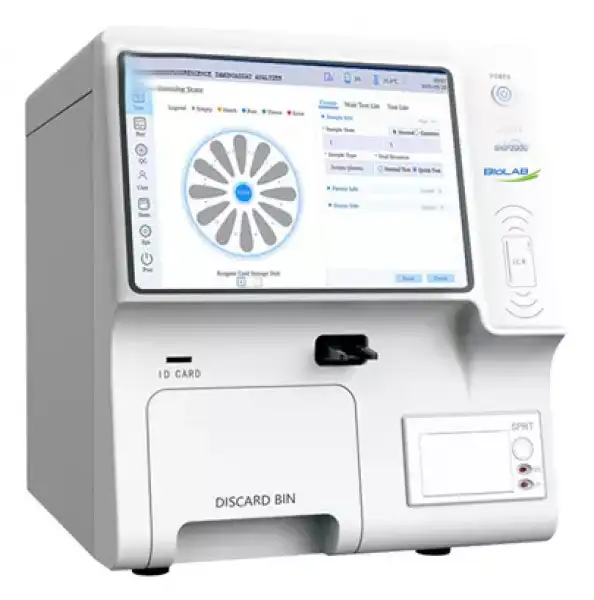
1) Appearance diagram

Figure 1

Figure 2
2) Internal structure layout

Figure 3
Note: The appearance of the instrument is subject to the actual product.
1.3. Scope of application
1.3.1. Intended Uses
Fluorescence Immunoassay Analyzer is used in conjunction with fluorescent immunochromatography reagents labeled with fluorescent microspheres for in vitro quantitative detection of analytes in human samples.
1.3.2. Applicable Items
Including pathogenic pathogen antigens/antibodies, proteins, carbohydrate, vitamins, kidney disease, myocardial disease, immune function and other items.
1.3.3. Intended use environment
It can be applied to central laboratories, outpatient/emergency laboratories, clinical departments and other medical service points (such as community medical points), physical examination centers, etc. in medical institutions, as well as scientific research laboratories. For laboratory medicine professionals to perform in vitro diagnostic experiments only.
1.4.Basic principle
1) Principles of Immune Response:
Competition method:
The detection area (T line) on the NC membrane of the detection card is coated with antigen, and the quality control area (C line) is coated with goat anti-mouse IgG.After the sample is added to the sample well, the liquid is chromatographed upward under the capillary effect.The analyte (antigen) in the sample competes with the antigen in the detection area (T line) on the NC membrane to bind the antibody labeled with fluorescent microspheres during the chromatography process, and then continues to be chromatographed upward,at the C line, a solid-phase goat anti-mouse IgG-fluorescent microsphere-labeled antibody complex is formedFluorescent microspheres emit visible light signals under excitation light. The more analytes in the sample, the less complexes accumulate on the T line. The signal intensity of the fluorescently labeled antibody on the T line is inversely proportional to the content of the analyte in the sample.
Sandwich method:
The detection area (T line) on the NC membrane of the detection card is coated with coating antibody, and the quality control area (C line) is coated with goat
anti-mouse IgG.After the sample is added to the sample well, the liquid is chromatographed upward under the capillary effect. During the chromatography process, the analyte in the sample is first combined with the labeled antibody labeled with fluorescent microspheres to form the analyte-fluorescent microsphere labeled labeled antibody complex, and then continue to be chromatographed upwards.Then the complex will be bound by the coated antibody coated on the T line, and a solid-phase coated antibody-antigen to be tested-fluorescent microsphere-labeled labeled antibody complex will be formed at the position of the T line.At the position of the C line, a solid-phase anti-mouse IgG-fluorescent microsphere-labeled labeled antibody complex was formed.The fluorescent microspheres emit fluorescent signals under excitation light.
The more analytes in the sample, the more complexes accumulate on the T line. The signal intensity of the fluorescently labeled antibody reflects the amount of the analytes captured.
2) Working principle:
Drop the sample containing the antigen (antibody) to be tested in the sample application area. If you use the fast mode, you need to wait for the antigen and antibody to react completely before putting it into the instrument, and the instrument will directly read the data;If you choose the normal mode, you need to directly put the reagent card that has just added the sample on the loading card position. When the instrument detects that a card is inserted, it will start the countdown. After the predetermined time is over, the instrument will read the data.The read procedure is as follows:The instrument automatically turns on the LED light source and scans the reaction area of the reagent card horizontally.The LED will gradually irradiate the detection area, and then irradiate to the quality control area, and the fluorescent immune complexes solidified on the reagent card will be excited under the specific wavelength of the LED.The excited light is collected by the silicon photocell and converted into an electrical signal. The strength of the electrical signal is strictly related to the number of fluorescent molecules.试 The fluorescence signal of the reagent card will be converted to the corresponding voltage signal, and the software calculates the signal value of the reagent card by the highest peak area method.Substitute this value into the calibration curve to calculate the concentration, and the reading process ends. Finally, discard the reagent card after the test is completed.
1.5 Software
Software interface: wizard-style interface, intuitive layout and program settings, easier to operate and edit.
Language support: English.
Data storage: The instrument can store experimental data files.
Data transmission: The experimental data can be printed out through the printer, or the experimental data can be exported to the U disk through USB.
1.6. Network Security
Software operating environment requirements:
Embedded software, its operating environment requirements are as follows: Android platform: PowerVR SGX544MPI, 8G (EMMC), android6.0 or above. Motherboard hardware configuration:
Control board main control chip: GDF205VCT6 Memory: AT24C64
Network type: none Security software: none
Data interface: LIS port, LAN port, USB port. LIS port and LAN port are used to connect LIS.
The USB port is used for keyboard and mouse access, data export and system upgrade.
The LIS port transmission protocol is the RS232 communication protocol. The LAN port transmission protocol is TCP/IP or UDP/IP protocol, and the USB interface protocol is USB protocol.
Data type: export data through USB data interface, the storage medium is U disk, and the exported test data is in .xls format.
Access Control: Deny any unauthorized external access. The software can log in to the software after the user enters the user name and password for verification.
It is divided into two levels: administrator and ordinary user. Ordinary user authority: can only access the test data of this user; administrator authority: can access the test data of all users.
1.7.Contraindications
No
2. The basic parameters and the conditions of use
2.1. The basic parameters
Host size and weight | 336mmx410mmx400mm(L*W*H);17KG; |
Sample type | Whole Blood, Serum, Plasma, Urine |
Detection speed | Single detection time <10s |
Detection method | Supports multiple items in one card |
Printer | Built-in thermal printer,57mm |
Display screen | 10.1-inch 24-bit true color LCD screen (screen can be customized) |
Interface Language | English |
Data storage | Unlimited |
Excitation light source | LED |
Working wavelength range | Excitation spectrum Center wavelengthλ0=365nm; Receive spectrum Center wavelengthλ1=615nm; |
Detection channel | 1 |
Reaction channel (Card Carrier) | 12 |
Power-on warm-up time | After powering on, set the required temperature, and the temperature can be tested when the temperature meets the requirements. |
Power consumption | 108VA |
Power Specifications | power supply:AC 100-240V, 50Hz/60Hz; |
Normal working conditions | Indoor use; The altitude is below 2000m; Ambient temperature: 10°C~30°C; Relative humidity: ≤70%; Atmospheric pressure: 86.0kPa~106.0kPa The power supply voltage fluctuation should not exceed ±10% of the nominal voltage; Transient overvoltage is category II of facility category (overvoltage category); The rated pollution degree is 2. |
Storage and transportation environment | The ambient temperature is -40°C ~ 55°C, and the relative humidity is not more than 70% |
Performance indicators | Repeatability: CV≤5%. Stability: σ≤±8%. Linear correlation: (r) ≥ 0.98. Accuracy: Δn≤±8%. |
Table 2
2.2. Function
(1) The analyzer should have ID card information reading function.
(2) The analyzer has a data display function: after testing with the analyzer, the test results can be inquired.
(3) The analyzer has touch operation function.
(4) The analyzer has the function of automatic printing. After the test is over, it can automatically print the test results.
(5) The analyzer has a self-checking function.
(6) The analyzer has a fault prompt: the analyzer has corresponding prompts for operation errors.
(7) The analyzer monitors the temperature of the reaction zone in real time. The set temperature range should be between 10°C and 40°C. The analyzer will prompt when the temperature is not within the set range. (applicable to BKP2000)
(8) The analyzer has the function of prompting when the discarded card bin is full. (applicable to BKP2000)
(9) The analyzer has a LIS data interface.
(10) The analyzer has user access control: it is divided into two levels: administrator and common user. Common user authority: can only access the test data of this user; administrator authority: can access the test data of all users.
2.3. Transport and storage conditions of the instrument
Transport
The instrument under the packaging condition is suitable for road, railway, air and water transportation. During loading, unloading and transportation, it should prevent severe vibration and shock, and should not be affected by moisture, and should not be mixed with
flammable and corrosive substances. Requirements according to the order contract.
Storage
When storing the instrument, it should be placed in the original packaging box, placed in a well-ventilated room, the packaging box should be padded, the ambient temperature should be -40°C ~ 55°C, and the relative humidity should not be greater than 70%.Harmful
gases, flammable, explosive substances and corrosive gases are not allowed.
3) Instrument installation
Please use this instrument under conditions that meet the environmental requirements of the instrument.
3.1. Package
If the package is damaged after receiving the instrument, or the instrument is obviously damaged, please contact the carrier immediately and file a claim according to the degree of damage. At the same time, please contact your supplier to confirm that the instrument is well packaged, and then follow the steps below to remove the packaging materials and install the instrument.
3.2. Unpack
Carefully remove the instrument and accessories from the box, saving the packing material for future shipping or storage.
(1) Count the random accessories item by item according to the packing list.
(2) Check the instrument and accessories for mechanical damage.
(3) When handling the instrument, it should be handled with care, and it is strictly forbidden to force the front case directly to avoid damage to the instrument.
(4) Place the instrument main body on a stable flat operating table.
If there are any problems please restore the packaging and contact your supplier immediately.
3.3. Packing List
No. | Name | Quantity | Unit | Remark |
1. | Host (including packing box, pearl cotton pad) | 1 | Set | Standard accessories |
2. | Instruction Manual | 1 | PCS | Standard accessories |
3. | Certificate | 1 | PCS | Standard accessories |
4. | Power cable | 1 | PCS | Standard accessories |
5. | Network Cable | 1 | PCS | Standard accessories |
6. | Fuse | 2 | PCS | Standard accessories |
7. | Clean cloth | 1 | PCS | Standard accessories |
8. | Barcode Gun | 1 | PCS | Standard accessories |
9. | Printer paper | 1 | PCS | Standard accessories |
10. | Customer Satisfaction Survery | 3 | PCS | Standard accessories |
Table 3
3.4.Installation requirements
3.4.1. Installation Environment
1) The instrument should be placed in a stable and level room with no serious dust, no direct sunlight and no corrosive gas, and the work surface can carry a weight of more than 20kg;
2) There is no strong vibration source and strong electromagnetic field around;
3) Do not place the instrument in a position where it is difficult to operate the disconnect device, where the distance between the back of the instrument and the wall is at least 10cm;
4) Nothing should be covered on the instrument to prevent the ventilation openings from being blocked;
5) Please try not to use parallel sockets to avoid fire caused by overload;
6) A 100-240V filter and an effectively grounded socket must be used;
7) The instrument should be tested in an environment of 10°C-30°C, and operate in strict accordance with the operation precautions in this manual.
3.4.2. Supply Voltage Requirements
Power supply: AC 100-240V, 50Hz/60Hz. Rated input power: 108VA. During use, be careful to avoid short circuit and risk of electric shock!
NOTE: Documentation must be consulted in all cases marked with a symbol
3.4.3. Accessories connection
Install the randomly configured related accessories on the corresponding interface of the instrument (such as: AC power cord, mouse, keyboard, etc.), according to needs, you can also directly touch the screen without using the mouse and keyboard.
3.4.4. Connect the power cable
Make sure that the power switch on the rear panel of the analyzer is in the off (O) state, insert the female end of the power cord plug into the power socket of the instrument, and insert the other end of the power cord into the power socket.
3.4.5. Thermal printing paper installation rules
Open the printer door, then place the thermal printer paper configured with the printer into the printer compartment and close the door.

Figure 4
Thermal Printer Diagram
1.Door button 2.Indicator light
Notes
Thermal printing paper size (width is 57±0.5mm, outer diameter is 30±0.5mm). The paper is installed with the thermally coated side facing up.
Before closing the door, please extend the printing paper 2-5cm outwards.
3.4.6.Start-up Procedure
Power on the instrument, then turn on the AC power switch and the PC power switch in sequence. After the instrument is turned on, enter the user name and password, enter the software experiment operation interface and enter the equipment self-check program(The position of the switch is shown in Figure 5 and Figure 6 below.

Figure 5
AC power switch location diagram

Figure 6
PC power switch location diagram
3.4.7. Shutdown Procedure
In the experimental operation and test interface of the instrument, click the "Pwr" button on the left, and then press the power button on the front to shut down, as shown in Figure 7 below

Figure 7
 Notes
Notes
a. During the normal testing process, it is strictly forbidden to turn off the instrument or force the power off.
b. When the instrument is normally shut down, it is strictly forbidden to force power off the instrument directly.
c. When the instrument does not work for a long time, the external power supply should be completely cut off.
3.4.8.LIS connection operation procedures
a. Connect the instrument to the PC through the network cable, and connect in the following way, as shown in Figure 8

Figure 9
b. Enter the "Test Set" page in the system settings page of the main system menu, and configure the "Enable Send Lis" option to configure whether to automatically upload Lis after the test is completed.

Figure 10
4. Operation interface instructions
Start the instrument, initialize the instrument and perform self-test. After the self-test is completed, the display interface is shown in Figure 10. Software system functions include [Test], [Rec], [Item], [Settings], [Pwr].

Figure 10
4.1. Item interface function description
Before testing, you need to read the Item card information. Insert the ID card, click to read the Item card, after the reading is successful, you can set the default Item card. And set the reference range etc. as needed.

Figure 11
4.2. Test interface function description
After entering the Item information, you need to enter the sample information before the sample test.
Select the sample type, enter the sample number, the number of samples, select the processing situation, and enter the sample information. Enter patient information and doctor information, click Generate, it will be displayed in the test list, insert the reagent card, start the test, and you can view the test progress in the test list. In the running status bar, it displays the status of the reagent card storage tray, incubation/progress/completed/discarded/abnormal.

Figure 12
4.2.1. Temperature control range setting operation procedure
Click the temperature display area in the upper right corner of the interface, and then set the desired temperature range in the dialog box.

Figure 13
4.2.2. Sample type setup procedure
Click the "Drop-Down" button in the red area in the figure below, and select the sample type according to the experimental requirements.

Figure 14
4.2.3. Patient information, doctor information setting operating procedures
You can fill in the relevant information of the patient and doctor according to the test needs.

Figure 15

Figure 16
4.2.4. Quick Test Operating Procedure
Select the number of the required quick test in the sample number to be tested, and then click the "Up" button.

Figure 17
4.3. Record interface function description
Click the [Rec] button, the interface is displayed as shown in Figure 18.
The historical test records of the completed tests are displayed on the record page. The test results can be filtered according to the sample type and time. Select the test results to view the details, delete, export, Lis, and print.

Figure 18
4.3.1. Test Record View Details
Select the object in the record interface and click the "Details" button in the interface to view the detailed information.

Figure 19
4.3.2.Manual printing procedure for test records
Select the print object in the record interface, and click the "Print" button in the interface.

Figure 19
4.4. User interface function description(Administrator permissions)
Display the user list, add or delete users.

Figure 20
4.5.System interface function description
4.5.1. About
Click the [About] button, the user can view the software version information
4.5.2. Test Set
Click the [Test Set] button, the interface is displayed as shown in Figure 21. Test Before: Entry Method, Entry Count Down, Task Test.
Testing: Pre-Read, Scan Barcode.
Test After: Print, Measure Pattern, Send Lis.

Figure 21
4.5.3. Lis/His
Click the [Lis/His] button, the interface is displayed as shown in Figure 22. Lis/His Set: Lis Connection, Code, Remote IP, Remote Port ,
Lis/His Test: Sample Number, Result, Test Time, Item Name.
![Click the [Lis/His] button, the interface is displayed as shown in Figure 22. Lis/His Set: Lis Connection, Code, Remote IP,](https://biolabscientific.com/content/manual/20200521001/Click-the-Lis-His-button-i36-Biolab.webp "Click the [Lis/His] button")
Figure 22
4.5.4. Print Set
Click the [Print Set] button, the interface is displayed as shown in Figure 23. Set up the printer, define the company name and prompt information.
![Click the [Lis/His] button, the interface is displayed as shown in Figure 22. Lis/His Set: Lis Connection, Code, Remote IP,](https://biolabscientific.com/content/manual/20200521001/Click-the-Lis-His-button-i37-Biolab.webp "Click the [Lis/His] button")
Figure 23
4.5.5. System Set
Click the [System Set] button, the interface is displayed as shown in Figure 24. Clock Set: Set the clock pattern and time.
IP Set: Set IP acquisition method, automatic acquisition/manual setting, input IP and mask.
System Set: Input Method Pattern (virtual/physical) ,Language Pattern (English).
![Click the [Lis/His] button, the interface is displayed as shown in Figure 22. Lis/His Set: Lis Connection, Code, Remote IP,](https://biolabscientific.com/content/manual/20200521001/Click-the-Lis-His-button-i38-Biolab.webp "Click the [Lis/His] button")
Figure 24
4.5.6. User
Click the [User] button, the interface is displayed as shown in Figure 25.
Display the current user, view the account number and user name. Change the password and log out.