
Get Price
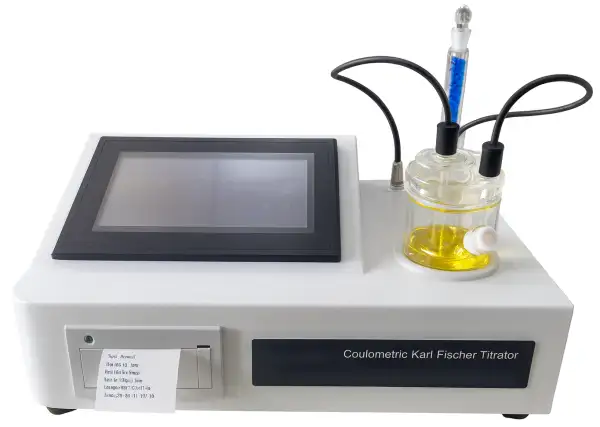
Columetric Karl Fischer Titrator BPTL-306
Meters of Petroleum Equipment measure the consistency of lubricating greases (Penetrometer) or determining their heat value which do not contain water, coal, paraffin and other combustible substance (Oxygen Bomb Calorimeter) or can trace low levels of free, emulsified and dissolved (Coulometric Karl Fischer Titrator)
- The instrument is used to determine water content in the liquid petroleum products. The instrument adopts microcomputer control technology, with the characteristics of fast analysis speed, high precision, LCD display, automatic printing, menu selection and other functions. It is a fully functional, easy to operate, automatic measuring and analyzing instrument. It can be used for micro analysis of low content samples with high sensitivity. The 0.5ul injector is equipped, and the calibration of the instrument is fast and accurate. The unique alternating balance isolation detection technology makes the balance detection more rapid, accurate and stable.
- Up to 3-Year Product Warranty
- US & EU Compliance Standards
- Door-to-Door Shipping
Technical Specifications
Detailed operating and construction parameters for this model.
| Model | BPTL-306 |
| Titration method | Microprocessor controlled titration |
| Electrolytic current output | 0-400 mA automatic control |
| Display system | LCD color 7-inch large screen display |
| Man-machine dialogue mode | Touch screen input |
| Sensitive valve | 0.1 μg H2O |
| Accuracy | 10 μg - 1 mg H2O: ±3 μg; Above 1 mg H2O: ±0.3% (excluding injection error) |
| Power consumption | Less than 100 W |
| Use environment | Temperature 5°C - 40°C, humidity < 85% |
| Power supply | AC220V ±10%, 50Hz ±2.5Hz |
Product Features
Key design, performance, usability, and safety advantages.
Applications Explore common laboratory, research, industrial, and process applications.
Petroleum Industry, Petrochemical Industry, Oil Industry
Operating Manual View instructions, operating procedures, safety information, and maintenance guidance.
1. Purpose and Scope
2. Main Technical Parameters
3. Main Characteristics
4. Structure of the Instrument
5. Working Principle
6. Operation Methods
7. Attentions
8. Full Set and Technical Documents
1. Purpose and Scope
Automatic trace moisture meter is the use of Karl - Fischer Coulomb titration method, the determination of liquid, gas, solid trace water in the instrument. The instrument is suitable for petroleum, chemical production process and the determination of water in the product; Determination of moisture in insulating oil of oil-filled electrical equipment; Determination of moisture in medicine, pesticides, mineral raw materials, etc. It is the ideal instrument for updating the micro moisture meter.
2. Main Technical Parameters
1. Titration method: microprocessor controlled titration.
2. Electrolytic current output: 0-400MA automatic control.
3. Display system: LCD color 7 inch large screen display.
4. Man-machine dialogue mode: touch screen input.
5. Sensitive valve: 0.1ugH2O.
6. Accuracy: 10ug - 1mgH2O is ±3ug,1mgH2O above, 0.3% (excluding injection error).
7. Power consumption: less than 100W.
8. The use of the environment: temperature 5°C - 40°C, humidity less than 85%.
9. Power supply: AC220V±10% 50Hz±2.5Hz.
3. Main Characteristics
The instrument adopts LCD large screen color display, touch screen input mode, simple interface, operation content Chinese characters prompt, man-machine dialogue flexible, convenient, in addition to the detection sensitive valve high, simple operation, fast test speed, good repeatability and other characteristics, but also has the experimental results storage, printing function, time display function.
4. Structure of the Instrument
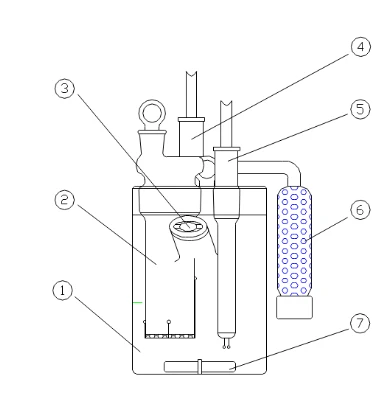
Figure 1 (Electrolytic cell)
1. Anode chamber
2. Cathode chamber
3. Injection cock
4. Electrolytic electrode
5. Measuring electrode
6. Drying tube
7. Stirring
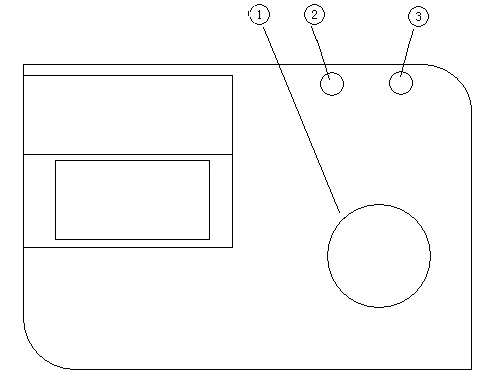
Figure 2 (The host)
1. Electrolytic tank seat
2. Electrolytic electrode socket
3. Measuring electrode socket
5. Working Principle
The automatic micromoisture meter is an automatic Coulomb titrator with double platinum as indicator electrode according to Faraday's law. The principle of the instrument for water determination is: when the aqueous sample enters the electrolyte containing constant iodine, he will consume iodine in the electrolyte. The change of iodine content is measured by the measuring electrode and iodine is released on the anode of the electrolytic electrode to supplement the iodine consumed by water. Because the number of grams of iodine in the whole reaction process is equal to the number of grams of water, the automatic processing of the instrument can directly show the real water content in the sample tested on the screen.
6. Operation Methods
1. Turn on the power switch, and the instrument automatically enters the instrument name display interface. Click the screen entry button to enter the function selection page, which is as follows :
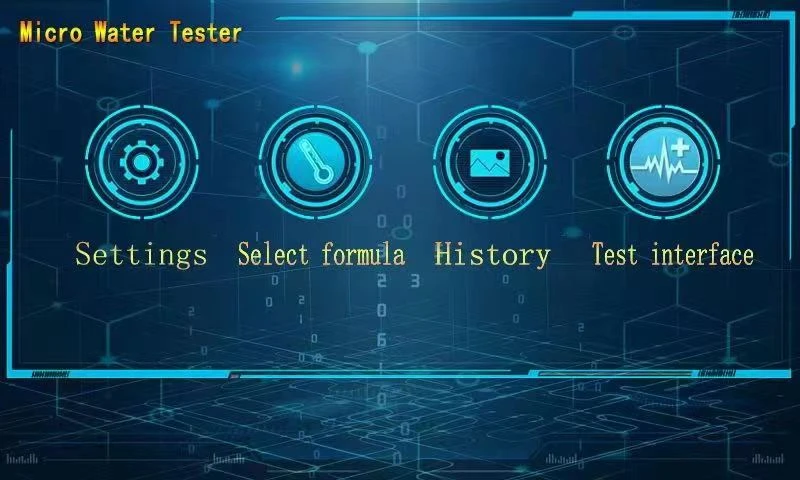
Figure 3
2. There are four options in the function selection page, which are "Parameter Setting", "Formula selection", "history record" and "Experiment interface". Click which function to enter the corresponding function page.
3. Setting of various parameters.
In the Setting function option, various general parameters can be set, as shown in the figure below :
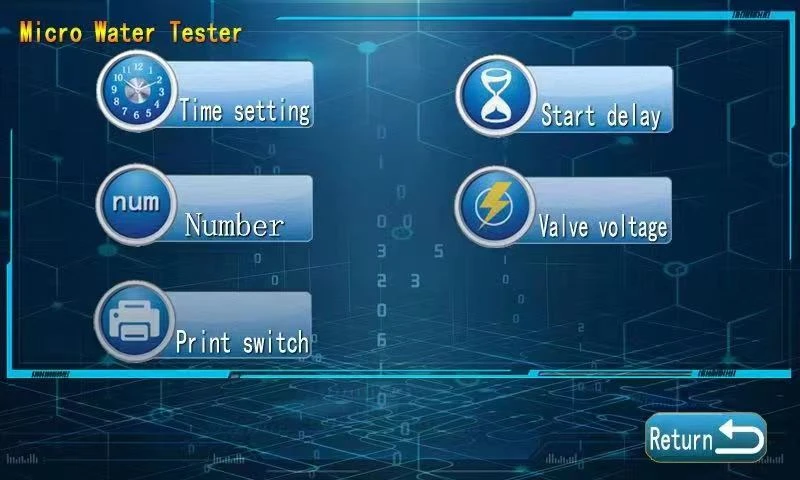
Figure 4
(1) Time setting :
Enter the time setting page from the function selection page, select the column to be modified and turn yellow, then click the number key at the bottom of the screen to input the required value, after setting, press the "back" key to exit this page to the function selection page.
(2) Serial number setting :

Figure 5
The valid range is 1-100. Directly click the number key to set the serial number, display it on the screen and save it. After setting, press the back key to exit this page.
(3) Whether to print:
According to the screen prompt, set as required. Pressing the switch button to make it blue is selected, automatic printing is allowed, and gray is forbidden. This function can also be set quickly on the test interface, and can be switched by pressing the corresponding position on the test interface.
The start delay time page and stop valve voltage page are debugging pages. Generally, users do not need to enter the setting, so as to avoid confusion.
4. Formula selection :
According to the need, select the corresponding test formula, this function can also be quickly switched and input in the test interface, press the corresponding position of the test interface to switch and input data.
F0 is based on the UG number of measured moisture
F1 mass PPM method. Show the UG number and PPM value of the measured moisture
F2 volume PPM method. Show the UG number and PPM value of the measured moisture
5. Measurement of moisture :
(1) After setting, enter the test page according to steps 1 and 2.
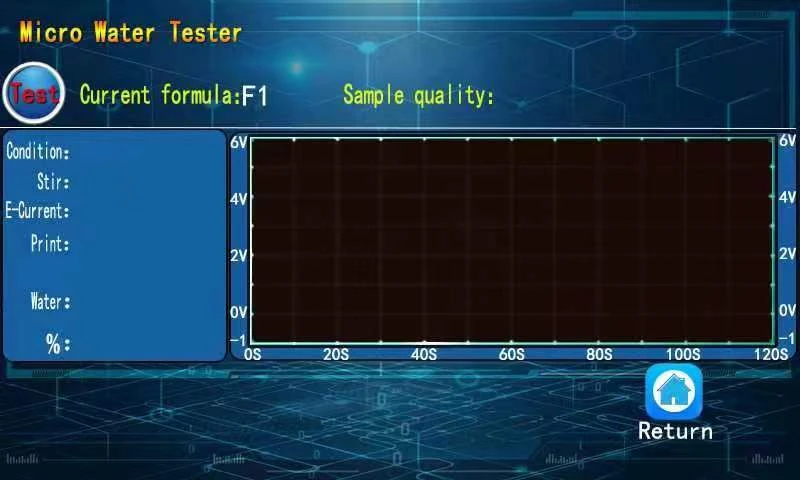
Figure 6
(2) In the test interface, you can quickly set the printing, formula, stirring gear, volume, density, quality. In the test interface, press the corresponding position to set.
(3) after setting the parameters, or according to the previous parameters do not need to be set, click "stirring" (stirring speed should be on the liquid surface just generated whirlpool is appropriate), "electrolytic" key, make it yellow, then the instrument blender work, start electrolytic automatic balance electrolyte, make the instrument automatic balance. After the instrument is balanced, "Balanced" is displayed in the status bar of the screen.
(4) After the instrument is balanced, prepare the sample to be tested. If the formula is F1 or F2, input the mass, volume and density data of the prepared sample. Press the test key to make it yellow, and inject the sample into the electrolytic cell, then the instrument will automatically test the moisture in the sample. After the experiment, the buzzer will sound a hint.
6. History page
This page can realize the query of experimental records, print, and up the 232 serial port of the machine to send data functions. Just press the corresponding key to achieve the required function. Delete key deletes the selected single record. The clear key is to clear all historical data. The print key prints the data that is currently in the selected state.
7. Change reagents
No automatic filling and draining equipment.
7. Attentions
1. Installation place of the instrument
(1) The instrument shall not be installed in the room with corrosive gas, the corrosive gas can make the circuit of the instrument part corrosion, shorten the life of the instrument.
(2) The instrument shall not be installed in the room temperature lower than 5°C or higher than 40°C.
(3) The instrument shall not be installed in the place of direct sunlight.
(4) The instrument shall not be installed near frequent electrical equipment.
(5) The instrument shall not be installed in a place with high humidity or near the discharge pipe of tap water.
(6) The instrument shall not be installed in places beyond the prescribed power supply fluctuation.
(7) After each automatic addition and discharge of electrolyte or oil, the pipeline should be cleaned with alcohol in time (the alcohol is placed in the electrolyte, anode and cathode tube for addition and discharge operation).
2. Electrolyte matters needing attention
(1) In the normal process of determination, every 100ml electrolyte can be reacted with no less than 1g of water, if the determination time is too long, the sensitivity of the electrolyte decreases, the electrolyte should be replaced.
(2) The electrolyte in the cathode chamber, if it is found in the determination process to release a strong bubble or the electrolyte is contaminated into a reddish brown, the reproducibility of the measurement at this time will be reduced, will make the time to reach the end point longer, then the electrolyte should be replaced as soon as possible.
(3) Titration time more than half an hour, the instrument is not stable, stop stirring at this time, observe whether there is obvious brown iodine production on the anode of the lower part of the ceramic filter plate, if there is no or little iodine production, the electrolyte should be replaced.
(4) The newly replaced reagent is dark brown, and when entering the sample for measurement, the instrument shows that it is too iodine. At this time can not be measured, need to add an appropriate amount of pure water to adjust the reagent balance point. 10 microliters of pure water can be injected with a 50 microliter injector. When the reagent color obviously becomes light, attention should be paid to control the injection amount until it enters the water state.
(5) Reagents from different manufacturers have different sensitivities. In order to make the measurement results more authentic and effective, it is suggested that 5 microliters of pure water be injected into the new reagent just after it enters the water state. After the instrument finds the equilibrium point, instrument calibration and sample measurement can be carried out.
(6) The instrument use interval time is long, in the next use, can be more gently shake the electrolytic cell bottle, so that the reagent is faster to absorb the water bottle wall, the instrument into the equilibrium point will be faster.
(7) Reagents should be stored at low temperature and low humidity, with the optimal temperature of 5-20 °C and relative humidity no more than 75%.
3. Precautions for determination
(1) When measuring, the instrument should show "the instrument has been balanced", then click "start", and inject the sample.
(2) When the sample is injected into the electrolytic cell, the needle tip of the liquid sampler should be inserted into the reagent, and the sample should not be contacted with the inner wall and electrode of the titration cell.
4. Replacement of silicone pad
The silica gel pad at the injection port of the sample, when used for a long time, the pinhole shrinkage variation through the silica gel pad makes the moisture in the atmosphere easy to enter the electrolytic cell and produce errors, then the silica gel pad should be replaced.
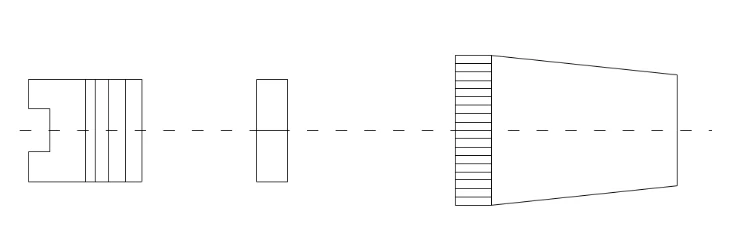
Figure 7
5. Replacement of color-changing silica gel
When the silica gel in the drying tube is changed from blue to light blue or pink, the new silica gel should be replaced (when replacing, attention should be paid to not loading the silica gel powder into the drying tube).
6. Maintenance of electrolytic tank grinding mouth
About a week to twist the mouth ground connection of the electrolytic cell, in can't easily turns, should be coated with a thin layer of vacuum grease again (note: vacuum fat not too much, or make it into the measuring error caused by titration pool), if not checked, vacuum grease will harden and grinding mouth joint parts may not come down. Therefore, it is necessary to maintain them regularly so that they are easy to disassemble and clean.
7.Electrolytic tank grinding mouth bonding treatment
If the electrolytic cell grinding mouth joint is firmly bonded together, it is not easy to disassemble, please press the procedure to disassemble:
(1) Drain the electrolyte in the electrolytic cell, and wash clean.
(2) Inject a small amount of acetone around the junction of the grinding mouth, and then gently rotate the parts at the grinding mouth to disassemble.
(3) If still cannot remove, please place electrolytic cell in a 2 liter beaker, slowly add the concentration of 5% potassium chloride solution covered, the liquid level position as shown in figure a, must be very attention, don't let the noise of measuring electrode, cathode electrode wire end into the liquid, covered about ten hours or after 24 hours, can remove (this method can be repeated).
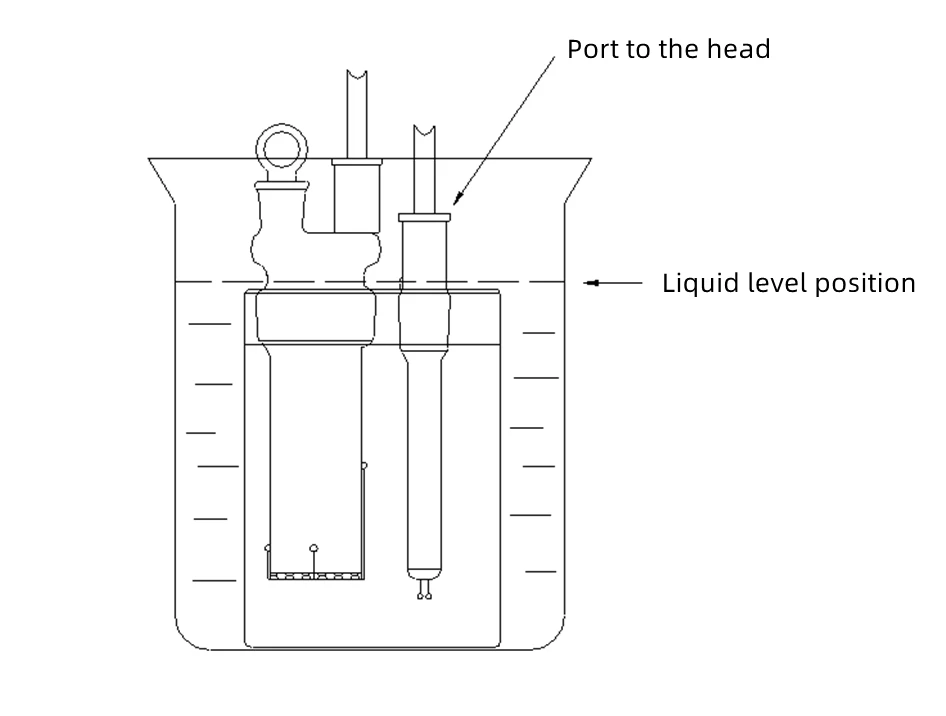
Figure 8
8. Measurement electrode maintenance
(1) When the magnetic stirrer rotates rapidly, it should be noted that the stirrer may jump and damage the electrode.
(2) When the measuring electrode is put in or taken out, it should stop stirring, and pay attention not to make it hit the whole wall of the electrolytic cell.
(3) When the measuring electrode is bent without short circuit, it can be used or repaired. To repair, hold the root of the platinum electrode with tweezers and slowly trim the tip of the electrode.
(4) when the measurement electrode is contaminated, acetone can be used to wipe it, if the platinum wire pollution still can not be removed, the platinum wire ball end can be burned by alcohol lamp (please note that the flame slowly close to the platinum wire ball end, to avoid rapid heating, and caused by the electrode glass part of the explosion).
9. Maintenance of the cathode room
(1) When the cathode chamber is to be removed, because the platinum wire and platinum mesh extend from the cross section of the cathode chamber grinding mouth connection, attention should be paid not to touch the top of the electrolytic cell and the hole wall.
(2) Cleaning of the cathode room
The following conditions may occur when the cathode chamber is contaminated:
1. Reduce the electrolytic efficiency, prolong the determination time.
2. The ceramic filter plate is easy to absorb water, so that the blank current increases, and can not reach the end point for a long time.
In the case of the above, acetone can be used to clean the dirt on the glass and platinum net (be careful not to touch the platinum wire and platinum net), put the acetone into the cathode chamber, seal the socket of the dry tube with a rubber plug or something similar, and shake fully to remove the dirt inside. When it is not clean, the cathode chamber can be invaded into a beaker containing dilute sulfuric acid to bubble. Be careful not to clean or bubble into the electrode lead.
(3) The cathode chamber is dry
Because the ceramic filter plates in the cathode chamber are difficult to dry, the cathode chamber can be dried in an oven at approximately 60 ° C for 4 hours and then allowed to cool naturally.
10.electrode plug, socket maintenance
Due to frequent activities of the plug and socket of the measuring electrode and cathode chamber electrode, the outer side of the plug and socket will gradually become loose. Due to long-term use, dirt will be adhered to the plug and socket and the jack of the socket, so that the contact is poor, so it is necessary to clean and trim.
(1) Loose plug
When the connection between the plug and the socket is loose, the outer metal piece of the plug can be pressed evenly to the inside with pliers.
(2) Clean plugs and sockets
Wipe the dirt on the metal parts with ethanol or acetone to make good contact.
8. Full Set and Technical Documents
No | Name | Unit | Qty | |
1 | Electrolytic cell | Main Unit | Set | 1 |
2 | Electrolytic cell bottle | Piece | 1 | |
3 | Measuring electrode | Piece | 1 | |
4 | Electrolytic electrode | Piece | 1 | |
5 | Injection plug | Piece | 1 | |
6 | Drying tube | Piece | 2 | |
7 | Electrolytic cell grinding plug | Piece | 1 | |
8 | Injector 0.5μl | Piece | 1 | |
9 | Injector 50μl | Piece | 1 | |
10 | Injector 1ml | Piece | 2 | |
11 | Needle (9#) | Piece | 2 | |
12 | Silicone pad | Piece | 10 | |
13 | Discolored silica gel | Box | 1 | |
14 | Vacuum grease | Piece | 1 | |
15 | Stirrer | Piece | 1 | |
16 | Electrolyte (500ml) | Bottle | 1 | |
17 | Printing paper | Roll | 2 | |
18 | Fuse | Piece | 2 | |
19 | power cord | Piece | 1 | |
Table 1
Technical documents
(1) Operation Manual 1 piece
(2) Quality Certificate 1 piece
(3) Repair Guarantee 1 piece