
Get Price
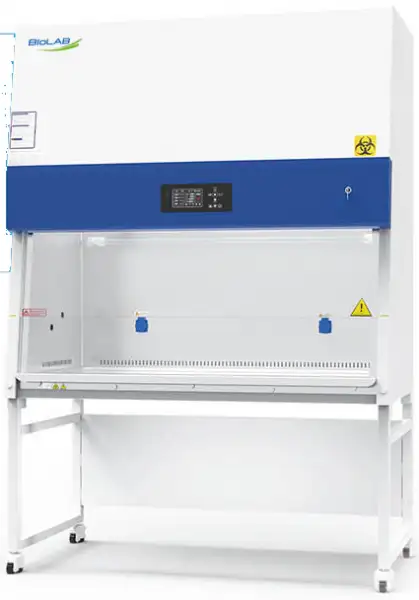
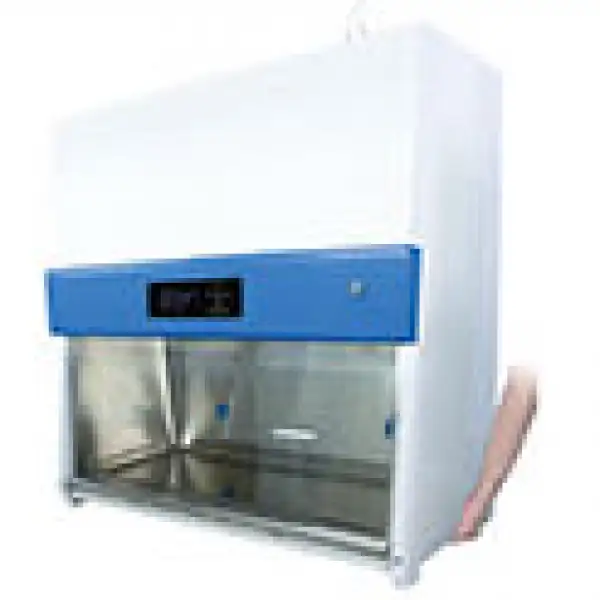
Class II Biosafety Cabinet BCBS-1205
- 1. Color key display: large screen, more clear and dynamic display of various values of the safety cabinet, and has the function of appointment timing.
- 2. Automatically adjust the wind speed.
- 3. With power-off memory function, the state before power-off will be restored after power-on, and there will be visual prompts and alarms.
- 4. The integrated design of the operation area makes it easy to disassemble and clean.
- 5. The cabinet is separated from the base. The height of the adjustable base can be customized.
- 6. Interlocking function: UV lamp and front window; UV lamp and fan, lamp; fan and front window.
- 7. It has the function of appointment timing, which can automatically set the time of starting and shutting down the safety cabinet and the running time of ultraviolet lamps, fans and sockets.
- 8. The front window closes the double trigger signal, so that the sterilization and disinfection function of the ultraviolet lamp is normally turned on.
- Up to 3-Year Product Warranty
- US & EU Compliance Standards
- Door-to-Door Shipping
Technical Specifications
Detailed operating and construction parameters for this model.
| Model | BCBS-1205 |
| External Size(W*D*H) | 700*650*1920mm(700*650*1280mm without base stand) |
| Internal Size(W*D*H) | 600*500*540mm |
| Tested Opening | Safety height 200mm |
| Max Opening | 380mm |
| Inflow Velocity | 0.53±0.025m/s |
| Down Flow Velocity | 0.33±0.025m/s |
| ULPA Filter | Two, 99.9995% efficiency at 0.12μm, filter life indicator |
| Front Window | Motorized. Single layered toughened glass 5mm. Anti UV. |
| Noise | ≤65dB |
| UV Lamp | 15W*1UV timer, UV life indicator, emission of 253.7 nanometers for most efficient decontamination |
| LED Lamp | 8W*2 |
| Illumination | ≥1000Lux |
| Consumption | ≤500W |
| Socket | Two, total load of two sockets: 500W |
| Display | LCD display: exhaust filter and downflow filter pressure, filter and UV lamp working time, inflow and downflow velocity, filter life, humidity and temperature, system working time, etc |
| Control System | 70% air recirculation, 30% air exhaust |
| Visual and Audio Alarm | Filter replacement, window over height, abnormal air flow velocity, high filter pressure alarm, abnormal power failure |
| Material | Work Zone: 304 stainless steelMain Body: Cold-rolled steel with anti-bacteria power coating |
| Work Surface Height | 750mm with base stand |
| Power Supply | AC220V, 50/60Hz; 110V, 60Hz |
| Standard Accessory | Cabinet*1, LED lamp*2, UV lamp*2, Remote control, Drain valve*1, Waterproof socket*2, Foot swith |
| Optional Accessory | Water and gas tap, Electric height adjustable base stand, Armrest, Base stand*1 |
| Package Size(W*D*H) | 880*787*1500mm (760*787*1500mm without base stand) |
| Gross Weight | 165kg (145kg without base stand) |
Product Features
Key design, performance, usability, and safety advantages.
1. Color key display: large screen, more clear and dynamic display of various values of the safety cabinet, and has the function of appointment timing.
2. Automatically adjust the wind speed.
3. With power-off memory function, the state before power-off will be restored after power-on, and there will be visual prompts and alarms.
4. The integrated design of the operation area makes it easy to disassemble and clean.
5. The cabinet is separated from the base. The height of the adjustable base can be customized.
6. Interlocking function: UV lamp and front window; UV lamp and fan, lamp; fan and front window.
7. It has the function of appointment timing, which can automatically set the time of starting and shutting down the safety cabinet and the running time of ultraviolet lamps, fans and sockets.
8. The front window closes the double trigger signal, so that the sterilization and disinfection function of the ultraviolet lamp is normally turned on.
9. The negative pressure air duct is equipped with a foreign matter filtering structure to prevent foreign matter such as paper scraps from entering the fan system and affecting the normal operation of the product.
10. The front window glass has a one-key lift function
11. The one-piece hand resting surface has a larger contact area with the arm and is more comfortable.
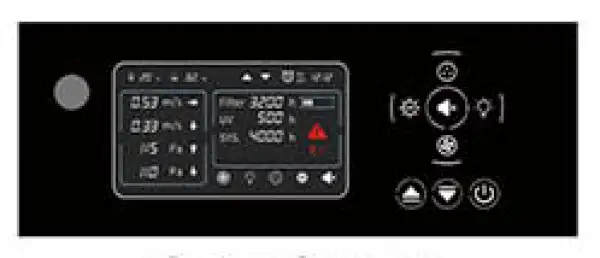
Color Screen, Real-time and clearer display of various values and appointment timing function
Work zone, made of 304 stainless steel, is surrounded by negative pressure.
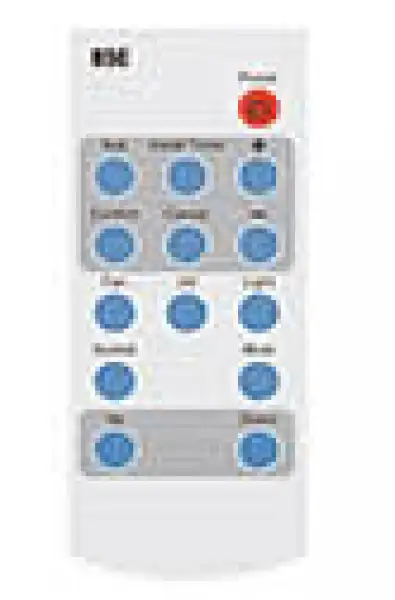
Remote Control, All functions can be realized with it, making the operation much easier and more convenient.
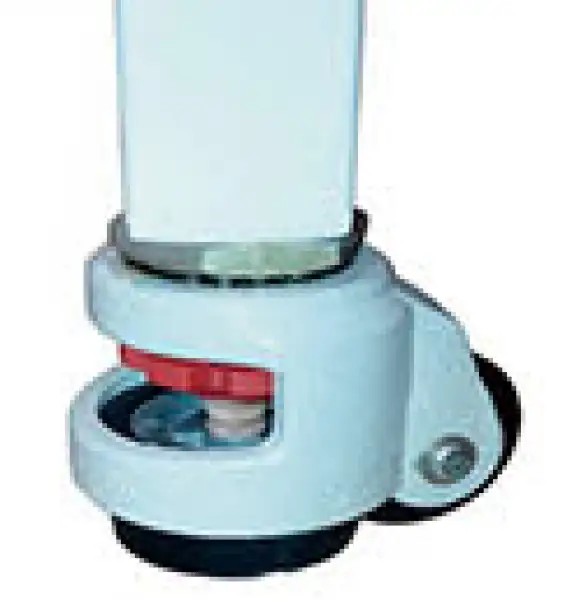
Footmaster Caster, Universal caster with brake and leveling feet.
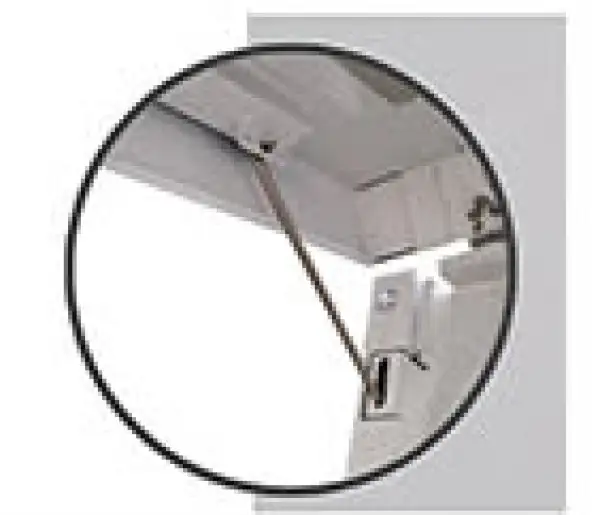
Iron hook support rod for panel support
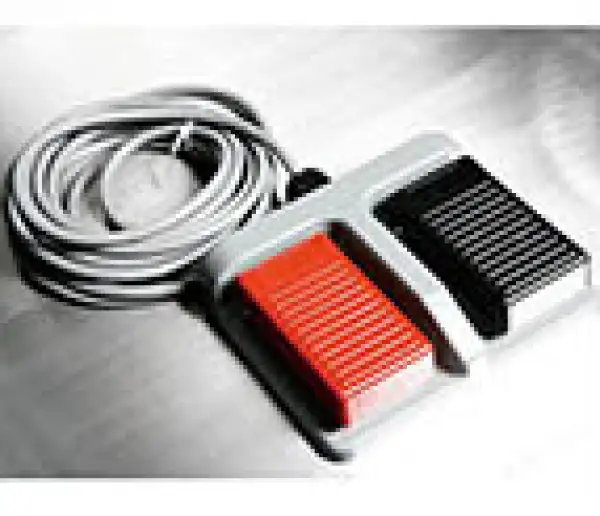
Foot Switch, Adjust front window height by foot during experiment, to avoid airflow turbulence caused by arm movement.
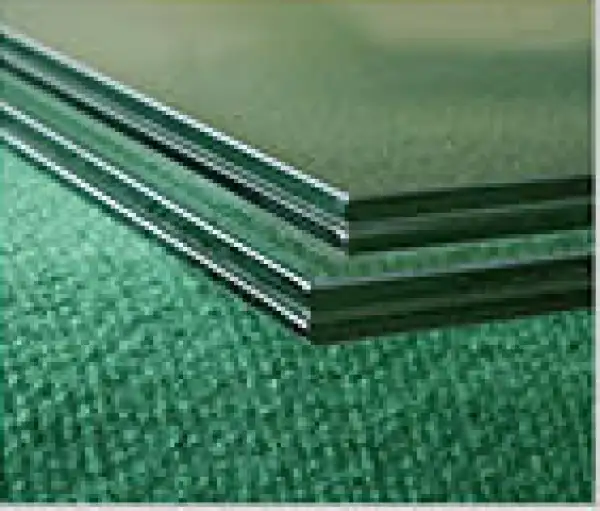
Front Window, motorized two-layer laminated toughened glass >6mm, Anti UV.
Cabinet Support Block, Easy to lift, prevent hand pressing
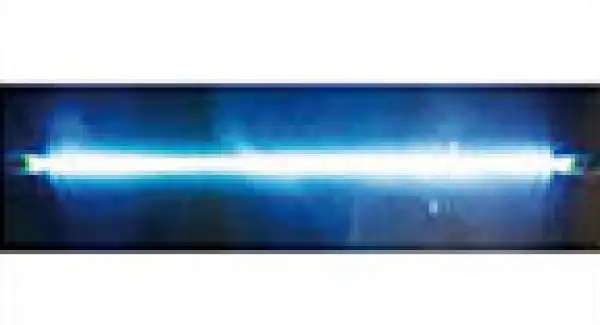
UV Lamp, Emission of 253.7 nanometers for rod for panel support most efficient decontamination.
Operating Manual View instructions, operating procedures, safety information, and maintenance guidance.
1. Precautions
2. Warranty
3. Unpacking, Installation, Debugging
3.1 Unpacking
3.2 Accessories Checking
3.3 Installation Conditions & Working Environment
3.4 Installation
3.5 Checking after Installation
4. User Instructions
4.1 Functions
4.2 Product Structure
4.3 Control Panel
4.4 Remote Control
4.5 Instructions for Operation
4.6. Daily Maintenance
1. Precautions
 Under all conditions marked with , it is necessary to consult the document, so as to clarity the nature of potential risks and any countermeasures that must be taken.
 Actions or operations which are prohibited.
 Actions or operations which must be followed.
Make sure input voltage is correct and stable. The rated load of main power socket should be higher than cabinet consumption. Plug must be well grounded.
In order to avoid air turbulence, the operator should slightly move his arms during experiment. Hands should stay inside the working area at least 1 minute before operating. In order to decrease the times of arms moving into and out of the working area, prepare all the necessary items inside the cabinet before starting experiment.
Moving principles of different samples inside cabinet: When two or more samples need to be moved, be sure that low-polluting samples move to high-polluting samples. Movement of items should also follow the principles of slow-moving.
Samples placed in parallel: Samples should be placed in the cabinet parallel to avoid cross-contamination between samples and blocking back air grille.
In order to avoid samples being sucked into the negative passage or the blower, do not place soft and slight samples (for example: soft tissue) on the surface during experiment;
The weight of items placed in the cabinet should be no more than 23kg/(25x25cm2);
Avoid vibration: avoid using vibration equipment (e.g. centrifuges, vortex oscillator, etc.) inside the cabinet. Vibration would cause lower cleanliness of operating area and affect operator protection.
No flame: No flame is allowed inside the cabinet. Using of fire will lead to airflow disorder, and filter damage. If sterilization is required during the experiment, infrared sterilizer is highly recommended.
The UV lamp can only be turned on when the front window is closed and the fluorescent lamp is off.When UV lamp working avoid looking straight.
ULPA filter life: With the usage time increasing, dust and bacteria accumulate inside ULPA filter. Filter Resistance is getting bigger, when it reaches the maximum point, there will be audible and visual alarm. Please replace new ULPA filter, otherwise it will affect the safety performance of the equipment. The used filter should be processed as medical waste.
There is a negative passage surrounding the work area, which is sealed strictly in the factory. The operator is not allowed to remove or loose screws of those parts. If necessary, please contact service personal.
Front Grille is used for air intake and drain. Do not block it, otherwise it will affect airflow. Armrest is recommended to solve this problem and reducing the operator's wrist fatigue.
Long-term use of Microbiological Safety Cabinets will inevitably cause pollution (e.g. ULPA filters, corner cabinets, etc.). In order to sterilize thoroughly every 500 hours, formalin (formaldehyde) fumigation sterilizer is recommended. After sterilization, neutralize formaldehyde gas with ammonium hydrogen carbonate. Make sure no sterilization gas escapes during the whole process.
The maximum storage period is one year. If the period is more than one year, performance test should be done.
The transportation process should take appropriate protective measures according to diagram on the surface of package. Purchaser in receiving should carefully check the integrity of the box. if there is damage and crush, please refuse to accept. And timely contact with our company.
When Microbiological Safety Cabinet installed and used move again, please timely contact with our company.
The ground bearing requirements: ground bearing capacity ≥350KPa.
Gross weight: 165kg.
Allowable pressure of water socket: ≤0.8MPa. (Optional)
For experiments that produce waste liquid, please timely drain wastewater in the sump through drain valve. If the liquid waste is harmful to human's body, according to the grade of pollution should add the corresponding grade container, or connect to the corresponding grade drainpipes, and drain waste into the experimental equipment to immediately dispose.
Person can operate Microbiological Safety Cabinet only if he is qualified after training, during using Microbiological Safety Cabinet if it is a harmful experiment, operator must wear appropriate protective gloves, masks and lab coats, etc., and avoid touching mouth, eyes and face.
There is risk to move the parts moving. Relevant personnel can use this equipment must after training. while the front window must be raised to 200mm and in this case person can operate in the cabinet. In this way we can reduce harm out of front window trouble.
When the equipment is repaired or scrapped. The internal parts can't be thrown about because of biological hazards. please deal with them according to local regulations.
Serious declaration: we will take no responsibility for risks caused by improper operation and man-made damages!
2. Warranty
1) Warranty is 12 months from EX-factory date (excluding consumable accessories and Fluorescent lamp, fuse).
2) We will take no responsibility for risks caused by improper operation and man-made damages.
3) After the expiration of warranty, our company is also responsible for repairs, but the corresponding maintenance cost should be charged.
4) Lifetime of Microbiological Safety Cabinet is 8 years from production date on the label.
5) We can provide equipment drawings and necessary technical data for maintenance companies or personnel trained by our company.
Warranty declaration: One-year Warranty, Life-long Maintenance.
3. Unpacking, Installation, Debugging
Please firstly check if packing box is in good condition. If the packing box is damaged, please take photos.
3.1 Unpacking
Choose the proper unpacking method according to the actual situation.
1) Method 1: Use M8 Wrench to unpack
2) Method 2: Electric drill with hexagon dead M8
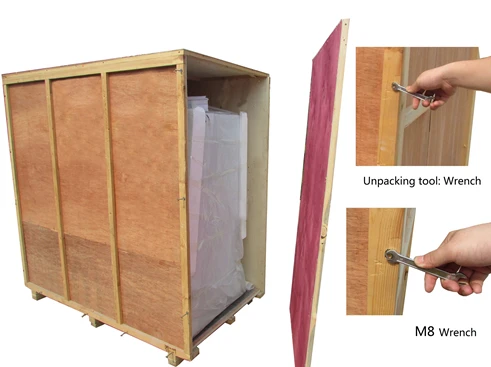
Figure 1
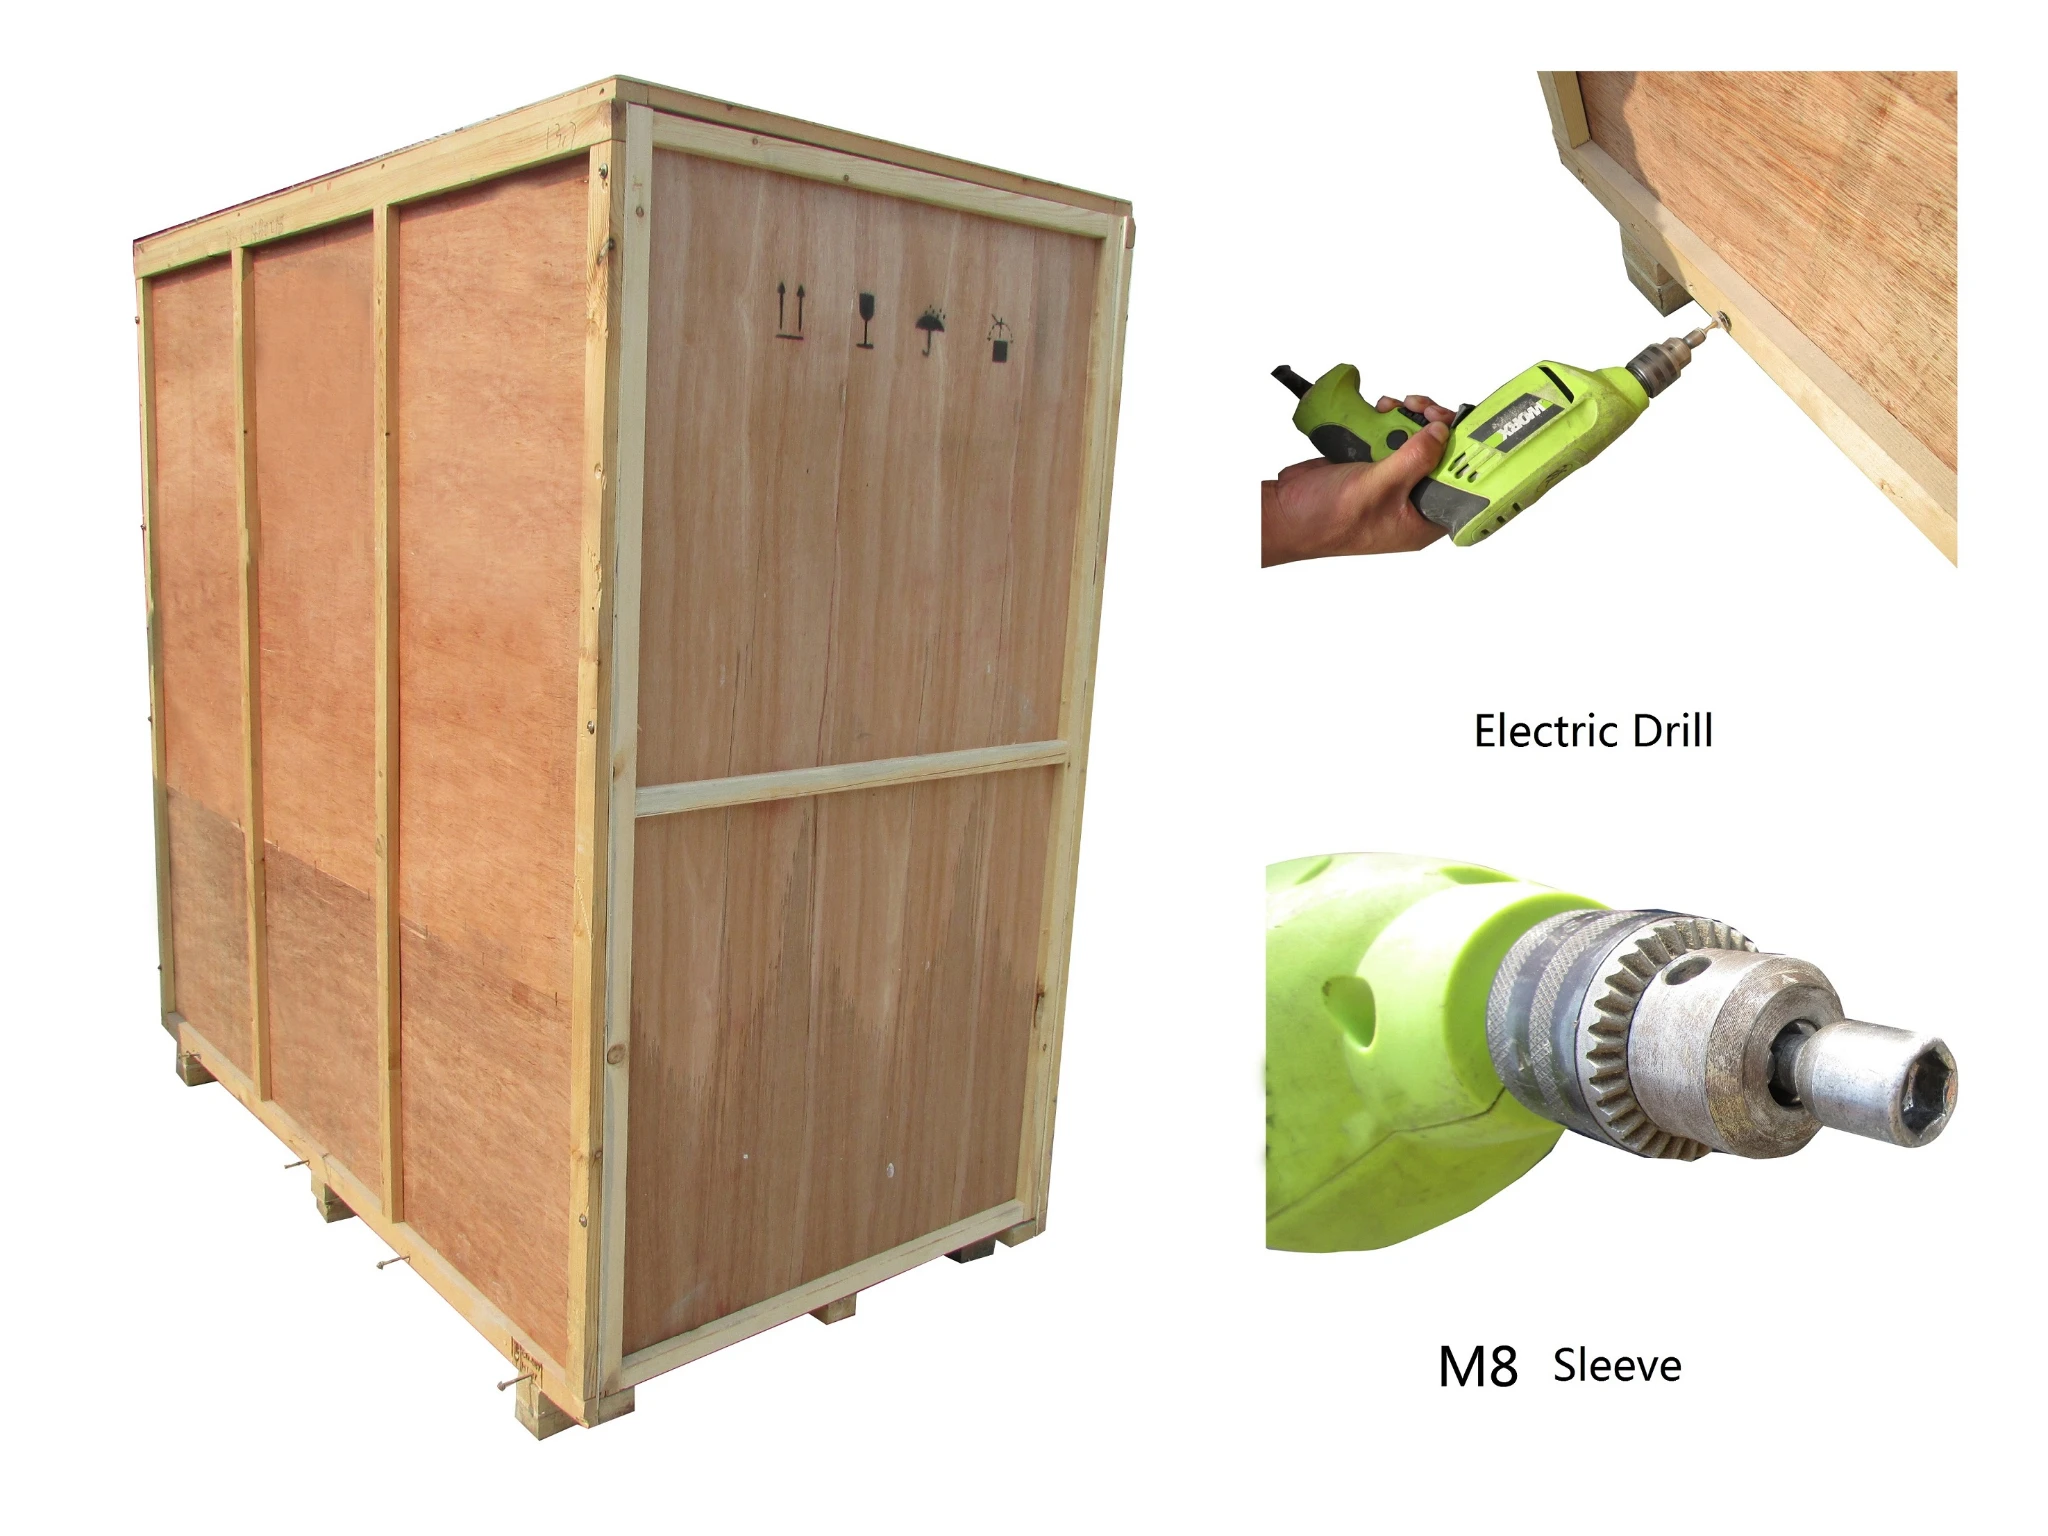
Figure 2
Rapid unpacking diagram . Disassemble the screws shown in the below picture , then move the
wooden pieces to right and left.
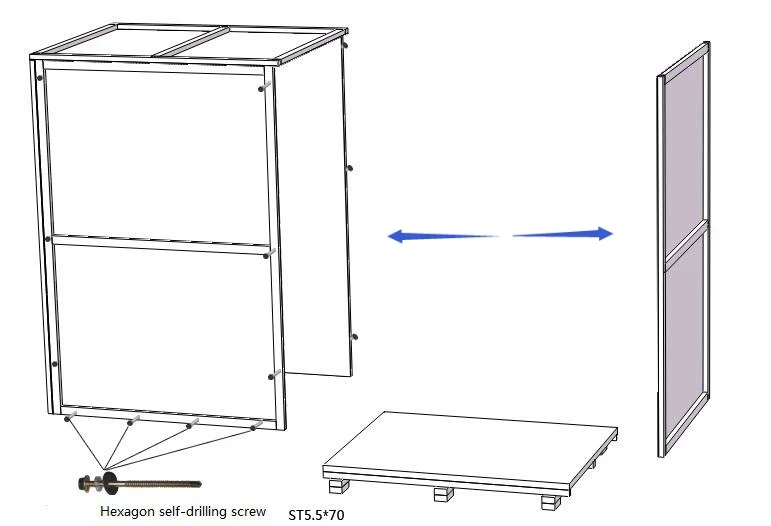
Figure 3
Unpacking method for carton
Using ordinary scissors to cut packing tape, take off the package cover, then move up the paper box body.
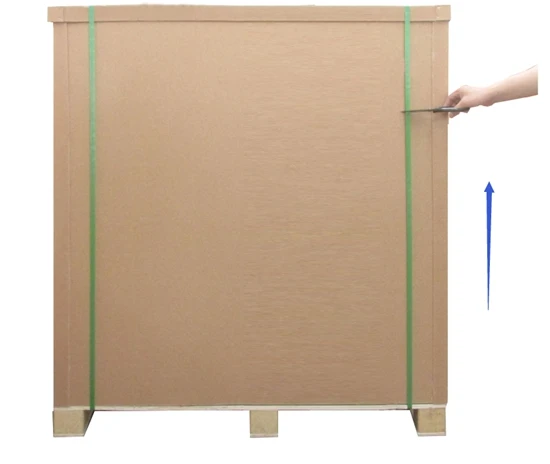
Figure 4
3.2 Accessories Checking
Refer to the packing list and check the accessories.
BCBS-1205 Packing List
Name | Position | Quantity | |
1 | BCBS-1205 host | Wooden packaging | 1 |
2 | BCBS-1205 base | Paper packaging | 1 |
3 | UV lamp tube (T8 15W) | Foam packing | 1 |
4 | The RVV power cord | Accessory case | 1 |
5 | Insurance Tube (10A) | 1 | |
6 | Insurance Tube (5A) | 1 | |
7 | Remote control (including the battery) | 1 | |
8 | Foot switch | 1 | |
9 | Inner hexagon cylindrical head screw M10*20(base fittings) | 5 | |
10 | Stainless steel flat washer (base fittings) | 5 | |
11 | Stainless steel spring washer (base fittings) | 5 | |
12 | Internal hexagon wrench (base fitting) | 1 | |
13 | Drainage ball valve coupling fastening nut (drawing No. NXA4028-1) | 1 | |
14 | Drainage ball valve coupling part (drawing No. NXA4028) | 1 | |
15 | Drainage ball valve (Figure No. 3ZB1142) | 1 | |
16 | Rubber large gasket (inner diameter * outer diameter * Φ20*Φ28*2mm thickness) | 1 | |
17 | Rubber small gasket (inner diameter * outer diameter * Φ13*Φ19*2mm thickness) | 1 | |
18 | Motor adjustment rod | 1 | |
19 | I weld + drain block plate II + flat washer 6 + spring washer 6 + M6 nut | 1 | |
20 | Key | Zip-bag | 2 |
21 | BCBS-1205 User Manual | 1 | |
22 | Certificate of conformity | 1 | |
23 | Warranty card | 1 | |
24 | Inspection report | 1 | |
29 | Remote control color page | 1 |
Table 1
3.3 Installation Conditions & Working Environment
Biological safety cabinet should be placed in a protected zone of airflow, front window operation mouth cannot face Windows and doors, Away from the ventilation system and air conditioning vents, prevented from ventilation systems, air-conditioned, doors, windows and people move caused an airflow impact on the safety cabinet. The tests show that if the air flow interference than other cabinet inlet suction air velocity, indoor infection air will enter the work space of biological safety cabinet. So the correct place safety cabinet, make its in the correct position, it is very necessary. It should also pay attention to safety cabinet exhaust and indoor and ventilated air or exhaust pipe, the relationship between safety cabinet exhaust air from above the cabinet put oneself in another position, at the time of placing safety cabinet should avoid limiting exhaust it. Biological safety cabinet should be in the direction of air flow downstream, must be in the safe cabinet side to keep at least 300 mm of space, in order to check.
Working environment:
1. Only is suitable for indoor;
2. Ambient temperature: 15°C~35°C;
3. Relative Humidity:≤75%;
4. Atmospheric pressure range: 70 kPa~106 kPa;
5. Electrical parameters: Consistent with the rated voltage of the biological safety cabinet
6. Power supply need to be grounded; (Judging method: testing the live line and the zero line of the power supply with multimeter, the live line to ground voltage should be grid voltage and the zero line to ground voltage should be 0, otherwise the power supply ground is bad);
7. Installation location: The biosafety cabinet should not be located in the passage, away from the room air flow that can destroy the isolation layer generated by the working air barrier. Should not be placed in the laboratory return air outlet, affect the laboratory return air; If the laboratory has Windows, they should be closed at all times. The biosafety cabinet should not be placed in the circulation air inlet, so that air can blow through the front window operating port or blow the exhaust filter; If space permits, a 30cm space should be left behind and around the biosafety cabinet for cleaning. If not permitted, 5cm on the back should be left for cleaning the biosafety cabinet. The power socket of the biosafety cabinet can be approached to facilitate the maintenance of the biosafety cabinet, and the biosafety cabinet can be tested for electrical safety without moving it; The biosafety cabinet should be installed near the laboratory exhaust outlet, that is, downstream of the indoor air flow direction, so as to facilitate the discharge of polluted air around the biosafety cabinet as soon as possible.
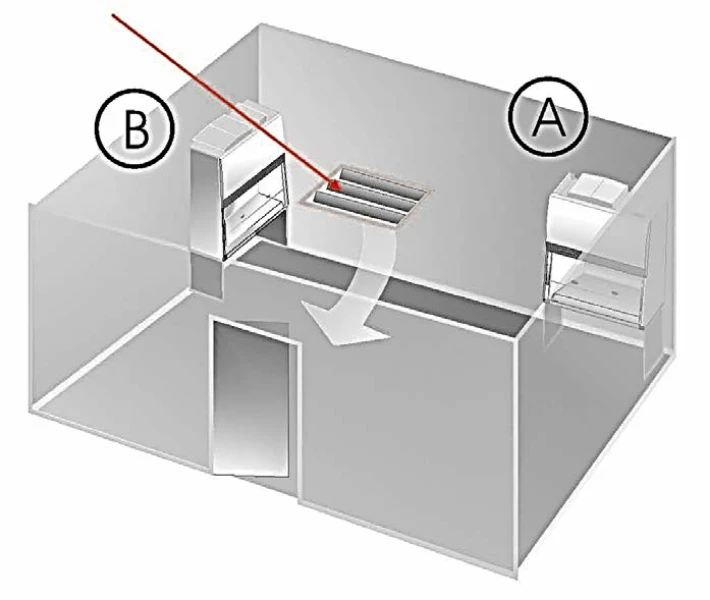
Figure 5
Recommended biosafety cabinet installation location in the laboratory
 Note: "A" is the best position, "B" is optional. The air outlet above or near the safety cabinet should be changed to avoid the front of the safety cabinet.
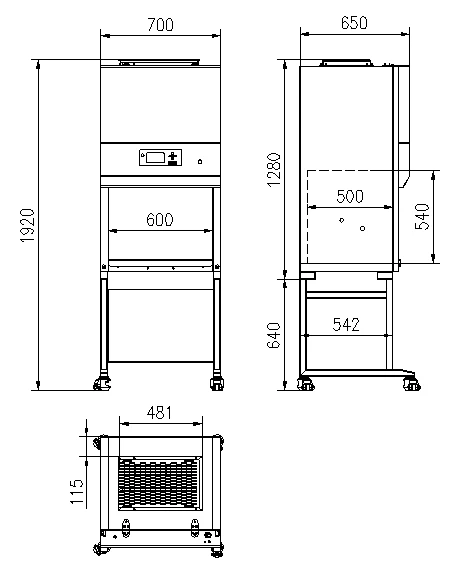
Figure 6 (Biosafety cabinet dimensions)
External Size:700*650*1920(mm)
Internal Size:600*500*540(mm)
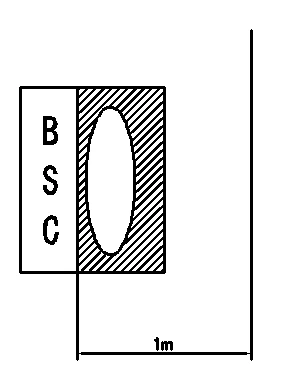
Figure 7
Allow at least 1.0 m between the cabinet and pedestrian traffic routes, thoroughfares or walkways.
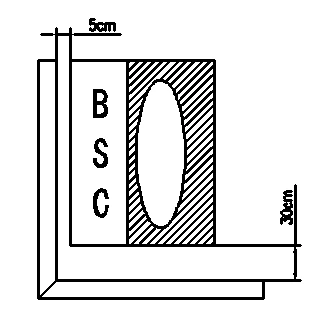
Figure 8
Allow at least 30 cm clearance on both sides of the cabinet and 5cm space on the rear of the cabinet.
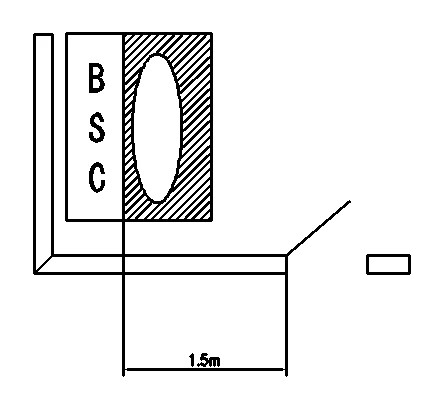
Figure 9
The distance between the cabinet aperture and any doorway is at least 1.5 m.
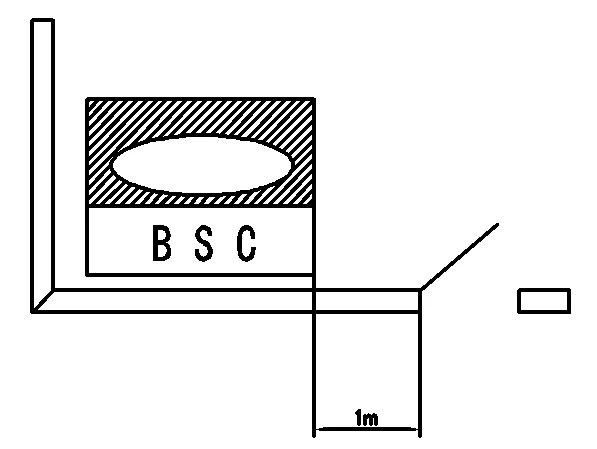
Figure 10
The distance between the side panel and any doorway is at least 1.0 m.
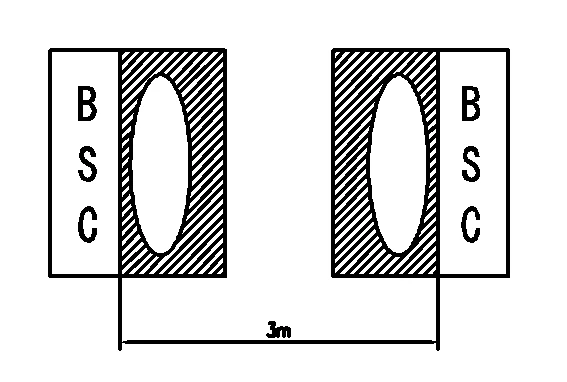
Figure 11
Allow at least 3m between the aperture and the aperture of an opposing cabinet, fume cupboard, etc.
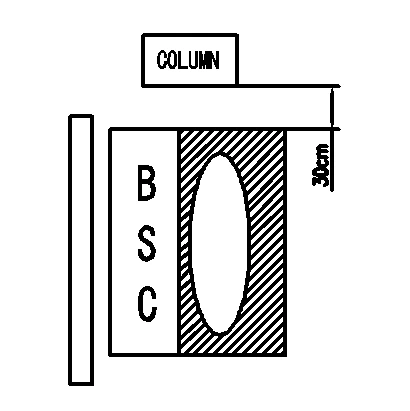
Figure 12
Any large obstruction projecting beyond the plane of the front aperture should not be within 30 cm of the sides of the cabinet.
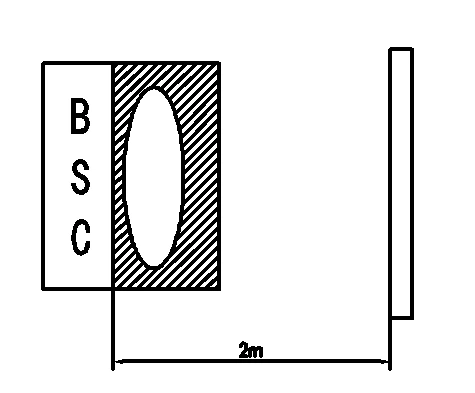
Figure 13
You should not position the cabinet in a location where there is an obstruction that affect airflow within 2 m of the front aperture.
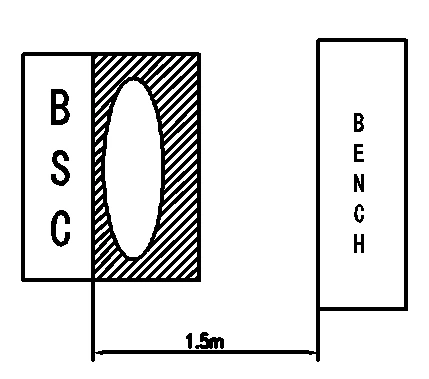
Figure 14
The distance between cabinet aperture and the front of a bench opposite should be at least 1.5 m aperture.
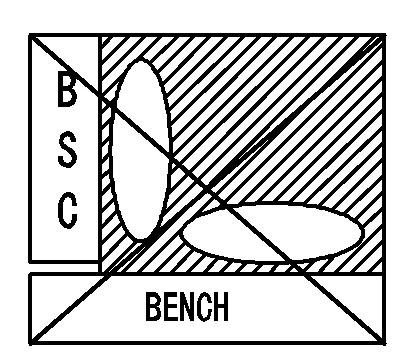
Figure 15
Avoid positioning a bench at right angles to the cabinet. Any person working at the bench is likely to disturb airflow close to the cabinet.aperture.
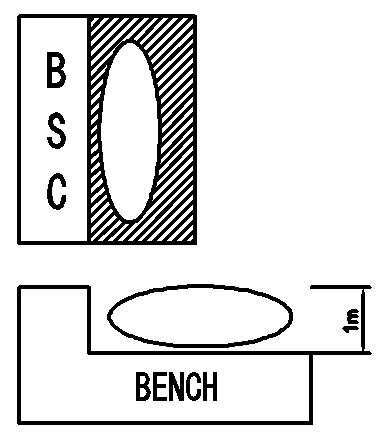
Figure 16
A projecting bench will help minimize traffic in front of the cabinet as long as the front of the bench is situated at least 1 m from the side of the cabinet.
3.4 Installation
1. Remove all the package modules;
2. Inspect the surface of main body whether there is scratch, deformation or foreign matters;
3. Move the whole device to the final installation location;
4. Assembly of base stand, drain valve.
5. According to the operating platform which the biological safety cabinet will be placed, to judge if the biological safety cabinet is with base stand; if the drain hole has reserved installation space, then installation of drain valve or drain baffle is needed.
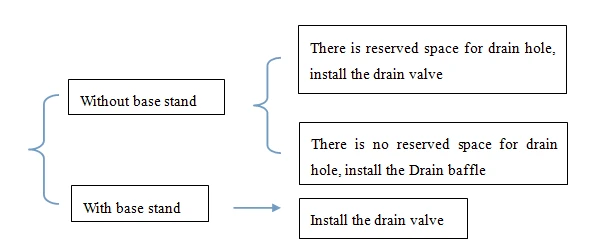
Figure 17
Note: Support section at the time of transport on the back of the safety cabinet, it should be removed before installation, it is forbidden to the bottom up and place or remove dumping.
1. Refer to below picture to assemble the base stand.
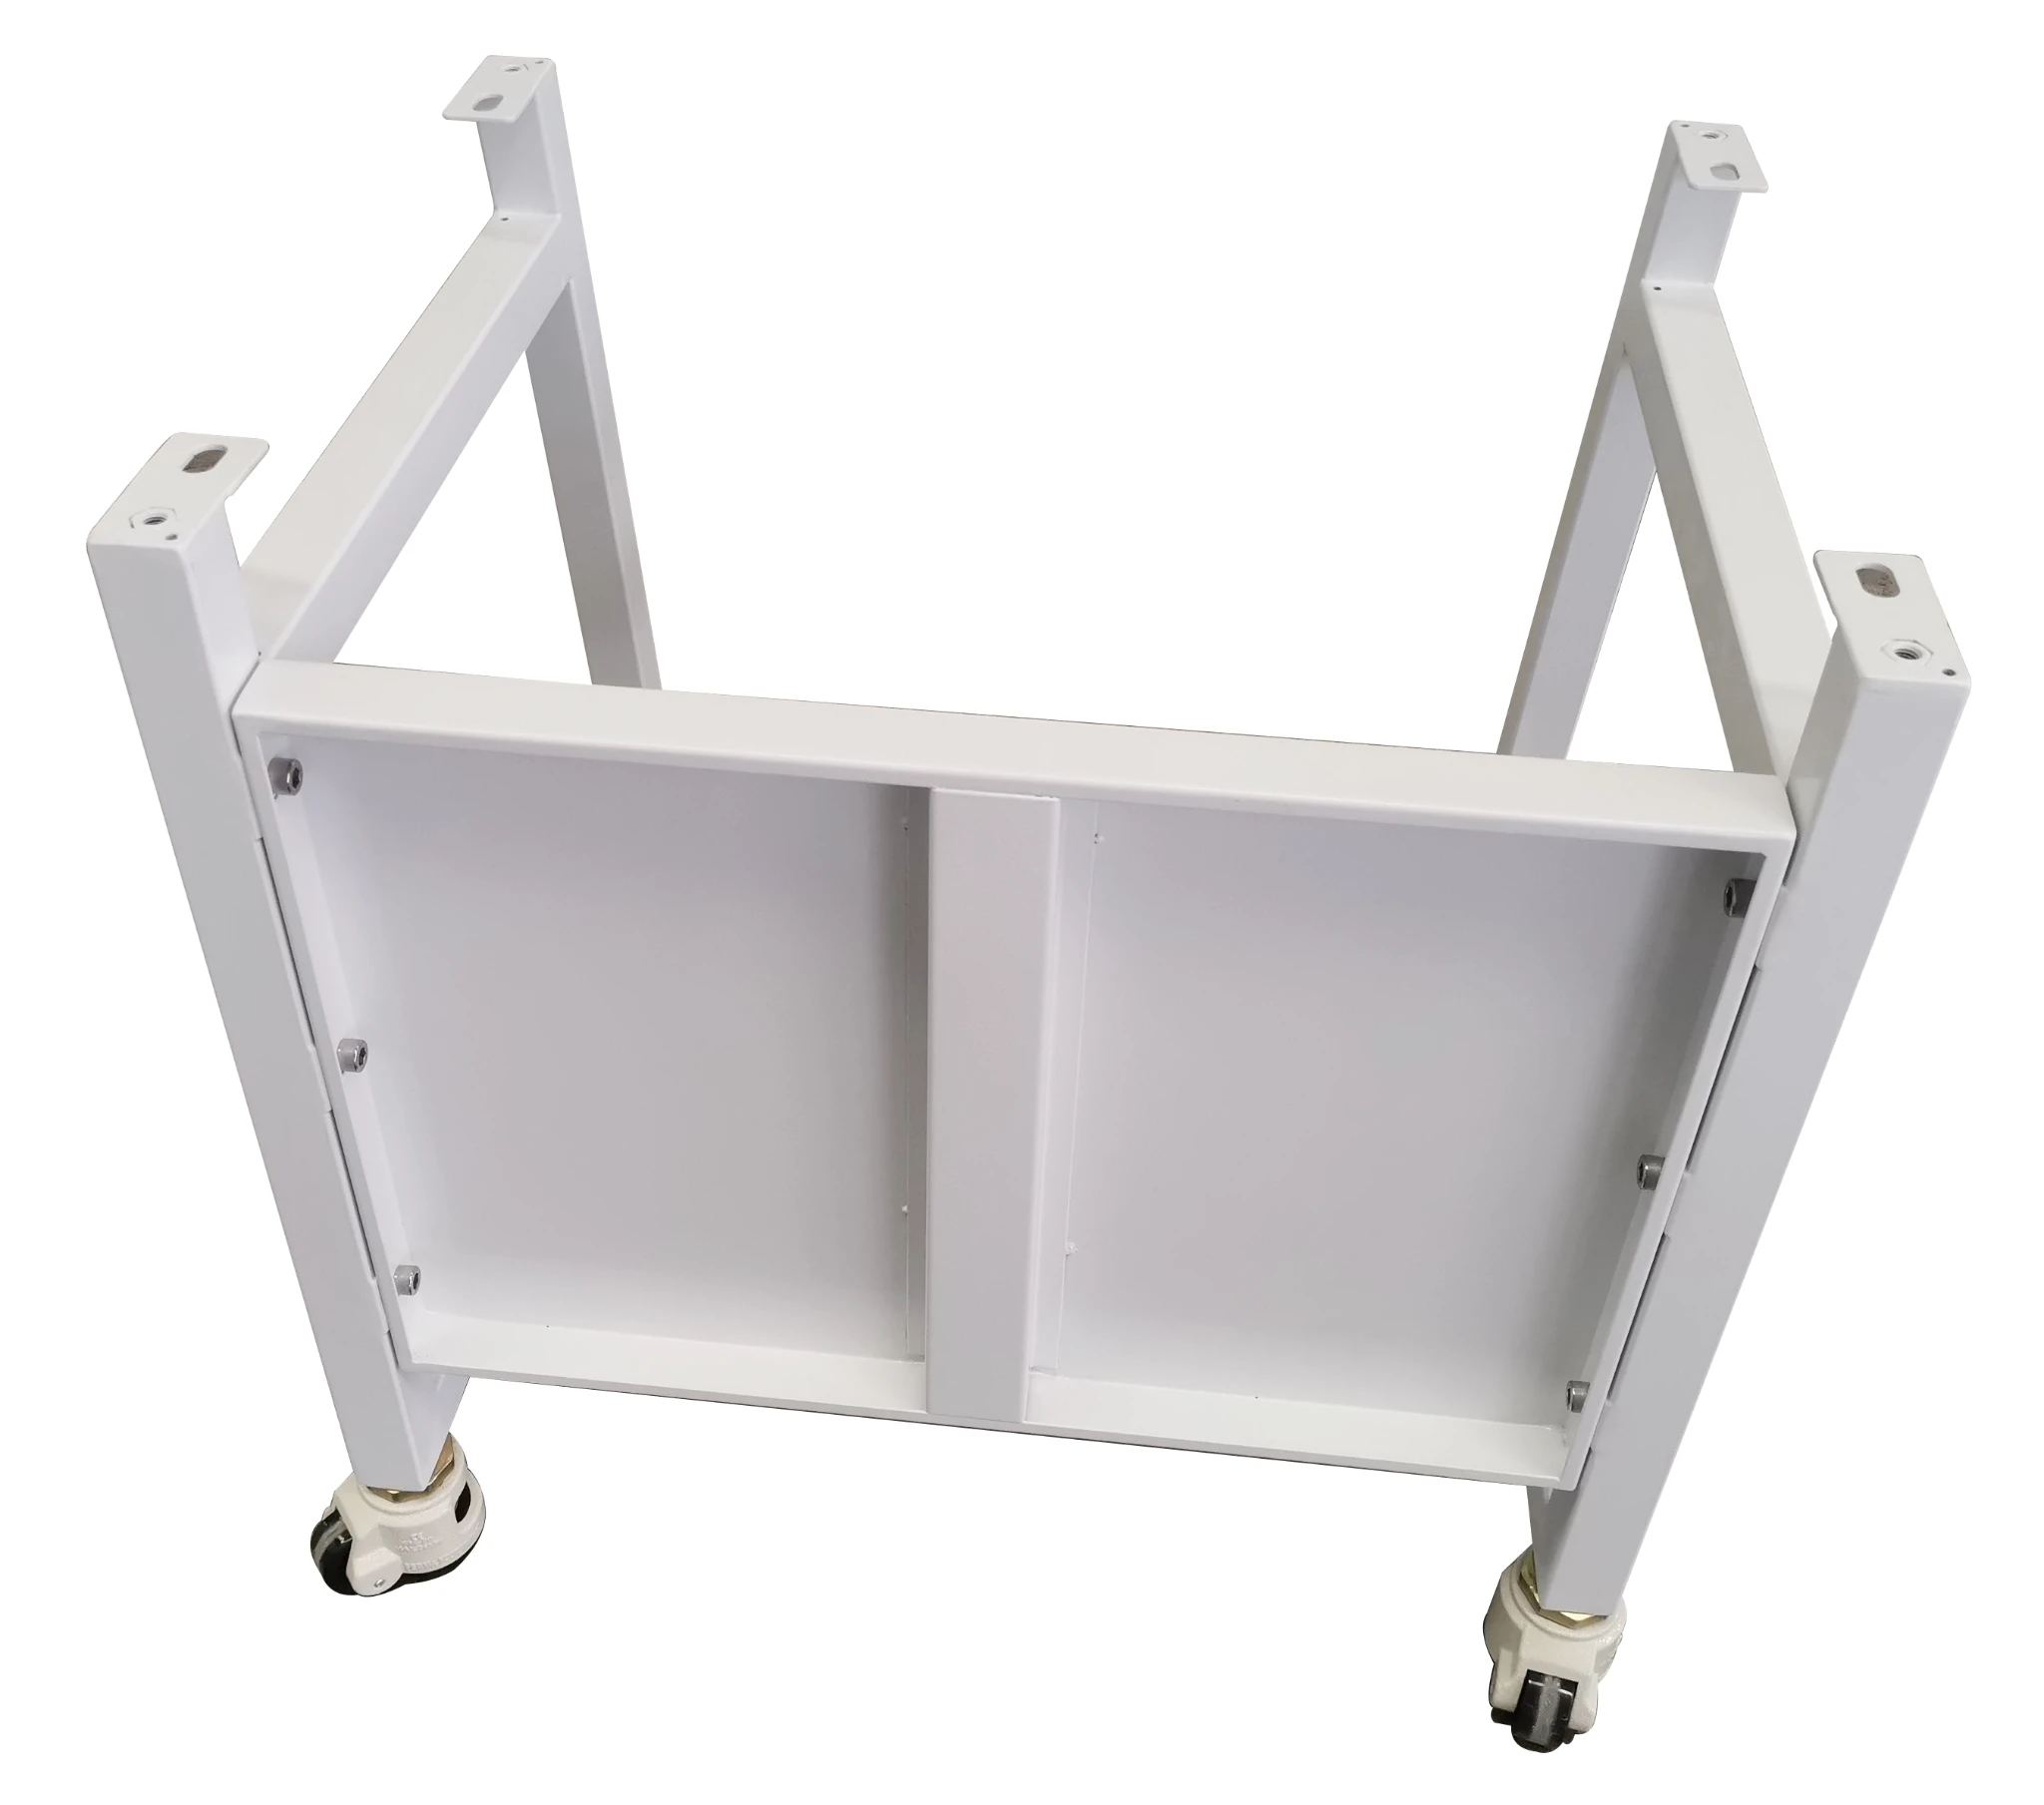
Figure 18
(M10*20 socket head cap screws)
Remove the M10x20 hex cylinder head bolts from the accessory box, from the left side bracket and right side bracket of the base stand to inset screw, for connecting with the connecting plate, then tighten the screws with inner hexagon wrench, referring to above picture.
Note: The base mounting bolts are fixed to the base stand. When install the base stand, except the 4 bolts marked with red circle in above picture, please remove the other bolts and install.
2. Connect base stand and main body
Refer to the picture below to connect the base stand and main body.
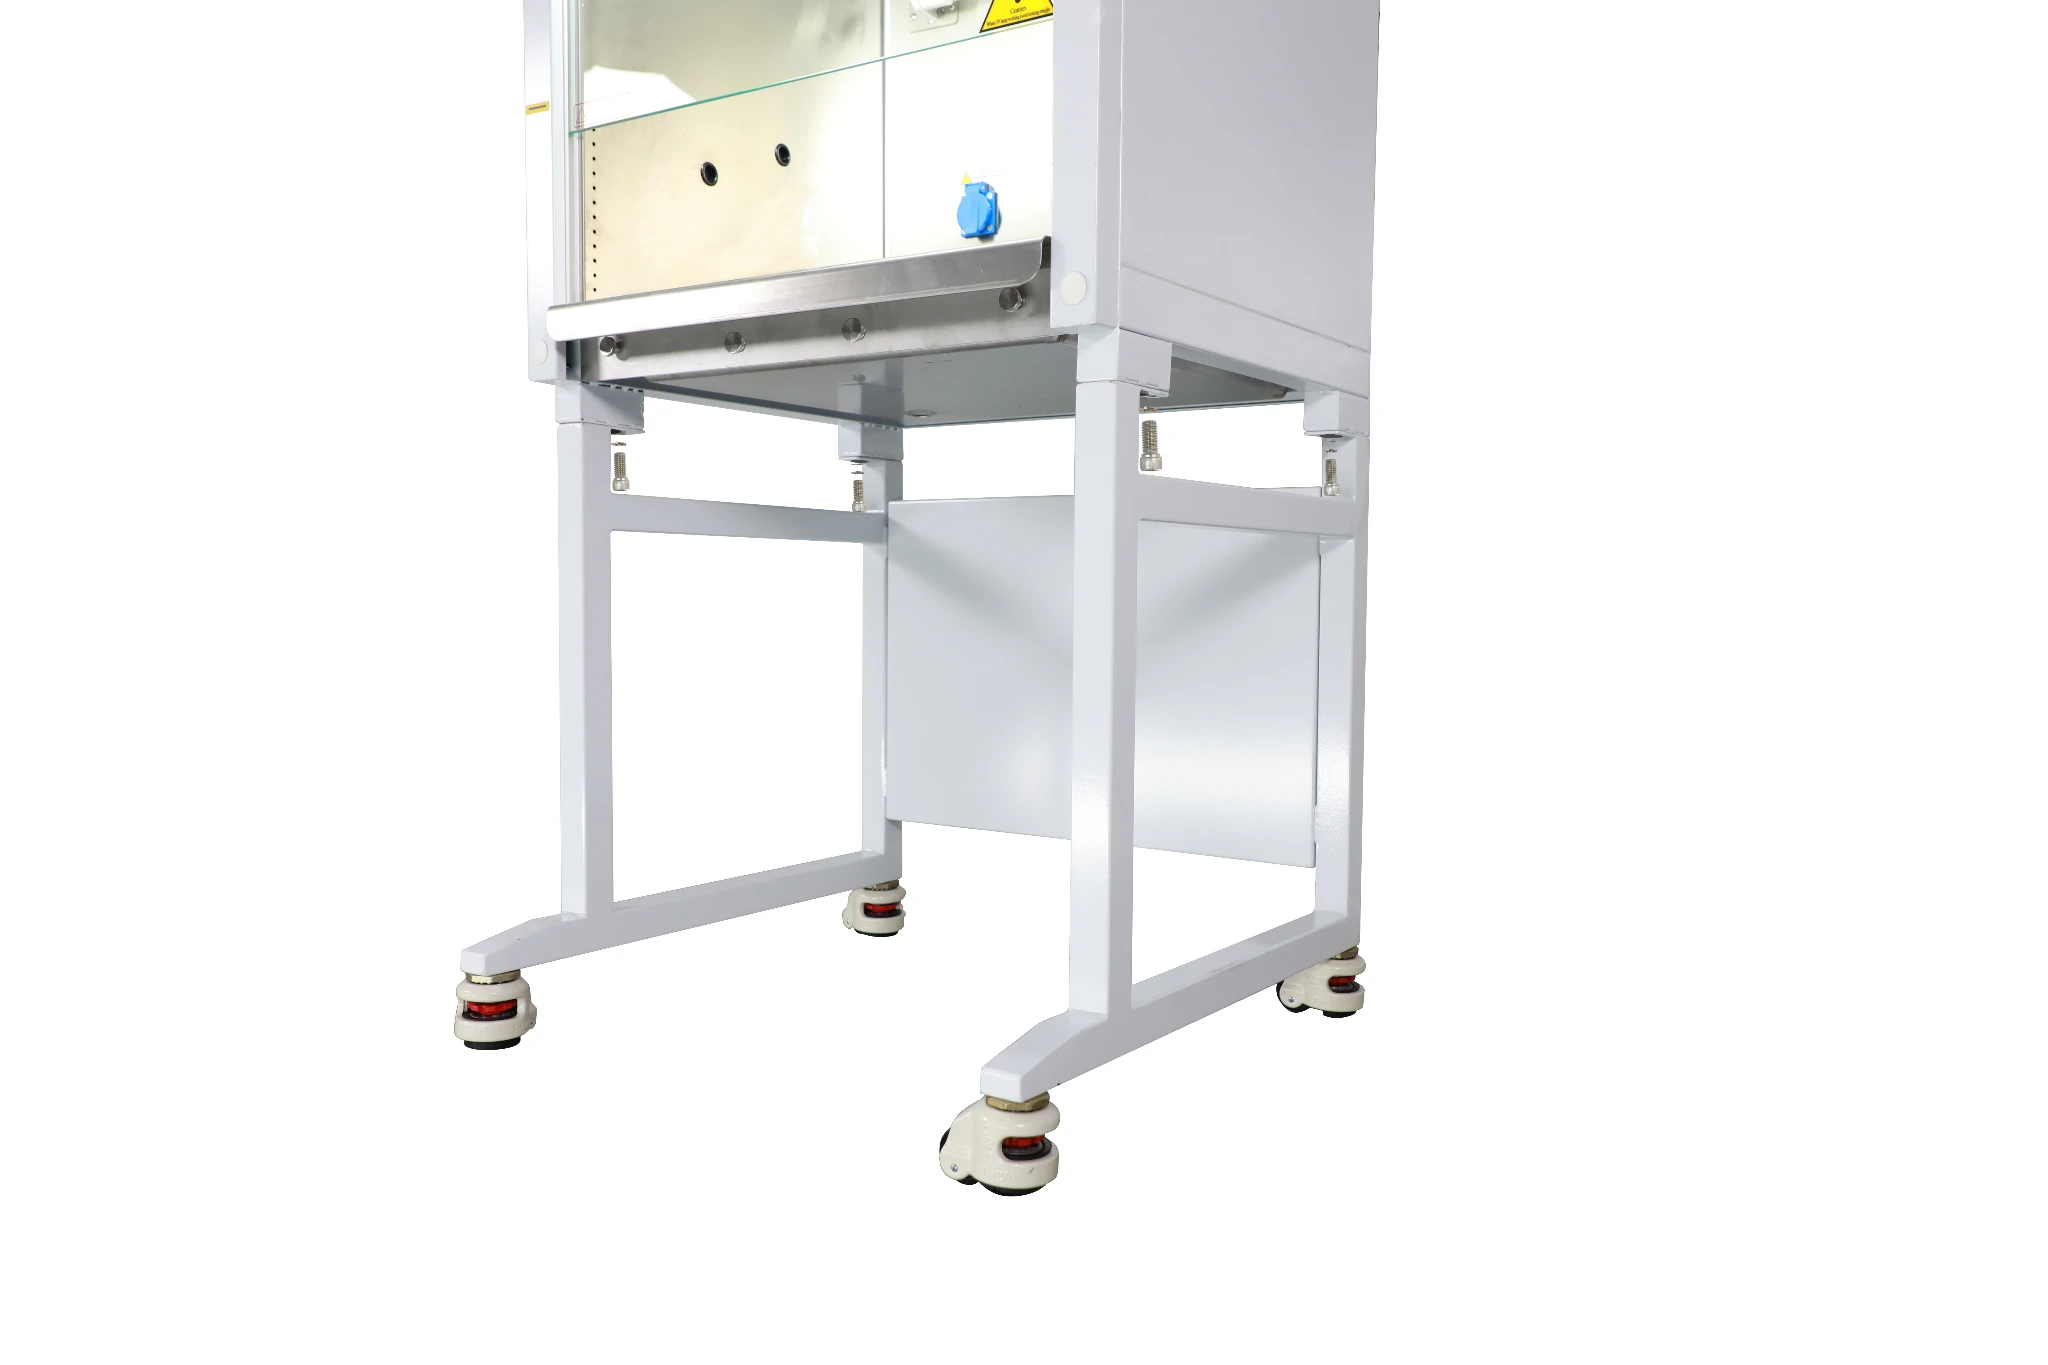
Figure 19
(M10*20 hexagon socket head bolt + flat washer 10 + spring washer 10, connect the cabinet and the base, and tighten.)
Take out the hex cylinder head bolt M10*20, spring washer10, flat washer10 from the accessory box, and connect the base stand and the main body as is shown in above picture.
3. Assembly of drain valve
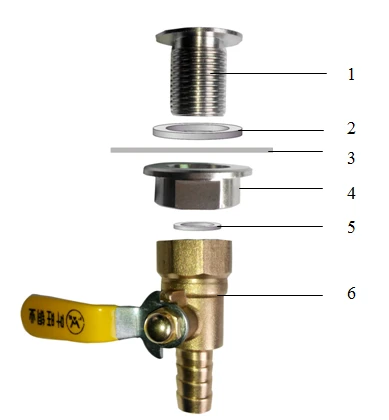
Figure 20
1 | Drain valve connector |
2 | Shim (Inner diameter*outer diameter*thicknessΦ20*Φ28*2mm) |
3 | Safety cabinet bottom installation holes |
4 | Drain valve connector fastening nut |
5 | Rubber gasket (Inner diameter*outer diameter*thicknessΦ13*Φ19*2mm) |
6 | Drain valve |
Table 2
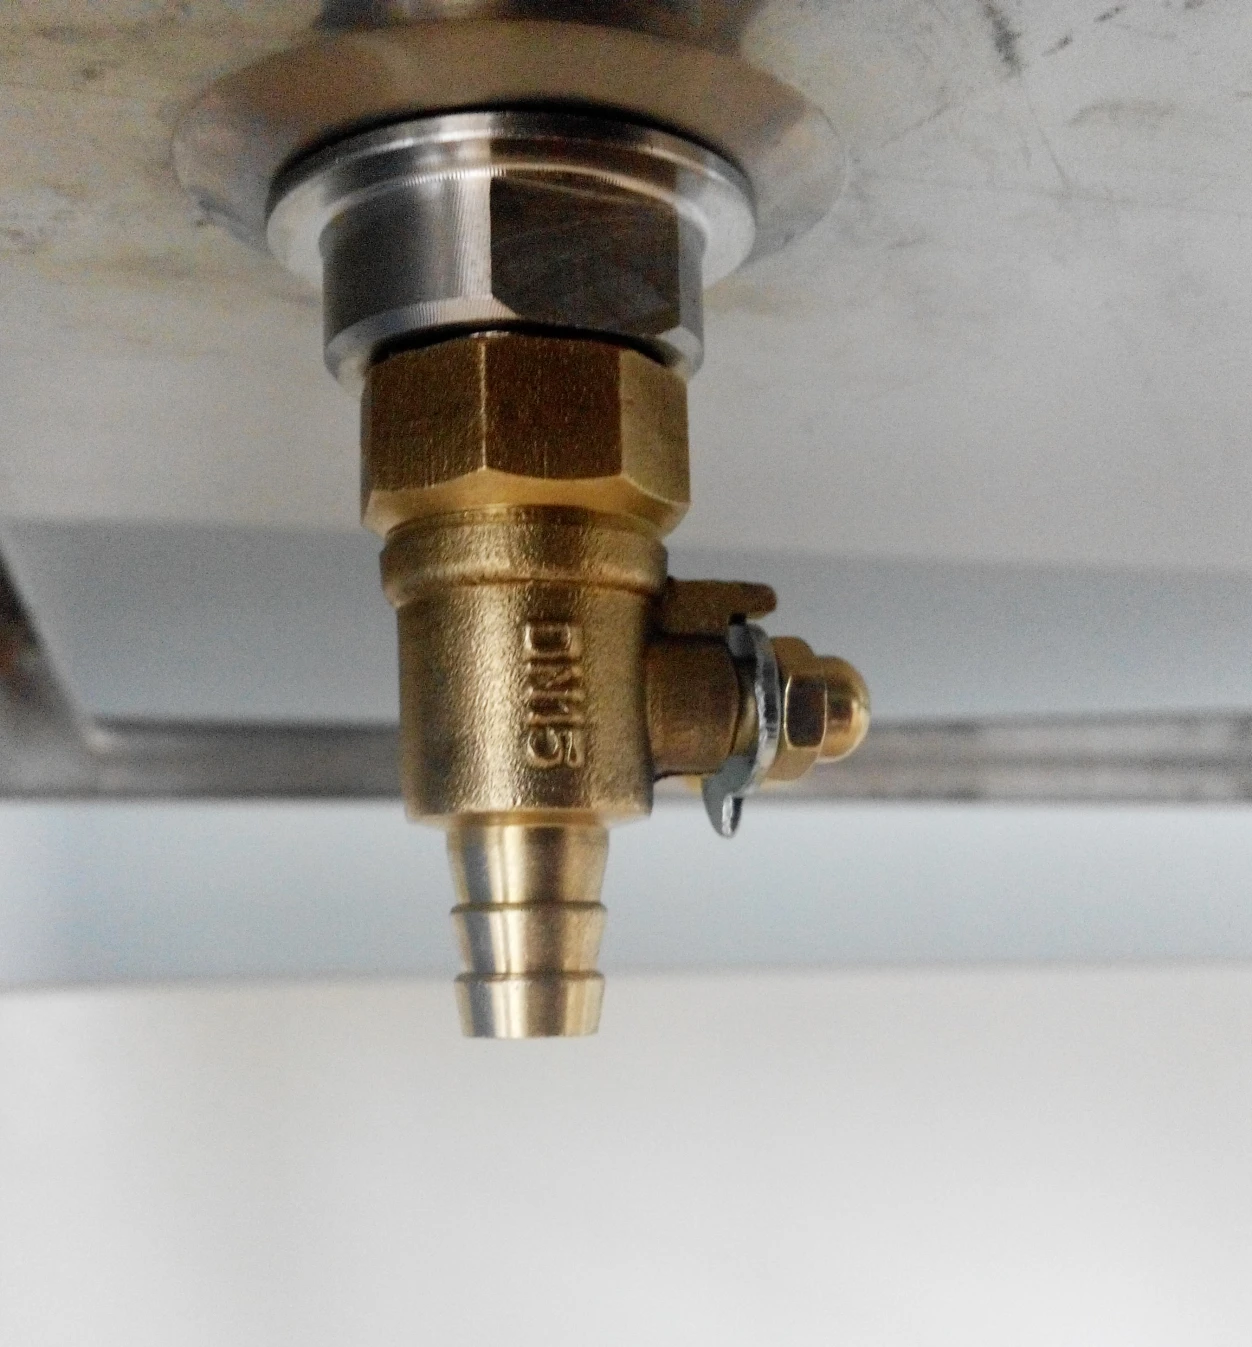
Figure 21
Take out drain valve connector, shim, drain valve connector fastening nut, rubber gasket, drain valve, assembling from up to down as are shown in above picture.
4. Assembly of drain baffle
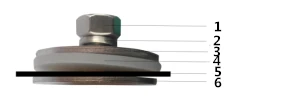
Figure 22
1 | M6 nut |
2 | Spring washer 6 |
3 | flat washer 6 |
4 | Drainage board I |
5 | Safety cabinet bottom installation holes |
6 | Drainage board II |
Table 3
Take out drainage board I, drainage board II, flat washer 6, spring washer 6, M6 nut, assembling from up to down as above picture illustrated.
5. Adjustment of footmaster caster
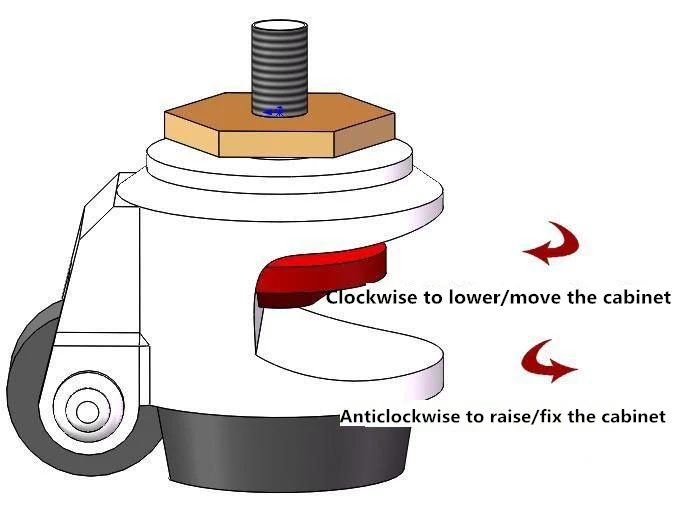
Figure 23
Clockwise rotate caster' red part to low down the base feet and the cabinet height. Low down all four casters can move the cabinet. Counterclockwise rotate casters' red part can raise the base leg and cabinet height. Raise all four casters at same time can fix the cabinet. Adjust the four casters to make the cabinet stable.
3.5 Checking after Installation
First, make sure the Voltage and frequency to be same as logo showing, and then check the follows items with power on:
Checking Item | Normal Situation |
Wind speed display | Inflow0.53±0.025m/s , downflow0.33±0.025m/s |
Pressure display | Exhaust filter80-110Pa, downflow filter 80-110Pa |
Fan running | Normally |
Fluorescent lamp | Lamp lights after pressing button |
UV lamp | Lamp lights after pressing button |
Display screen buttons | All buttons can be used |
Socket | Press the socket key, multimeter testing output supply voltage |
Table 4
4. User Instructions
4.1 Functions
4.1.1 Product Concept
Biological safety cabinet is a kind of negative pressure filtration system for protecting operator, the laboratory environment and work materials, the front opening which air flow inward have protection function for operator, the filtered laminar flow generated by vertical ULPA can protect work materials, what's more, the polluted air flow become pure after processed by ULPA filter. When it's used in microbiology experiment environment filled with volatile or toxic chemical and radionuclide, suitable exhaust hood in function have to be linked.
4.1.2 Application Range
Biological Safety Cabinet is necessary equipment in the laboratory in the search of microbiology, biomedical, DNA recombinant, animal experiment, and biological products, especially in the occasion that operator need to adopt protective measure, such as medical and health, pharmacy, medical research. Our equipment provides a safety working environment which don't have bacterial and dust in the process of bacterial culture.
4.1.3 Operating Principle/Airflow Pattern
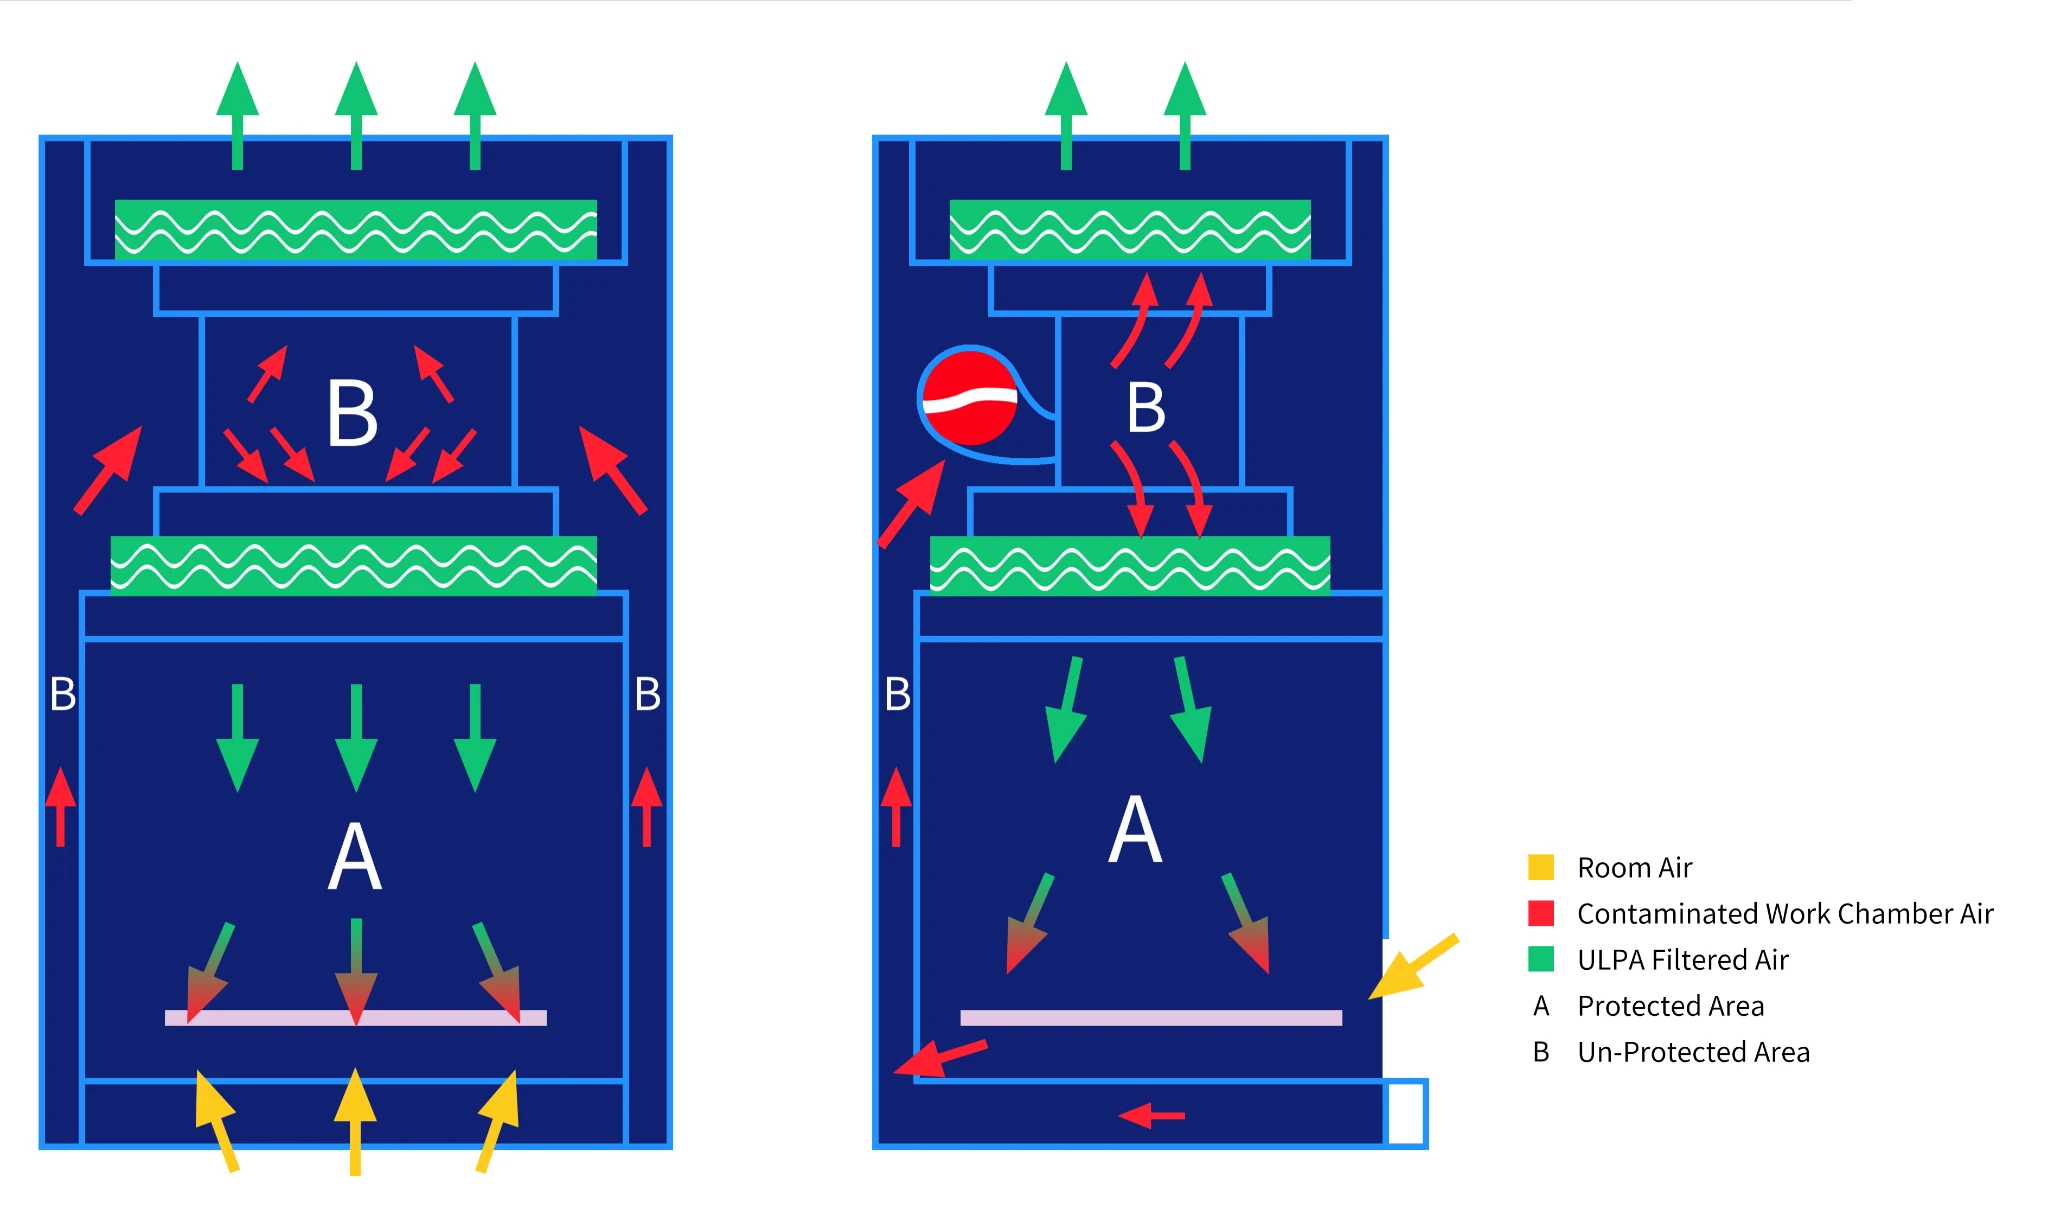
Figure 24
4.1.4 Protected Objects
Biological safety cabinets (BSCs) are designed to protect the operator, the laboratory environment and work materials from exposure to infectious aerosols and splashes that may be generated when manipulating materials containing infectious agents, such as primary cultures, stocks and diagnostic specimens.
4.1.5 Technical Parameters
Parameter | BCBS-1205 |
External Size(W*D*H) | 700*650*1920 mm |
Internal Size(W*D*H) | 600*500*540 mm |
Power Supply (AC) | 220V±10% 110V±10% |
Frequency | 50 Hz 60Hz |
Consumption | 500 W |
Total Airflow Volume | 230 m3/h |
UV Lamp Consumption | 15W |
Fluorescent Lamp Consumption | 8W *2(LED) |
Down-flow Velocity | 0.33±0.025m/s |
Inflow Velocity | 0.53±0.025m/s |
ULPA Filter | 99.9995%(Diameter:0.12μm) |
Noise | ≤65dB(A) |
Table 5
Notes:
(1) Electric consumption power includes the power used to load the base stand (optional).
(2) Our company has right for changing the products, if we need to change and re-design, please forgives us for not notifying you.
1. Biological safety functions
Personnel protection: with the KI way, the protection factor of the front window operating port should not be less than 1 * 105;
Sample protection: microbial colony count ≤5CFU;
Cross contamination protection: microbial colony count ≤2CFU.
2. Leak-proof Cabinet
If cabinet pressurized to 500Pa, the pressure should be no less than 450 Pa after 10 min.
3. Integrity of ULPA Filter
Scan and detect the ULPA filter, the leakage rate at any point should not be >0.01%.
4. Vibration amplitude
The net vibration amplitude between frequency 10Hz and 10KHz is no more than 5μm(rms).
5. Illumination
The average illumination is no less than 650 lux, max illumination is no less than 1000lux.
6. Mechanical performance
Structure design is reasonable, high quality materials are adopted for the cabinet.
It can resist the shape of global deformation caused by external force.
The working surface will not occur permanent deformation when weight reaches 23kg.
7. Electrical properties
The voltage increases to 1390V(AC) in 5s and keep for another 5s without breakdown.
Grounding resistance ≤0.1Ω
4.2 Product Structure
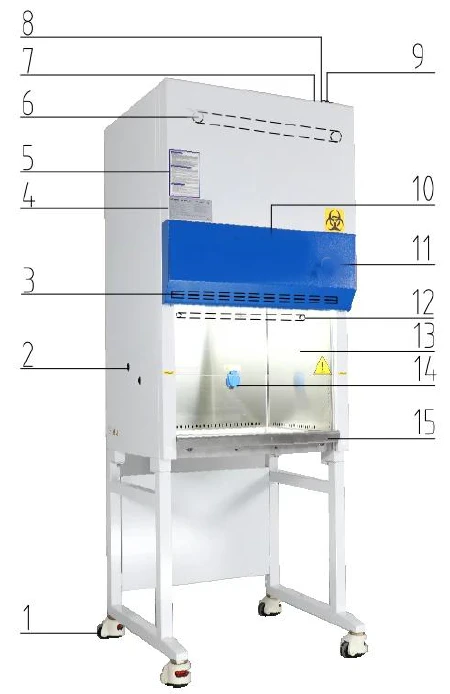
Figure 25
1 | Footmaster caster |
2 | Reserved holes for water and air faucets |
3 | LED lamp |
4 | Nameplate |
5 | Operating instruction |
6 | Door motor |
7 | Fuse socket |
8 | General power fuse socket |
9 | Power socket |
10 | Control panel |
11 | Power lock |
12 | UV lamp |
13 | Front window glass |
14 | Waterproof socket |
15 | Handrest panel |
Table 6
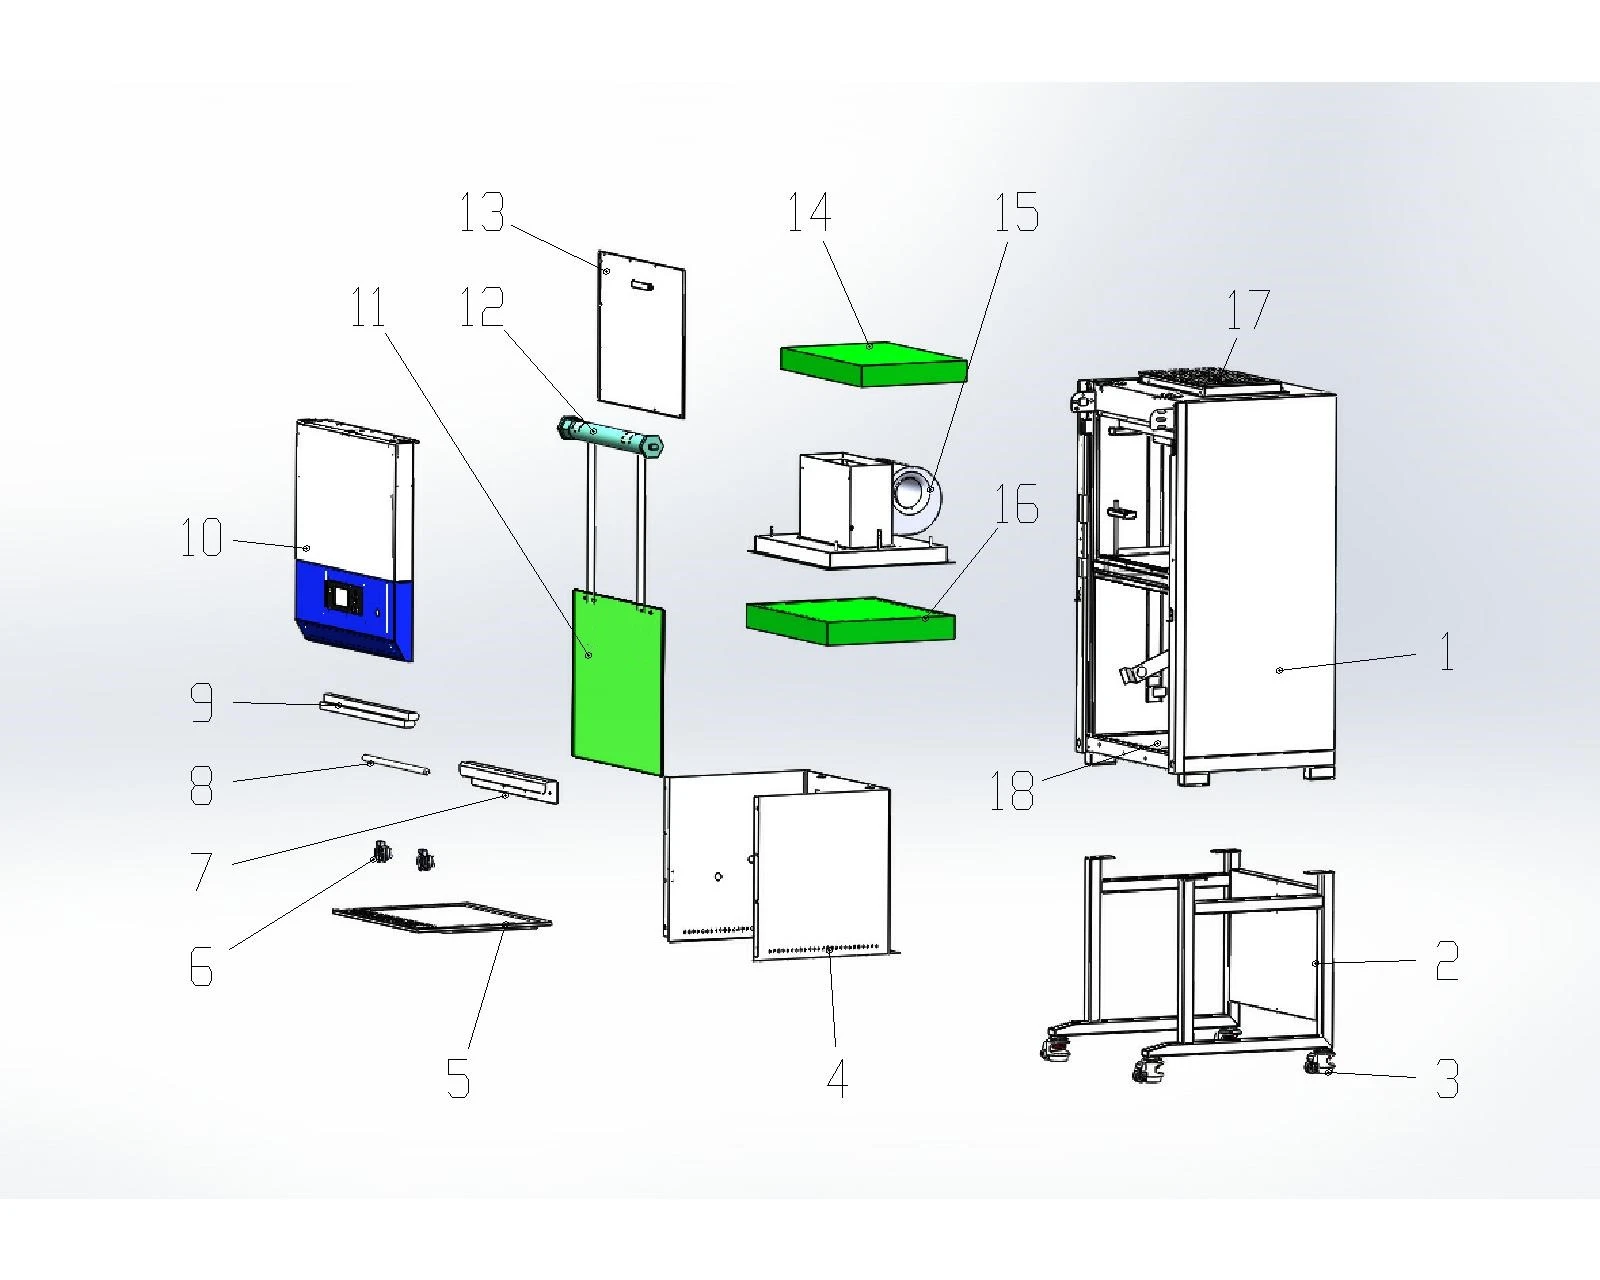
Figure 26
1 | Cabinet | 2 | Base | 3 | Footmaster caster | 4 | Apron board |
5 | Operating table | 6 | Waterproof socket | 7 | Handrest panel | 8 | UV lamp |
9 | LED lamp | 10 | Front panel | 11 | Front window glass | 12 | Door motor |
13 | Inner front plate | 14 | Exhaust filter | 15 | Fan assembly | 16 | Supply filter |
17 | Exhaust opening | 18 | Sump |
Table 7
4.2.1 Structure Introduction
1) Driving system of front window
Driving system consists of tube motor, front window, hauling sash and position switch.
2) Air filtration system
Air Filtration System is the most important system of BSC. It consists of fan, supply filter and exhaust filter. The function of Air Filtration System is transferring filtered air to work area, ensure the down flow velocity, keep cleanness of work area and exhaust gas reach the standard request.
3) UV lamp
UV lamp is inside work area. So UV lamp can well sterilize all space of work area.
4) Fluorescent lamp
The BSC is equipped with straight tube type energy-saving fluorescent lamp. It can make sure average illumination inside work area which meets standard requirements.
5) Sampling port
The sampling port reserved on the safety cabinet for testing the aerosol concentration of the upstream of the ULPA filter is located at the lower part of the worktable in the working area.The transparent tube marked with "filter upstream" is the sampling port for aerosol concentration test on the upstream of air supply filter and exhaust filter.
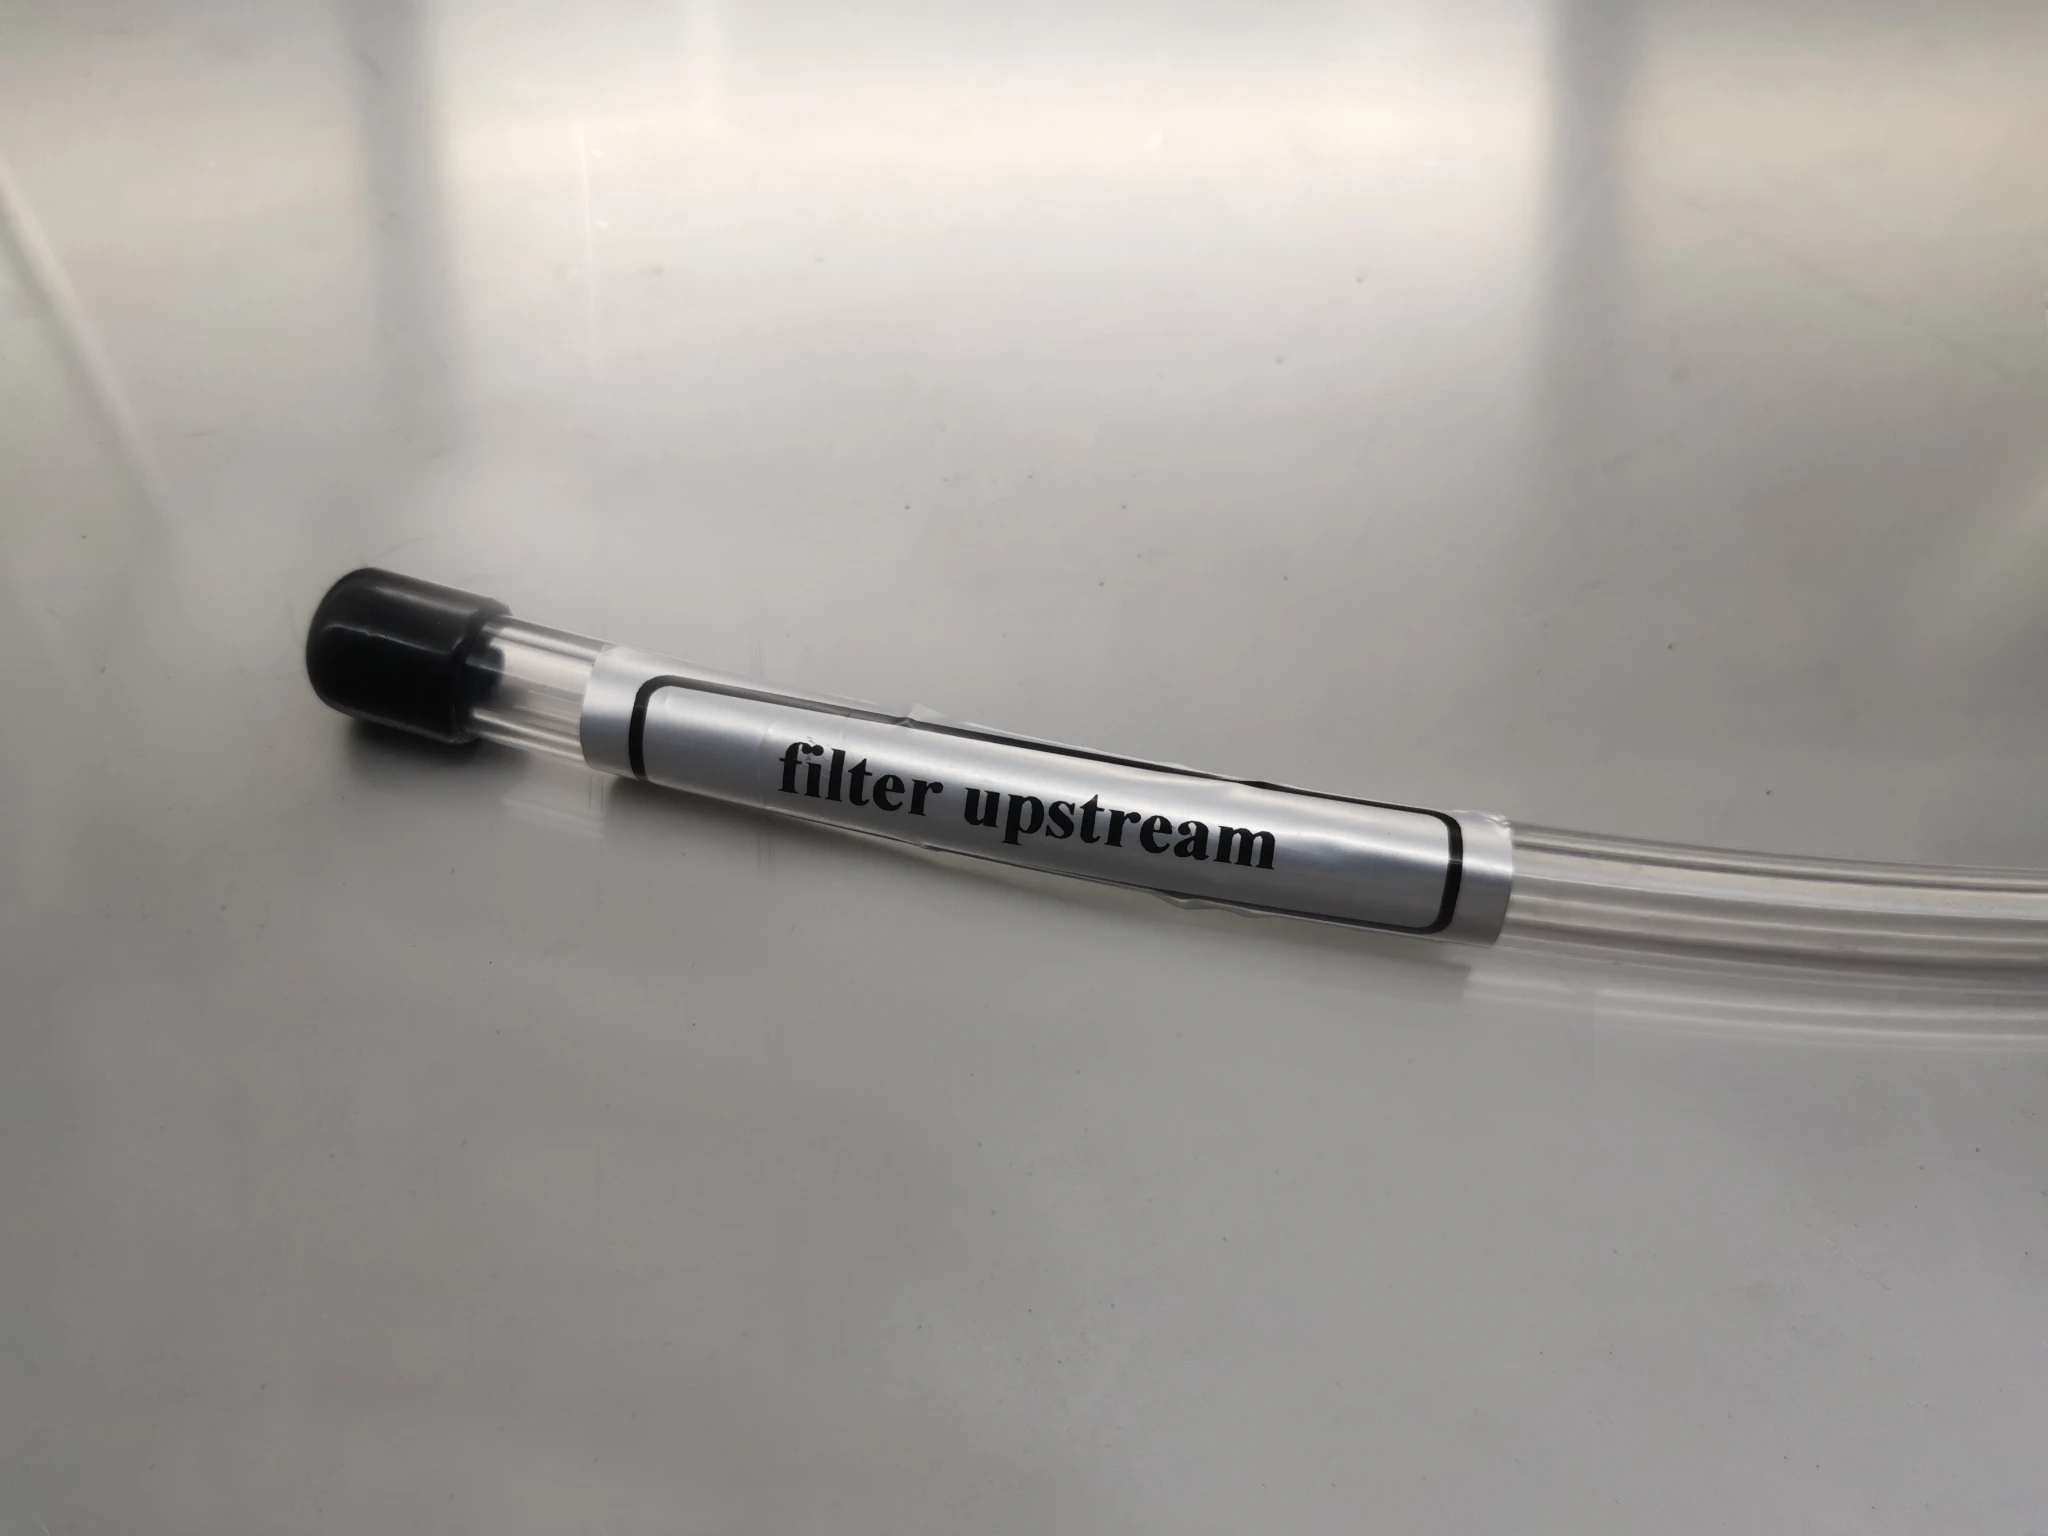
Figure 27
6) Power lock
When the power cord is connected to main power, switch the key for power lock, then the equipment is powered on.
7) Waterproof socket
Waterproof Sockets are located on the right side of the work area, which can be controlled by a SOCKET button.
(1) Please make sure the total load of sockets should be ≤ 500W;
(2) Waterproof connector can only be waterproof when the lid down, the socket cannot be regards as waterproof connector when the cover is opened.
8) Fuse protector
The equipment is equipped with main power fuse, waterproof socket fuse. They are located near the power cord's outlet. Fuse label is corresponding to the relevant specifications. Please refer to 3.2.
9) LCD display
LCD Crystal Display is placed in the middle of the two pieces of parallel glass liquid crystal, there are many vertical and horizontal fine wire between two pieces of glass, control rods crystal molecules change direction through electricity or not, and will have a picture lamp refraction. Low power consumption, no electromagnetic radiation, and the service life can be up to 100000 hours.
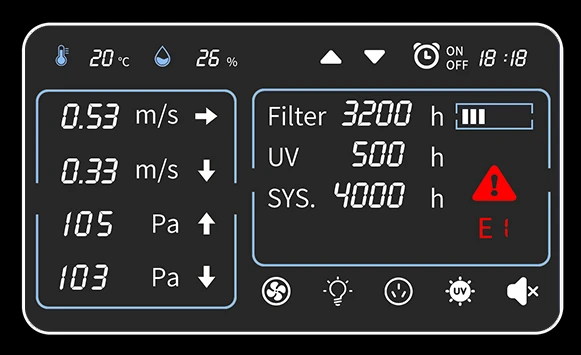
Figure 28
Large LCD display indicates detailed key parameters; it can real-time display to reflect the equipment working condition, such as effective working state of the filter, which is more intuitive.
10) Control of front window
Front window is motorized. It could be controlled by remote control, and control panel.
11) Structure
a) Biological Safety Cabinet's both sides and back area are negative pressure air channel. Make a double isolation by air curtain and cabinet between working area and external environment And the working area surrounded by negative pressure to avoid any leakage.
b) Cabinet body is built of 1.2mm cold-rolled steel with anti-powder coating. Strong and steady.
c) Work area is fully made of 304 stainless steel which looks beautiful and with corrosion resistance performance.
d) Base stand is made of cold-rolled steel with anti-powder coating.
e) Soft touch type control panel, easy to handle and beautiful appearance.
4.3 Control Panel
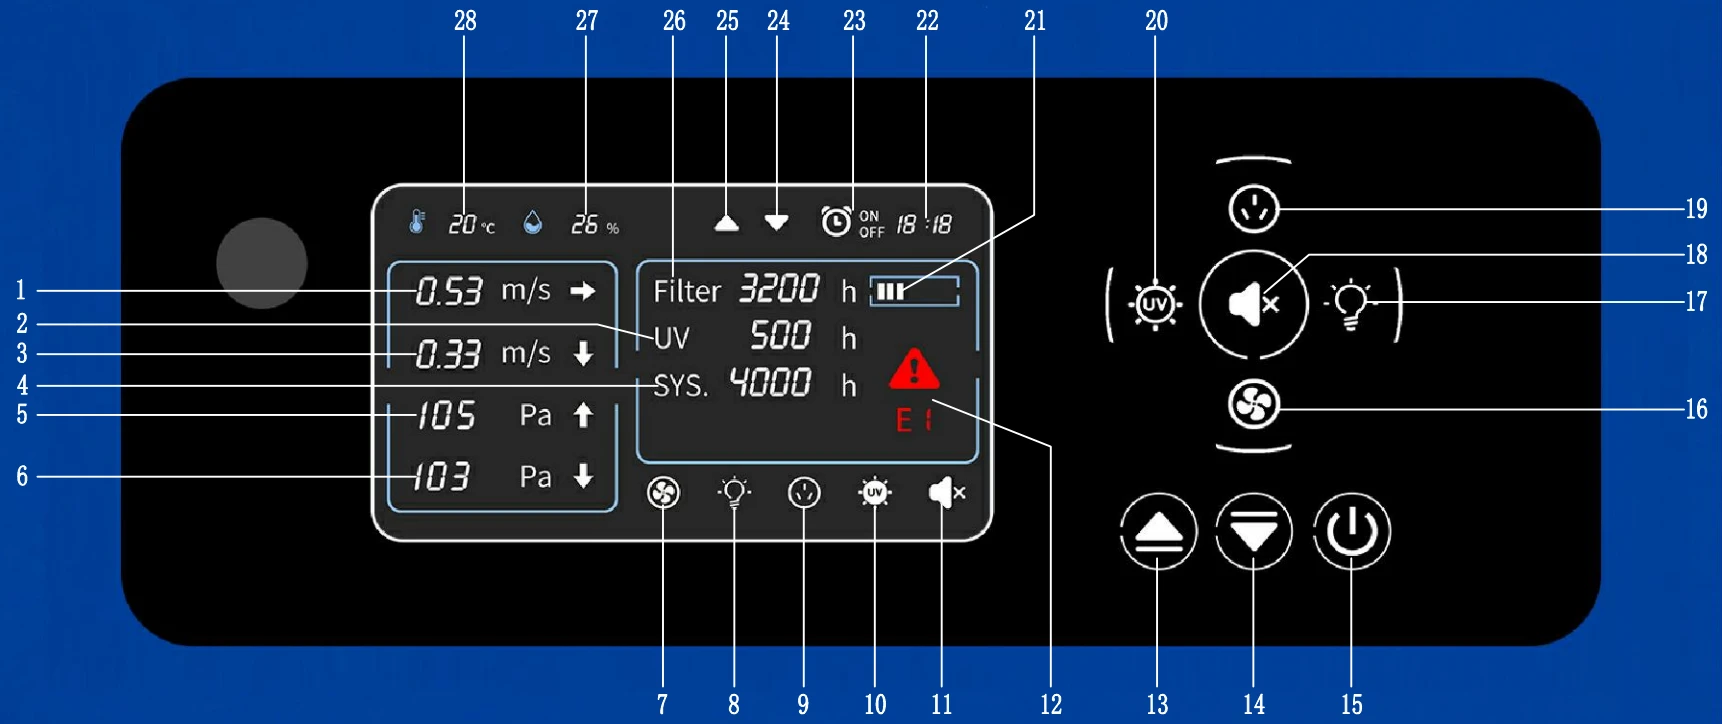
Figure 29
1 | Inflow velocity display | 2 | UV lamp working time display | 3 | Downflow velocity display |
4 | System working time display | 5 | Exhaust filter differential pressure display | 6 | Air supply filter differential pressure display |
7 | Fan working state display | 8 | LED lamp working state display | 9 | Socket working state display |
10 | UV lamp working state display | 11 | Mute state display | 12 | Alarm state display |
13 | Glass door up button | 14 | Glass door down button | 15 | Power button |
16 | Fan button | 17 | LED lamp button | 18 | Mute button |
19 | Socket button | 20 | UV lamp button | 21 | Filter working time barcode display |
22 | Clock display | 23 | Timing function state display | 24 | Glass door down state display |
25 | Glass door up state display | 26 | Filter working time display | 27 | Humidity display |
28 | Temperature display |
Table 8
a) LCD screen
The working status of the equipment and operation can be seen on the LCD screen
b) Soft touch button.
Main functions could be executed by touch-buttons.
| Power button | Master switch for controlling other function buttons. |
| LED lamp button | Control button for LED lamp. Each time you press it, the state of the LED lamp and the indication state on the LCD will change once, that is, from on to off, or from off to on. |
| UV lamp button | Control button for UV lamp. Each time you press it, the state of the UV lamp and the indication state on the LCD will change once, that is from on to off, or from off to on. (This button will be valid only when the glass door is completely closed) |
| Fan control button | Control button for fan working state. Each time you press it, the working state of the fan and the indication state on the LCD will change once. (This button does not work when the glass door is closed) |
| Socket button | The control button for the the power on/off state of the socket. Each time you press it, the power on/off state and the indication state on the LCD will change once. |
| Mute button | When this button is pressed, the mute function is activated. |
| Glass door up button | Press the up button, the glass door will keep rising, and stop when it is 200mm away from the work table. Press the UP button again it reaches the highest point of travel, the glass door will stop moving. |
| Glass door down button | Press the down button, the glass door will keep falling, and stop when it is 200 mm away from the table panel.Press the button again, the glass door will shut down and stop moving. |








Table 9
You can also complete the time adjustment and one-key timing function of the UV lamp through the combination of buttons:
Combination button | Time adjustment | After power on, in the standby (black screen) state, first press the Mute |
One button timing function of the UV lamp | When the device is running, close the fan, LED lamp and glass door, long press the UV lamp Change the UV timing time: In the standby (black screen ) state, long press the UV button |
Table 10
4.4 Remote Control
It is inconvenient for the users to operate from a distance. Small &lamp remote control is flexibly to be used to control all the functions of the cabinet in a distance ≤6m, 30° range. The operator can even carry it with themselves during experiment for convenience.
This remote control adopt specific chip which is featured with good anti-jamming performance, longer control distance and high control precision.
Biological safety cabinet is equipped with special UV lamp. When turning on or turning off the cabinet, sterilization time of UV lamp should be at least 30 minutes. In order to save the waiting time of turning on or turning off the cabinet, we develop reservation time function. It realizes function of automatic turning on or turning off the cabinet after the sterilization finished. Reservation time setting range is from 0 to 99 hours and 59 minutes. This function helps operators to save time and improve efficiency.
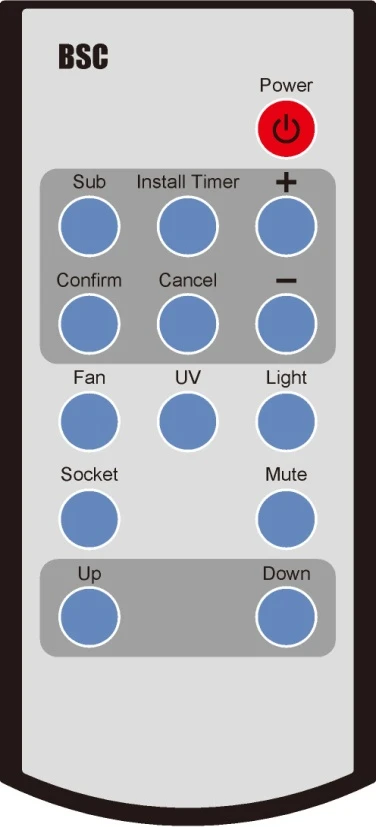
Figure 30
Buttons of Remote Control: |
1. Power (POWER) |
2. Reservation Time (SUB) |
3. Timer (INSTALL TIMER) |
4. Confirm (CONFIRM) |
5. Cancel (CANCEL) |
6. Turn up (+) |
7. Turn down (-) |
8. Fan (FAN) |
9. UV (UV) |
10. Illumination (lamp) |
11. Socket (SOCKET) |
12. Mute (MUTE) |
13. Front window up (UP) |
14. Front window down (DOWN) |
Table 11
A.Timed shutdown
a. When the equipment is running, press the reservation key (SUB) to set the timed shutdown, and the LCD displays off;
b.Adjust the time by pressing the+and - buttons, press the INSTALL TIMER to switch the 10 minutes' bit, hour bit and 10 hours' bit of the time, press the CONFIRM button to save the settings and start the timed shutdown;
c.Press the SUB key twice in succession to exit the timed shutdown function.
B.Reservation timing
a.Plug in the power supply, open the power lock, and select each function button (UV, FAN, SOCKET) to start the corresponding function;
b. Modify the reservation time: when the reservation function is running, press the SUB button to set the reservation opening time, and the interface displays (on). Press the INSTALL TIMER to switch the 10 minutes' bit, hour bit and 10 hours' bit of the time, and press the + and - buttons to adjust the time; Press the CONFIRM button again, and the interface displays (off). Set the running time of the reservation function. The modification steps are the same as above; Finally, press the CONFIRM button to start the reservation timing function;
c.To start the reservation function immediately, set the start time (on) to 00:00; If it is not necessary to start the reservation function immediately, after completing the corresponding reservation settings, press the corresponding buttons (UV, FAN, SOCKET) to exit, and then press the reservation function button to start the reservation function;
d.The glass door must be closed before starting the UV reservation timing function; The glass door must be at a safe height before starting the fan reservation timing function;
e.nterface on: indicates the function will be started after a period of time; Interface off: indicates the function will be closed after running a period of time.
C.Other buttons have the same function as the touch buttons on the operation panel.
4.5 Instructions for Operation
4.5.1 Normal Operation Notice
1) Make sure input voltage is correct and stable.,The rated load of main power socket should be higher than cabinet consumption. Plug must be well grounded.
2) In order to avoid air turbulence, the operator should slightly move his arms during experiment. Hands should stay inside the working area at least 1 minute before operating. In order to decrease the times of arms moving into and out of the working area, prepare all the necessary items inside the cabinet before starting experiment;
3) Moving principles of different samples inside cabinet: When two or more samples need to be moved, be sure that low-polluting samples move to high-polluting samples. Movement of items should also follow the principles of slow-moving.
4) Samples placed in parallel: Samples should be placed in the cabinet parallel to avoid cross-contamination between samples and blocking back air grille.
5) In order to avoid samples being sucked into the negative passage or the Fan, do not place soft and slight samples (for example: soft tissue) on the surface during experiment;
6) The weight of items placed in the cabinet should be no more than 23Kg/25x25cm2;
7) Avoid vibration: avoid using vibration equipment (eg centrifuges, vortex oscillator, etc.) inside the cabinet. Vibration would cause lower cleanliness of operating area and affect operator protection.
8) No flame: No flame is allowed inside the cabinet. Using of fire will lead to airflow disorder, and filter damage. If sterilization is required during the experiment, infrared sterilizer is highly recommended.
9) ULPA filter life: With the usage time increasing, dust and bacteria accumulate inside ULPA filter. Filter Resistance is getting bigger, when it reaches the maximum point, there will be audible and visual alarm. Please contact our company service department in time, replace new ULPA filter, otherwise it will affect the safety performance of the equipment. The used filter should be processed as medical waste.
10) There is a negative passage surrounding the work area, which is sealed strictly in the factory. The operator is not allowed to remove or loose screws of those parts. If necessary, please contact service personal.
11) Front Grille is used for air intake and drain. Do not block it, otherwise it will affect airflow. Armrest is recommended to solve this problem and reducing the operator's wrist fatigue.
12) Long-term use of biological safety cabinets will inevitably cause pollution (e.g. ULPA filters, corner cabinets, etc.). In order to sterilize thoroughly every 500 hours, formalin (formaldehyde) fumigation sterilizer is recommended. After sterilization, neutralize formaldehyde gas with ammonium hydrogen carbonate. Make sure no sterilization gas escapes during the whole process.
The maximum storage period is one year. If the period is more than one year, performance test should be done.
 Serious declaration: we will take no responsibility for risks caused by improper operation and man-made damages!
4.5.2 Operation Process
1) Connect the same power reply, as required of equipment
2) Open the power lock, LCD display lamps up and alarm rings at the same time, then the machine enters to standby status. Waiting for the operator to input button to use it;
3) Press POWER button, then the following functions are available: Fluorescent lamp. UV lamp,
Fan, Mute, Sockets, Front window up and down, Reservation timing;
When front window is closed and fluorescent lamp is off, then press the UV button to select the sterilization function.
4) Before doing experiment, please sterilize the cabinet for more than 30 minutes by UV lamp;
(1) For safety of eyes and skin, people should leave room during the UV sterilization.
(2) UV lamp intensity should be tested regularly. If there is no test conditions, it should be replace when the UV timer on the display indicate the working time reaches to 1000 hours.
5) Please move the front window at 200mm height from the work table, turn on the fan, make sure the experiment should be started after fan working for at least half an hour;
For operating safety, please put testing materials inside the cabinet in advance, and keep the front window at 200mm height from the work table during operation.
6) After finishing the experiment, please move the front window down to the bottom, and make sure to sterilize the cabinet by UV lamp for 30 minutes before turning off the cabinet.
4.6. Daily Maintenance
Because the operating time will directly affect the judgment of maintenance needs, we recommend the user keep a detailed record of operating time for reference.