
Get Price
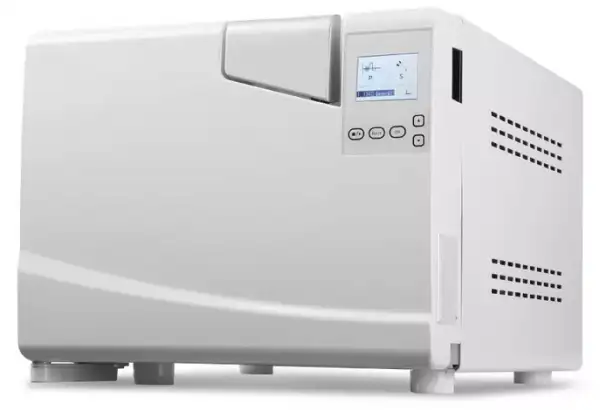
Class B Autoclave BAPV-202
- 1.Safety Valve
- Prevent chamber from over pressure
- 2.Bacteria Filter
- High quality,2μm precision
- 3.Steam Generator
- Patented design, high efficiency and reliable
- 4.Air Switch
- Shut down the machine in case of electricity leakage or short circuit
- Up to 3-Year Product Warranty
- US & EU Compliance Standards
- Door-to-Door Shipping
Technical Specifications
Detailed operating and construction parameters for this model.
| Model | BAPV-202 |
| Capacity | 12L |
| Sterilization Temperature | |
| Working Pressure | |
| Features | |
| Description / V/Hz | 220/50 |
| Voltage / W | 2500 |
| Chamber size / cm | Φ 20x38 |
| Product size / cm | 61x50x43 |
| Installation Size / cm | 80 |
| Weight / kg | 50 |
Product Features
Key design, performance, usability, and safety advantages.
Extra Information View additional product guidance, technical notes, diagrams, and supporting information.
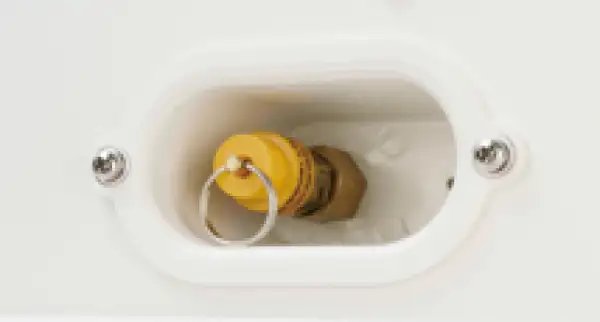
1.Safety Valve
Prevent chamber from over pressure
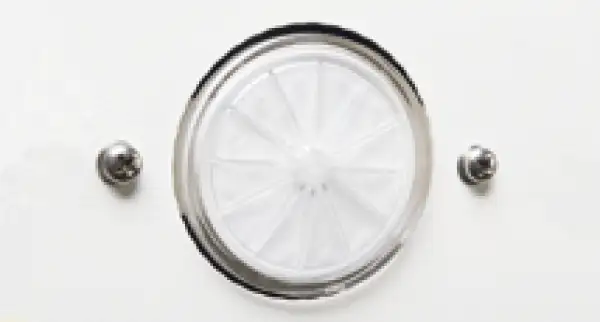
2.Bacteria Filter
High quality,2μm precision
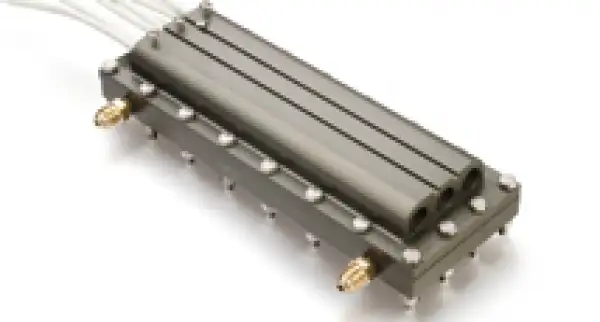
3.Steam Generator
Patented design, high efficiency and reliable
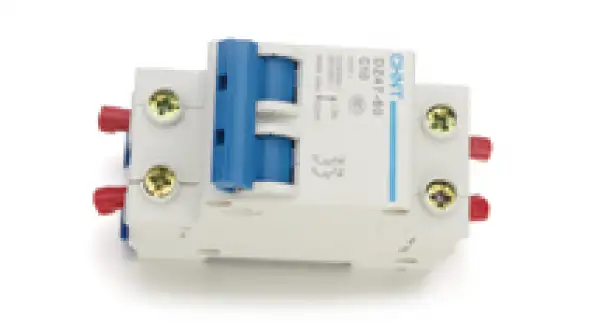
4.Air Switch
Shut down the machine in case of electricity leakage or short circuit
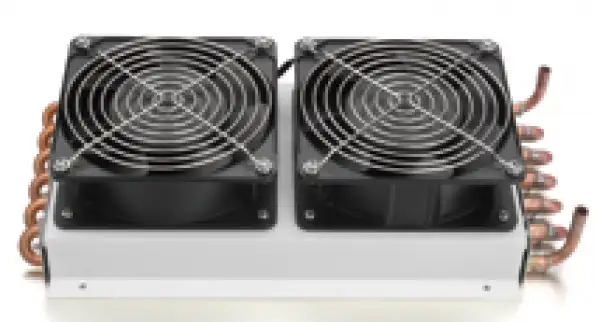
5.Double Fans
Bring faster cooling and more efficiency sterilization
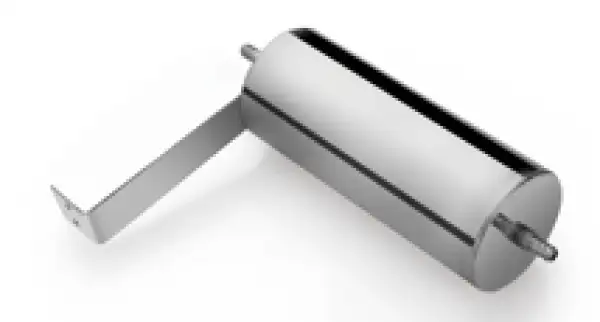
6.Water Steam Separator
Patented design, prevent vacuum pump from oil damaging
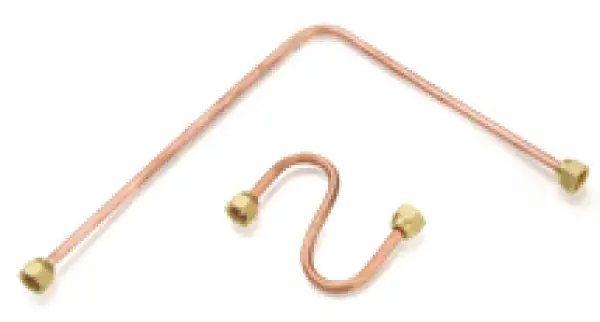
7.Brass Piping
Withstand high temperature and pressure safe and reliable
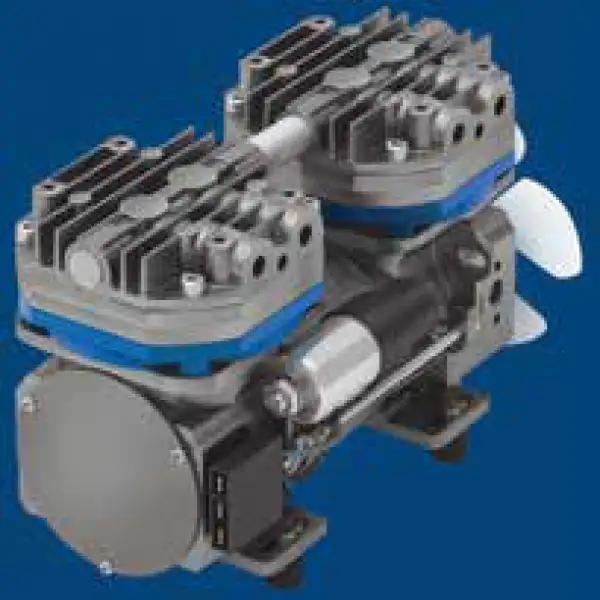
8. German vacuum pump (optional)
More powerful and less noise.
Operating Manual View instructions, operating procedures, safety information, and maintenance guidance.
1. Explanation of Symbols on Unit
2. General Introduction
3. Using Range
4. Parameters and Process of the Sterilizer
5. Control Panel
5.1. LCD screen presentation
5.2 Menu "USER" presentation
5.3 ADV MENU
5.4 Press button
6. Installation
7.Operation
8. Abnormal Situation
9. Maintenance
10. Transport and Storage
11. Guarantee
12. Accessories
1. Explanation of Symbols on Unit
| Caution,Read the instruction for use |
| Symbol for"PROTECTIVE CONDUCTOR TERMINAL" |
| Symbol for "HOT SURFACE" |
| Symbol for "ENVIRONMENT PROTECTION - Waste electrical products should not be disposed of with household waste. Please recycle where facilities exist. Check with your local Authority or retailer for recycling advice". |
| Symbol for "MANUFACTURER" |
| Symbol for "COMPILES WITH MDD93/42/EEC REQUIREMENTS" |
| Symbol for "DATE OF MANUFACTURE" |
| Symbol for "SERIAl NUMBER" |
| Symbol for "EUROPEAN REPRESENTATION" |
| Symbol for "THIS WAY UP" |
| Symbol for "KEEP AWAY FROM RAIN" |
| Symbol for "DO NOT ROLL" |
| Symbol for "STACKING LIMITED 3" |
| Symbol for temperature limits are 5°C ~40°C |
| Symbol for The relative humid:≤ 80% |


Table 1
Safety Cautions
 If you ignore these "cautions", may cause electric shock, fire or equipment damages.
1. Please use a three hole socket (230±23VAC/10A/50Hz~60Hz),and be sure the socket is connected to the ground.
Do not put the device in a place where it is very difficult to cut off the power.
2. Please don't use any other voltage powers.
3. Never touch the plug or the socket with wet hands.
4. Don't pull, change, over-bend or twist wire, or don't leave heavy things on wire.
5. Don't put the sterilizer on an unstable shelf or counter or surfaces which could cause a fire or fume.
6. Don't block the sterilizer's ventilation and radiation.
7. Don't put anything on the sterilizer.
8. If the user smells or hears abnormally while running (it doesn't include the noise of pumps), then cut off the power and contact sellers or manufacturers.
9. Please cut off the power if the user won't use the sterilizer for a long time.
2. General Introduction
Steam Sterilizer is operated by doctors or professionals and is designed specially for clinic, hospital, laboratory etc. The sterilizer uses a microprocessor with an intelligence control system, and humanistic interface, operating easily, safely and reliably. The parameters and conditions of the sterilizer will be displayed on the digital screen during the processing. To ensure the reliability of sterilization, the machine will trouble self-diagnose and self-protect automatically during overheat or overpressure situations. Inside of the sterilizer has a collector of condensate water that prevents the steam from polluting the environment.
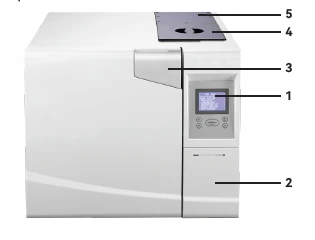
Figure 1
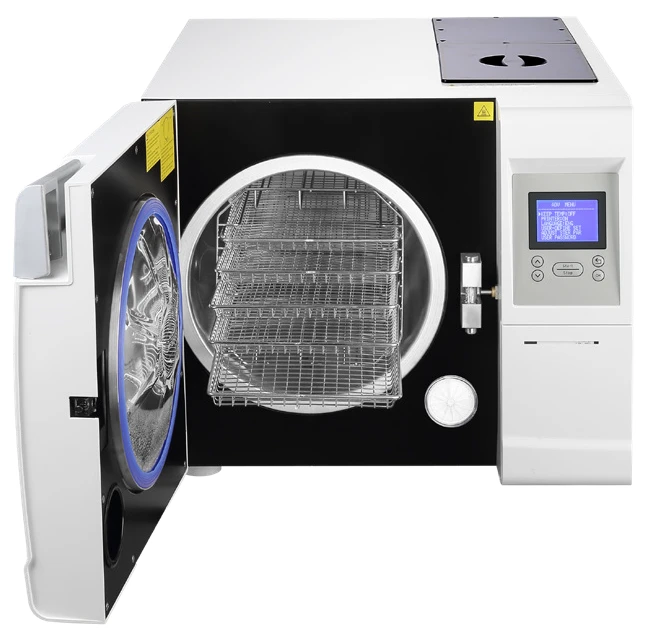
Figure 2
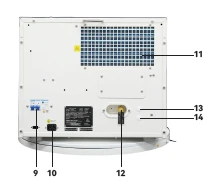
Figure 3
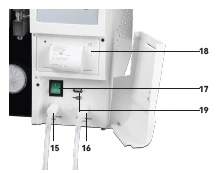
Figure 4
Item | Description | Item | Description |
1 | Interface for user | 2 | Printer cover |
3 | Handle for opening/closing door | 4 | Clean water tank |
5 | Waste water tank | 6 | Door gasket |
7 | Bacteria filter | 8 | Door locker |
9 | Air-break switch | 10 | Power inlet |
11 | Air outlet for cooling | 12 | Safety vavle |
13 | Auto water inlet | 14 | Auto drainage |
15 | Waste water outlet | 16 | Clean water outlet |
17 | Power | 18 | Printer cover |
19 | USB |
Table 2
3. Using Range
This sterilizer is for sterilization of invasive medical devices. It can prevent cross infection.
This sterilizer is highly penetrable for the department of hospital, stomatology, ophthalmology, and biological research institute. Sterilizing surgical equipment, stomatology instruments and syringes etc. It can sterilize the wrapped or non-wrapped, solid, hollow load products type A and porous products as represented by the test loads in the standard "EN13060:2004+A2:2010".
This sterilizer is also can be used in non-medical and veterinary applications.
 Do not sterilize liquid!
4. Parameters and Process of the Sterilizer
4.1 Parameters :
The condition of using the sterilizer:
Temperature of environment: 5°C~40°C;
Relative humidity: ≤80%;
Bactericidal pressure: >70kPa;
Input:230VAC, 50Hz, 2250VA
The condition of working:
The highest rated working pressure: 0.21~0.23MPa;
The highest rated working temperature: 134~137°C;
Life time: 5 years
The condition of transport and storage:
The temperature range: 5~40°C
The relative humid:≤80%
No corroding gases
The net weight of the device:BAPV-202 :50.25KG BAPV-203:53.5KG
The measure of device: see below picture.
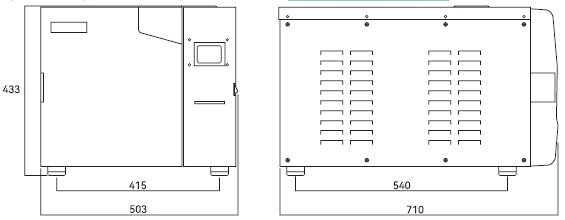
Figure 5
4.2 Parameters of the Sterilizer
Process | Vacuum Times | Sterilizing Time | Sterilizing Temperature | Sterilizing Pressure | Vacuum Persist Time | Dry Time |
121°C / SOLID | 1* | 20 min* | 121°C | 110 kPa | - | 3* |
121°C / POROUS | 3* | 20 min* | 121°C | 110 kPa | - | 7* |
121°C / HOLLOW | 3* | 20 min* | 121°C | 110 kPa | - | 10* |
134°C / SOLID | 1* | 4 min* | 134°C | 210 kPa | - | 3* |
134°C / POROUS | 3* | 4 min* | 134°C | 210 kPa | - | 7* |
134°C / HOLLOW | 3* | 4 min* | 134°C | 210 kPa | - | 10* |
USER DEFINED | 3* | 5 min* | 134°C* | 210 kPa | - | 10* |
B-D TEST | 3 | 4 min | 134°C | 210 kPa | - | 7 |
VACUUM TEST | - | - | - | -80 kPa | 15 min | - |
CLEAN PROCESS | 3 | 5 min | 105°C | 20 kPa | - | 10 |
PRIONEN | 3 | 19 min | 135°C | 210 kPa | - | 10 |
Table 3
B-D Test: Countdown on the display shows 4min,but normally it takes 3.5min.
5. Control Panel
5.1. LCD screen presentation
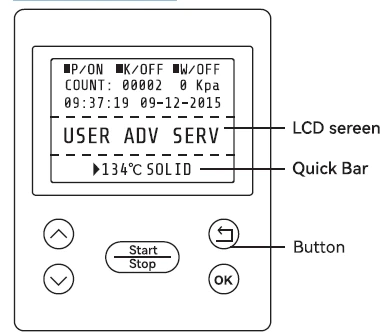
Figure 5
5.1.1 ■P/ON:Indicate the status of printer
The relative menu :
"ADV →PRINTER:ON/OFF".
ON indicates that: the printer can work.
OFF indicate that: the printer can't work
User can change the printer's status in menu:
"ADV→PRINTER:ON/OFF "
5.1.2 ■K/OFF:Indicate the status of function of "Keep temperature"
The relative menu:
"ADV→KEEP TEMP:ON/OFF" .
ON indicates that the sterilizer will heat the chamber and steam generator to preset temperature, when the door is opened, the sterilizer will stop heating the chamber and steam generator. The longest time to keep temperature is 8 hours.
Setting it on can shorten the time of the whole cycle.
User can change the option of keep temperature in menu: "ADV→KEEP TEMP: ON/OFF"
5.1.3 ■W/OFF:Indicate the status of function of "Preheat"
The relative menu: "ADV→PREHEAT:ON/OFF" .
ON indicates that if a user runs a sterilizer program,the sterilizer can't execute the next step until the temperature in the chamber reaches 50°C。
User can change the option of preheat in menu: "ADV→PREHEAT:ON/OFF"
set ■ W/ON, The sterilizer will take very long time to finish the whole cycle.
The standards of some states require this function, please Check with your local standards and set it.
5.1.4 COUNT:Times of already running sterilization program
00023 indicate the sterilizer have ran 23 times
B&D/helix test and vacuum test are not counted.
5.1.5 2 Kpa:
It indicates that the pressure in the chamber is 2 Kpa;
when the sterilizer's door is opened, this pressure is the local air pressure.
5.1.6 14:09:00: Time
User can set it in menu: "ADV→DATE/TIME"
5.1.7 26-11-2011: Date
User can set it in menu: "ADV→DATE/TIME"
5.1.8 USER: User menu
All programs are in this menu, User can select the program in this menu.
5.1.9 ADV: Advance menu/Set menu
User can change options and set the Parameters in this menu
5.1.10 SERV: Serve menu
This menu is for maintenance , only the personnel can enter it with password, user can not enter it
5.1.11 134°C/solid : Shortcut area,
There can record the program which was implemented last time. Users need not to enter USER menu to select the same program.
5.2 Menu "USER" presentation
Eleven process for user to select:
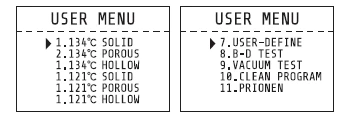
Figure 6
121°C-program and 134°C-program has no difference in sterilization , please take 121°C program for the instruments temperature resistance below 134°C.
Solid programs can only sterilize solid instruments without wrapping, such as pliers, forfex, forceps etc.
A porous program can sterilize the loads which are made of porous material.
A hollow program can sterilize the hollow A and hollow B loads.
User-defined program, All this program's parameters can be adjusted: The sterilization temperature, the sterilization time,dry time and vacuum times.
B-D test is for hollow A loads test . The B-D test and Helix test are the same test program. The only difference is that the B-D test uses a B-D test package, while the Helix test uses a Helix test device (PCD:process challenge device).
A vacuum test is an air leakage test.
We suggest that users do a vacuum test every month. If the result is FAIL, Do not use this device.
Clean program. This program is used to clean the pipeline of the equipment. When the sterilizer displays the prompt of "NEED CLEAN", it shall run this program to clear this display.
Prion program. This program is to sterilize prion virus. For example: Mad cow virus.
5.3 ADV MENU
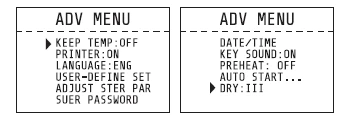
Figure 7
▶ : Cursor
Users can press the "up" or "down" to move the cursor.
When the cursor is before the option which the user wants to set, the user can press "OK" to change the setting.
5.3.1 KEEP TEMP
The relative parameter is "◀ K" in first page.
ON: The sterilizer will heat the chamber and steam generator to preset temperature, when the door is opened, the sterilizer will stop heating the chamber and steam generator. The longest time to keep temperature is 8 hours. Setting it on can shorten the time of the whole cycle.
OFF: The sterilizer will not heat the chamber and steam generator.
5.3.2 PRINTER
ON: The printer will print the records during the working cycle.
OFF: The printer will not print the records during the working cycle.
5.3.3 LANGUAGE
ENG: English
ITL: Italian
5.3.4 USER-DEFINED SET
Setting the program"USER-DEFINED", When the cursor is before this option, the user can enter a detailed setting page by pressing "OK". The detailed setting page:
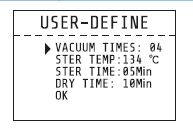
Figure 8
When the cursor is before this option, the user can press "UP" or "DOWN" to change the setting.
Press "OK" with the cursor moving to the next option.
VACUUM TIMES: Setting of vacuum times during the sterilization cycle,
04: Meaning that: the program "USER-DEFINED" has 4 vacuum processes. The range of the "VACUUM TIMES" is 1~10.
STER TEMP: Setting of sterilization temperature,
134°C: The sterilizer temperature of the program "USER-DEFINED" is 134 °C, The range of the "STER TEMP" is 105°C~134°C.
STER TIME: Setting of sterilization time,
05Min:. The sterilizer time of the program "USER-DEFINED" is 05Min, The range of the "STER TIME" is 04min-60min.
DRY TIME: Setting of dry time.
10Min:. The dry time of the program "USER-DEFINED" is 10Min, The range of the "DRY TIME" is 04min-60min.
OK: Save setting and return to the page of the upper.
5.3.5 ADJUST STER PAR :
When the cursor is before this option, the user can press "OK" to enter the program selection page. There are six programs that can be adjusted.
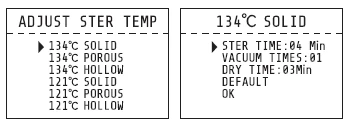
Figure 9
When you select the program which you want to adjust by pressing "UP" or "DOWN", the user presses "OK" to enter the next page. For example 134°C SOLID
There can be three parameters: STER TIME, VACUUM TIMES and DRY TIME.
The setting method is the same as the setting of user-defined program,
DEFAULT: Return to default.
Move the cursor to the "DEFAULT" option by pressing "OK", press "UP" to default the parameters.
5.3.6 USER PASSWORD
If the user sets a user password and sets the "ENABLED" to "ON", user power on the sterilizer, user must input the correct password first, if the password is not correct, user can't use the sterilizer.
If a user forgets the password, please contact the seller or manufacturer.
When the cursor is before the "USER PASSWORD" option in "ADV" menu, press "OK" to enter the next page.
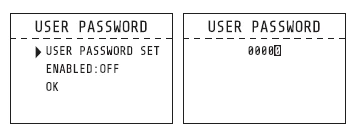
Figure 10
USER PASSWORD SET:
When the cursor is before the "USER PASSWORD SET" option, then press "OK" to enter the next page (pic 4)
User can change the "0" with white fill by press "UP" or "DOWN",
UP: +1; DOWN:-1
Press "START" to change the place of the digit which you want to change.
ENABLED:
ON: the password which you set works.
OFF: the password which you set can't work.
OK:Return to the page of the upper.
5.3.7 DATE/TIME
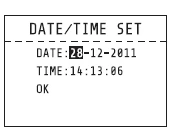
Figure 11
When the cursor is before the "DATE/TIME" option,
Press "OK" to enter the next page.
Press "UP" or "DOWN" to change the date:
UP: +1; DOWN:-1
Press "START/STOP" to change the place of the digit which the user wants to change.
5.3.8 KEY SOUND
When the cursor is before the "KEY SOUND" option, press "OK" to change "ON" or "OFF".
ON: Press a key with a sound.
OFF: Press a key without a sound.
5.3.9 PREHEAT
The relative parameter is "■W" in first page.
When the cursor is before the "PREHEAT" option, press "OK" to change "ON" or "OFF".
ON: If user run a sterilizer program, the sterilizer can't execute the next step until the temperature in chamber reach 50°C
OFF: If a user runs a sterilizer program, the sterilizer will execute the next step whenever the temperature in the chamber reaches 50°C.
5.3.10 T/P ADJUST
When the cursor is before the "T/P ADJUST" option, press "OK" to enter the next page (Pic5).
This menu is to adjust the temperature sensor's base value. If the user finds the display temperature is lower or higher than actual temperature. Users can adjust here.
If found lower, the user should subtract; higher should add.
TEMP1: The temperature in the chamber.
TEMP2: The temperature outside of the heating ring.
TEMP3: The temperature of the steam generator.
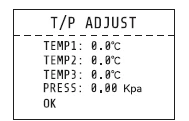
Figure 12
5.4 Press button
5.4.1 UP button
Move up or left
5.4.2 DOWN button
Move down or right
5.4.3 RETURN button
Return to menu of the upper
5.4.4 OK button
Confirm or enter the next menu.
5.4.5 START/STOP button
After the program is selected and confirmed, the prompt :"please push the start key to start…"appears, press the button Start/Stop to start the program.
When the program is running , press the button Start/Stop to finish the program.
6. Installation
When the user has received the product, open the cover of the box by the screw-driver. Then take the product out by the ropes.
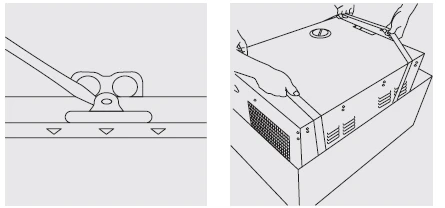
Figure 13
6.1 At least 10 cm space should be left around the sterilizer, and the back space must be at least 20 cm.
Suggest putting sterilizer in a well-ventilated location. Don't block the radiator of the sterilizer.
Put the sterilizer on the horizontal shelf or counter.
Make sure the shelf or counter is strong enough to put the device on.
6.2 Adjust atmospheric pressure before the first time use since atmospheric pressure varies from place to place.
Steps: Cut off the power 2) Open the door 3) Turn on the power, and 20's late, cut off the power, it is done automatically.
If the user does not adjust atmospheric pressure, the sterilizer might not be able to run.
6.3 Auto Water Fill
To use the auto water-fill function:
Connect one end of the water hose to the auto water-fill inlet on the device, and the other end to the water supply source.( the auto water-fill inlet is shown as the figure on the right)
The water supply pressure must be at least 40kPa.
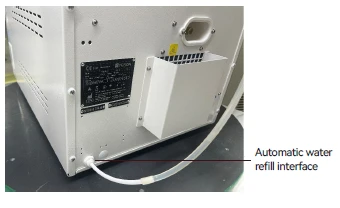
Figure 14
7.Operation
Preparation before using
Before starting to use the sterilizer, please connect the power, press the main power switch at the right side of the plastic panel in the front, if the indicator lamp of this switch is on and LCD screen is also on, That indicates the power of the sterilizer is on. At this time, the program of the sterilizer is in initial status and the sterilizer does not heat. User can select the program which you want to use and start the program by pressing the buttons "OK and Start/Stop" successively.
Please ensure to be well grounded.
7.1 Water filling
After opening the power switch of the sterilizer, if the LCD screen displays the prompt "please fill water" and there is beep, that indicates that the water level in the water tank is too low. As this time the program can't work until fill water full;
Filling water with this series of sterilizers is manual. On the top of the sterilizer, there is a manual water filling hold, as shown in the figure. When the water level in the water tank reaches above the alarm water level, The water shortage prompt will display on LCD. and the beep appears. Fill the water until you hear the voice of "du", it indicates that the water is full.
Please use distilled water to avoid clogging of the steam generator and the valves. Users should be responsible for the consequences it caused.
1.Before top up water, the power must be connected.
2.Please do not put the sterilizer upside down when the tank is full.
3.Suggest: Drain the waste storage tank also when the water in the storage water tank used out.
7.2 If you want to use a flash disk to record the data. Please insert the flash disk into the usb port.
7.3 Working
When the water tank has enough water and waste water tank is not full, it is ready for working.
7.3.1 Put the loads into the chamber
1. No more than 70% of the volume of the sterilizer or no more than 6kg for once.
2. The instruments should not stick to the inside-wall, especially should not block the outlet of the chamber. It should leave at least 10 mm from the inside-wall.
3. Put the test paper into the center of the sterilization package if the user wants to test and judge the sterilization effect.
4. When putting the loads into the sterilizer, we suggest using the tray-hand-holder to prevent scalding.
7.3.2 Setting
Set the parameters:KEEP TEMP,PRINTER,PREHEAT.
7.3.3 Close door
If the door is not be closed correctly, when you have selected the program and press "OK", the LCD will display "Please close the door".
If the user feels the handle is too hard to turn, there may be steam still in the sterilizer. We suggest closing the door quickly or waiting for a few seconds before closing the door.
7.3.4 Choosing program and start
After the door is closed, choose the relative sterilization program according to the loads in the chamber.
All the programs are in "USER" menu. When the cursor moving to "USER" by pressing "UP" or "DOWN", press "OK" to enter. Move the cursor before the right program by pressing "UP" or "DOWN", press "OK" to select this program. The LCD will display "please push the start key to start", then press "START/STOP" to run this program.
The sterilizer will run pre-heating, 3-times vacuum, sterilization and drying automatically. The time of the whole cycle is decided by the initial temperature, the loads and the program.
When the program is finished, LCD will display "END" with three beeps. The user can open the door and take the sterilized loads out.
7.3.5 When it is not in use, please turn off the power switch (be sure the power lamp is off). If the user won't use the sterilizer for a long time, please disconnect the power.
The user shall fill in water promptly if there is a low-water alert. Otherwise it will show "E08 or E9" error alarm.
1. We strongly suggest using the tray-hand-holder to take the tray out of the sterilizer to prevent scalding.
2. Don't open the door until the pressure is within "-05\~05".
To ensure the effectiveness of sterilization, we suggest putting test paper or pouches with indicators together with the loads into the sterilization chamber every time.
7.3.7 If the LCD displays "PLEASE DRAIN WATER FROM WASTE WATER TANK!", this means the waste water tank is full. You must drain water (see picture on page 22, A is waste water tank bleeder valve).
The waste water may be hot; be careful to avoid scalding.
8. Abnormal Situation
The sterilizer will give alarm, release pressure and stop heating automatically if it has any abnormal situations during working. It will absolutely keep the user safe and display the error code( See the below page 14).
Write down the error code No. and cut off the power, don,t open the door and then turn on the power again to wait the pressure turn back to "-0.5~0.5".
We suggest running one more time to see if the error happens again.
If the user cannot find the resolution from the table, contact the seller or our service department, telling us the error code No., we will help the user to solve it as soon as possible.
Item | Code | Alarm | Reason | Resolution |
1 | E31 | Continuous beep | Temperature in chamber >150°C; | Check temperature sensor in chamber |
2 | E32 | Continuous beep | Temperature outside of the heating ring>280°C; | Check temperature sensor outside of the heating ring |
3 | E51 | Continuous beep | Temperature in chamber e ≤ 0°C; | Check temperature sensor in chamber Check the temperature of the place where the sterilizer put on is below 0°C or not. |
4 | E52 | Continuous beep | Temperature outside of the heating ring ≤ 0°C; | Check temperature sensor outside of the heating ring Check the temperature of the place where the sterilizer put on is below 0°C or not. |
5 | E63 | Continuous beep | steam generator temperature ≤ 0°C; steam generator temperature>230°C;Steam temperature control instability,over 230°C,steam generator temperature sensor damaged. | Check steam generator temperature sensor, control board, steam generator |
6 | E2 | Continuous beep | The sterilization pressure over preset pressure +0.4ba(r 134°C process over 3.5bar(absolute pressure)/121°C process over 2.5bar); vacuum unusually,have many air remain in chamber. | Check vacuum pump Do a vacuum test |
7 | E61 | Continuous beep | 134°C process: inner temperature >140°C or 121°C process:inner temperature >127°C;temperature control instability. | Check temperature sensor in chamber. |
8 | E62 | Continuous beep | Temperature outside of the heating ring>155°C;temperature control instability,control board damaged. | Ask professional check temperature sensor outside of the heating ring, control board, heating ring |
9 | E41 | Continuous beep | In preheat period, after 8mins temperature outside of the heating ring<100°C;heating circle damaged. | Check heating ring |
10 | E42 | Continuous beep | In preheat period, after 8mins steam generator temperature <110°C; heating rod damaged. | Check heating rod |
11 | E5 | Continuous beep | When the period of "sterilization" finished. Drain for 10mins, the pressure in chamber still over 0.5bar;air relief instability. | Check water drain valve |
12 | E6 | Continuous beep | The door opened in sterilization period;the door detector switch damaged. | Check door detector switch |
13 | E7 | Continuous beep | The local air pressure value <70KPa; | Can not use in these area Adjust atmospheric pressure:see 5.2 in page 15 |
14 | E8 | Continuous beep | In rise period, every 5mins temperature rise <3°C . | Check water pump, heating rod, control board. Check water tank has enough water. |
15 | E9 | Continuous beep | In sterilization period, the sterilization pressure below the preset pressure -0.3bar. | Check the water tank has no water. |
16 | E10 | Continuous beep | The electromagnet in wrong condition(power on, the electromagnet at close condition; process stack, the electromagnet at open condition; process finished, the electromagnet at close condition) | Check electromagnet, control board |
17 | E11 | Continuous beep | The electromagnet at open condition during running; the poke on control board which use to control electromagnet damaged. | Check control board |
18 | E12 | Continuous beep | The vacuum not reach -70Kpa 2 times during the program which have 3 times vacuum. | Check vacuum pump |
19 | E13 | Continuous beep | Water tank remains lack of water after filling water automatically for a while. | Disable this function or connect to a pressurized water source(≥40kPa) |
20 | E14 | Continuous beep | The water tank triggers low-level and high-level aleks simultaneously. | Replace the high-level sensor or low-level sensor sequentially |
21 | E15 | Continuous beep | The water quality system have problem. | Check the water quality sensor and PCB |
22 | E16 | Continuous beep | During the balancing phase, the pressure inside the chamber is 15 kPa lower than the ambient atmospheric pressure. | Cause 1: Bacterial filter blockage Solution: Replace the bacterial filter periodically Cause 2: solenoid valve F5 failure Solution: Replace solenoid valve F5 |
23 | E99 | Continuous beep | The communication between CPU is wrong. | Check control board data line, and CPU install |
Table 4
9. Maintenance
The parts must be regular check or replaced:
The germ-tight filter.
The seal ring.
The safety valve.
Item | Operator | Cycle | Maintenance |
Door | Professional | 2 years | See 9.1 |
Seal ring | User | 1 year | See 9.5 |
Paper of printer | User | When the printer has no paper | See 9.2 |
Fuse | Professional | When the fuse is damaged | See 9.6 |
Safety valve | Professional | 1 year | See 9.9 |
Water tank level sensor | User | Every half of year | See 9.10 |
Water quality module | User | Every half of year | See 9.11 |
Table 5
9.1 Door Tightness Adjustment
Door Adjustment:
Push down the lever while turning the door to adjust tightness. As shown in the picture below, anticlockwise turning will tighten the door, i.e, the door will be closer to the chamber. Therefore, it needs more strength to turn the handle. Clockwise turning the door will loosen it.
Steps :
1)Push down the lever a little
2)Turning the door to an angle
3)Release the lever
4)Keep turning the door to a place where the door cannot move anymore.
After the door adjustment, it needs to do a vacuum test. If there is a leakage, the user shall adjust it again.
If the door is too loose, the sealing ring might explode out with a big "bang". So, please be careful when using this function!
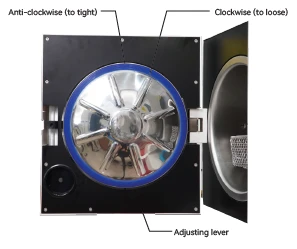
Figure 15
9.2 Change printer paper and paper feed.
Change printer paper :
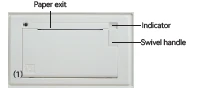
Figure 16
press "open" button of the printer to open the door,
change the paper,cover the door sheet as the figure 2;
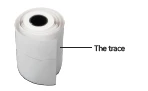
Figure 17
Checking whether the paper change is correct through paper feed.
Printer paper feed check:
when press "LF" button once to see if the paper feed in gear; if the paper feed out of gear, the paper jammed, then change paper and feed again;
If the printer paper feed is correct, but there's no data on the paper, please anti to install the printer paper.
The printer paper has direction and only one side can be printed on.
9.3 To use disinfectant to clean the tank every week.
9.4 To use ethyl alcohol disinfect and clean the inner surface of the sterilizer every month.
9.5 Every 150 cycles, we recommend replacing the germ-tight filter.
9.6 Replace the fuse
(1) Disconnect power
(2) Push the screwdriver and turn the screws in anti-clockwise, and then take the fuse out.
(3) Replace the old fuse with a new one , then turn the screws clockwise.
Check the parameter of the new fuse if it is correct before replacement.
9.7 Clean seal ring regularly
For keeping a good seal, the user should clean the seal ring regularly. Cleaning the seal ring by distilled water. If leaking still happens after cleaning, the user may have to replace the seal ring.
9.8 Replace the seal ring
Tool:The user needs a screwdriver without sharpness.
A. Hold the seal ring by hand and use another one to hold a screwdriver carefully to separate the door and the seal ring. Then take the seal ring out slowly.
B. After the user takes the seal ring out, clean and check it, if it is damaged, the user must replace it.
C. After the seal ring is cleaned, put it back.
D. Attention: if the user finds it hard to put the seal ring back, use a screwdriver and press it carefully until it is done.
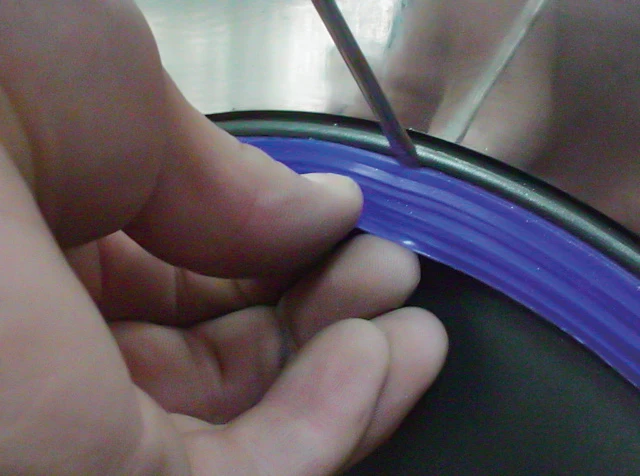
Figure 18
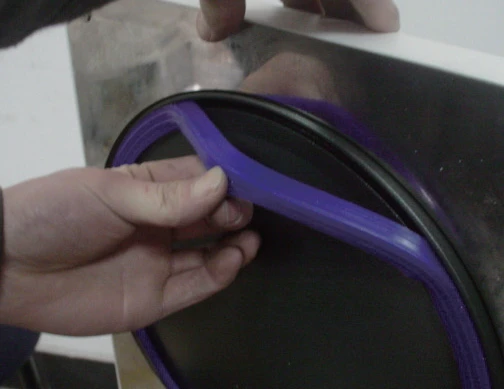
Figure 19
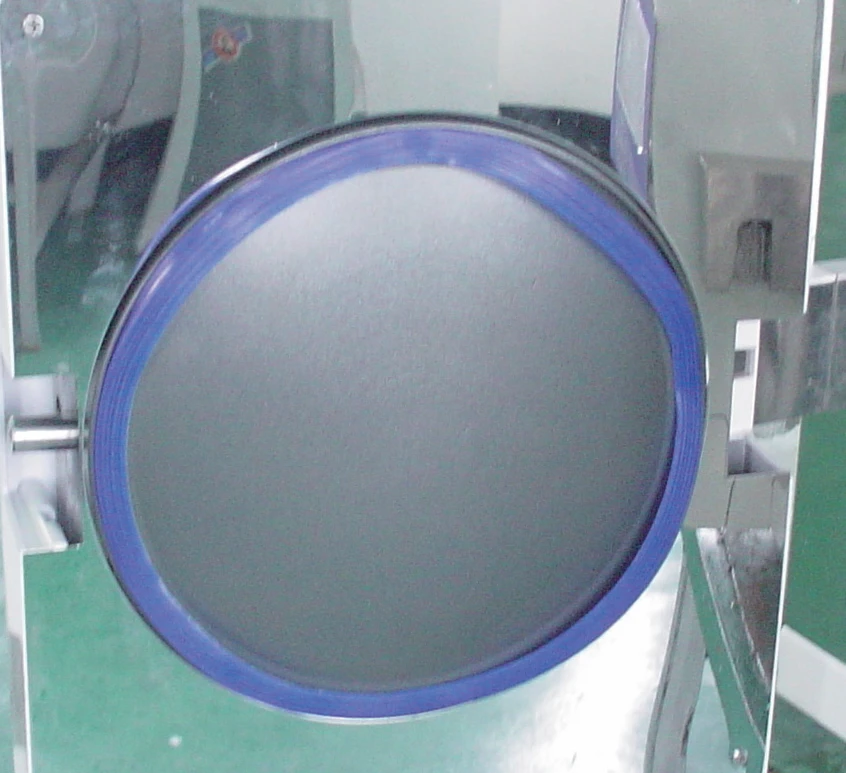
Figure 20
9.9 Regular check the safety valve. If the safety valve is become invalid,it must be replaced
Replace the safety valve:
1. Removing part 1, then removing the pipe which connects the safety valve.
2. Removing the screw);
3. Replace the new safety valve.
The new safety valve must be the same model. If a user can't find the same safety valve,please contact the seller or our service department.
Never maintain and repair the sterilizer until the power is disconnected and it is getting cool down for preventing scald. Repairing the sterilizer must be done by well trained professionals.
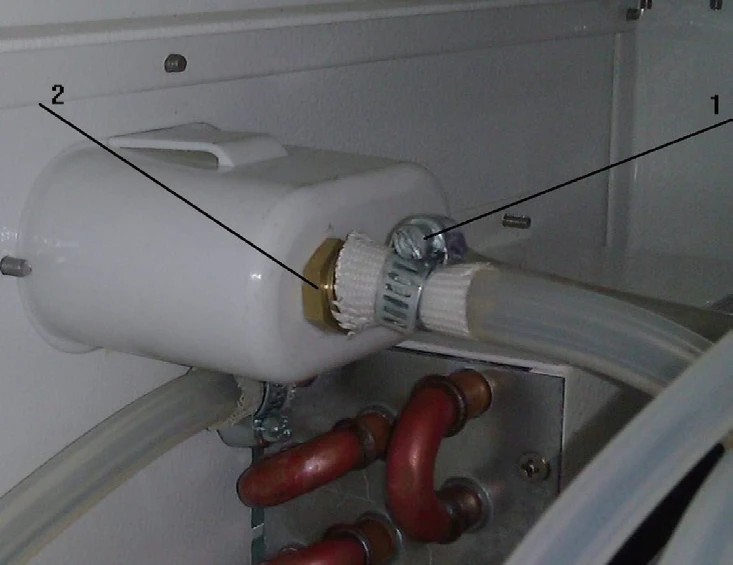
Figure 21
9.10 Checking the water tank low-level sensor
With the device powered on, press the shortcut key to access the operation interface. Drain the water tank completely. If WATER DEFICIENCY ALERT appears on the interface, the sensor functions correctly. If NO ALERT appears, contact the supplier and report the fault.
9.11 Checking the water quality function
With the device powered on and water present in the tank, use a conductor(e.g. tweezers, scissors) to short-circuit the two probe pins of the water quality sensor. Maintain the contact for 5-10 seconds. If WATER QUALITY ALERT appears on the interface, the function is normal. If NO ALERT appears, contact the supplier and report the fault.
10. Transport and Storage
10.1 Preparation
Cool down the sterilizer and disconnect power.
10.2 Drainage
Empty all tanks:Insert the side of the pipe without joint into the bleeder valve,A is a waste water tank bleeder valve,B is a water storage tank bleeder valve. Then turn the drainage switch towards anti-clockwise.
10.3 Terms of transportation:
Terms of transportation should according to the order contract.
10.4 Terms of store:
After packing, the sterilizer should be kept indoor, which the temperature is 5°C~40°C, the relative humid is no more than 80%,no corroding gases and well-ventilated.
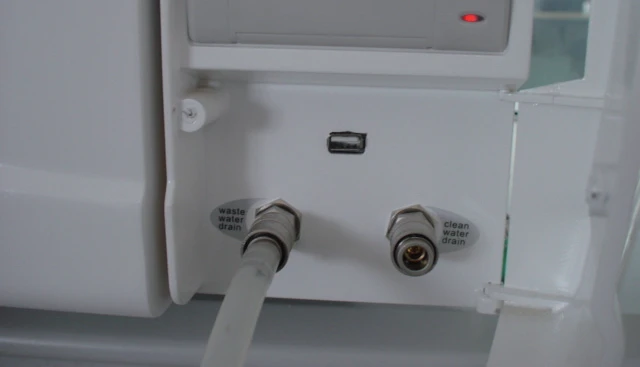
Figure 22
Don't drag during moving.
11. Guarantee
1. Warranty : 2 years.
2. We will not offer free service even in the first year if the things happen as below:
(1)The damage is caused by incorrect installation;
(2)The damage is caused by fall down or impact by careless;
(3)The damage is caused by customer's install or repair;
(4) Without invoice and guarantee card;
(5)The damage is caused by force majeure such as abnormal voltage, fire etc;
The damages are caused by the above reasons, we will still offer our service, but we will also charge appropriate fees.
12. Accessories
1.Drainage pipe *1
2.Tray *3
3.Cable with plug *1
4. Tray shelf *1
5. Tray-hand-holder *1
6. Fuse ( Φ6X30 230V20A ) *2
7. Manual *1
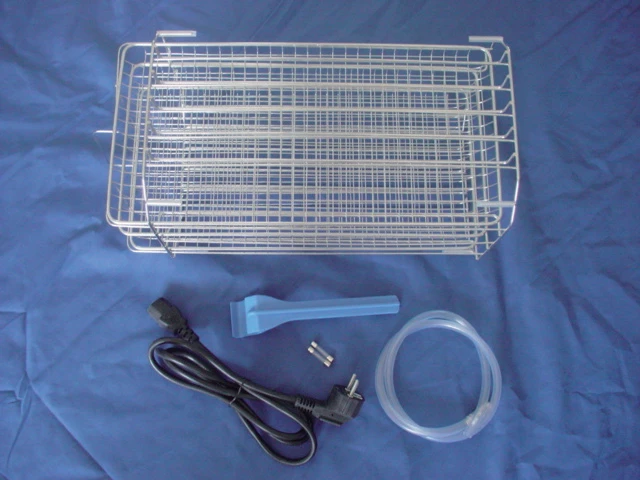
Figure 23
APPENDIXES
Appendix 1 : Structure Diagram
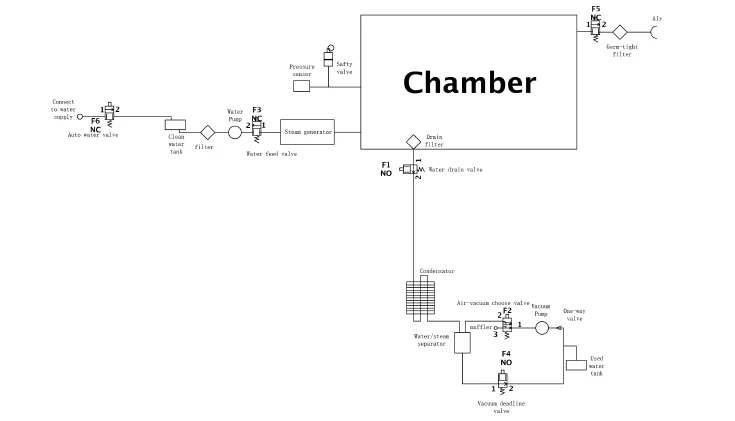
Figure 24
Appendix 2:Circuit diagram
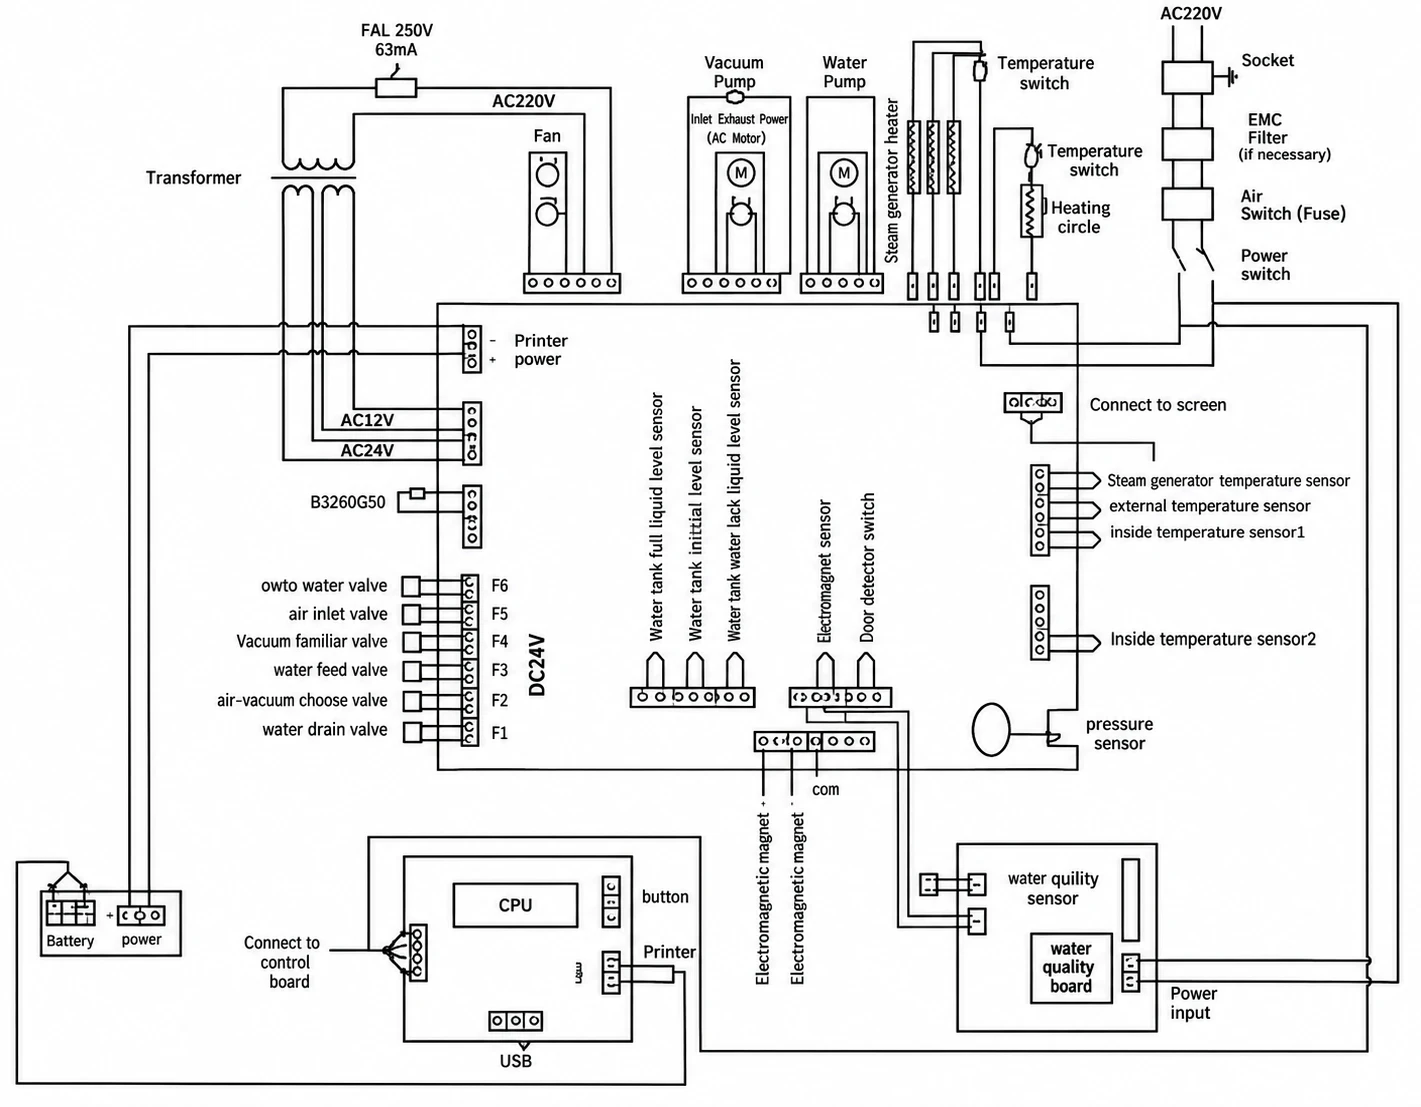
Figure 25
Vacuum pump power: AC: 230V 50Hz 70W
Water pump power: AC: 230V 50Hz 47W
Heating circle: AC: 230V 50Hz 1500W
Heating rod: AC: 230V 50Hz 750W
Electromagnetic valve: DC: 24V 5W
Appendix 3: EMC
The Steam sterilizer is intended for use in the electromagnetic environment specified below. The customer or the user of the Steam sterilizer should assure that it is used in such an environment.
Emissions Test | Compliance | Electromagnetic Environment - Guidance |
RF emissions CISPR 11 | Group 1 | The Steam sterilizer uses RF energy only for its internal function. Therefore, its RF emissions are very low and are not likely to cause any interference in nearby electronic equipment. |
RF emissions CISPR 11 | Class B | The Steam sterilizer is suitable for use in all establishments, including domestic establishments and those directly connected to the public low-voltage power supply network that supplies buildings used for domestic purposes. |
Harmonic emissions IEC 61000-3-2 | Class A | The Steam sterilizer is suitable for use in all establishments, including domestic establishments and those directly connected to the public low-voltage power supply network that supplies buildings used for domestic purposes. |
Voltage fluctuations/flicker emissions IEC 61000-3-3 | Complies | The Steam sterilizer is suitable for use in all establishments, including domestic establishments and those directly connected to the public low-voltage power supply network that supplies buildings used for domestic purposes. |
Table 6
The Steam sterilizer is intended for use in the electromagnetic environment specified below. The customer or the user of the Steam sterilizer should assure that it is used in such an environment.
Immunity Test | IEC 60601 Test Level | Compliance Level | Electromagnetic Environment - Guidance |
Electrostatic discharge (ESD) IEC 61000-4-2 | ±6 kV contact; ±8 kV air | ±6 kV contact; ±8 kV air | Floors should be wood, concrete or ceramic tile. If floors are covered with synthetic material, the relative humidity should be at least 30%. |
Electrical fast transient/burst IEC 61000-4-4 | ±2 kV for power supply lines; ±1 kV for input/output lines | ±2 kV for power supply lines; ±1 kV for input/output lines | Mains power quality should be that of a typical commercial or hospital environment. |
Surge IEC 61000-4-5 | ±1 kV line(s) to line(s); ±2 kV line(s) to earth | ±1 kV line(s) to line(s); ±2 kV line(s) to earth | Mains power quality should be that of a typical commercial or hospital environment. |
Interruptions and voltage variations on power supply input lines IEC 61000-4-11 | <5% Uₜ (greater than 95% dip in Uₜ) for 0.5 cycle; 40% Uₜ (60% dip in Uₜ) for 5 cycles; 70% Uₜ (30% dip in Uₜ) for 25 cycles; <5% Uₜ (greater than 95% dip in Uₜ) for 5 sec | <5% Uₜ (greater than 95% dip in Uₜ) for 0.5 cycle; 40% Uₜ (60% dip in Uₜ) for 5 cycles; 70% Uₜ (30% dip in Uₜ) for 25 cycles; <5% Uₜ (greater than 95% dip in Uₜ) for 5 sec | Mains power quality should be that of a typical commercial or hospital environment. If the user of the Steam sterilizer requires continued operation during power mains interruptions, it is recommended that the Steam sterilizer be powered from an uninterruptible power supply or a battery. |
Power frequency (50/60 Hz) magnetic field IEC 61000-4-8 | 3 A/m | 3 A/m | Power frequency magnetic fields should be at levels characteristic of a typical location in a typical commercial or hospital environment. |
Table 7
Electromagnetic Immunity
The Steam sterilizer is intended for use in the electromagnetic environment specified below. The customer or the user of the Steam sterilizer should assure that it is used in such an environment.
Immunity Test | IEC 60601 Test Level | Compliance Level | Electromagnetic Environment - Guidance |
Conducted RF IEC 61000-4-6 | 3 Vrms, 150 kHz to 80 MHz | 3 Vrms | Portable and mobile RF communications equipment should be used no closer to any part of the Steam sterilizer, including cables, than the recommended separation distance calculated from the equation applicable to the frequency of the transmitter. |
Radiated RF IEC 61000-4-3 | 3 V/m, 80 MHz to 2.5 GHz | 3 V/m | Recommended separation distance: (150 kHz to 80 MHz); (80 MHz to 800 MHz); (800 MHz to 2.5 GHz). Where P is the maximum output power rating of the transmitter in watts (W) according to the transmitter manufacturer and d is the recommended separation distance in metres (m). Field strengths from fixed RF transmitters, as determined by an electromagnetic site survey, should be less than the compliance level in each frequency range. Interference may occur in the vicinity of equipment marked with the RF interference warning symbol. |
Table 8
Note | Description |
Note 1 | At 80 MHz and 800 MHz, the higher frequency range applies. |
Note 2 | These guidelines may not apply in all situations. Electromagnetic propagation is affected by absorption and reflection from structures, objects and people. |
a | Field strengths from fixed transmitters, such as base stations for radio (cellular/cordless) telephones and land mobile radios, amateur radio, AM and FM radio broadcast and TV broadcast cannot be predicted theoretically with accuracy. To assess the electromagnetic environment due to fixed RF transmitters, an electromagnetic site survey should be considered. If the measured field strength in the location in which the Steam sterilizer is used exceeds the applicable RF compliance level above, the Steam sterilizer should be observed to verify normal operation. If abnormal performance is observed, additional measures may be necessary, such as reorienting or relocating the Steam sterilizer. |
b | Over the frequency range 150 kHz to 80 MHz, field strengths should be less than 3 V/m. |
Table 9
Recommended Separation Distances Between Portable and Mobile RF Communications Equipment and the Steam Sterilizer
The Steam sterilizer is intended for use in an electromagnetic environment in which radiated RF disturbances are controlled. The customer or the user of the Steam sterilizer can help prevent electromagnetic interference by maintaining a minimum distance between portable and mobile RF communications equipment (transmitters) and the Steam sterilizer as recommended below, according to the maximum output power of the communications equipment.
Rated Maximum Output Power of Transmitter (W) | Separation Distance 150 kHz to 80 MHz (m) | Separation Distance 80 MHz to 800 MHz (m) | Separation Distance 800 MHz to 2.5 GHz (m) |
0.01 | 0.12 | 0.12 | 0.23 |
0.1 | 0.38 | 0.38 | 0.73 |
1 | 1.2 | 1.2 | 2.3 |
10 | 3.8 | 3.8 | 7.3 |
100 | 12 | 12 | 23 |
Table 10
Description | Details |
Separation Distance Calculation | For transmitters rated at a maximum output power not listed above, the recommended separation distance d in metres (m) can be estimated using the equation applicable to the frequency of the transmitter, where P is the maximum output power rating of the transmitter in watts (W) according to the transmitter manufacturer. |
Note 1 | At 80 MHz and 800 MHz, the separation distance for the higher frequency range applies. |
Note 2 | These guidelines may not apply in all situations. Electromagnetic propagation is affected by absorption and reflection from structures, objects and people. |
Table 11