
Get Price

Benchtop Low Speed Centrifuge BCBL-401
Low Speed Centrifuge is suitable for extraction of medical products, blood bank, clinical trial and blood serum, plasma, body fluids and biological specimens in biology laboratories.
- LCD screen displays timing and speed, convenient to set and read.
- Three patterns: Short mix, timing set:30 to 59s, continuous running. More efficient.
- Sound alerts after the rotor stops . LCD displays process.
- Adjustable speed from 300 to 4500rpm, relative centrifugal force to 2490xg. High accuracy of speed and time, excellent performance.
- Up to 3-Year Product Warranty
- US & EU Compliance Standards
- Door-to-Door Shipping
Technical Specifications
Detailed operating and construction parameters for this model.
| Model | BCBL-401 |
| Max. Speed | 4500rpm |
| Max. RCF | 2490xg |
| Max. Capacity | 7ml/5mlx16 or 10ml/15mlx12 or 50mlx6 |
| Speed Accuracy | ±20rpm |
| Time Range | 1s~99m59s or continuous |
| Safety | self-lock, over-speed, status diagnosis system |
| Working Noise | ≤56dB |
| Acceleration / Deceleration | 50s ↑ 20s ↓ |
| Voltage | AC100~240V, 50/60Hz |
| Power | 120W |
| Dimension (WxDxH) | W.300 x D.431 x H.178mm |
| Net weight | 17.0kgs |
Product Features
Key design, performance, usability, and safety advantages.
Accessories For Purchase View compatible optional accessories and additional items available separately.
| Images | Name | Description |
 | Rotor | 5ml/7ml x16 |
 | Rotor | 10ml/15ml x12 |
 | Rotor | 50ml x6 |
Operating Manual View instructions, operating procedures, safety information, and maintenance guidance.
1. PREFACE
2. Introduction
2.1 Unit Kit
2.2 Structure
2.3 Installation
3. Parameters
4. Safety Warnings
4.1 Sample and Tube Placement.
4. 2 Rotor Cleaning and Maintenance
5. Operation Guide
5.1 Operation Key
5.2 Rotor Installation and Uninstallation
5.3 Sample loading
5.4 Setting Time and Speed
5.5 Short Operation
5.6 How to open the lid when power off
6. Maintenance
7. Error Analysis and Trouble Shooting
8. Warranty
1. PREFACE
Thanks for choosing low speed centrifuge. This operation manual describes functions and operation of the instrument. In order to use the instrument properly, please read this manual carefully before operating the Instrument.
2. Introduction
his centrifuge is suitable for tubes 5ml, 7ml, 10ml, 15ml or 50ml, widely used in laboratories in life science, medical science and chemical industry. Read this manual carefully before operating the Instrument.
2.1 Unit Kit
Item | Quantity |
Low Speed Centrifuge | One Set |
Power Line | One Line |
Operation Manual | One Piece |
Table 1
2.2 Structure
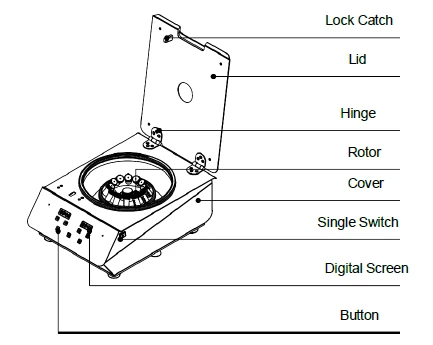
Figure 1
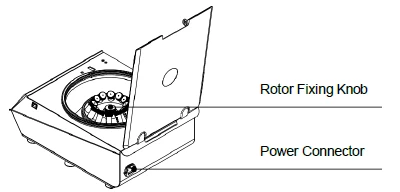
Figure 2
2.3 Installation
2.3.1 Put the instrument on a horizontal and even working table. Make the suction feet hold the table.
2.3.2 Connect power as below figure. DC socket is on the rear of the instrument. Voltage should be AC110V or 220V,50Hz/60Hz.
2.3.3 Make sure there is no harm materials (or potential harm materials) in 30mm around the instrument.
2.3.4 Power on and open the cover, put the rotor in the motor shaft. Use the rotor fixing knob to fix the rotor tightly. If the rotor already put on the motor shaft, check and make sure it is fixed tightly.
IMPORTANT!
Make sure the rotor is fixed tightly before operation whenever you need to use the instrument.
3. Parameters
Type | BCBL-401 |
Voltage | 110-240V ~ 50-60Hz |
Power | 120W |
Max. Speed | 300~4500rpm |
Max. RCF | 2700 X g |
Speed Accuracy | ±20 rpm |
Timing Range | 30s~99m:59s/continuous working |
Rotor Capacity | 16x7ml/5ml, 12x15ml/10ml, 6x50ml tubes |
Safety | Self-lock, Over speed protection, Status diagnosis system |
Noise | ≤ 56 dB |
Increase/decrease speed | 20s ↑ 20s ↓ |
Other Functions | Speed/accelerated speed switch function, short operation, operating status display,alert |
Dimension(WxDxH) | 300mmX431mmX178mm |
Net Weight(include rotor) | 17kgs |
Table 2
4. Safety Warnings
 Forbidden using rotor with crack or damage.
Forbidden moving the instrument when it is in operation.
4.1 Sample and Tube Placement.
4.1.1 Density of sample in the tube should less than max. allowed density.
4.1.2 Check the condition of the centrifugal tubes before place them into the rotor. Do not use tube with crack or damage.
4.1.3 Make sure the tube lid is well closed before putting it into the rotor. In case the liquid damage the rotor and machine.
4.1.4 Place the centrifugal tubes symmetrically in order to make centrifugate stable.
4. 2 Rotor Cleaning and Maintenance
4.2.1 Any slight crack or damage will lead potential safety hazard. Properly use the rotor and take care of it.
4.2.2 Do not use corrosive to touch the rotor.
4.2.3 If fluid spilled out during operating, put out the rotor and clean it with non-corrosive cleansing fluid (PH=7±1) immediately.
5. Operation Guide
5.1 Operation Key
START/STOP ------ Start or stop operation
SHORT-SPIN ------ Short operation key. Keep press to spin
LID OPEN ----------- Unlock the cover
+/ ----------- Set time or speed value. Keep press +/- to adjust
value fast.
5.2 Rotor Installation and Uninstallation
Fix the rotor to the motor shaft. Hold the rotor, screw the rotor fixing knob to the Rotor Fixing Shaft to clockwise rotate the knob tightly. No any loosen or relative slip between rotor and the Rotor Fixing Shaft when the knob fixed correctly.
To uninstall the rotor, hold the rotor, anticlockwise rotate the rotor fixing Knob. Screw off the knob and uninstall the rotor.
IMPORTANT!! Make sure rotor in good condition, correctly and tightly fixed before operation every time.
5.3 Sample loading
The tubes must be placed evenly into the rotor. It also requests sample in the tubes basically the same (including volume and density). Balanced placement of sample makes the operation less wearing on the motor shaft and reduces operation noise.
5.4 Setting Time and Speed
5.4.1 Power on, press "Lid Open" key to open the cover. Check if the rotor is in good condition and correctly tightly fixed.
5.4.2 Press + or - of Time key to set timing value. Time range is 30 seconds to 99 minutes. Press + or - of Speed key to set speed. Max. speed is 4500rpm.
5.4.3 Place evenly centrifugal tubes in the rotor, close the rotor safety cover and protection cover. Press "Start/Stop" key to start operating. Press it again to stop operating.
When machine starts working, timing starts and displays remnant time. After time ends, the centrifuge stops operating and unlock the cover automatically.
5.5 Short Operation
5.5.1 Power on, press "Lid Open" key to open the cover. Check the rotor is in good condition and correctly tightly fixed.
5.5.2 Place centrifugal tubes evenly in the rotor, close the rotor.
5.5.3 Keep press "SHORT-SPIN" key, it spins at the max. speed (4500rpm), release "SHORT-SPIN", operation stop accordingly.
5.6 How to open the lid when power off
When power is off, the lid can not be open. First pull out the power line, press the shaft in the left hole on the machine, the lid switch will be open.
6. Maintenance
Regularly clean the outer shell and the rotor (including holes) separately with diluent alcohol after power line disconnected. Do not dip the instrument into fluid or water it.
After cleaning finish, check the rotor condition - whether there is any crack or damage. Make sure the rotor is in good condition then fix the rotor correctly and tightly to the motor shaft with the knob for rotor fixing.
7. Error Analysis and Trouble Shooting
Phenomenon | Possible Causes | Processing Procedure |
no operation when power on | Power line problem | Check the power line |
No power | Check the power | |
cannot open the lid | Power off | Power on |
Rotor is spinning | Stop device operation | |
Lid Key broken | Contact the seller | |
Instrument shaking during operation | Rotor not fixed correctly | Fix the rotor correctly and tightly |
Tubes are not balanced | Place the tubes in balanced holes | |
Display Er=01 | Unlock circuit broken | Contact the seller |
Display Er=02 | Lock circuit broken | Contact the seller |
Display Er=03 | Motor control circuit broken | Contact the seller |
Table 3
Appendix A:Wiring Diagram of BCBL-401
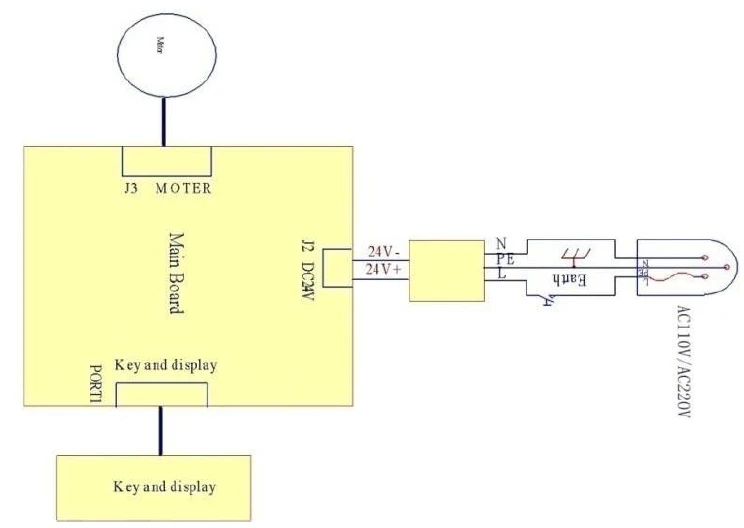
Figure 3
8. Warranty
Warranty Description
Within one month of delivery, the company is responsible for exchange for breakdown caused by material or manufacture. Within 12 months of delivery, the company is responsible for free repair for breakdown caused by material or manufacture. Proven with defect under warranty, the company will exchange the instrument or free repair it alternatively.
Warranty Coverage
Breakdown due to improper use, operation in inappropriate conditions, maintain or refitting without authorization are not in warranty coverage. Repair after warranty will be charged reasonable cost.